1997 NISSAN ALTIMA seat adjustment
[x] Cancel search: seat adjustmentPage 13 of 203
broken, or missing, or if the light remains on,
see your NISSAN dealer immediately.
CAUTION
Do not continue driving if the belt is
loose, broken or missing.
Door open warning light
This light comes on when any of the doors
are not closed securely while the ignition
key is ON.
Seat belt warning light and
chime
The light and chime remind you to fasten
seat belts. The light illuminates whenever
the ignition key is turned to ON, and re-
mains illuminated until the driver's seat belt
is fastened. At the same time, the chime
sounds for about seven seconds unless the
driver's seat belt is securely fastened.
Refer to ``Seat belts'' in the ``Pre-driving
checks and adjustments'' section for pre-
cautions on seat belt usage.
Supplemental air bag warn-
ing light
When the ignition key is in the ON or START
position, the supplemental air bag warning
light illuminates for about 7 seconds and
then turns off. This means the system is
operational.
If any of the following conditions occur, the
supplemental air bag system needs servicing
and your vehicle must be taken to your near-
est authorized NISSAN dealer:
1. The supplemental air bag warning light
does not come on and remain on for 7
seconds and then go off as described
above.
2. The supplemental air bag warning light
flashes intermittently or remains on.
3. The supplemental air bag warning light
does not come on at all.
Unless checked and repaired, the Supple-
mental Restraint System (Supplemental air
bag system) may not function properly. For
additional details, see ``Supplemental Re-
straint System'' in the ``Pre-driving checks
and adjustments'' section.
WARNING
cIf the supplemental airbag warning
light is on, it could mean that the
supplemental airbag will not operate
in an accident.
Low washer fluid warning
light (Canada only)
This light comes on when the washer fluid is
at a low level. Add washer fluid as neces-
sary. See the ``Do-it-yourself operations''
section.
orBrake warning light
This light functions for both the parking
brake and the foot brake systems.
The light comes on when the parking brake
is applied, and also warns of a low brake
fluid level. If the light comes on while the
engine is running with the parking brake not
applied, stop the vehicle and perform the
following:
1. Check the brake fluid level. Add brake
fluid as necessary. See ``Brake and
clutch fluid'' in the ``Do-it-yourself opera-
tions'' section.
1-6
ZX
Page 30 of 203

2Pre-driving checks and adjustments
Key .........................................................................2-2
Door locks ..............................................................2-2
Manual door lock ....................................................2-2
Power door lock .....................................................2-3
Child safety rear door lock .....................................2-4
Multi-remote control system (if so equipped).........2-4
Battery replacement ...............................................2-6
Hood release ..........................................................2-8
Glove box ...............................................................2-8
Trunk lid lock operation ..........................................2-9
Opener cancel lever for trunk lid..........................2-10
Fuel filler lid lock operation ..................................2-10
Fuel filler cap ........................................................2-11
Front seats ...........................................................2-12
Seat adjustment ...................................................2-12
Head restraints .....................................................2-14
Rear seat ..............................................................2-15
Supplemental restraint system (air bag
system) .................................................................2-16Supplemental air bag system...............................2-19
Warning labels......................................................2-21
Supplemental air bag warning light......................2-21
Seat belts .............................................................2-23
Precautions on seat belt usage ...........................2-23
Child safety...........................................................2-25
3-point type with retractor ....................................2-26
2-point type without retractor (center position
of rear seat) ..........................................................2-28
Seat belt extenders ..............................................2-30
Seat belt maintenance .........................................2-30
Child restraints for infants and small children......2-30
Top strap child restraint .......................................2-34
Tilting steering wheel ...........................................2-37
Outside mirror remote control ..............................2-37
Outside mirrors .....................................................2-37
Inside mirror .........................................................2-38
Vanity mirror .........................................................2-38
ZX
Page 41 of 203
SEAT ADJUSTMENT
WARNING
cDo not adjust the driver's seat while
driving. The seat may move sud-
denly and could cause loss of con-
trol of the vehicle.
cAfter adjustment, gently rock in the
seat to make sure it is securely
locked.
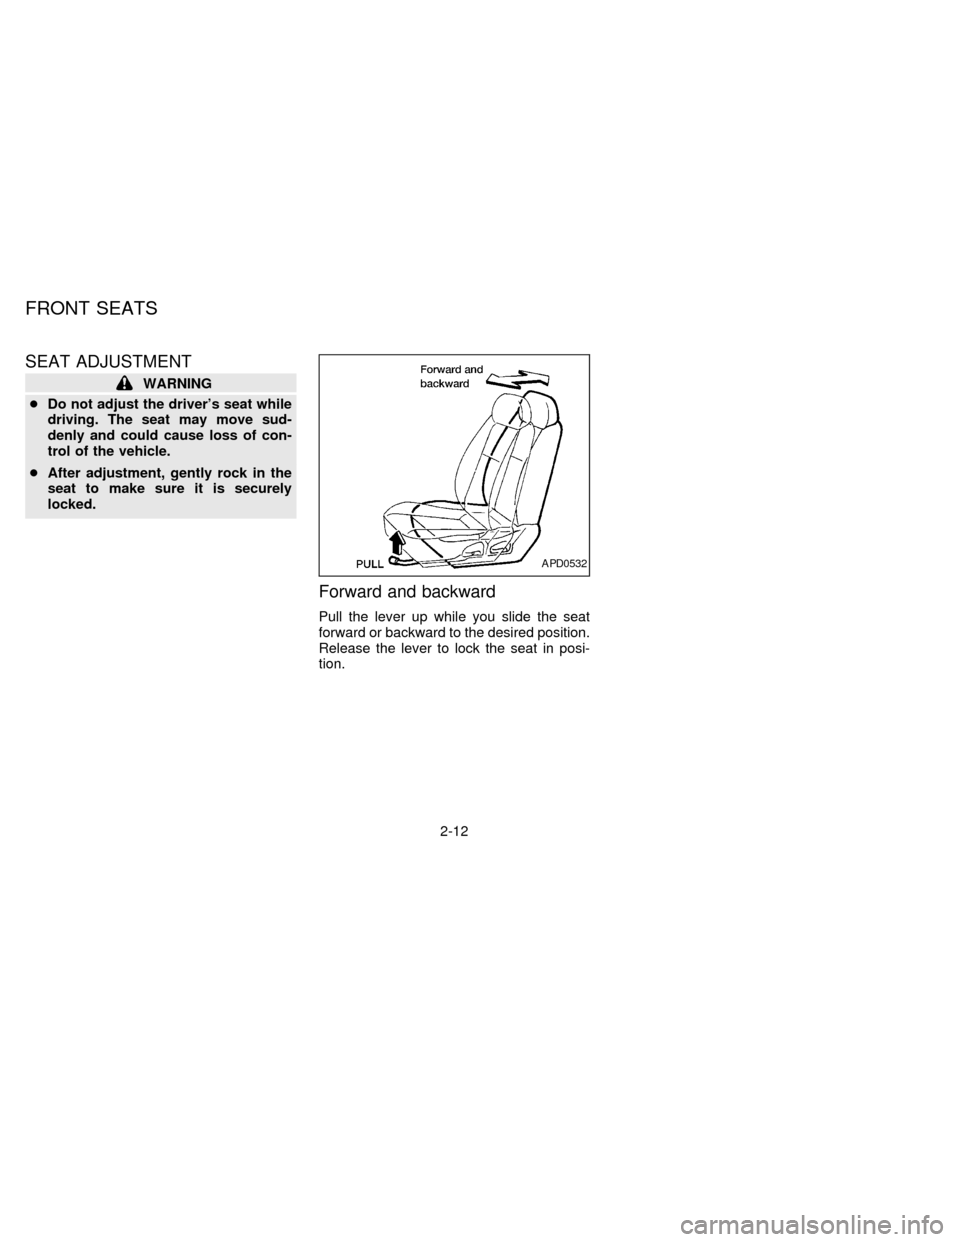
Forward and backward
Pull the lever up while you slide the seat
forward or backward to the desired position.
Release the lever to lock the seat in posi-
tion.
APD0532
FRONT SEATS
2-12
ZX
Page 57 of 203
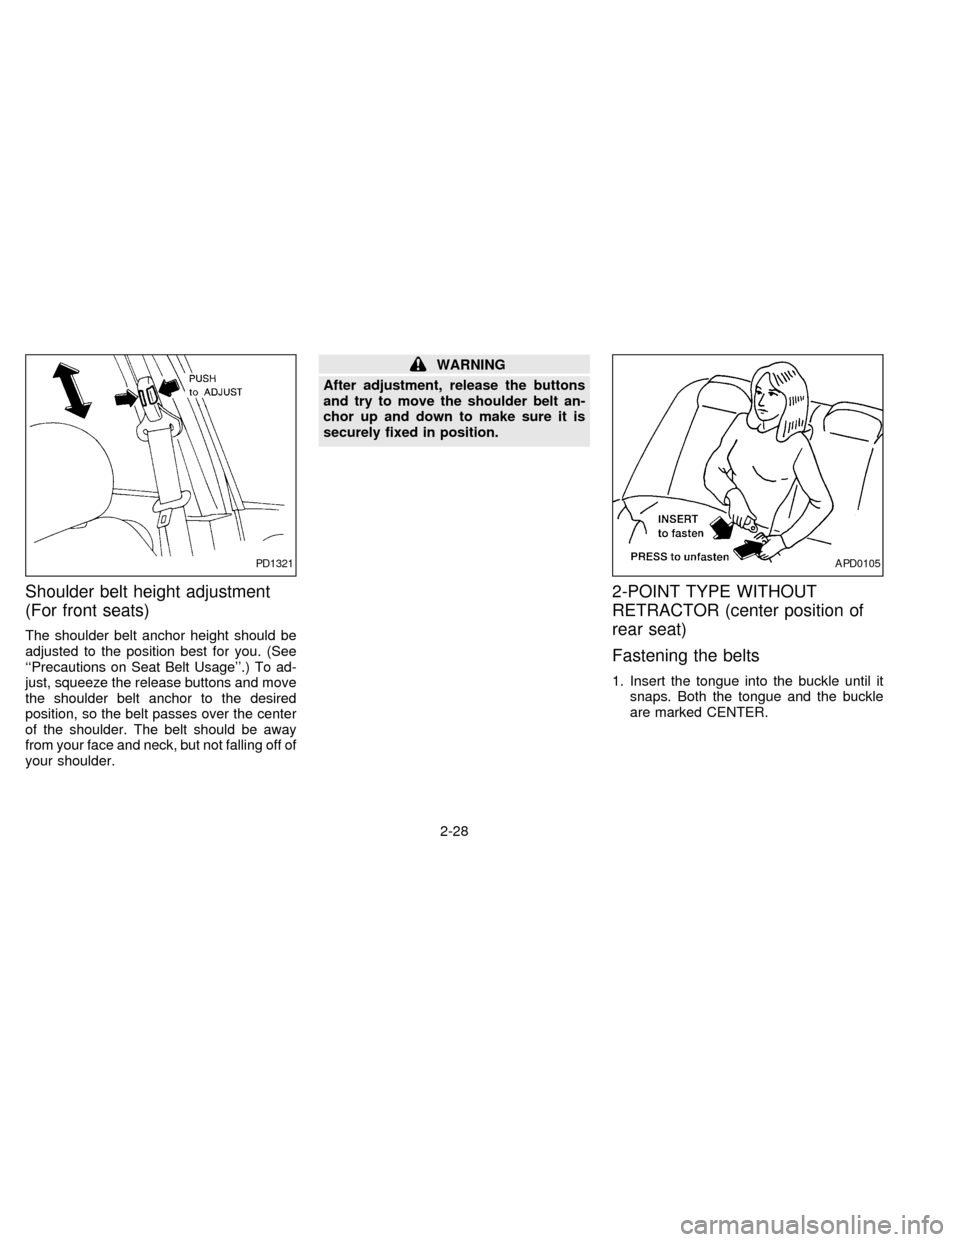
Shoulder belt height adjustment
(For front seats)
The shoulder belt anchor height should be
adjusted to the position best for you. (See
``Precautions on Seat Belt Usage''.) To ad-
just, squeeze the release buttons and move
the shoulder belt anchor to the desired
position, so the belt passes over the center
of the shoulder. The belt should be away
from your face and neck, but not falling off of
your shoulder.
WARNING
After adjustment, release the buttons
and try to move the shoulder belt an-
chor up and down to make sure it is
securely fixed in position.
2-POINT TYPE WITHOUT
RETRACTOR (center position of
rear seat)
Fastening the belts
1. Insert the tongue into the buckle until it
snaps. Both the tongue and the buckle
are marked CENTER.
PD1321APD0105
2-28
ZX
Page 61 of 203
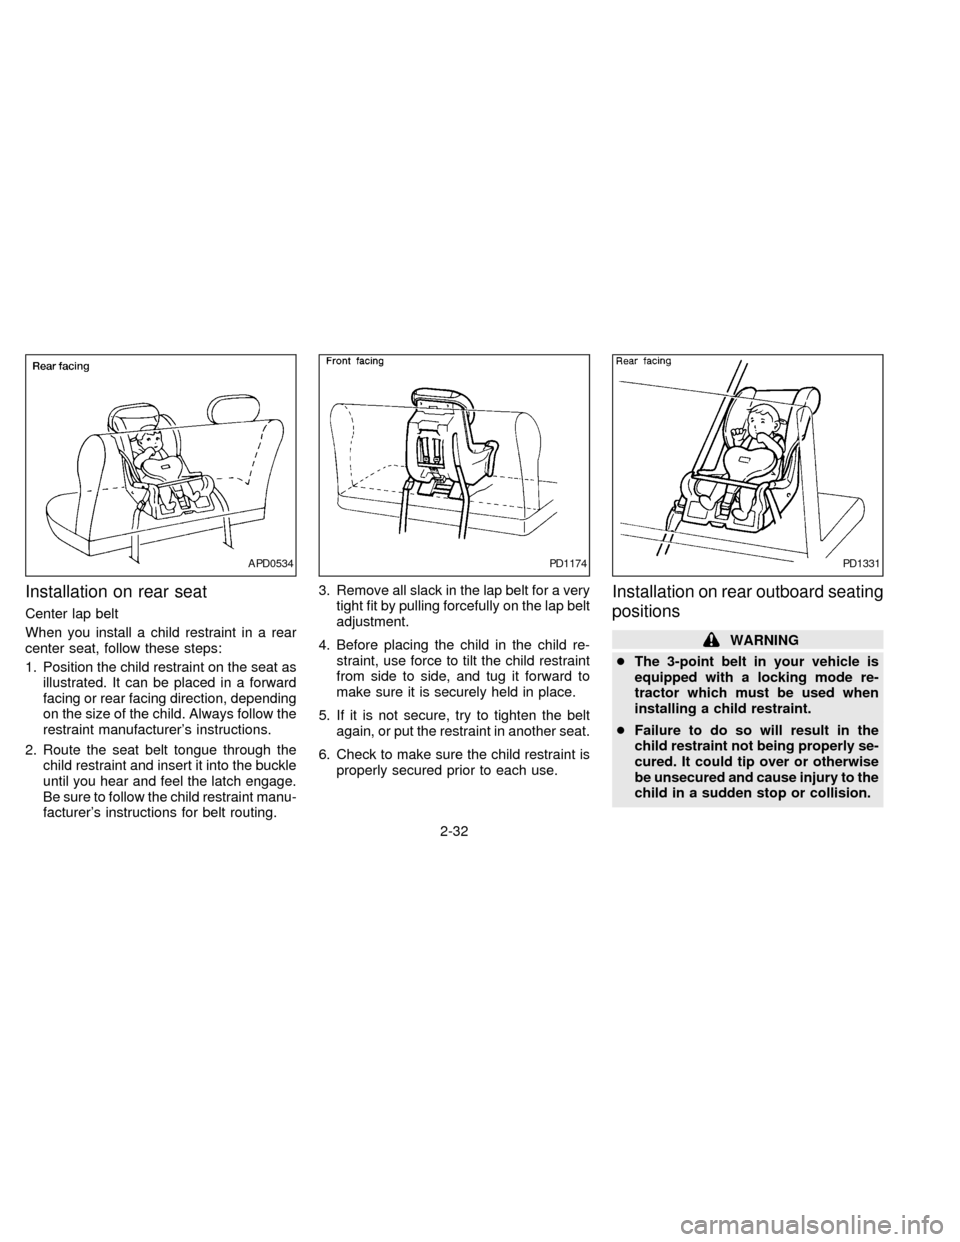
Installation on rear seat
Center lap belt
When you install a child restraint in a rear
center seat, follow these steps:
1. Position the child restraint on the seat as
illustrated. It can be placed in a forward
facing or rear facing direction, depending
on the size of the child. Always follow the
restraint manufacturer's instructions.
2. Route the seat belt tongue through the
child restraint and insert it into the buckle
until you hear and feel the latch engage.
Be sure to follow the child restraint manu-
facturer's instructions for belt routing.3. Remove all slack in the lap belt for a very
tight fit by pulling forcefully on the lap belt
adjustment.
4. Before placing the child in the child re-
straint, use force to tilt the child restraint
from side to side, and tug it forward to
make sure it is securely held in place.
5. If it is not secure, try to tighten the belt
again, or put the restraint in another seat.
6. Check to make sure the child restraint is
properly secured prior to each use.
Installation on rear outboard seating
positions
WARNING
cThe 3-point belt in your vehicle is
equipped with a locking mode re-
tractor which must be used when
installing a child restraint.
cFailure to do so will result in the
child restraint not being properly se-
cured. It could tip over or otherwise
be unsecured and cause injury to the
child in a sudden stop or collision.
APD0534PD1174PD1331
2-32
ZX
Page 153 of 203
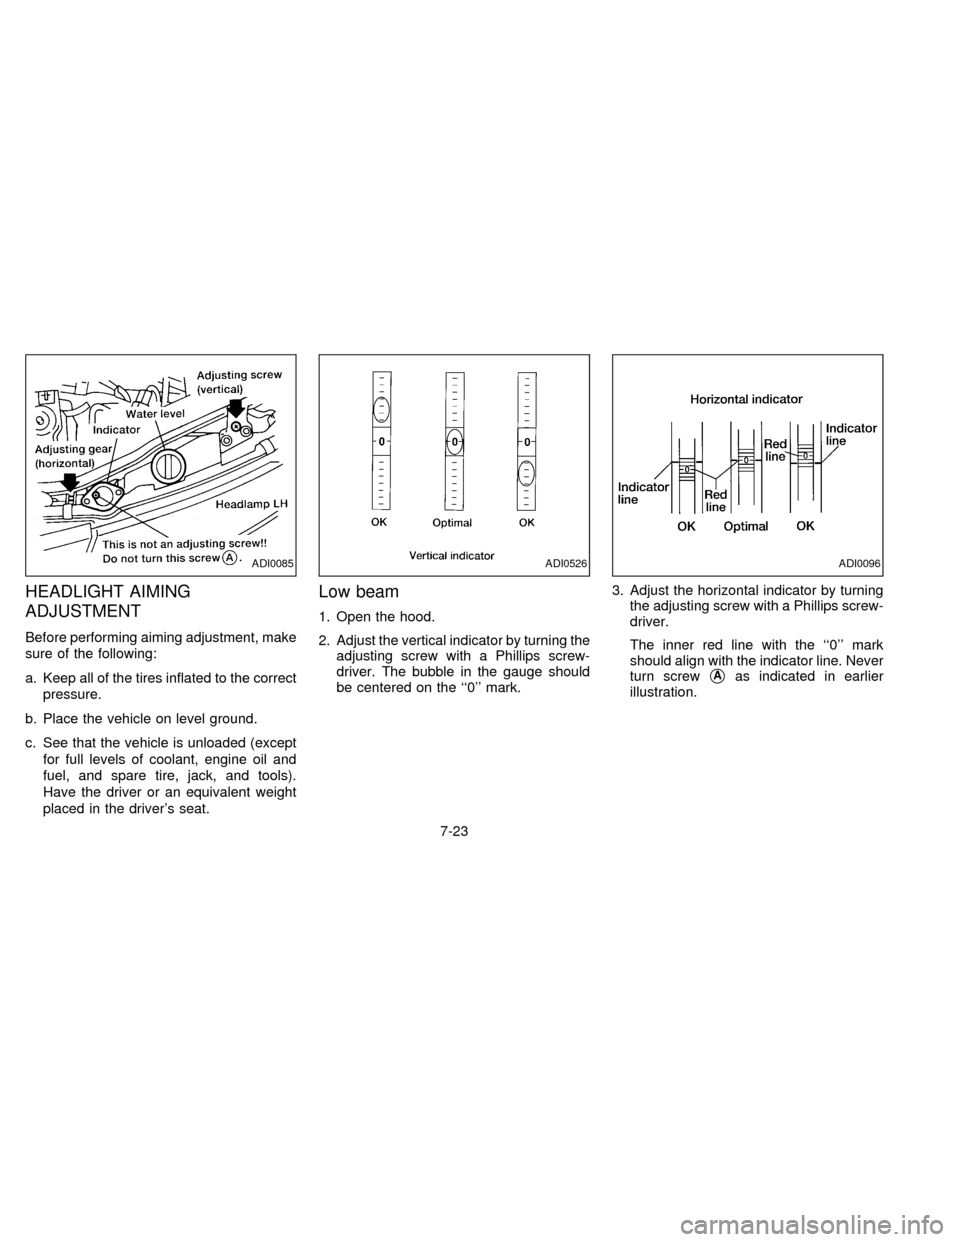
HEADLIGHT AIMING
ADJUSTMENT
Before performing aiming adjustment, make
sure of the following:
a. Keep all of the tires inflated to the correct
pressure.
b. Place the vehicle on level ground.
c. See that the vehicle is unloaded (except
for full levels of coolant, engine oil and
fuel, and spare tire, jack, and tools).
Have the driver or an equivalent weight
placed in the driver's seat.
Low beam
1. Open the hood.
2. Adjust the vertical indicator by turning the
adjusting screw with a Phillips screw-
driver. The bubble in the gauge should
be centered on the ``0'' mark.3. Adjust the horizontal indicator by turning
the adjusting screw with a Phillips screw-
driver.
The inner red line with the ``0'' mark
should align with the indicator line. Never
turn screw
sAas indicated in earlier
illustration.
ADI0085ADI0526ADI0096
7-23
ZX
Page 201 of 203
Oil
Capacities and recommended
fuel/lubricants.......................................... 9-2
Changing engine oil................................ 7-8
Changing engine oil filter........................ 7-9
Checking engine oil level ....................... 7-7
Engine oil ................................................ 7-7
Engine oil and oil filter
recommendation ..................................... 9-5
Opener lever for trunk lid........................... 2-10
Outside mirror remote control.................... 2-37
Outside mirrors .......................................... 2-37
Overdrive switch .......................................... 4-8
Overheat
If your vehicle overheats ........................ 5-9
Owner's manuals/service manual
order form .................................................. 9-21
P
Parking
Parking brake check ............................. 7-18
Parking brake operation ....................... 4-11
Parking/parking on hills ........................ 4-15
Periodic maintenance schedules ................. 8-5
Power
Power antenna ..................................... 3-22
Power door lock...................................... 2-3
Power steering fluid .............................. 7-11
Power steering system ......................... 4-16
Power windows..................................... 1-17
Rear power windows ............................ 1-18Precautions
Maintenance precautions ....................... 7-2
Precautions on seat belt usage............ 2-23
Precautions when starting and driving ... 4-2
Push starting ................................................ 5-9
Q
Quick reference (See gas station information)
R
Radio
AM-FM radio with cassette player ........ 3-12
AM-FM radio with cassette player and
compact disc player.............................. 3-17
CB radio or car phone .......................... 3-23
Readiness for inspection maintenance
(I/M) test..................................................... 9-20
Rear seat ................................................... 2-15
Rear window defogger switch ................... 1-11
Refrigerant recommendation ....................... 9-7
Registering your vehicle in another
country ....................................................... 9-10
Reporting safety defects (USA) ................. 9-19
S
Safety
Child safety rear door lock ..................... 2-4
Reporting safety defects (USA) ............ 9-19Seat adjustment ......................................... 2-12
Seat belt
Precautions on seat belt usage............ 2-20
Seat belt extenders .............................. 2-30
Seat belt maintenance.......................... 2-30
Seat belts.............................................. 2-23
Seat belt warning light ............................ 1-6
2-point type without retractor................ 2-28
3-point type with retractor..................... 2-26
Seats
Front seats............................................ 2-12
Rear seat .............................................. 2-15
Service manual/owner's manual
order form .................................................. 9-21
Shifting
Automatic transmission .......................... 4-7
Manual transmission............................... 4-9
Spark plug replacement............................. 7-15
Speedometer ............................................... 1-3
Spotlight ..................................................... 1-21
SRS warning labels ................................... 2-18
Starting
Before starting the engine ...................... 4-5
Jump starting .......................................... 5-7
Precautions when starting and driving ... 4-2
Push starting........................................... 5-9
Starting the engine .............................. 4-10
Steering
Power steering fluid .............................. 7-11
Tilting steering wheel............................ 2-37
Stop light .................................................... 7-28
Sunroof ...................................................... 1-18
10-4
ZX