Page 3971 of 4133

8
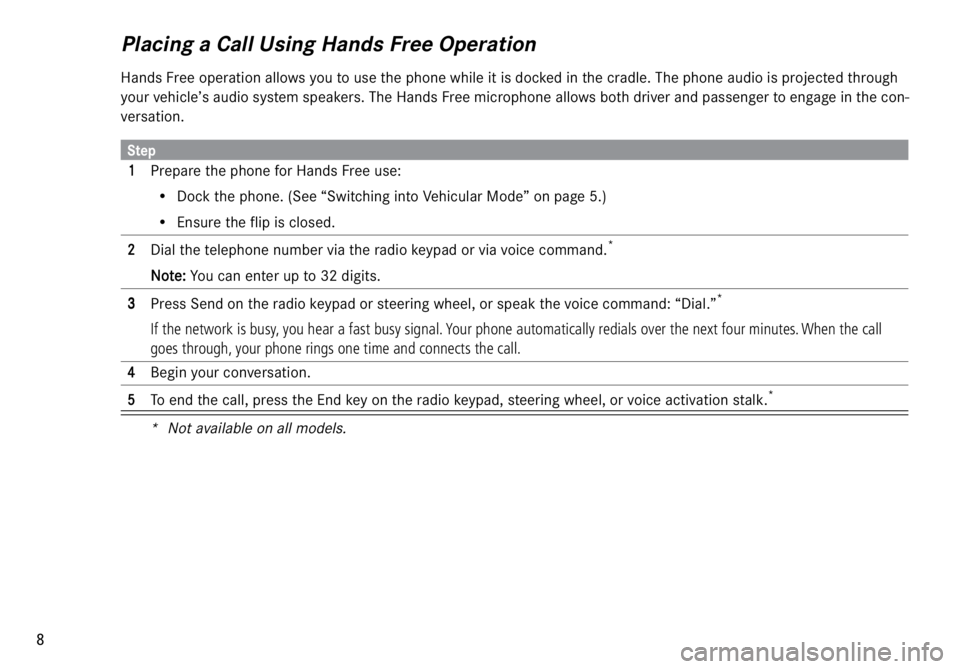
Placing a Call Using Hands Free Operation
Hands Free operation allows you to use the phone while it is docked in the cradle. The phone audio is projected through
your vehicle’s audio system speakers. The Hands Free microphone allows both driver and passenger to engage in the con-
versation.
Step
11 1 1
Prepare the phone for Hands Free use:
• Dock the phone. (See “Switching into Vehicular Mode” on page 5.)
• Ensure the flip is closed.
22 2 2
Dial the telephone number via the radio keypad or via voice command.
*
NN N N
oo o o
tt t t
ee e e
::: :
You can enter up to 32 digits.
* Not available on all models.
33 3 3
Press Send on the radio keypad or steering wheel, or speak the voice command: “Dial.”
*
If the network is busy, you hear a fast busy signal. Your phone automatically redials over the next four minutes. When the call
goes through, your phone rings one time and connects the call.
44 4 4
Begin your conversation.
55 5 5
To end the call, press the End key on the radio keypad, steering wheel, or voice activation stalk.
*
Page 3972 of 4133

9
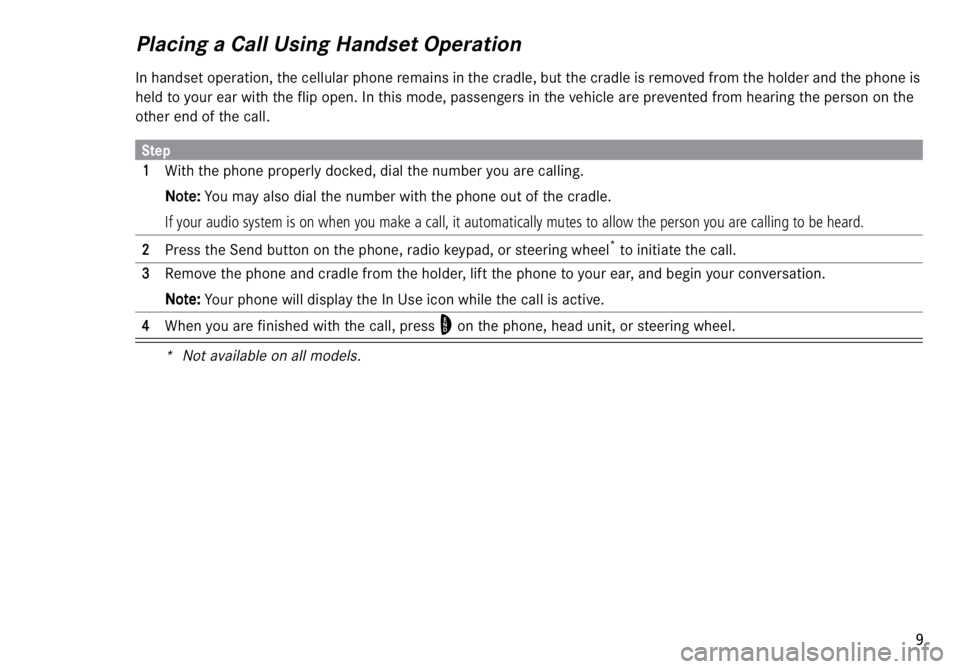
Placing a Call Using Handset Operation
In handset operation, the cellular phone remains in the cradle, but the cradle is removed from the holder and the phone is
held to your ear with the flip open. In this mode, passengers in the vehicle are prevented from hearing the person on the
other end of the call.
Step
11 1 1
With the phone properly docked, dial the number you are calling.
NN N N
oo o o
tt t t
ee e e
::: :
You may also dial the number with the phone out of the cradle.
If your audio system is on when you make a call, it automatically mutes to allow the person you are calling to be heard.
22 2 2
Press the Send button on the phone, radio keypad, or steering wheel
*
to initiate the call.
* Not available on all models.
33 3 3
Remove the phone and cradle from the holder, lift the phone to your ear, and begin your conversation.
NN N N
oo o o
tt t t
ee e e
::: :
Your phone will display the In Use icon while the call is active.
44 4 4
When you are finished with the call, press
O
on the phone, head unit, or steering wheel.
Page 3973 of 4133
10
Answering a Call Using Hands Free Operation
NN N N
oo o o
tt t t
ee e e
::: :
If your phone is set to silent mode while it is docked, you will not hear a hands free ring tone when you receive a call.
Answering a Call Using Privacy Mode
Step
11 1 1
Prepare the phone for Hands Free use:
aa a a
Close the flip on the phone.
bb b b
Dock the phone. (See “Switching into Vehicular Mode” on page 5.)
22 2 2
Press Send on the radio keypad or steering wheel
*
to answer the call.
* Not available on all models.
33 3 3
Speak clearly in order for the Hands Free microphone to deliver your conversation.
44 4 4
After you finish your conversation, end the call by pressing the End key on the radio keypad or steering wheel.
*
Step
11 1 1
Remove the cradle from the holder.
22 2 2
Open the flip on your phone.
33 3 3
Lift the phone to your ear.
44 4 4
Begin speaking.
Page 3974 of 4133
11
Switching from Hands Free to Handset Operation
If you are using the phone in Hands Free operation and wish to switch to Handset operation:
Switching from Handset to Hands Free Operation
With the phone in the cradle, close the flip to switch the call from Handset to Hands Free mode.
Muting and Unmuting a Hands Free Call
To Mute
Press the mute key on the radio keypad.
To Unmute
Depress the mute key on the radio keypad.
Muting and Unmuting a Handset Call
To Mute
Press
MUTE
(+
).
This mutes the call so the other party cannot hear you speaking.
To Unmute
Press
UNMUTE
(+
).
Step
11 1 1
Open the flip on your phone.
22 2 2
Remove the phone and cradle from the holder.
33 3 3
Begin speaking.
Page 3975 of 4133

12
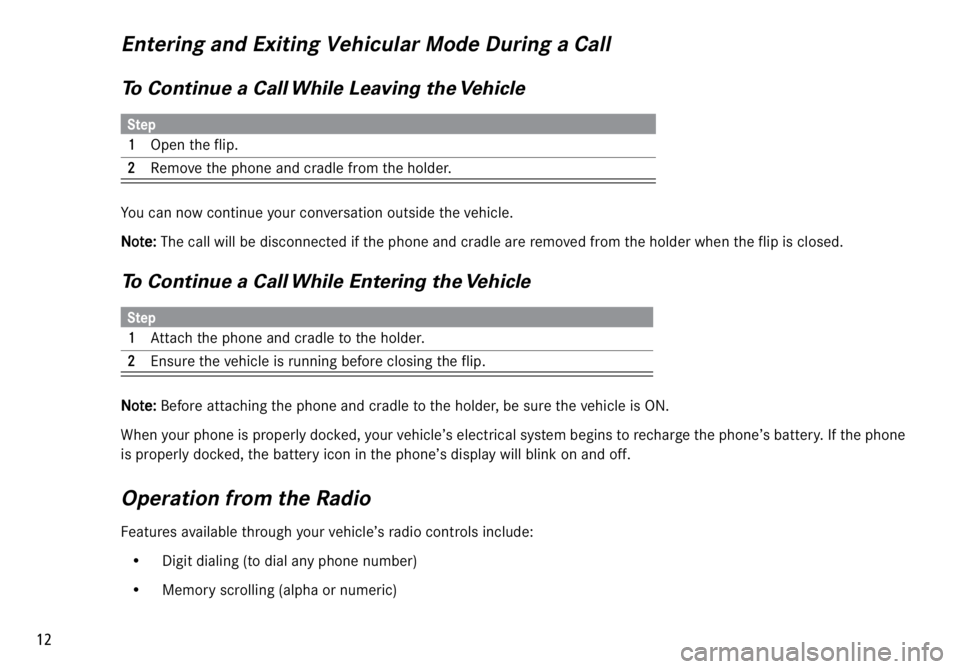
Entering and Exiting Vehicular Mode During a Call
To Continue a Call While Leaving the Vehicle
You can now continue your conversation outside the vehicle.
NN N N
oo o o
tt t t
ee e e
::: :
The call will be disconnected if the phone and cradle are removed from the holder when the flip is closed.
To Continue a Call While Entering the Vehicle
NN N N
oo o o
tt t t
ee e e
::: :
Before attaching the phone and cradle to the holder, be sure the vehicle is ON.
When your phone is properly docked, your vehicle’s electrical system begins to recharge the phone’s battery. If the phone
is properly docked, the battery icon in the phone’s display will blink on and off.
Operation from the Radio
Features available through your vehicle’s radio controls include:
• Digit dialing (to dial any phone number)
• Memory scrolling (alpha or numeric)
Step
11 1 1
Open the flip.
22 2 2Remove the phone and cradle from the holder.
Step
11 1 1
Attach the phone and cradle to the holder.
22 2 2Ensure the vehicle is running before closing the flip.
Page 3976 of 4133
13 • Last 10 numbers dialed
• Unlock the phone system (using the first 3 digits of the phone’s 4-digit unlock code)
• Answer a call
• DTMF tone dialing during a call (for accessing voice mail, automated phone menus, etc.)
• Speed dialing, Turbo Dial
™
• Signal strength
• Call status information (in use, roaming, etc.)
• Automatic redial
• Phonebook editing
• Mobile Terminated SMS (Short Message System)
(SMS Messages can be received and displayed on the audio head units in Vehicular Mode but cannot be sent by the
head unit.)
• Caller ID
• Last number dialed from portable phone
• Incoming call list
*
• Pause & Variable Head Unit entry
(Pause and Variable characters can be entered from head unit by pressing * two or three times respectively.
Variable entry is only available through Privacy Mode.)
• Missed call message
*
These features are described in the user’s guide for your phone and in the radio manual.
* Not available on all models.
Page 3982 of 4133

AZ82.60-P-0004A
Retrofit vehicle video system
3.10.00
MODELS
163.136 /154 /172 1A as of 145273,
163.136 /154 /172 1X as of 708319,
163.113 /128 /157 /174 /175 1#
left hand drive vehicle
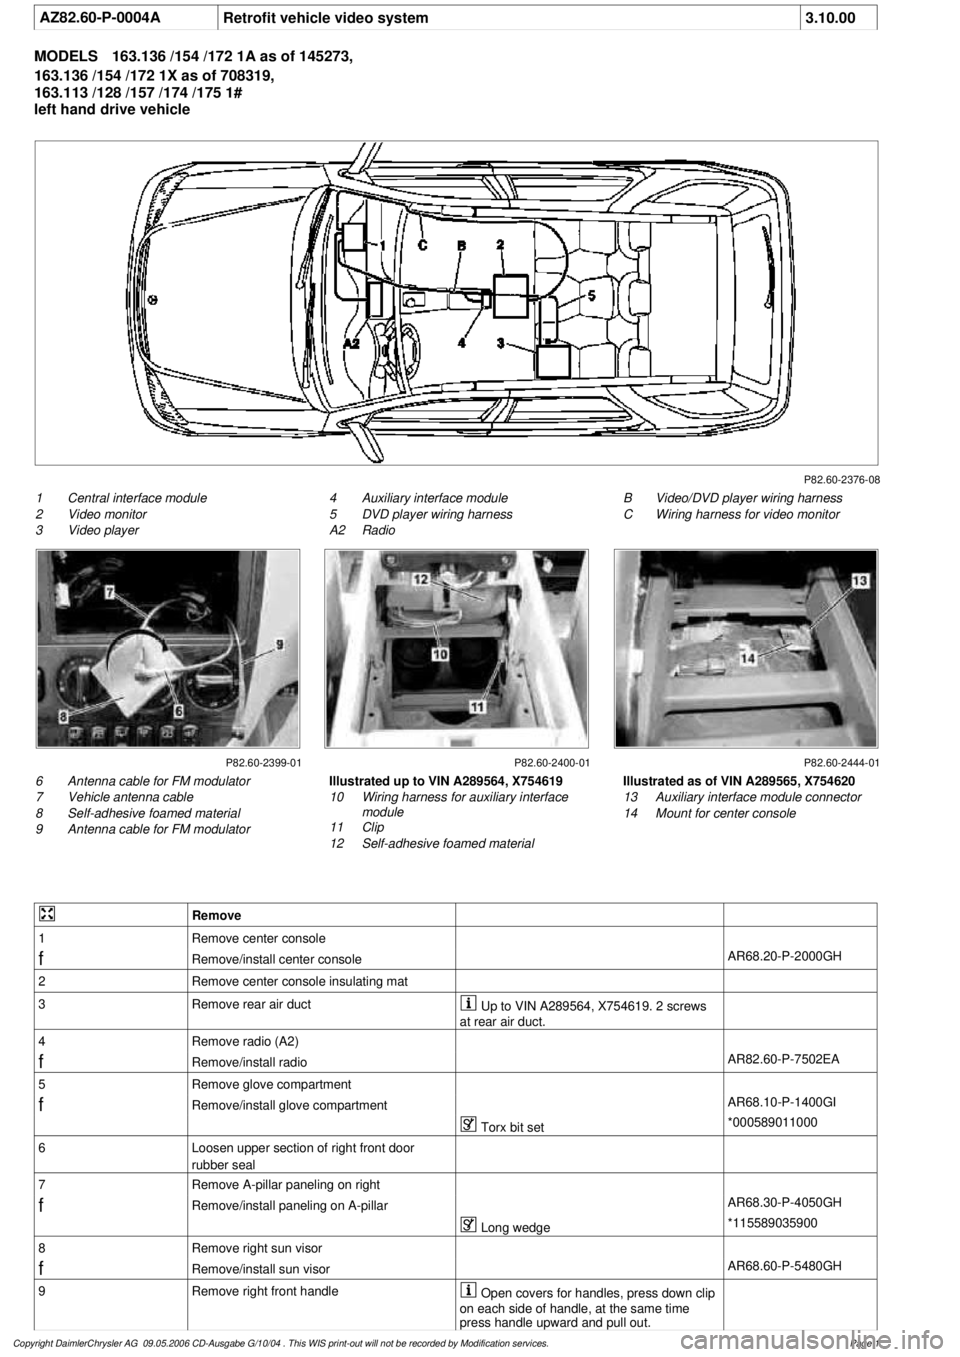
P82.60-2376-08
1
Central interface module
2
Video monitor
3
Video player
B
Video/DVD player wiring harness
C
Wiring harness for video monitor
4
Auxiliary interface module
5
DVD player wiring harness
A2
Radio
P82.60-2399-01 P82.60-2400-01 P82.60-2444-01
6
Antenna cable for FM modulator
7
Vehicle antenna cable
8
Self-adhesive foamed material
9
Antenna cable for FM modulator
Illustrated as of VIN A289565, X754620
13
Auxiliary interface module connector
14
Mount for center console
Illustrated up to VIN A289564, X754619
10
Wiring harness for auxiliary interface
module
11
Clip
12
Self-adhesive foamed material
Remove
1
Remove center console
f
Remove/install center console
AR68.20-P-2000GH
2
Remove center console insulating mat
3
Remove rear air duct
Up to VIN A289564, X754619. 2 screws
at rear air duct.
4
Remove radio (A2)
f
Remove/install radio
AR82.60-P-7502EA
5
Remove glove compartment
f
Remove/install glove compartment
AR68.10-P-1400GI
Torx bit set
*000589011000
6
Loosen upper section of right front door
rubber seal
7
Remove A-pillar paneling on right
f
Remove/install paneling on A-pillar
AR68.30-P-4050GH
Long wedge
*115589035900
8
Remove right sun visor
f
Remove/install sun visor
AR68.60-P-5480GH
9
Remove right front handle
Open covers for handles, press down clip
on each side of handle, at the same time
press handle upward and pull out.
Copyright DaimlerChrysler AG 09.05.2006 CD-Ausgabe G/10/04 . This WIS print-out will not be recorde
d by Modification services.
Page 1
Page 3983 of 4133

10
Remove edge guard for tilting/sliding roof
cutout
11
Release upper right B-pillar paneling
12
Remove covers at lower rear seat
Do NOT remove center cover for lower
40% seat. Do NOT reinstall curtain on 60%
front bench seat.
f
Remove and install cover on bottom of rear
seat
AR91.12-P-1100GH
13
Release side shade at the 60% bench
Fold shade upward so that the working
area is not obstructed.
14
Remove 40% rear seat
f
Remove and install bench
AR91.12-P-1010GI
Torx bit set
*000589011000
Install
15
Retrofit central interface module (1)
AZ82.60-P-0004-01A
16
Insert antenna cable for FM modulator (6) into
vehicle antenna cable (7)
17
Cover connector with self-adhesive foamed
material (8)
18
Plug remaining antenna cable of FM
modulator (9) into radio
19
Install radio (A2)
f
Remove/install radio
AR82.60-P-7502EA
20
Retrofit video monitor (2) and wiring harness
of video monitor (C)
With
glass version of electric sliding/tilting
roof, code 414a.
AZ82.60-P-0004-02A
Except
glass version of electric
sliding/tilting roof, code 414a.
AZ82.60-P-0004-02B
21
Secure upper right B-pillar paneling
Ensure that the lugs of the seat belt height
adjustment are located correctly in the recess
clearance of the paneling.
22
Install right front handle
23
Install right sun visor
f
Remove/install sun visor
AR68.60-P-5480GH
24
Install right front A-pillar cover
f
Remove/install paneling on A-pillar
AR68.30-P-4050GH
25
Re-secure upper area of rubber door seal
26
Route wiring harness of video/DVD player
(B), additional interface module (4) and wiring
harness of video monitor (C) later
Up to VIN A289564, X754619.
AZ82.60-P-0004-03A
As of VIN A289565, X754620.
AZ82.60-P-0004-03B
27
Retrofit auxiliary interface module (4) in
center console
Up to VIN A289564, X754619.
AZ82.60-P-0004-04A
As of VIN A289565, X754620.
AZ82.60-P-0004-04B
28
Install center console insulating mat
29
Install center console
f
Remove/install center console
AR68.20-P-2000GH
30.1
Plug in plug of additional interface module
and secure the wiring harness of the
additional interface module (10) to the clip
(11) together with the wiring harness of the
rear power windows in the center console
Up to VIN A289564, X754619.
30.2
Insert auxiliary interface module (13)
connector and route between center console
mount (14) and center console.
As of VIN A289565, X754620.
31.1
Secure auxiliary interface module plug in the
left rear corner of the ashtray housing using
self-adhesive foamed material (12)
Up to VIN A289564, X754619.
32
Open ashtray and cup holder and close to
check correct function
33
Attach side shade of the 60% bench
34.1
Retrofit video player (3)
AZ82.60-P-0004-05A
*BA91.12-P-1005-03A
*BA91.12-P-1008-03A
34.2
Retrofit DVD player
AZ82.60-P-0005-01GH
35
Install 40% rear seat
f
Remove and install bench
AR91.12-P-1010GI
Torx bit set
*000589011000
Copyright DaimlerChrysler AG 09.05.2006 CD-Ausgabe G/10/04 . This WIS print-out will not be recorde
d by Modification services.
Page 2