Page 1070 of 4133
266 Practical hintsReplacing bulbs
�Replacing bulbsSafe vehicle operation depends on proper
exterior lighting and signaling. It is there-
fore essential that all bulbs and lamp as-
semblies are in good working order at all
times.
Correct headlamp adjustment is extremely
important. Have headlamps checked and
readjusted at regular intervals and when a
bulb has been replaced. See your autho-
rized Mercedes-Benz Light Truck Center
for headlamp adjustment.
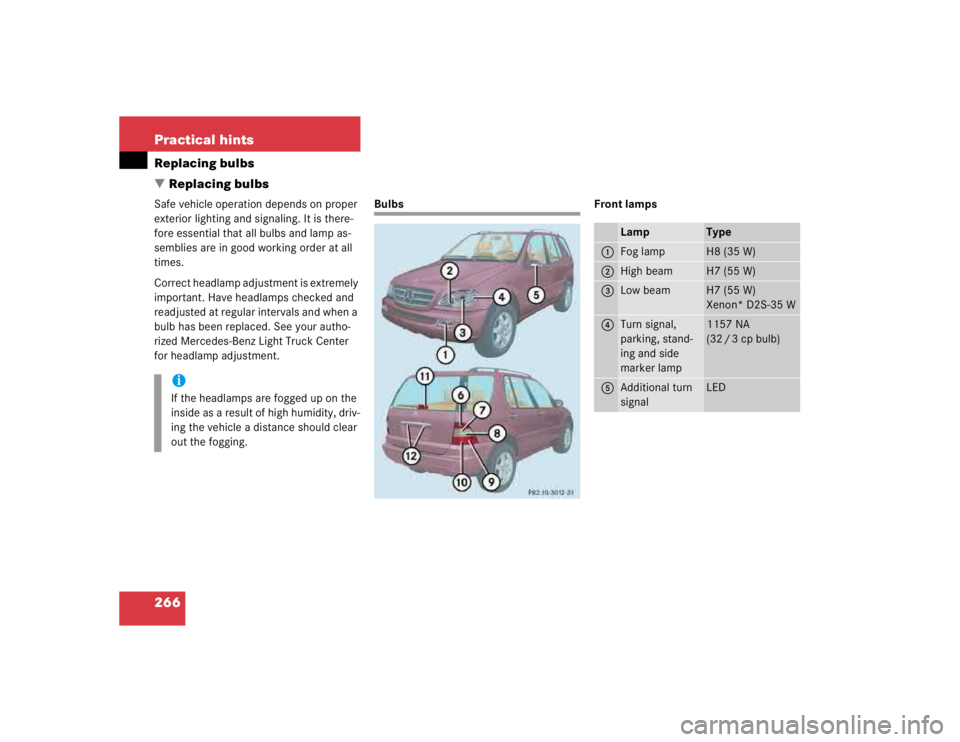
Bulbs Front lamps
iIf the headlamps are fogged up on the
inside as a result of high humidity, driv-
ing the vehicle a distance should clear
out the fogging.
Lamp
Type
1
Fog lamp
H8 (35 W)
2
High beam
H7 (55 W)
3
Low beam
H7 (55 W)
Xenon* D2S-35 W
4
Turn signal,
parking, stand-
ing and side
marker lamp
1157 NA
(32 / 3 cp bulb)
5
Additional turn
signal
LED
Page 1071 of 4133

267 Practical hints
Replacing bulbs
Rear lamps Notes on bulb replacement
�
Use only 12-volt bulbs of the same type
and with the specified watt rating.
�
Switch lights off before changing a bulb
to prevent short circuits.
�
Always use a clean lint-free cloth when
handling bulbs.
�
Your hands should be dry and free of oil
and grease.
�
If the newly installed bulb does not light
up, visit an authorized Mercedes-Benz
Light Truck Center.
�
Have the LEDs and bulbs for the follow-
ing lamps replaced by an authorized
Mercedes-Benz Light Truck Center:�
Additional turn signals in the exteri-
or rear view mirrors
�
Bi-Xenon lamps*
�
Front fog lamps (vehicles with sport
package)*
Lamp
Type
6
Brake lamp
1073
(32 cp bulb)
7
Backup lamp
1073
(32 cp bulb)
8
Turn signal lamp
PY 21 W
9
Tail, parking and
standing lamp
Rear fog lamp, driv-
er’s side
P 21 / 4 W
a
Side marker lamp
W5W
b
High mounted brake
lamp
1073
(32 cp bulb)
c
License plate lamps
C 5 W
Warning!
G
Keep bulbs out of reach of children.
Bulbs and bulb sockets can be very hot. Al-
low the lamp to cool down before changing
a bulb.
Halogen lamps contain pressurized gas. A
bulb can explode if you:�
touch or move it when hot
�
drop the bulb
�
scratch the bulb
Wear eye and hand protection.
Because of high voltage in xenon lamps, it is
dangerous to replace the bulb or repair the
lamp and its components. We recommend
that you have such work done by a qualified
technician.
Page 1074 of 4133
270 Practical hintsReplacing bulbs�
Align headlamp cover and click into
place.
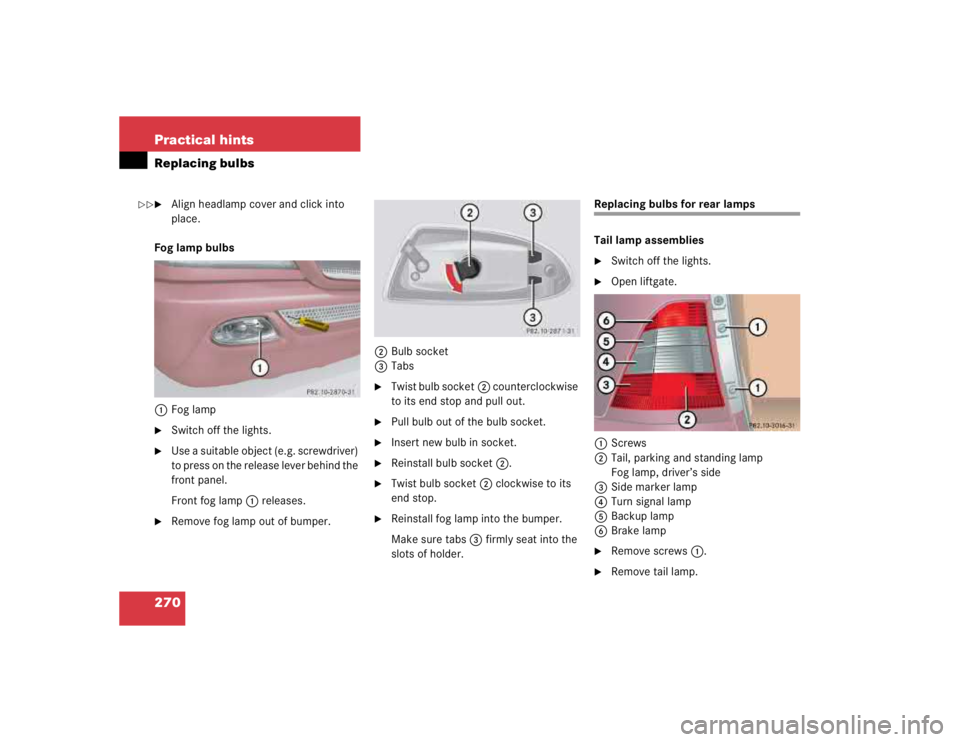
Fog lamp bulbs
1Fog lamp
�
Switch off the lights.
�
Use a suitable object (e.g. screwdriver)
to press on the release lever behind the
front panel.
Front fog lamp1 releases.
�
Remove fog lamp out of bumper.2Bulb socket
3Tabs
�
Twist bulb socket2 counterclockwise
to its end stop and pull out.
�
Pull bulb out of the bulb socket.
�
Insert new bulb in socket.
�
Reinstall bulb socket2.
�
Twist bulb socket2 clockwise to its
end stop.
�
Reinstall fog lamp into the bumper.
Make sure tabs3 firmly seat into the
slots of holder.
Replacing bulbs for rear lamps
Tail lamp assemblies�
Switch off the lights.
�
Open liftgate.
1Screws
2Tail, parking and standing lamp
Fog lamp, driver’s side
3Side marker lamp
4Turn signal lamp
5Backup lamp
6Brake lamp
�
Remove screws1.
�
Remove tail lamp.
��
Page 1124 of 4133

320 IndexBulbs, replacing 266
Additional turn signals 266
Backup lamps 267
Brake lamps 267
Fog lamps 266
Front fog lamp 270
Front lamps 266
High beam 266
High mounted brake lamp 267, 271
License plate lamps 267, 271
Low beam 266
Parking lamps 266, 267, 269
Rear fog lamp 267
Rear fog lamps 270
Rear side marker lamp bulbs 270
Side marker lamps 266, 267, 269
Standing lamps 266, 267
Tail lamp assemblies 267, 270
Turn signal lamps 266, 267, 269C
CAC (Customer Assistance Center) 311
Calibrating compass 188
California
Important notice 11
Calling up
Service indicator 233
CAN system 311
Capacities
Fuels, coolants, lubricants, etc. 300
Cargo area cover blind* 161
Closing 161
Installing 162
Opening 161
Removing 161
Cargo area see Cargo compartment 89
Cargo compartment
Liftgate 89
Lighting 114
Tie-down rings 158Cargo floor plates 162
Installing 163
Removing 162
Storing 162
Cargo tie-down rings 158
Catalytic converter 212
CD-changer* 258
Center console 27
Lower part 28
Upper part 27
Central locking
Automatic 93
From inside 93
Switch 94
Unlocking from inside 93, 94
Central locking switch 94
Certification label 292
Charge indicator lamp 254
Charging
Vehicle battery 279
Page 1132 of 4133

328 IndexK
Key
Global locking 89
Global unlocking 89
Loss of 90
Positions in steering lock 33
Remote control with folding key 88
Unlocking liftgate 89
Unlocking the driver’s door, fuel filler
flap 89
Key positions in steering lock 33
Key, Mechanical 261
Key, Remote control
Unlocking with 32
Kickdown 123, 313
L
Labels, identification 292
Lamp bulbs, exterior 266
Lamps, exterior
Front 266
Rear 267Lamps, indicator and warning
4-ETS 251, 252
ABS 242
Adjustable steering column 253
AIRBAG OFF 63, 243
BAS 78, 245, 246, 247
Battery indicator lamp 254
Brake pad wear 254
Brakes 244
CHECK ENGINE 248
Coolant 249
EBP 245
Engine diagnostics 248
ESP 245, 246, 247, 251
Front fog lamps 253
Fuel reserve 252
Low engine oil level 253
LOW RANGE 252
Low washer system fluid level 253
Seat belts 253
Service indicator 232
SRS 255
Turn signals 25LATCH child seat anchors 72
LATCH child seat mounts 72
Layout of poly-V-belt drive 293
Leather upholstery
Cleaning 239
Lever
For cruise control 150
License plate lamps
Replacing bulbs 267, 271
Liftgate
Closing 92
Opening 89, 91
Opening from inside 91
Opening from outside 91
Light alloy wheels
Cleaning 238
Lighter
Rear center console 169
Lighter see cigarette lighter 168
Page 1133 of 4133

329 Index
Lighting 107
Automatic headlamp mode 108
Cargo compartment 114
Combination switch 110
Daytime running lamp mode 109
Door entry lamps 113
Front fog lamps 111
High beam flasher 110
High beams 110
Instrument cluster illumination 116
Interior 112
Locator lighting 110
Night security illumination 109
Limiting the gear range 121
Limp Home Mode 124
Line of fall 313
Loading 157
Cargo area cover blind* 161
Cargo floor plates 162
Cargo tie-down rings 158
Hooks 159
Instructions 157, 158
Partition net* 159
Roof rack 163Split rear bench seat 99
Trailer 208
Locator lighting 110
Lock button 313
Locking 88
Automatic while driving 93
Centrally from inside 94
Fuel filler flap 214
Global 89
Vehicle in an emergency 262
Locking knobs 32
Loss of keys 90
Loss of Service and Warranty Information
Booklet 291
Low beam headlamps
Replacing bulbs 266, 268
Switching on 48
Low engine oil level
Indicator lamp 253
LOW RANGE - 4-ETS 80
LOW RANGE - ABS 77LOW RANGE - ESP 81
LOW RANGE mode 125
Low washer system fluid level
Indicator lamp 253
Lowering
Vehicle 276
M
Main dimensions 298
Maintenance 12
Display messages 256
Manual operations
Fuel filler flap 263
Interior lighting control 113
Locking the vehicle 262
Sliding/pop-up roof* 265
Unlocking the driver’s door 261
Unlocking transmission selector
lever 264
Page 1744 of 4133

TESTING & REPAIR
TESTING AND REPAIR WORK: PASSENGER CARS: ELECTRICAL SYSTEM BODY - AR82.00-Z-9163AA
MODEL 163
Battery voltage 1114 V
Fuses in order
Radio in order
Testing
1Voltage supply, testing
electrical system, CD changerModels 202, 208, 210
up to 05/98 and models
124, 168AD82.64-P-6000-01A
2Voltage supply, testing
electrical system, CD changerModels 163AD82.64-P-6000-01B
3Voltage supply, testing
electrical system, CD changerModels 129, 202, 208,
210 as of 6/98AD82.64-P-6000-01C
4Operating function, testing
electrical system, CD changer AD82.64-P-6000-02A
Removing and
installing bulbs o
f
headlamp unit
MODEL 163.113/136 /154 /172 /174 up to
31.8.01AR82.10-P-
1201GH
Remove/install
fog lamp bulbMODEL 163.113/128 /136 /154 /157 /172 /175
with CODE (U49) Styling package MODEL
163.174AR82.10-P-
1825GH
Remove/install
fog lamp bulbMODEL 163...AR82.10-P-
1825GI
Remove/install
headlight beam
adjustment
control moduleMODELS 163.154 /172 /113 with CODE (612b)
Xenon headlamp unit MODELS
163.174 /175 /128/157AR82.10-P-
4081GH
Remove/install
electric headlamp
range adjustment
motorMODEL 163.154 /172 /113 with CODE (612)
Xenon headlamp unit MODEL
163.174 /175 /128/157AR82.10-P-
4082GH
Remove/install
xenon headlamp
control unitMODEL 163...AR82.10-P-
4632GH
Remove/install
xenon headlamp
control unitMODEL 163.113 #X as of 754620,
163.113 /154 /174 #A as of 289565,
163.128 /157 /175AR82.10-P-
4632GI
Remove/install
turn signal lampsMODEL 163...AR82.10-P-
4725GH
2001 Mercedes-Benz ML320
1998-2005 ACCESSORIES & BODY, CAB Electrical System - Body - 163 Chassis
me
Saturday, October 02, 2010 3:30:08 PMPage 249 © 2006 Mitchell Repair Information Company, LLC.
Page 1750 of 4133
Fig. 155: Identifying Longitudinal Wedge (115 589 03 59 00)
REMOVE/INSTALL FOG LA MP BULB - AR82.10-P-1825GI
MODELS 163.113 #A as of 289565, 163.113 #X as of 754620, 163.154 #A as of 289565, 163.154 #X as of
754620, 163.128/157/175
Fig. 156: Identifying Fog Lamp Bulb Components
REMOVE/INSTALL HEADLIGHT BEAM ADJUSTMENT CONTROL MODULE - AR82.10-P-4081GH
order
Remove/install
1Remove fog lamp (1) AR82.10-P-5103GI
2Remove bulb with plug
(2)Do not hold the bulb with
bare fingers, as fingerprints
bake and leave behind
opaqueness on the bulb. Use
a soft, lint-free cloth.
To unlock, rotate
counterclockwise.
The bulb and plug are
one unit.
3Install in the reverse
order
2001 Mercedes-Benz ML320
1998-2005 ACCESSORIES & BODY, CAB Electr ical System - Body - 163 Chassis
me
Saturday, October 02, 2010 3:30:08 PMPage 255 © 2006 Mitchell Repair Information Company, LLC.

REMOVE/INSTALL FOG LA MP BULB - AR82.10-P-1825GI
MODELS 163.113 #A as of 289565, 163.113 #X as of 754620, 163.154 #A as of 289565, 163.15")