Page 905 of 4133
.
�
Move front seats forward. Manual seat
(�page 35) or power seat (
�page 37).
�
Press and hold release button1 to u")
101 Controls in detailSeats
�
Close cup holder in rear center console
(�page 167).
�
Move front seats forward. Manual seat
(�page 35) or power seat (
�page 37).
�
Press and hold release button1 to un-
lock lever2.
�
Pull lever2 in direction of arrow.
�
Pull release lever3 and push down
rear seat until it locks in place.
�
Fold down the backrest (
�page 100).
�
Adjust front seats to desired position.
Manual seats (
�page 35) or power
seats (
�page 37).Folding up the rear seat
�
Move front seats forward. Manual seat
(�page 35) or power seat (
�page 37).
�
Pull release lever3 and raise rear seat
until it locks in place.
Easy entry / exit feature*
The easy entry / exit feature allows access
to the third row seats*. The right cargo
floor plate must be removed (
�page 162).Folding rear seat forward
1Lever
�
Move right seat forward. Manual seats
(�page 35) or power seats
(�page 37).
�
Move rear seat forward (
�page 99).
�
Push head restraint fully down and tilt
it forward.
�
Fold backrest forward (
�page 100).
�
Pull lever1 up and fold the rear seat
forward.
Warning!
G
Failure to assure that seats are locked into
place could result in an increased chance of
injury in an accident.Warning!
G
Never drive with the second row right seat
folded forward (easy entry / exit feature). It
could open and fold back unintentionally.
Page 906 of 4133
 up
and unfold backrest until it locks into
place.
�
Check for se")
102 Controls in detailSeatsResetting rear seat�
Pull down on seat bench until it locks
into place.
�
Pull lock button1 (
�page 100) up
and unfold backrest until it locks into
place.
�
Check for secure locking by pulling and
pushing on the backrest.
The red backrest lock indicator at lock
button1 (
�page 100) is not visible in
the locked position.
�
Move the rear and front seats in de-
sired position.
�
Pull up and adjust head restraint
(�page 36).
Third row seats*Folding down single seat
1Head restraint
2Hook
3Tensioner
4Hook and loop velcro strip
�
Remove cargo floor plate
(�page 162).
�
Remove head restraint1 from seat
cushion.
�
Lift tensioner3 upward to a horizon-
tal position to release tension of the
belt.
�
Disengage hook2 while holding onto
the seat firmly with one hand.
Warning!
G
For your protection, drive only with properly
positioned head restraints.
Adjust head restraint so that head restraint
supports the back of the head at eye level.
This will reduce the potential for injury to the
head and neck in the event of an accident or
similar situation.
Failure to assure that seats are locked into
place could result in an increased chance of
injury in an accident.
Never place hands under seat or near any
moving parts while a seat is being adjusted.
Page 907 of 4133
 on underside of
seat.
5Backrest release
6Seat release
�
Fold seat down until it locks securely in
place.
The re")
103 Controls in detailSeats
�
Attach belt at hook and loop velcro
strip4 (
�page 102) on underside of
seat.
5Backrest release
6Seat release
�
Fold seat down until it locks securely in
place.
The red marking on the seat release6
should not be visible.
�
Store cargo floor plates inside the
backrest (
�page 162).
�
Pull backrest release5 and unfold
backrest until it locks securely in place.
�
Install head restraint1 in backrest
(�page 102).
Storing single seat
�
Remove head restraint from backrest
(�page 102).
�
Pull backrest release5 and fold back-
rest forward until it locks securely in
place.
�
Remove cargo floor plates from the
backrest.
�
Pull seat release6 (
�page 103) and
fold seat up.
�
Disengage belt and engage hook2
(�page 102) in ceiling mount.
�
Pull on free end of belt until tight.
�
Install head restraint in openings
provided in seat cushion.
�
Install cargo floor plates (
�page 162).
Warning!
G
After folding the seats up, manually place
the lap belt portion of the seat belt behind
the seat (arrow). Otherwise, the lap belt may
be subject to damage and could rip.
Page 966 of 4133
162 Controls in detailLoadingInstalling blind�
Place left side of blind in left mount.
�
Position right side of blind over right
mount.
�
Push button3, releasing mounting
sleeve to slide into mount.
Cargo floor plates
Removing cargo floor plates�
Lift cargo floor plate at rear edge
(arrow).
Cargo floor plate unhinges automati-
cally.
�
Remove cargo floor plate by pulling it
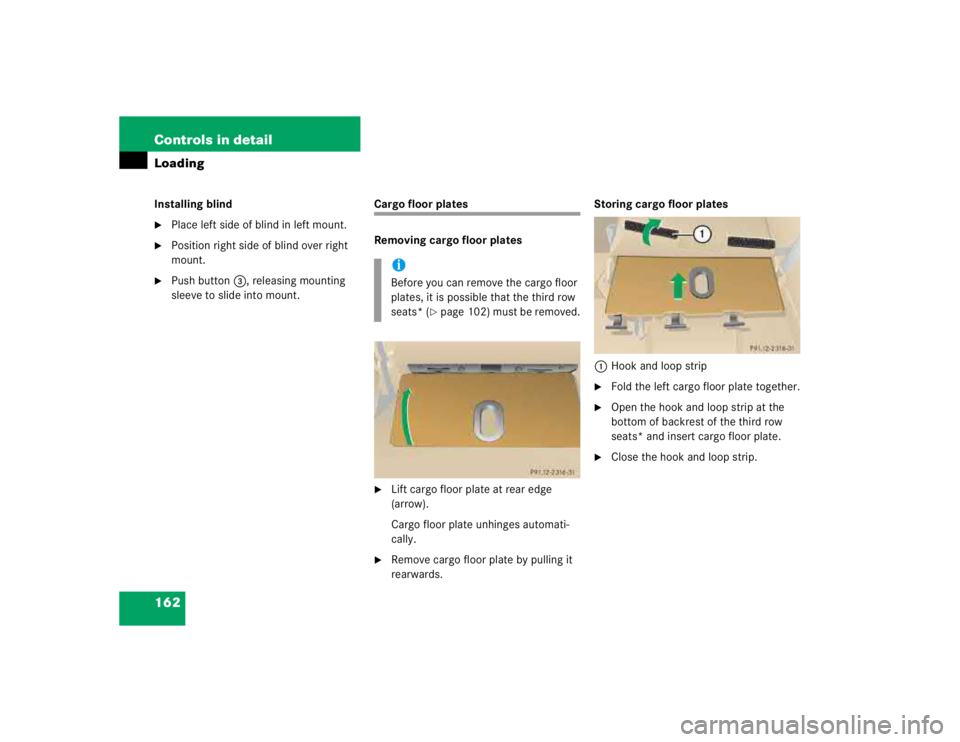
rearwards.Storing cargo floor plates
1Hook and loop strip
�
Fold the left cargo floor plate together.
�
Open the hook and loop strip at the
bottom of backrest of the third row
seats* and insert cargo floor plate.
�
Close the hook and loop strip.
iBefore you can remove the cargo floor
plates, it is possible that the third row
seats* (
�page 102) must be removed.
Page 1137 of 4133

333 Index
Reading lamps 114
Rear automatic climate control 141
Adjusting air volume and air distribu-
tion manually 141
Automatic mode 141
Rear bench seat
Foldable 99
Rear door window
Blocking operation 73
Rear fog lamp 267
Bulb 267
Switching on 111
Rear lamp bulbs
Replacing 270
Rear parking lamp
Replacing bulbs 270
Rear passenger compartment ventilation
and climate control
Activating 141
Deactivating 141
Rear passenger compartment ventilation
and rear automatic climate
control 141Rear quarter windows* 146
Opening 146
Closing 147
Rear seats 99
Easy entry/exit feature* 101
Enlarging cargo area 99
Folding down backrest 100
Folding up 101
Folding up backrest 100
Fore and aft 99
Lowering 100
Third row* 102
Rear standing lamp
Replacing bulbs 270
Rear towing eyes 285
Rear view mirror automatic antiglare 126
Rear view mirrors see Mirrors
Rear window defroster 133
Activating 133
Deactivating 133Rear window wiper 131
Rain sensor* 131
Rear window wiper/washer 51
Reconnecting
Vehicle battery 279
Refrigerant
Air conditioning 302
Refueling 214
Regular checks 215
Reinstalling vehicle battery 279
Remote control
Changing battery 262
Global locking 89
Global unlocking 89
Synchronizing 263
Unlocking liftgate 89
Unlocking the driver’s door, fuel filler
flap 89
Unlocking with 32
Remote control with folding key 88
Page 1142 of 4133

338 IndexTele Aid* 171
Emergency calls 173
Information 177
Initiating an emergency call
manually 175
Remote door unlock 179
Roadside assistance 175
Stolen vehicle tracking services 180
System self-check 172
Upgrade signals 178
Telematics* 315
Telephone* 170
Temperature
Grades of tires 309
Tires 228
Third row seats* 102
Folding down single seat 102
Installing single seat 104
Removing single seat 104
Storing single seat 103
Tie-down rings (Cargo
compartment) 158Tightening torque 315
Tightening torque (Wheel bolts) 277
Tilt
Head restraint 37, 39
Time
Setting hours 118
Setting minutes 118
Tire inflation pressure
Checking 216, 227
Tire speed rating 198, 315
Tire traction 197
Tires 295, 308
Direction of rotation 227
Driving instructions 196
Retreads 226
Rims and tires 295
Rotating 228
Service life 227
Temperature 228
Temperature grades 309
Tread depth 230
Wear pattern 228
Winter 230Tools 257
Vehicle jack 258
Vehicles with CD-changer* 258
Wheel bolt wrench 258
Tow-away alarm 29, 84
Arming 84
Disarming 84
Disarming for transport 84
Towing
Trailer 206
Towing a trailer 209
Automatic transmission 124
Towing eyes
Front 285
Rear 285
Towing the vehicle 283
Stranded vehicle 286
Tracking services
For stolen vehicle 180
Page 1494 of 4133

AR91.12-P-1010GI
Remove and install bench
21.3.00
MODELS
163.136 /154 /172 as of 1.9.99,
163.113 /128 /157 /174 /175
40 % bench seat
P91.12-2126-06
1
Bolts, front of rear seat fastening
2
Bolts, rear of rear seat fastening
4
Seat frame covering
Remove, Install
1
Remove headrest
See Operating Instructions
2.1
Remove covering (4) on bottom of rear seat
On 40 % rear seat only.
AR91.12-P-1100GH
3.1
Disconnect plug to seat belt buckle cable
Only with side airbag in the rear (left and
right), code 293.
4.1
Remove electric lead attached to seat frame
with adhesive tape
Only with side airbag in the rear (left and
right), code 293.
Installation:
Replace adhesive tape.
5
Unscrew bolts (1) on front of rear seat
fastening
Installation:
Replace bolts and nuts with
locking agent applied.
Torx bit set
*000589011000
*BA91.12-P-1005-03A
6
Release backrest and tip forward
See Operating Instructions
7
Release seat bench and fold down
See Operating Instructions
8
Remove bolts (2) on rear of rear seat fastening
Installation:
Replace bolts and nuts with
locking agent applied.
Torx bit set
*000589011000
*BA91.12-P-1005-03A
9
Remove 40 % bench
10
Install in the reverse order
Rear seats
Number
Designation
Model
163 as of
09/99
BA91.12-P-1005-03A
Nuts for rear seat console on vehicle floor
NM
40
Copyright DaimlerChrysler AG 12.06.2006 CD-Ausgabe G/10/04 . This WIS print-out will not be recorde
d by Modification services.
Page 1
Page 3782 of 4133

AZ91.20-P-0001A
Retrofitting anchor rings for child seat restraint attachments
14.11.00
MODEL
163.113 /136 /154 /172 /174
P91.20-2039-06
2
Anchor mounting plate
3
Long spacer
4
Short spacer
5
Trim plate
6
Anchor ring
7
Long bolt
8
Short bolt
9
Trim cover
P91.20-2040-01
1
Template
12
Bolt location for
mounting plate
13
Rivet locations for
mounting plate
Hole in carpet,
Ø=57 mm
10
Center hole for
anchor ring, Ø=9.5
mm
11
Hole for rivet, Ø=4
mm
P91.20-2038-01
Removing
1
Remove compact spare tire
See Owner's Manual.
2
Fold 3rd row seats to storage position
Only with code (847). See Owner's Manual.
3
Remove footwell covers
See Owner's Manual.
4
Remove cargo anchor rings
Modifying
5
Place template (1) on top of load
compartment floor covering and secure with
cargo anchor bolts (arrows)
Turn template over for opposite side.
Template
*163589066300
6
Mark floor covering through center of bolt
location (12) for anchor mounting plate (2)
Only for those positions at which anchor
rings will be installed.
7
Remove template (1)
8
Remove load compartment floor covering
f
AR68.20-P-4810GH
9
Place floor covering faceup on suitable surface
10
Using hole saw, create Ø=57 mm hole for
anchor ring assembly
Only for those positions at which anchor
rings will be installed. Secure floor covering
appropriately to ensure hole is cut cleanly.
Use mark as a guide for center of hole.
11
Lower rear axle carrier
Only Model 163.174 for installation of 2nd
row center anchor ring.
f
AR35.10-P-0020-01GH
12
Place template (1) on floor pan and secure
with cargo anchor bolts
Copyright DaimlerChrysler AG 14.06.2006 CD-Ausgabe G/10/04 . This WIS print-out will not be recorde
d by Modification services.
Page 1