Page 859 of 4133
55 Getting started
Parking and locking
�
Press the seat belt release button
(�page 42).
Allow the retractor to completely re-
wind the seat belt by guiding the latch
plate.
�
After exiting the vehicle, press the lock
button‹ on the remote control
(�page 32).
The turn signal lamps flash three times
and the locking knobs on the doors
move down.
More information on parking and locking
can be found in the “Controls in detail”
section (�page 88).
iWith the key removed and the driver’s
door open, a warning sounds if the ve-
hicles exterior lamps are not switched
off.Warning!
G
To prevent possible personal injury, always
keep hands and fingers away from the door
openings when closing the doors. Be espe-
cially careful when small children are
around.
Before closing doors, ensure that there is no
possibility of someone getting caught in a
door during closing.
Warning!
G
When leaving the vehicle, always remove the
key from the starter switch, and lock your
vehicle. Do not leave children unattended in
the vehicle, or with access to an unlocked
vehicle. Unsupervised use of vehicle equip-
ment may cause an accident and / or seri-
ous personal injury.
Page 887 of 4133
83 Safety and Security
Anti-theft systems
�Anti-theft systems
Immobilizer
The immobilizer prevents unauthorized
persons from starting your vehicle.
Activating
Removing the key from the steering lock
activates the immobilizer.
Deactivating
Turning the key in the steering lock to
position2 (
�page 33) deactivates the im-
mobilizer.
Anti-theft alarm
Once the alarm system has been armed, a
visual and audible alarm is triggered when
someone:�
opens a door
�
opens the liftgate
�
opens the hood
The alarm will stay on even if the activating
element (a door, for example) is immedi-
ately closed.
The alarm system will also be triggered
when
�
someone attempts to raise the vehicle
�
unlocking and opening the driver’s
door with the mechanical keyArming the alarm system
The alarm system is armed after locking
the vehicle with the remote control. The
turn signal lamps flash three times to indi-
cate that the alarm system is activated. A
red lamp in the center console will flash af-
ter approximately 10 seconds when the
alarm system is completely armed
(
�page 27).
iIn case the engine cannot be started
(vehicle’s battery is in order), the sys-
tem is not operational. Contact an au-
thorized Mercedes-Benz Light Truck
Center or call 1-800-FOR-MERCedes
(in the USA), or 1-800-387-0100 (in
Canada).
iIf the alarm stays on for more than
20 seconds, an emergency call is initi-
ated automatically by the Tele Aid* sys-
tem (
�page 171) provided Tele Aid
service was subscribed to and properly
activated, and that necessary cellular
service and GPS coverage are avail-
able.
Page 892 of 4133
88 Controls in detailLocking and unlocking
�In the “Controls in detail” section you will
find detailed information on how to ope-
rate the equipment installed in your vehi-
cle. If you are already familiar with the ba-
sic functions of your vehicle, this section
will be of particular interest to you.
To quickly familiarize yourself with the ba-
sic functions of the vehicle, refer to the
“Getting started” section of this manual.
The corresponding page numbers are
given at the beginning of each segment.
Locking and unlocking
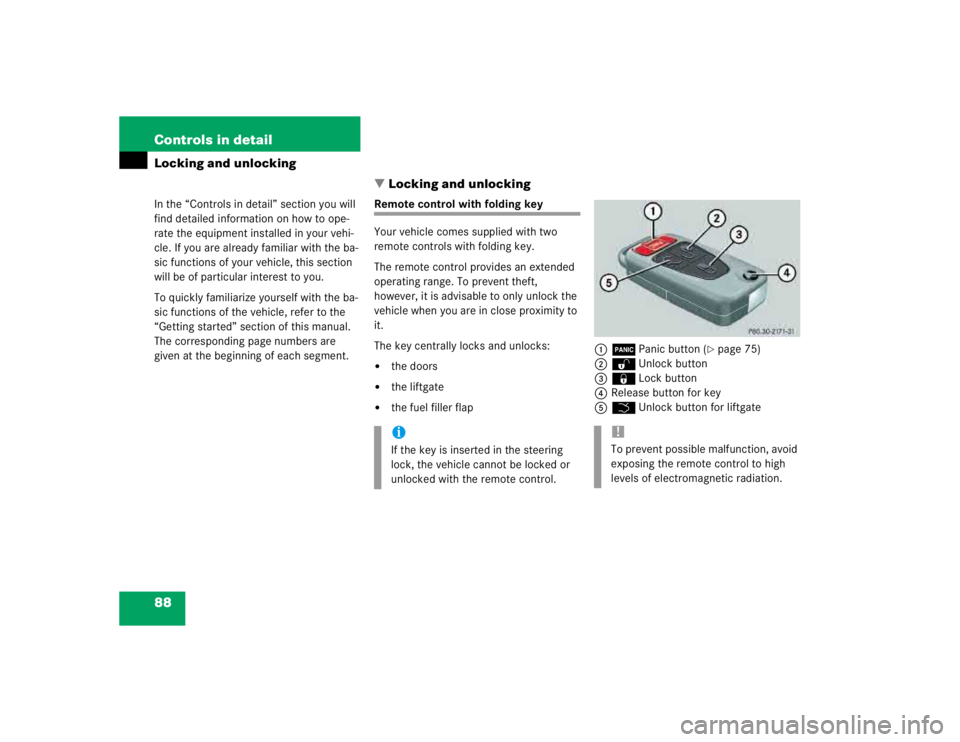
Remote control with folding key
Your vehicle comes supplied with two
remote controls with folding key.
The remote control provides an extended
operating range. To prevent theft,
however, it is advisable to only unlock the
vehicle when you are in close proximity to
it.
The key centrally locks and unlocks:�
the doors
�
the liftgate
�
the fuel filler flap1ÂPanic button (
�page 75)
2ŒUnlock button
3‹Lock button
4Release button for key
5ŠUnlock button for liftgate
iIf the key is inserted in the steering
lock, the vehicle cannot be locked or
unlocked with the remote control.
!To prevent possible malfunction, avoid
exposing the remote control to high
levels of electromagnetic radiation.
Page 898 of 4133
94 Controls in detailLocking and unlockingLocking and unlocking from the inside
You can lock or unlock the doors and the
tailgate from inside using the central lock-
ing switch. This can be useful, for example,
if you want to lock the vehicle before start-
ing to drive.Locking
�
Press upper part1 of central locking
button (
�page 93).
If all the doors are closed, the vehicle
locks.
Unlocking
�
Press lower part2 of central locking
button (
�page 93).
The vehicle unlocks.
Warning!
G
When leaving the vehicle, always remove the
key from the steering lock and lock the vehi-
cle. Do not leave children unattended in the
vehicle, or with access to an unlocked vehi-
cle. Unsupervised use of vehicle equipment
may cause an accident and / or serious per-
sonal injury.
iYou can open a locked door from the
inside. Open door only when conditions
are safe to do so.
If the vehicle was previously centrally
locked using the remote control, it will
not unlock using the central locking
switch.
Page 980 of 4133
176 Controls in detailUseful featuresWhen the connection is established, the
message
ROADSIDE ASSISTANCE –
CALL CONNECTED
appears in the MCS dis-
play. The Tele Aid system will transmit data
generating the vehicle identification num-
ber, model, color and location (subject to
availability of cellular and GPS signals).
A voice connection between the Roadside
Assistance dispatcher and the occupants
of the vehicle will be established. When a
voice connection is established the audio
system mutes and the message
TELE AID
– ROADSIDE ASSISTANCE CALL ACTIVE
ap-
pears in the MCS display.
�
Describe the nature of the need for as-
sistance.The Mercedes-Benz Roadside assistance
dispatcher will either dispatch a qualified
Mercedes-Benz technician or arrange to
tow your vehicle to the nearest
Mercedes-Benz Light Truck Center. For
services such as labor and / or towing,
charges may apply. Refer to the Roadside
Assistance manual for more information.
These programs are only available in the
USA:
�
Sign and Drive services: Services such
as jump start, a few gallons of fuel or
the replacement of a flat tire with the
vehicle spare tire are obtainable,
�
Remote Vehicle Diagnostics: This func-
tion permits the Mercedes-Benz Road-
side Assistance dispatcher to
download malfunction codes and actu-
al vehicle data.
iWhile the call is connected you can
change to navigation menu by pressing
NAVI button on the MCS unit.
iThe indicator lamp in the Roadside As-
sistance button• remains illumi-
nated in red for approx. ten seconds
during the system self-check after turn-
ing the key in the steering lock to
position2 (together with the SOS but-
ton and the Information button¡).
See system self-check (
�page 172)
when the indicator lamp does not light
up in red or stays on longer than ap-
proximately ten seconds.
Page 989 of 4133
185 Controls in detail
Useful features
Step 4:�
Continue to press and hold the inte-
grated signal transmitter button (3,
4 or5) while you press and re-press
(“cycle”) your hand-held remote con-
trol transmitter1 every two seconds
until the frequency signal has been
learned. Upon successful training, the
indicator lamp6 will flash slowly and
then rapidly after several seconds.
�
Proceed with programming step 5 and
step 6 to complete.
Operation of remote control
�
Switch on ignition.
�
Select and press the appropriate inte-
grated signal transmitter button (3,
4or5 to activate the remote con-
trolled device.
The integrated remote control trans-
mitter continues to send the signal as
long as the button is pressed – up to
20 seconds.Erasing the remote control memory
�
Switch on ignition.
�
Simultaneously hold down the signal
transmitter buttons3 and5, for ap-
proximately 20 seconds, or until the in-
dicator lamp6 f la shes ra pid ly. Do not
hold for longer than 30 seconds.
The codes of all three channels are
erased.Reprogramming a single integrated
signal transmitter button
To program a device using a signal trans-
mitter button previously trained, follow
these steps:
�
Press and hold the desired signal trans-
mitter button (3, 4 or5). Do not re-
lease the button.
�
The indicator lamp will begin to flash af-
ter 20 seconds. Without releasing the
integrated signal transmitter button,
proceed with programming starting
with step 3.
iIf you sell your vehicle, erase the codes
of all three channels.
Page 1123 of 4133

319 Index
Rear passenger compartment 141
Rear window defroster 133
Residual heat utilization 140
Residual ventilation 140
Switching off 137
Switching on 137
Automatic headlamp mode 108
Automatic interior lighting control
Activating 113
Deactivating 113
Automatic locking when driving 93
Automatic transmission 119
Accelerator position 123
Emergency operation (Limp Home
Mode) 124
Gear ranges 121
Gear selector lever position 122
Gear shifting malfunctions 124
Kickdown 123
Manual shifting 120
One-touch gearshifting 120Selector lever position 119
Towing a trailer 124
Transmission fluid 222
B
BabySmart
TM
Airbag deactivation system 70
Compatible child seats 70, 311
Self-test 70
BabySmart
TM airbag deactivation
system 311
Backrest tilt 35
Backup lamps 267, 270
Bulbs 267
BAS 78, 311
Malfunction indicator lamp 245, 246,
247
Warning lamp 245, 246, 247
Batteries, remote control
Changing 262
Batteries, vehicle 223
Battery discharged
Jump starting 281Battery indicator lamp
Indicator lamp 254
Battery, vehicle 223, 278
Charging 279
Disconnecting 279
Reconnecting 279
Reinstalling 279
Removing 279
Bi-Xenon headlamps* 311
Blocking
Rear door window operation 73
Brake assist system (BAS) 311
Brake fluid 302
Brake lamp bulbs 267
Brake lamp, high mounted 267
Brake pad wear
Indicator lamp 254
Brakes 194
Warning lamp 244
Break-in period 192
Page 1128 of 4133

324 IndexEmergency calls
Initiating an emergency call 175
With Tele Aid* 173
Emergency operation (Limp Home
Mode) 124
Emergency operations
Closing sliding/pop-up roof* 265
Locking the vehicle 262
Opening sliding/pop-up roof* 265
Remote door unlock 179
Unlocking the vehicle 261
Emergency tensioning device see
ETD 67, 312
Emission control 212
Emission control label 292
Engine
Starting 46
Technical data 294
Turning off 54
Engine cleaning 236Engine compartment
Fuse box in 287
Hood 217
Engine malfunction indicator lamp 25,
248
Engine number 311
Engine oil 218, 302
Adding 221
Additives 302
Checking level 218
Consumption 218
Messages in display 219
Oil dipstick 221
Viscosity 312
Enlarged cargo area 99
Error
Display messages 256ESP 25, 80, 312
LOW RANGE mode 81
Malfunction indicator lamp 245, 246,
247
Switching off 81
Switching on 82
Synchronizing 246
Warning lamp 245, 246, 247, 251
ETD 312
Safety guidelines 62
ETD (Emergency tensioning device) 67
Exterior mirrors
Folding 128
Exterior rear view mirrors 40
Adjusting 40
Folding electrically 128