1997 MERCEDES-BENZ ML350 air conditioning
[x] Cancel search: air conditioningPage 1955 of 4133
gas. Risk of poisoning
and caustic burns from
swallowing battery
electrolyte. Risk of
injury from caustic burns
to eyes and skin from
battery electrolyte or
from handling damaged
lead-acid batteriesflames or smoking. Wear
acid-resistant gloves,
clothing and glasses. Pour
battery electrolyte only
into suitable and
appropriately marked
containers.
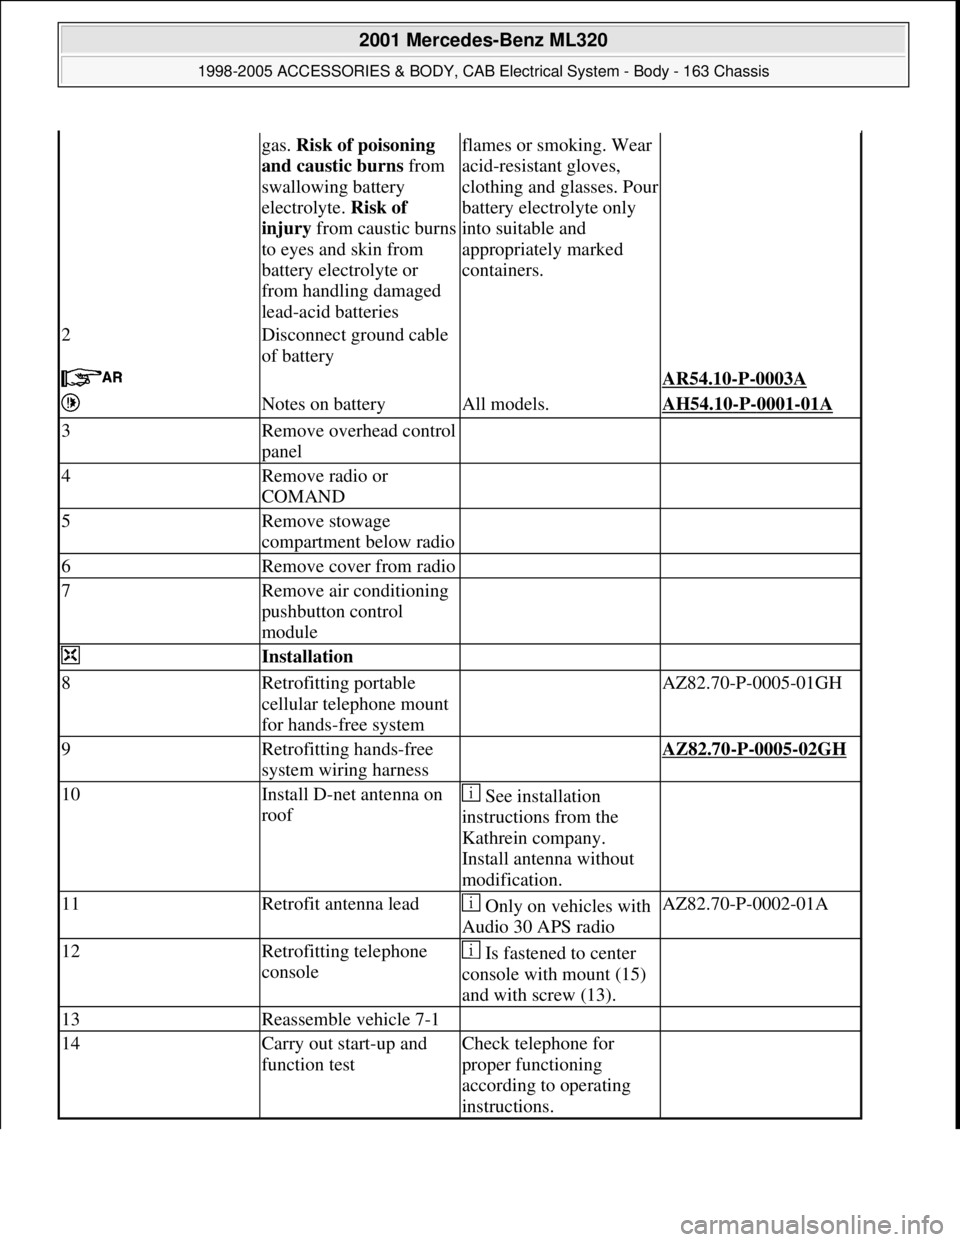
2Disconnect ground cable
of battery
AR54.10-P-0003A
Notes on batteryAll models.AH54.10-P-0001-01A
3Remove overhead control
panel
4Remove radio or
COMAND
5Remove stowage
compartment below radio
6Remove cover from radio
7Remove air conditioning
pushbutton control
module
Installation
8Retrofitting portable
cellular telephone mount
for hands-free system AZ82.70-P-0005-01GH
9Retrofitting hands-free
system wiring harness AZ82.70-P-0005-02GH
10Install D-net antenna on
roof See installation
instructions from the
Kathrein company.
Install antenna without
modification.
11Retrofit antenna lead Only on vehicles with
Audio 30 APS radioAZ82.70-P-0002-01A
12Retrofitting telephone
console Is fastened to center
console with mount (15)
and with screw (13).
13Reassemble vehicle 7-1
14Carry out start-up and
function testCheck telephone for
proper functioning
according to operating
instructions.
2001 Mercedes-Benz ML320
1998-2005 ACCESSORIES & BODY, CAB Electrical System - Body - 163 Chassis
me
Saturday, October 02, 2010 3:30:14 PMPage 460 © 2006 Mitchell Repair Information Company, LLC.
Page 1957 of 4133
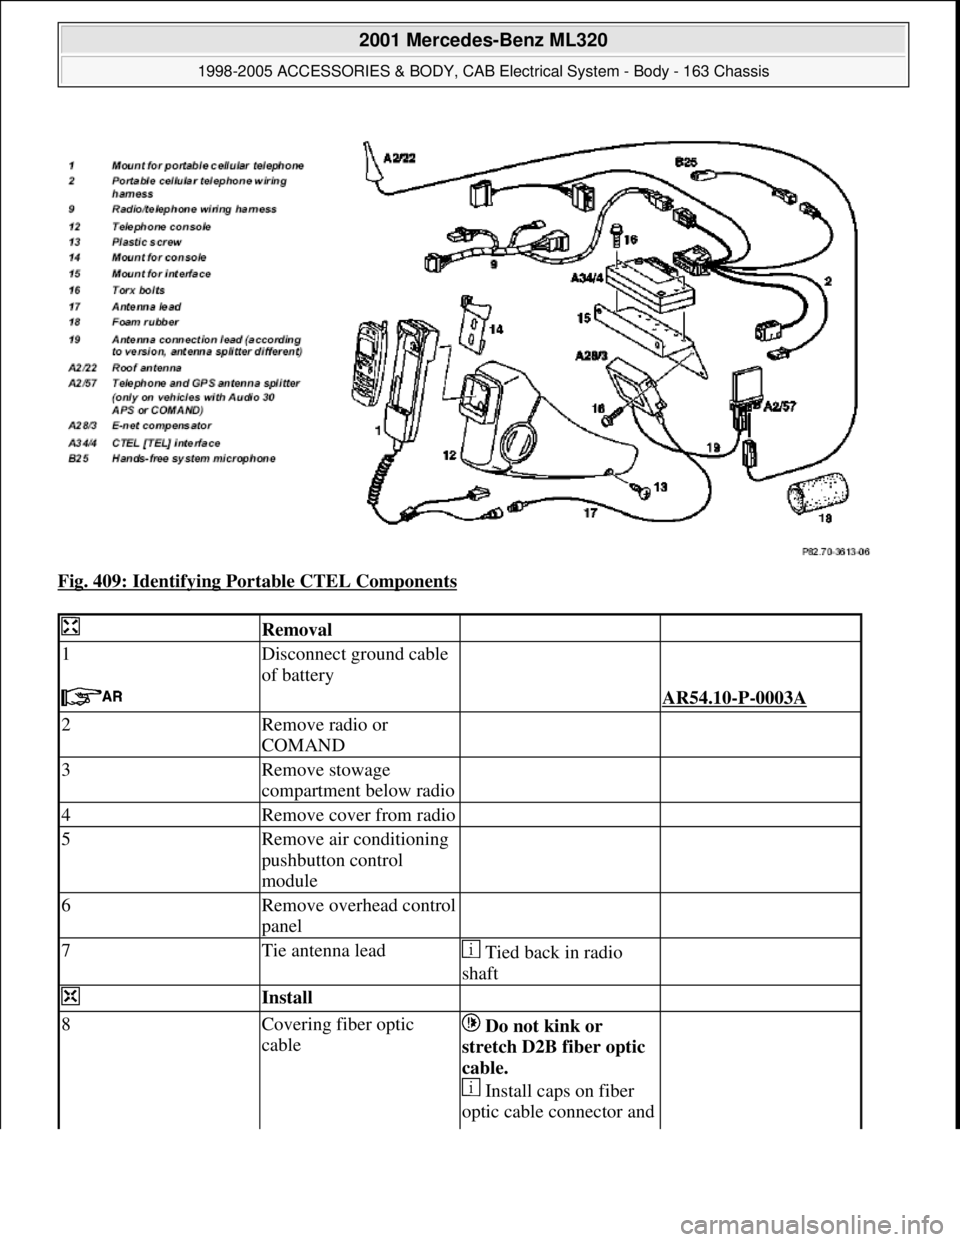
Fig. 409: Identifying Portable CTEL Components
Removal
1Disconnect ground cable
of battery
AR54.10-P-0003A
2Remove radio or
COMAND
3Remove stowage
compartment below radio
4Remove cover from radio
5Remove air conditioning
pushbutton control
module
6Remove overhead control
panel
7Tie antenna lead Tied back in radio
shaft
Install
8Covering fiber optic
cable Do not kink or
stretch D2B fiber optic
cable.
Install caps on fiber
optic cable connector and
2001 Mercedes-Benz ML320
1998-2005 ACCESSORIES & BODY, CAB Electrical System - Body - 163 Chassis
me
Saturday, October 02, 2010 3:30:14 PMPage 462 © 2006 Mitchell Repair Information Company, LLC.
Page 1961 of 4133
LARGER
CONTAINER FOR
WINDSHIELD
WASHER SYSTEM
Remove
1Remove radiator
crossmember AR62.30-P-2300GH
2Drain the washer fluid
reservoir Fig. 189
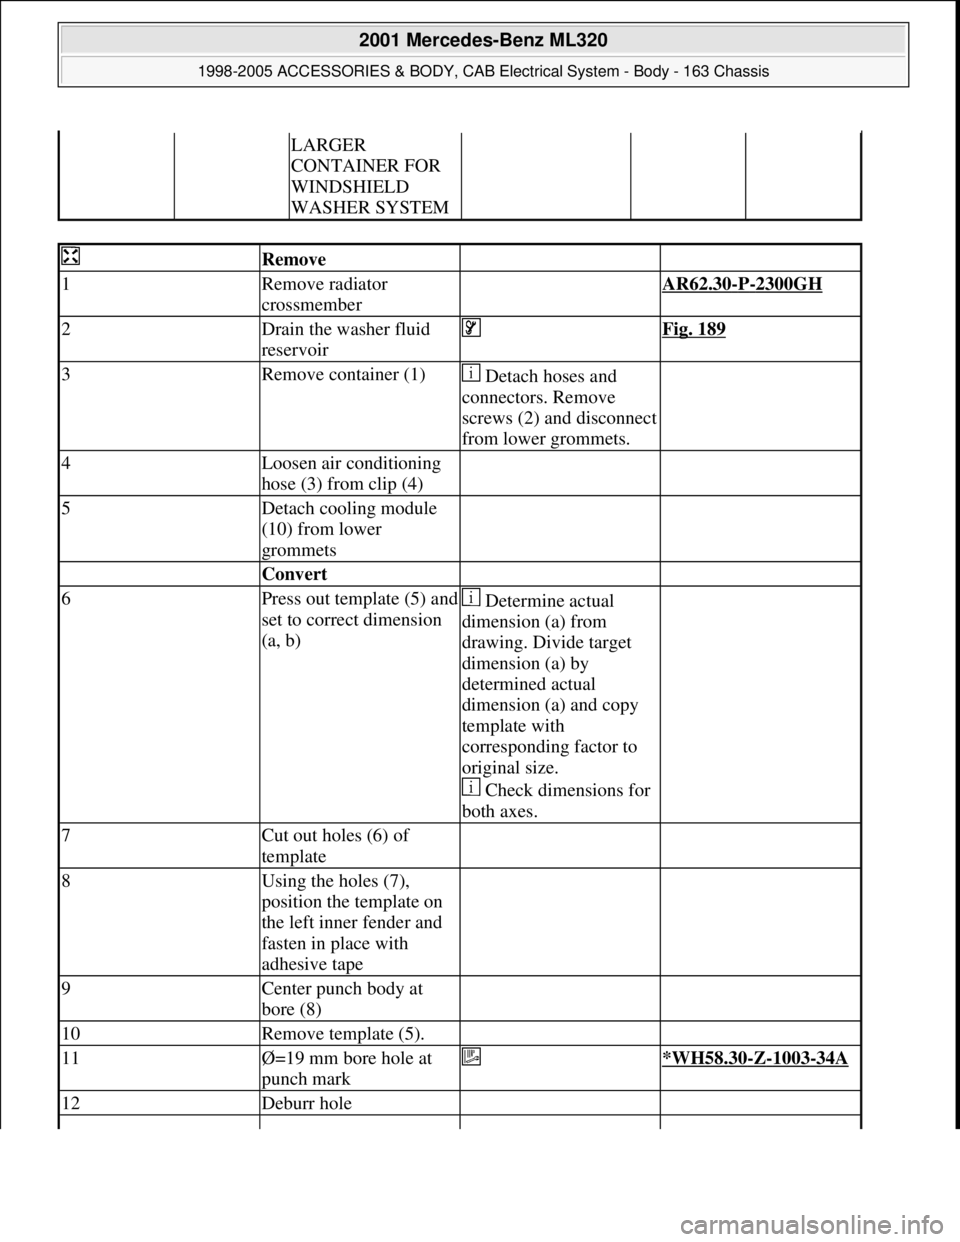
3Remove container (1) Detach hoses and
connectors. Remove
screws (2) and disconnect
from lower grommets.
4Loosen air conditioning
hose (3) from clip (4)
5Detach cooling module
(10) from lower
grommets
Convert
6Press out template (5) and
set to correct dimension
(a, b) Determine actual
dimension (a) from
drawing. Divide target
dimension (a) by
determined actual
dimension (a) and copy
template with
corresponding factor to
original size.
Check dimensions for
both axes.
7Cut out holes (6) of
template
8Using the holes (7),
position the template on
the left inner fender and
fasten in place with
adhesive tape
9Center punch body at
bore (8)
10Remove template (5).
11Ø=19 mm bore hole at
punch mark *WH58.30-Z-1003-34A
12Deburr hole
2001 Mercedes-Benz ML320
1998-2005 ACCESSORIES & BODY, CAB Electrical System - Body - 163 Chassis
me
Saturday, October 02, 2010 3:30:14 PMPage 466 © 2006 Mitchell Repair Information Company, LLC.
Page 2884 of 4133
ASSIGNMENT OF DATA LINK CONNECTOR - AD00.00-P-2000-02C
Hazardous
voltage Short-circuit to
positive
Multimeter direct
voltage type of
measurement
Brake lining
wear indicator Plug Socket
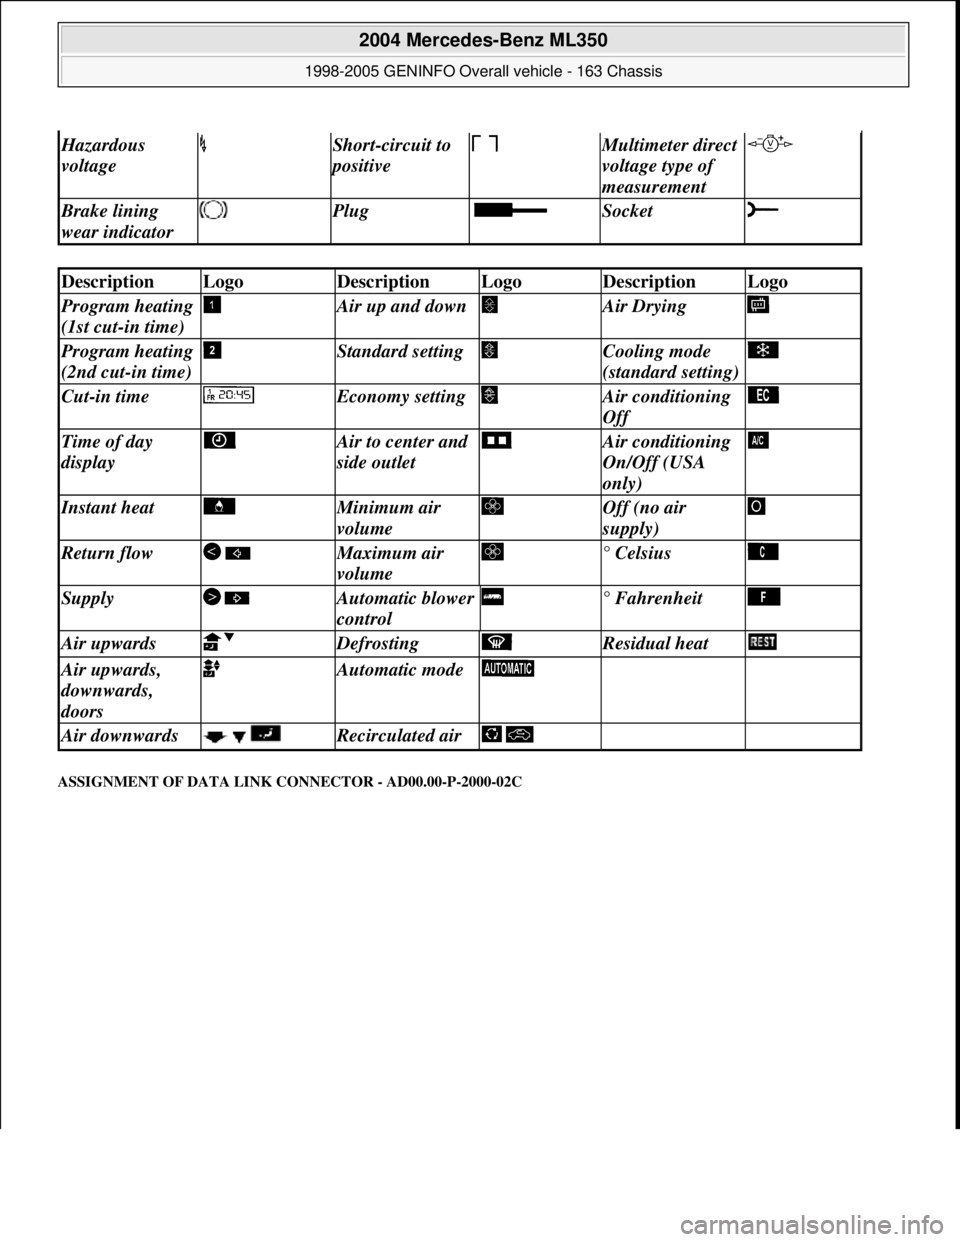
DescriptionLogoDescriptionLogoDescriptionLogo
Program heating
(1st cut-in time) Air up and down Air Drying
Program heating
(2nd cut-in time) Standard setting Cooling mode
(standard setting)
Cut-in time Economy setting Air conditioning
Off
Time of day
display Air to center and
side outlet Air conditioning
On/Off (USA
only)
Instant heat Minimum air
volume Off (no air
supply)
Return flow Maximum air
volume ° Celsius
Supply Automatic blower
control ° Fahrenheit
Air upwards Defrosting Residual heat
Air upwards,
downwards,
doors Automatic mode
Air downwards Recirculated air
2004 Mercedes-Benz ML350
1998-2005 GENINFO Overall vehicle - 163 Chassis
me
Saturday, October 02, 2010 3:47:48 PMPage 239 © 2006 Mitchell Repair Information Company, LLC.
Page 3052 of 4133
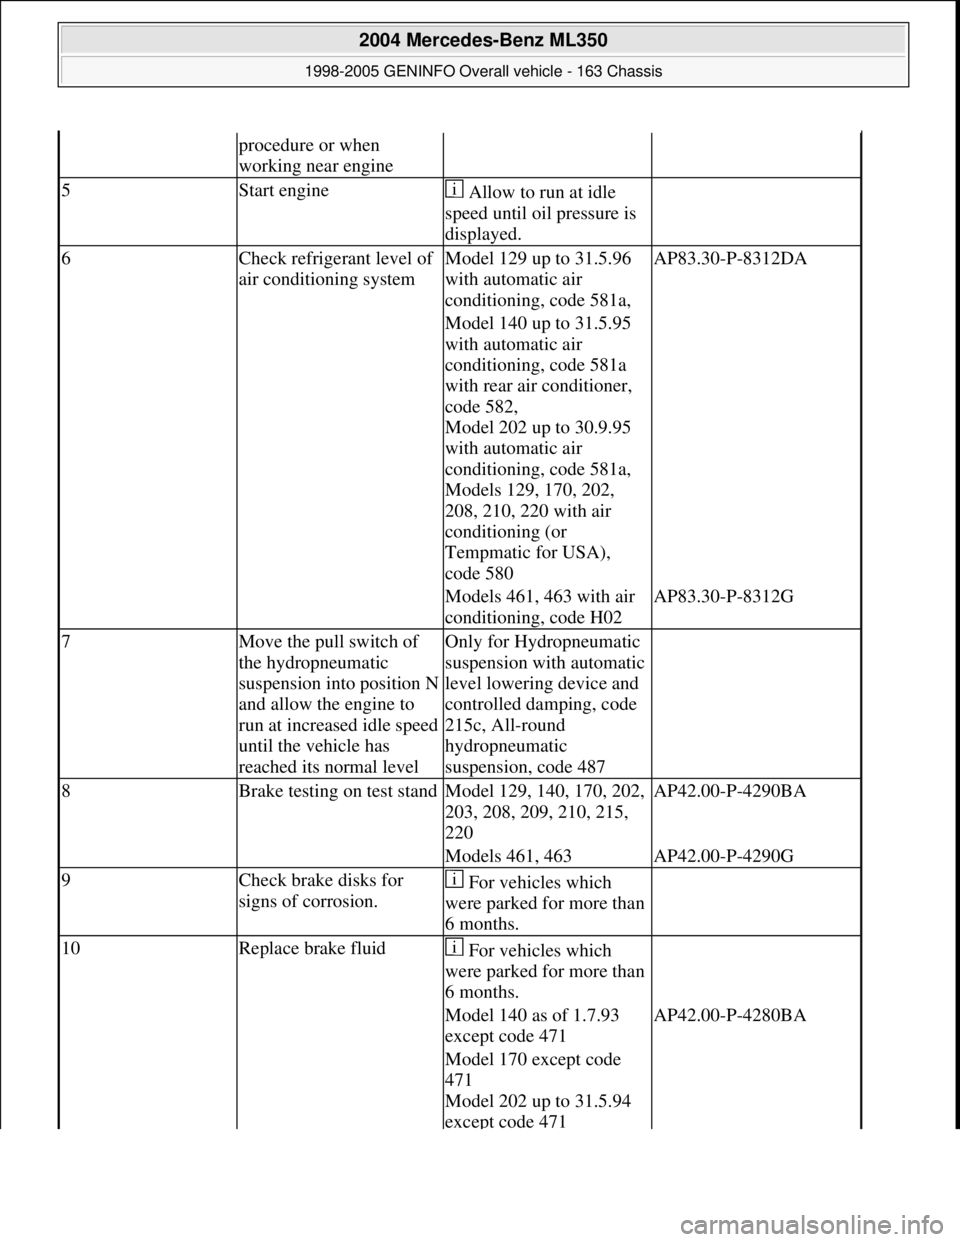
procedure or when
working near engine
5Start engine Allow to run at idle
speed until oil pressure is
displayed.
6Check refrigerant level of
air conditioning systemModel 129 up to 31.5.96
with automatic air
conditioning, code 581a,AP83.30-P-8312DA
Model 140 up to 31.5.95
with automatic air
conditioning, code 581a
with rear air conditioner,
code 582,
Model 202 up to 30.9.95
with automatic air
conditioning, code 581a,
Models 129, 170, 202,
208, 210, 220 with air
conditioning (or
Tempmatic for USA),
code 580
Models 461, 463 with air
conditioning, code H02AP83.30-P-8312G
7Move the pull switch of
the hydropneumatic
suspension into position N
and allow the engine to
run at increased idle speed
until the vehicle has
reached its normal levelOnly for Hydropneumatic
suspension with automatic
level lowering device and
controlled damping, code
215c, All-round
hydropneumatic
suspension, code 487
8Brake testing on test standModel 129, 140, 170, 202,
203, 208, 209, 210, 215,
220AP42.00-P-4290BA
Models 461, 463AP42.00-P-4290G
9Check brake disks for
signs of corrosion. For vehicles which
were parked for more than
6 months.
10Replace brake fluid For vehicles which
were parked for more than
6 months.
Model 140 as of 1.7.93
except code 471AP42.00-P-4280BA
Model 170 except code
471
Model 202 up to 31.5.94
except code 471
2004 Mercedes-Benz ML350
1998-2005 GENINFO Overall vehicle - 163 Chassis
me
Saturday, October 02, 2010 3:47:52 PMPage 407 © 2006 Mitchell Repair Information Company, LLC.
Page 3204 of 4133
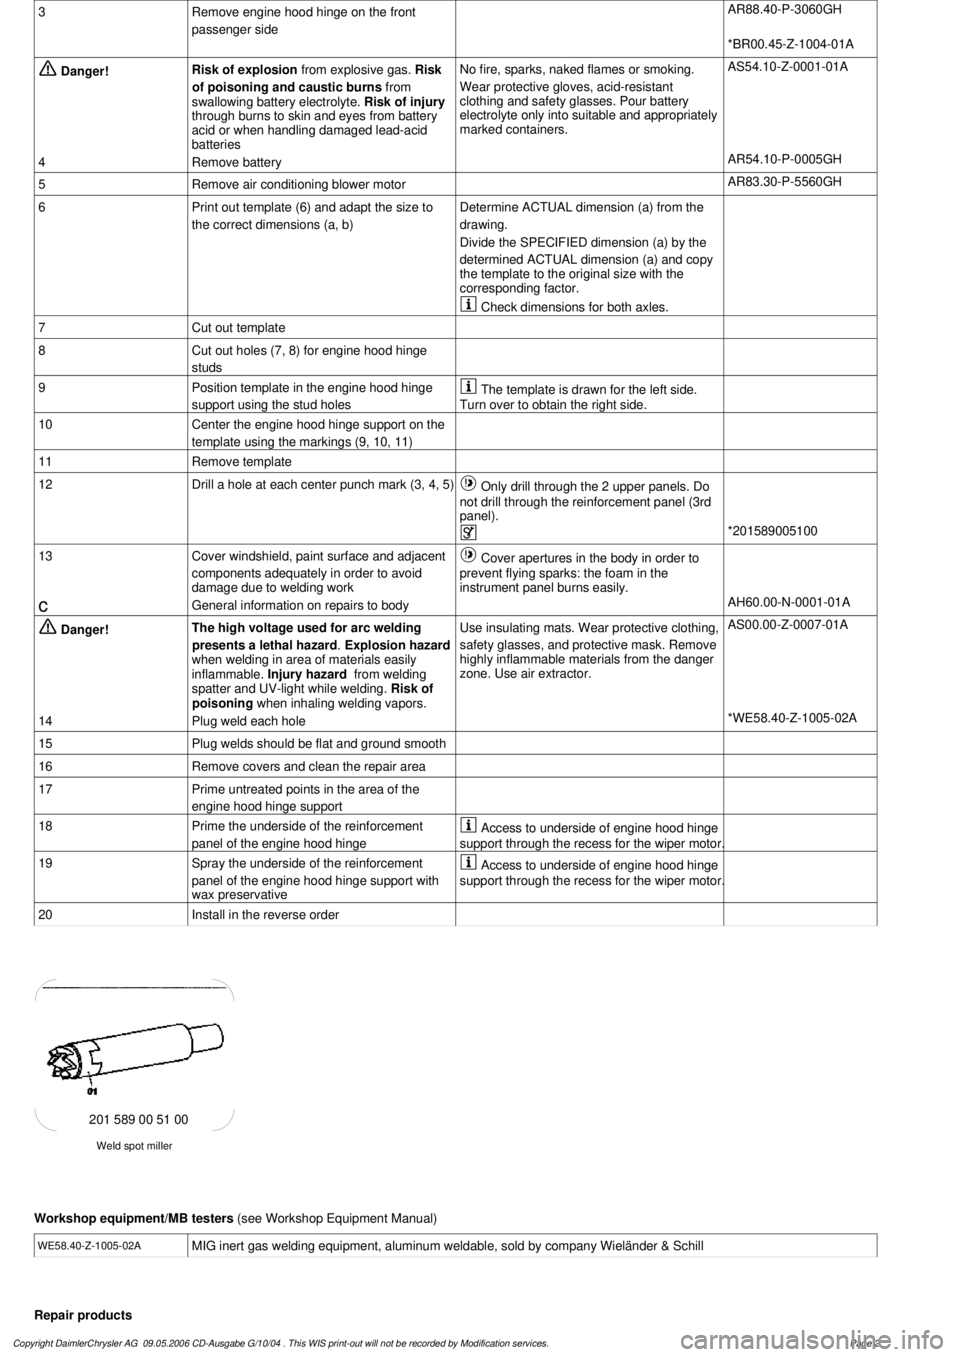
3
Remove engine hood hinge on the front
passenger side
AR88.40-P-3060GH
*BR00.45-Z-1004-01A
Danger!
Risk of explosion
from explosive gas.
Risk
of poisoning and caustic burns from
swallowing battery electrolyte.
Risk of injury
through burns to skin and eyes from battery
acid or when handling damaged lead-acid
batteries
No fire, sparks, naked flames or smoking.
Wear protective gloves, acid-resistant
clothing and safety glasses. Pour battery
electrolyte only into suitable and appropriately
marked containers.
AS54.10-Z-0001-01A
4
Remove battery
AR54.10-P-0005GH
5
Remove air conditioning blower motor
AR83.30-P-5560GH
6
Print out template (6) and adapt the size to
the correct dimensions (a, b)Determine ACTUAL dimension (a) from the
drawing.
Divide the SPECIFIED dimension (a) by the
determined ACTUAL dimension (a) and copy
the template to the original size with the
corresponding factor.
Check dimensions for both axles.
7
Cut out template
8
Cut out holes (7, 8) for engine hood hinge
studs
9
Position template in the engine hood hinge
support using the stud holes
The template is drawn for the left side.
Turn over to obtain the right side.
10
Center the engine hood hinge support on the
template using the markings (9, 10, 11)
11
Remove template
12
Drill a hole at each center punch mark (3, 4, 5)
Only drill through the 2 upper panels. Do
not drill through the reinforcement panel (3rd
panel).
*201589005100
13
Cover windshield, paint surface and adjacent
components adequately in order to avoid
damage due to welding work
Cover apertures in the body in order to
prevent flying sparks: the foam in the
instrument panel burns easily.
c
General information on repairs to body
AH60.00-N-0001-01A
Danger!
The high voltage used for arc welding
presents a lethal hazard
.
Explosion hazard
when welding in area of materials easily
inflammable.
Injury hazard
from welding
spatter and UV-light while welding.
Risk of
poisoning
when inhaling welding vapors.
Use insulating mats. Wear protective clothing,
safety glasses, and protective mask.
Remove
highly inflammable materials from the danger
zone. Use air extractor.
AS00.00-Z-0007-01A
14
Plug weld each hole
*WE58.40-Z-1005-02A
15
Plug welds should be flat and ground smooth
16
Remove covers and clean the repair area
17
Prime untreated points in the area of the
engine hood hinge support
18
Prime the underside of the reinforcement
panel of the engine hood hinge
Access to underside of engine hood hinge
support through the recess for the wiper motor.
19
Spray the underside of the reinforcement
panel of the engine hood hinge support with
wax preservative
Access to underside of engine hood hinge
support through the recess for the wiper motor.
20
Install in the reverse order
Weld spot miller
201 589 00 51 00
Workshop equipment/MB testers
(see Workshop Equipment Manual)
WE58.40-Z-1005-02A
MIG inert gas welding equipment, aluminum weldable, sold by company Wieländer & Schill
Repair products
Copyright DaimlerChrysler AG 09.05.2006 CD-Ausgabe G/10/04 . This WIS print-out will not be recorde
d by Modification services.
Page 2
Page 3245 of 4133
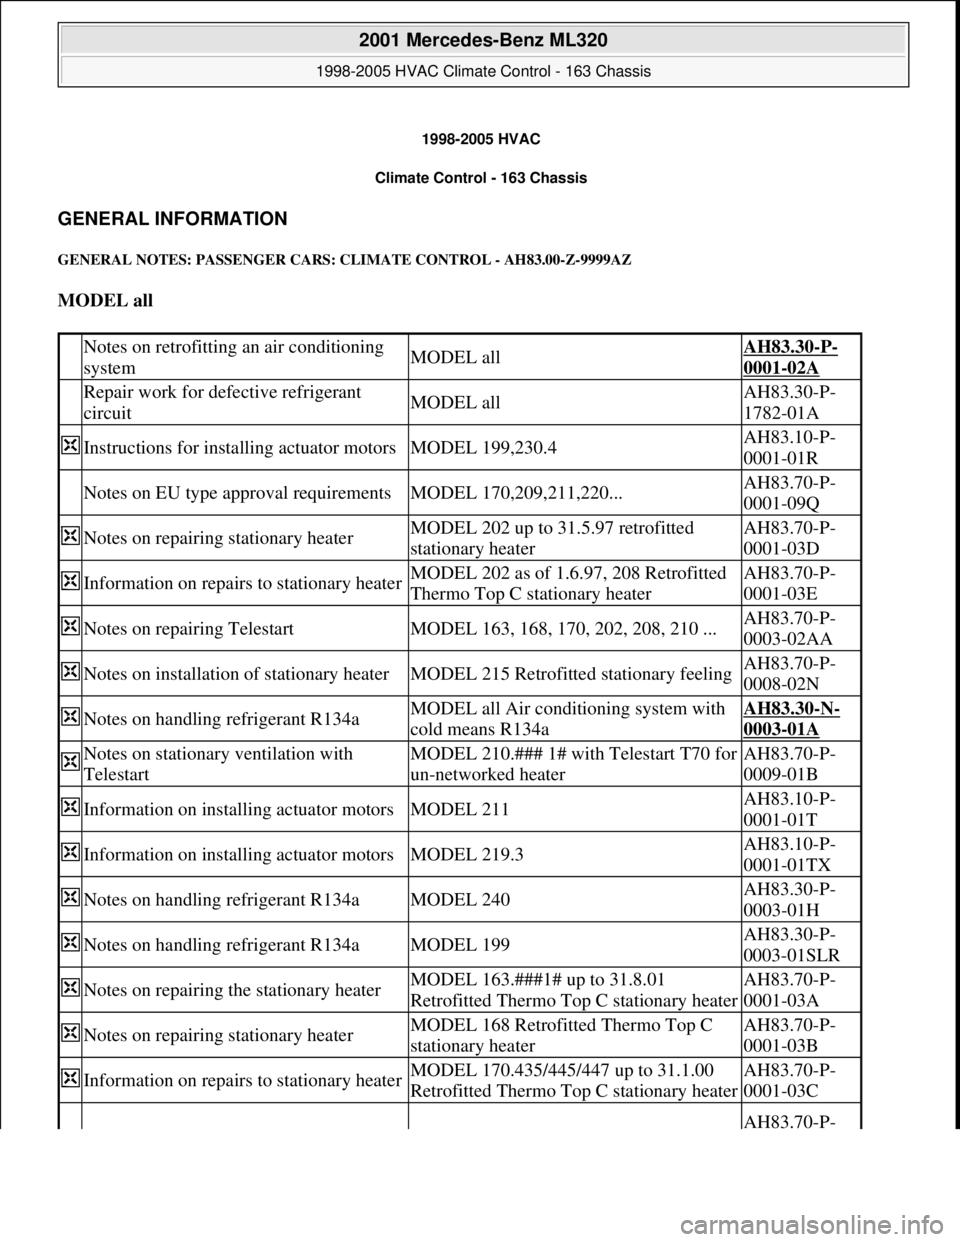
1998-2005 HVAC
Climate Control - 163 Chassis
GENERAL INFORMATION
GENERAL NOTES: PASSENGER CARS: CLIMATE CONTROL - AH83.00-Z-9999AZ
MODEL all
Notes on retrofitting an air conditioning
systemMODEL allAH83.30-P-
0001-02A
Repair work for defective refrigerant
circuitMODEL allAH83.30-P-
1782-01A
Instructions for installing actuator motorsMODEL 199,230.4AH83.10-P-
0001-01R
Notes on EU type approval requirementsMODEL 170,209,211,220...AH83.70-P-
0001-09Q
Notes on repairing stationary heaterMODEL 202 up to 31.5.97 retrofitted
stationary heaterAH83.70-P-
0001-03D
Information on repairs to stationary heaterMODEL 202 as of 1.6.97, 208 Retrofitted
Thermo Top C stationary heaterAH83.70-P-
0001-03E
Notes on repairing TelestartMODEL 163, 168, 170, 202, 208, 210 ...AH83.70-P-
0003-02AA
Notes on installation of stationary heaterMODEL 215 Retrofitted stationary feelingAH83.70-P-
0008-02N
Notes on handling refrigerant R134aMODEL all Air conditioning system with
cold means R134aAH83.30-N-
0003-01A
Notes on stationary ventilation with
TelestartMODEL 210.### 1# with Telestart T70 for
un-networked heaterAH83.70-P-
0009-01B
Information on installing actuator motorsMODEL 211AH83.10-P-
0001-01T
Information on installing actuator motorsMODEL 219.3AH83.10-P-
0001-01TX
Notes on handling refrigerant R134aMODEL 240AH83.30-P-
0003-01H
Notes on handling refrigerant R134aMODEL 199AH83.30-P-
0003-01SLR
Notes on repairing the stationary heaterMODEL 163.###1# up to 31.8.01
Retrofitted Thermo Top C stationary heaterAH83.70-P-
0001-03A
Notes on repairing stationary heaterMODEL 168 Retrofitted Thermo Top C
stationary heaterAH83.70-P-
0001-03B
Information on repairs to stationary heaterMODEL 170.435/445/447 up to 31.1.00
Retrofitted Thermo Top C stationary heaterAH83.70-P-
0001-03C
AH83.70-P-
2001 Mercedes-Benz ML320
1998-2005 HVAC Climate Control - 163 Chassis
2001 Mercedes-Benz ML320
1998-2005 HVAC Climate Control - 163 Chassis
me
Saturday, October 02, 2010 3:23:14 PMPage 1 © 2006 Mitchell Repair Information Company, LLC.
me
Saturday, October 02, 2010 3:24:17 PMPage 1 © 2006 Mitchell Repair Information Company, LLC.
Page 3246 of 4133
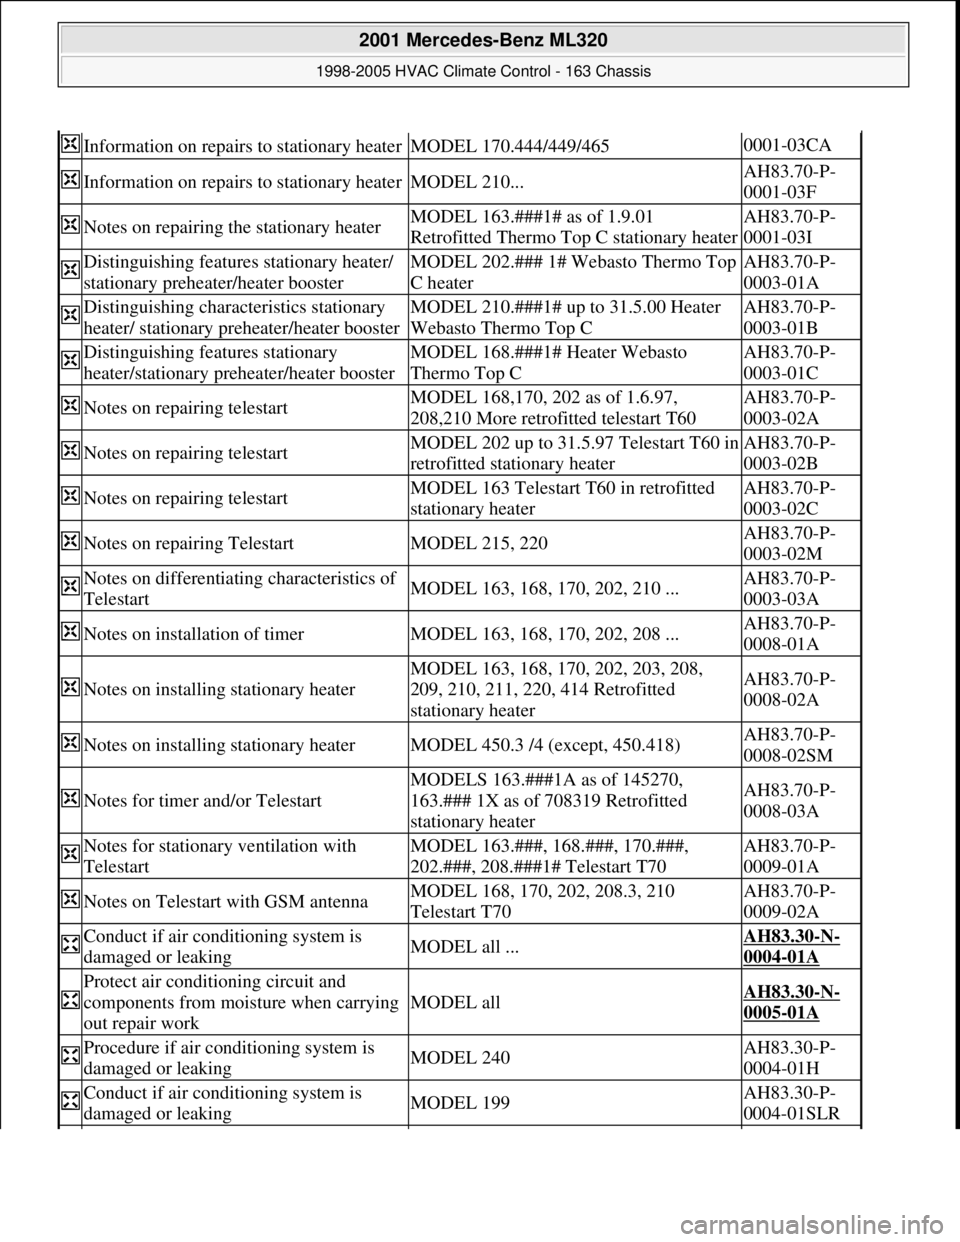
Information on repairs to stationary heaterMODEL 170.444/449/4650001-03CA
Information on repairs to stationary heaterMODEL 210...AH83.70-P-
0001-03F
Notes on repairing the stationary heaterMODEL 163.###1# as of 1.9.01
Retrofitted Thermo Top C stationary heaterAH83.70-P-
0001-03I
Distinguishing features stationary heater/
stationary preheater/heater boosterMODEL 202.### 1# Webasto Thermo Top
C heaterAH83.70-P-
0003-01A
Distinguishing characteristics stationary
heater/ stationary preheater/heater boosterMODEL 210.###1# up to 31.5.00 Heater
Webasto Thermo Top CAH83.70-P-
0003-01B
Distinguishing features stationary
heater/stationary preheater/heater boosterMODEL 168.###1# Heater Webasto
Thermo Top CAH83.70-P-
0003-01C
Notes on repairing telestartMODEL 168,170, 202 as of 1.6.97,
208,210 More retrofitted telestart T60AH83.70-P-
0003-02A
Notes on repairing telestartMODEL 202 up to 31.5.97 Telestart T60 in
retrofitted stationary heaterAH83.70-P-
0003-02B
Notes on repairing telestartMODEL 163 Telestart T60 in retrofitted
stationary heaterAH83.70-P-
0003-02C
Notes on repairing TelestartMODEL 215, 220AH83.70-P-
0003-02M
Notes on differentiating characteristics of
TelestartMODEL 163, 168, 170, 202, 210 ...AH83.70-P-
0003-03A
Notes on installation of timerMODEL 163, 168, 170, 202, 208 ...AH83.70-P-
0008-01A
Notes on installing stationary heater
MODEL 163, 168, 170, 202, 203, 208,
209, 210, 211, 220, 414 Retrofitted
stationary heaterAH83.70-P-
0008-02A
Notes on installing stationary heaterMODEL 450.3 /4 (except, 450.418)AH83.70-P-
0008-02SM
Notes for timer and/or Telestart
MODELS 163.###1A as of 145270,
163.### 1X as of 708319 Retrofitted
stationary heaterAH83.70-P-
0008-03A
Notes for stationary ventilation with
TelestartMODEL 163.###, 168.###, 170.###,
202.###, 208.###1# Telestart T70AH83.70-P-
0009-01A
Notes on Telestart with GSM antennaMODEL 168, 170, 202, 208.3, 210
Telestart T70AH83.70-P-
0009-02A
Conduct if air conditioning system is
damaged or leakingMODEL all ...AH83.30-N-
0004-01A
Protect air conditioning circuit and
components from moisture when carrying
out repair work
MODEL allAH83.30-N-
0005-01A
Procedure if air conditioning system is
damaged or leakingMODEL 240AH83.30-P-
0004-01H
Conduct if air conditioning system is
damaged or leakingMODEL 199AH83.30-P-
0004-01SLR
2001 Mercedes-Benz ML320
1998-2005 HVAC Climate Control - 163 Chassis
me
Saturday, October 02, 2010 3:23:14 PMPage 2 © 2006 Mitchell Repair Information Company, LLC.