1997 MERCEDES-BENZ ML320 retaining bolt
[x] Cancel search: retaining boltPage 3794 of 4133
AR91.10-P-1915GH
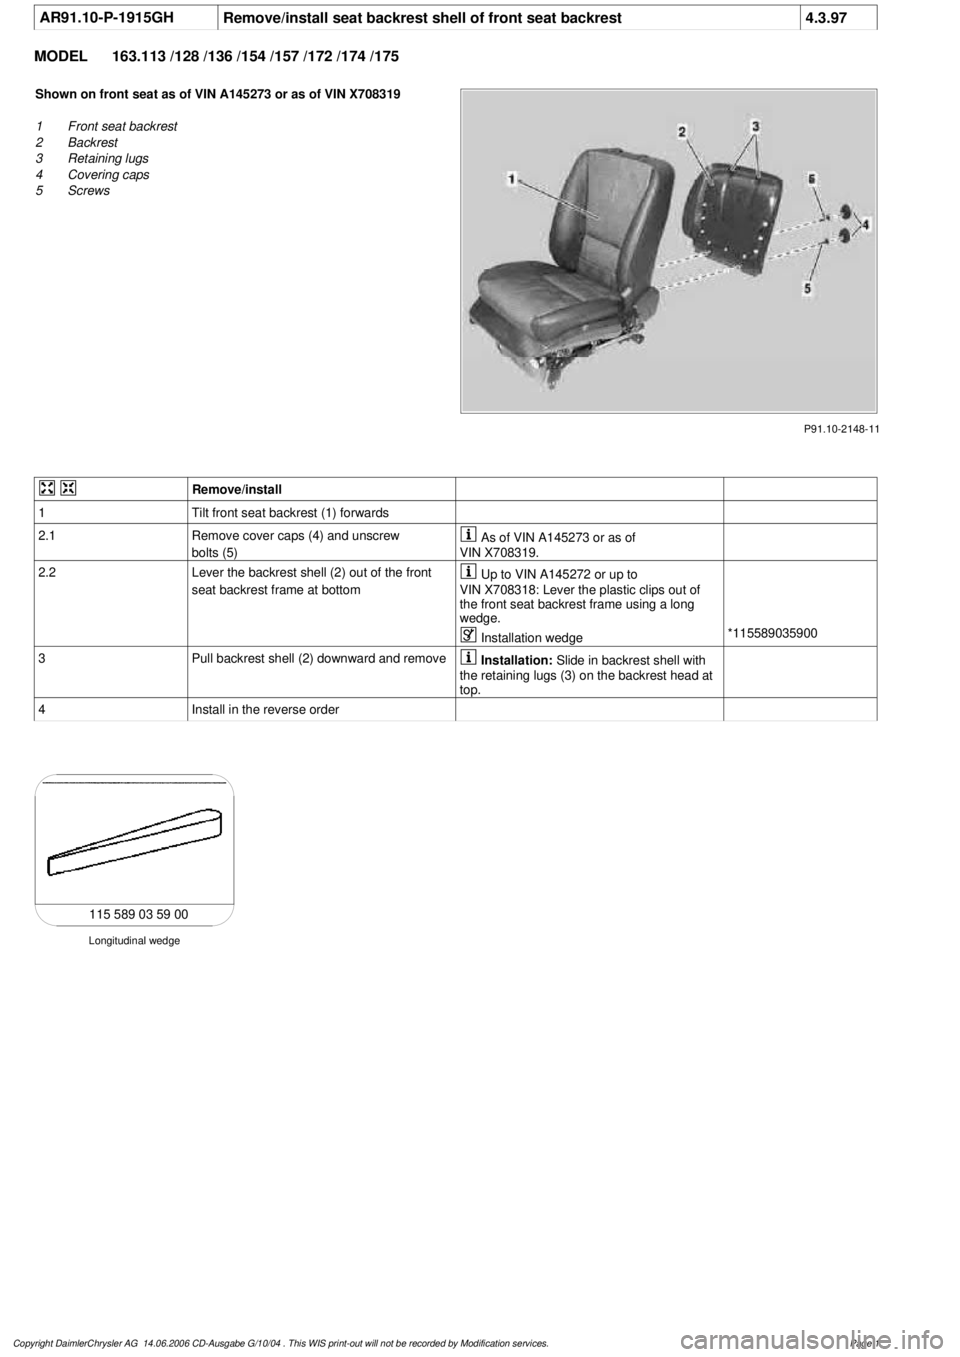
Remove/install seat backrest shell of front seat backrest
4.3.97
MODEL
163.113 /128 /136 /154 /157 /172 /174 /175
P91.10-2148-11
Shown on front seat as of VIN A145273 or as of VIN X708319
1
Front seat backrest
2
Backrest
3
Retaining lugs
4
Covering caps
5
Screws
Remove/install
1
Tilt front seat backrest (1) forwards
2.1
Remove cover caps (4) and unscrew
bolts (5)
As of VIN A145273 or as of
VIN X708319.
2.2
Lever the backrest shell (2) out of the front
seat backrest frame at bottom
Up to VIN A145272 or up to
VIN X708318: Lever the plastic clips out of
the front seat backrest frame using a long
wedge.
Installation wedge
*115589035900
3
Pull backrest shell (2) downward and remove
Installation:
Slide in backrest shell with
the retaining lugs (3) on the backrest head at
top.
4
Install in the reverse order
Longitudinal wedge
115 589 03 59 00
Copyright DaimlerChrysler AG 14.06.2006 CD-Ausgabe G/10/04 . This WIS print-out will not be recorde
d by Modification services.
Page 1
Page 3807 of 4133
AR91.18-P-1850GI
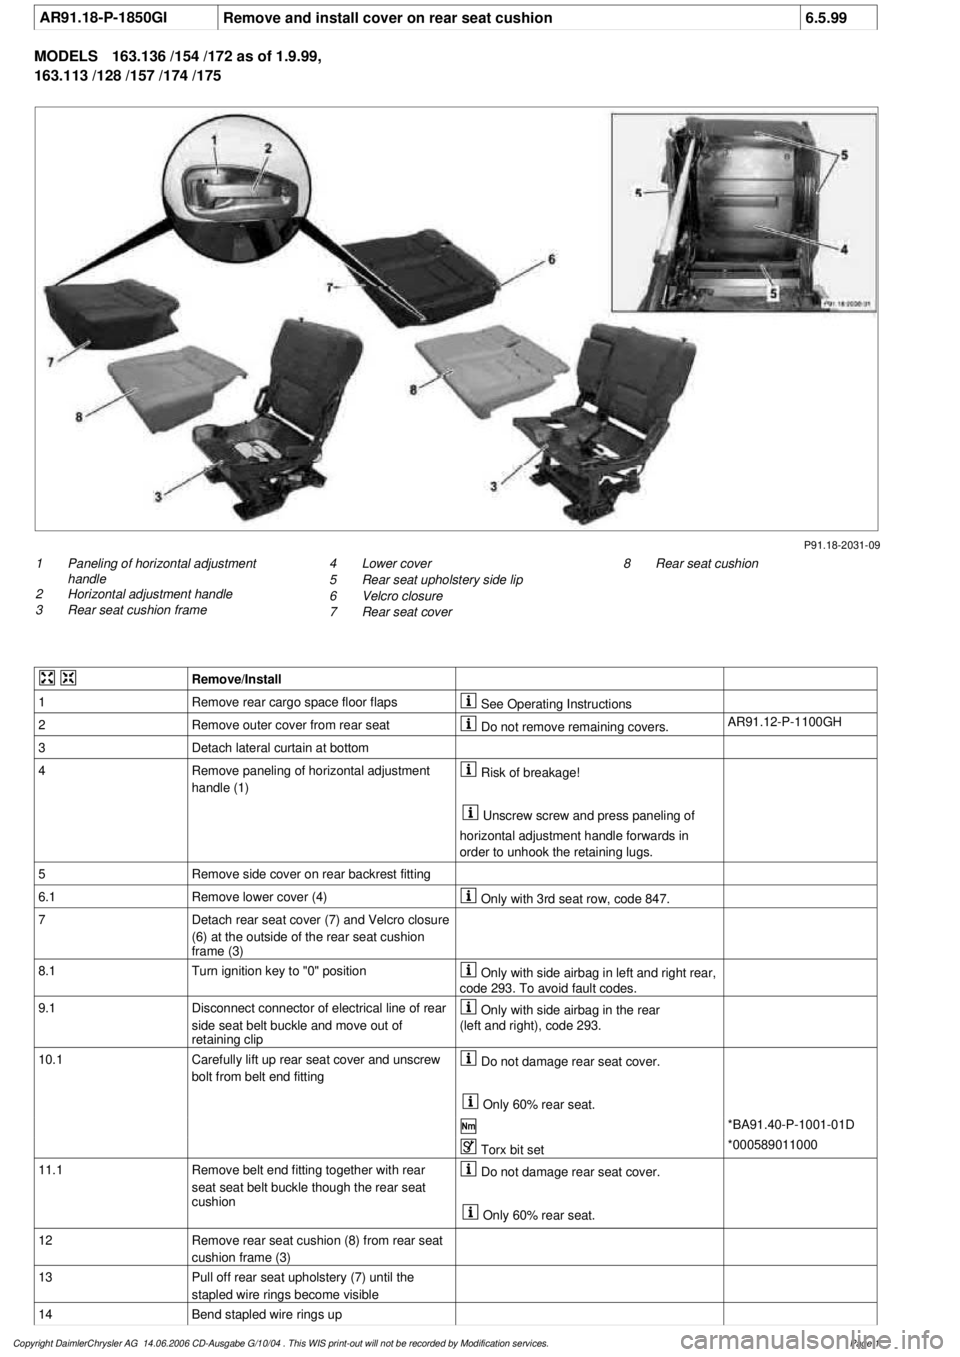
Remove and install cover on rear seat cushion
6.5.99
MODELS
163.136 /154 /172 as of 1.9.99,
163.113 /128 /157 /174 /175
P91.18-2031-09
1
Paneling of horizontal adjustment
handle
2
Horizontal adjustment handle
3
Rear seat cushion frame
8
Rear seat cushion
4
Lower cover
5
Rear seat upholstery side lip
6
Velcro closure
7
Rear seat cover
Remove/Install
1
Remove rear cargo space floor flaps
See Operating Instructions
2
Remove outer cover from rear seat
Do not remove remaining covers.
AR91.12-P-1100GH
3
Detach lateral curtain at bottom
4
Remove paneling of horizontal adjustment
handle (1)
Risk of breakage!
Unscrew screw and press paneling of
horizontal adjustment handle forwards in
order to unhook the retaining lugs.
5
Remove side cover on rear backrest fitting
6.1
Remove lower cover (4)
Only with 3rd seat row, code 847.
7
Detach rear seat cover (7) and Velcro closure
(6) at the outside of the rear seat cushion
frame (3)
8.1
Turn ignition key to "0" position
Only with side airbag in left and right rear,
code 293. To avoid fault codes.
9.1
Disconnect connector of electrical line of rear
side seat belt buckle and move out of
retaining clip
Only with side airbag in the rear
(left and right), code 293.
10.1
Carefully lift up rear seat cover and unscrew
bolt from belt end fitting
Do not damage rear seat cover.
Only 60% rear seat.
*BA91.40-P-1001-01D
Torx bit set
*000589011000
11.1
Remove belt end fitting together with rear
seat seat belt buckle though the rear seat
cushion
Do not damage rear seat cover.
Only 60% rear seat.
12
Remove rear seat cushion (8) from rear seat
cushion frame (3)
13
Pull off rear seat upholstery (7) until the
stapled wire rings become visible
14
Bend stapled wire rings up
Copyright DaimlerChrysler AG 14.06.2006 CD-Ausgabe G/10/04 . This WIS print-out will not be recorde
d by Modification services.
Page 1
Page 3809 of 4133
AR91.12-P-1110GH
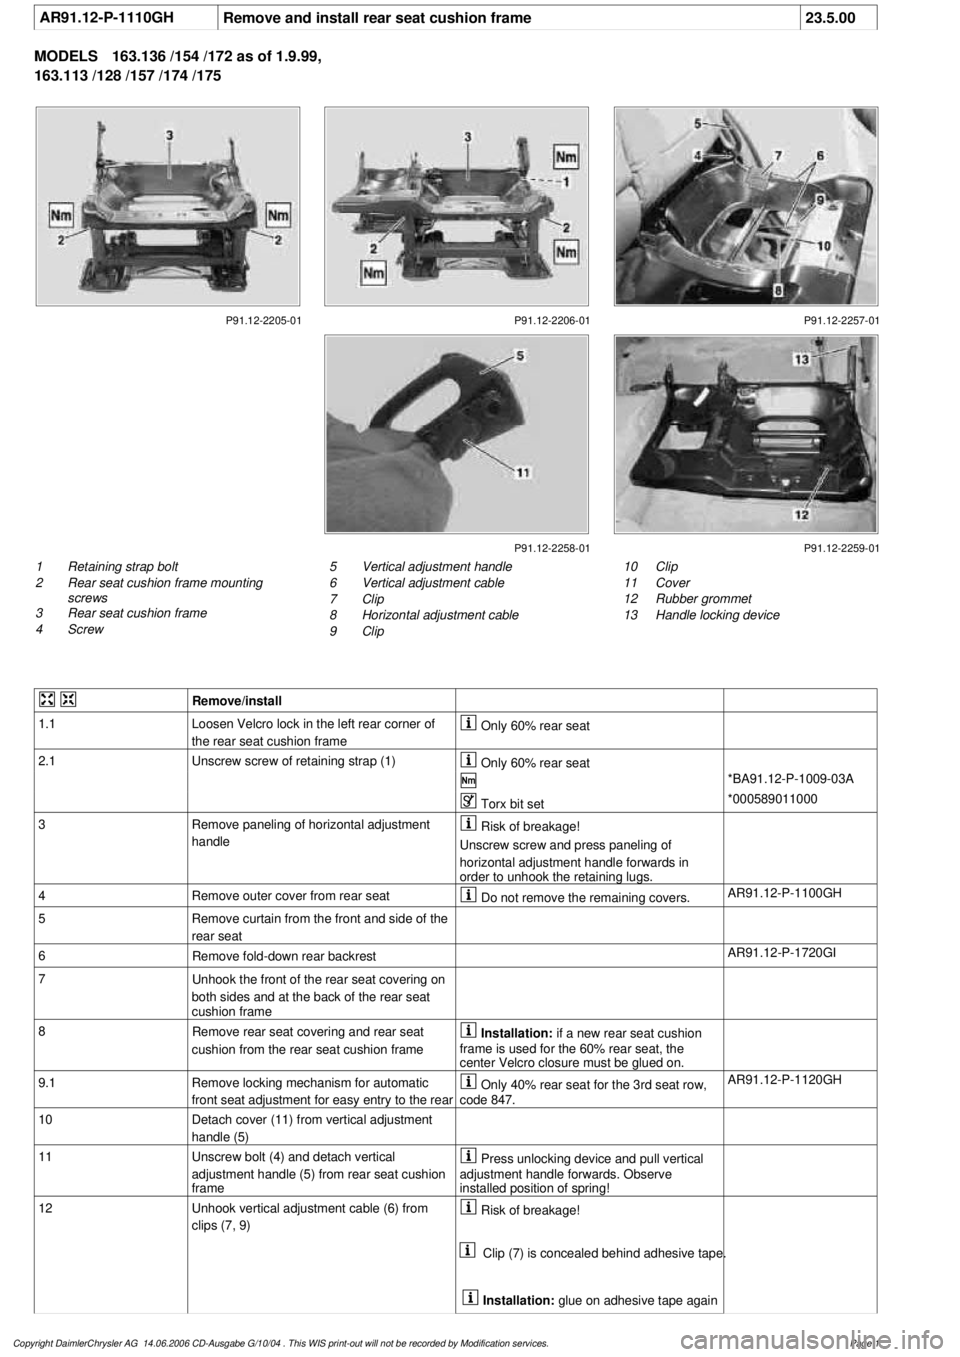
Remove and install rear seat cushion frame
23.5.00
MODELS
163.136 /154 /172 as of 1.9.99,
163.113 /128 /157 /174 /175
P91.12-2205-01 P91.12-2206-01 P91.12-2257-01
P91.12-2258-01 P91.12-2259-01
1
Retaining strap bolt
2
Rear seat cushion frame mounting
screws
3
Rear seat cushion frame
4
Screw
10
Clip
11
Cover
12
Rubber grommet
13
Handle locking device
5
Vertical adjustment handle
6
Vertical adjustment cable
7
Clip
8
Horizontal adjustment cable
9
Clip
Remove/install
1.1
Loosen Velcro lock in the left rear corner of
the rear seat cushion frame
Only 60% rear seat
2.1
Unscrew screw of retaining strap (1)
Only 60% rear seat
*BA91.12-P-1009-03A
Torx bit set
*000589011000
3
Remove paneling of horizontal adjustment
handle
Risk of breakage!
Unscrew screw and press paneling of
horizontal adjustment handle forwards in
order to unhook the retaining lugs.
4
Remove outer cover from rear seat
Do not remove the remaining covers.
AR91.12-P-1100GH
5
Remove curtain from the front and side of the
rear seat
6
Remove fold-down rear backrest
AR91.12-P-1720GI
7
Unhook the front of the rear seat covering on
both sides and at the back of the rear seat
cushion frame
8
Remove rear seat covering and rear seat
cushion from the rear seat cushion frame
Installation:
if a new rear seat cushion
frame is used for the 60% rear seat, the
center Velcro closure must be glued on.
9.1
Remove locking mechanism for automatic
front seat adjustment for easy entry to the rear
Only 40% rear seat for the 3rd seat row,
code 847.
AR91.12-P-1120GH
10
Detach cover (11) from vertical adjustment
handle (5)
11
Unscrew bolt (4) and detach vertical
adjustment handle (5) from rear seat cushion
frame
Press unlocking device and pull vertical
adjustment handle forwards. Observe
installed position of spring!
12
Unhook vertical adjustment cable (6) from
clips (7, 9)
Risk of breakage!
Clip (7) is concealed behind adhesive tape.
Installation:
glue on adhesive tape again
Copyright DaimlerChrysler AG 14.06.2006 CD-Ausgabe G/10/04 . This WIS print-out will not be recorde
d by Modification services.
Page 1
Page 3813 of 4133
AR91.12-P-1720GI
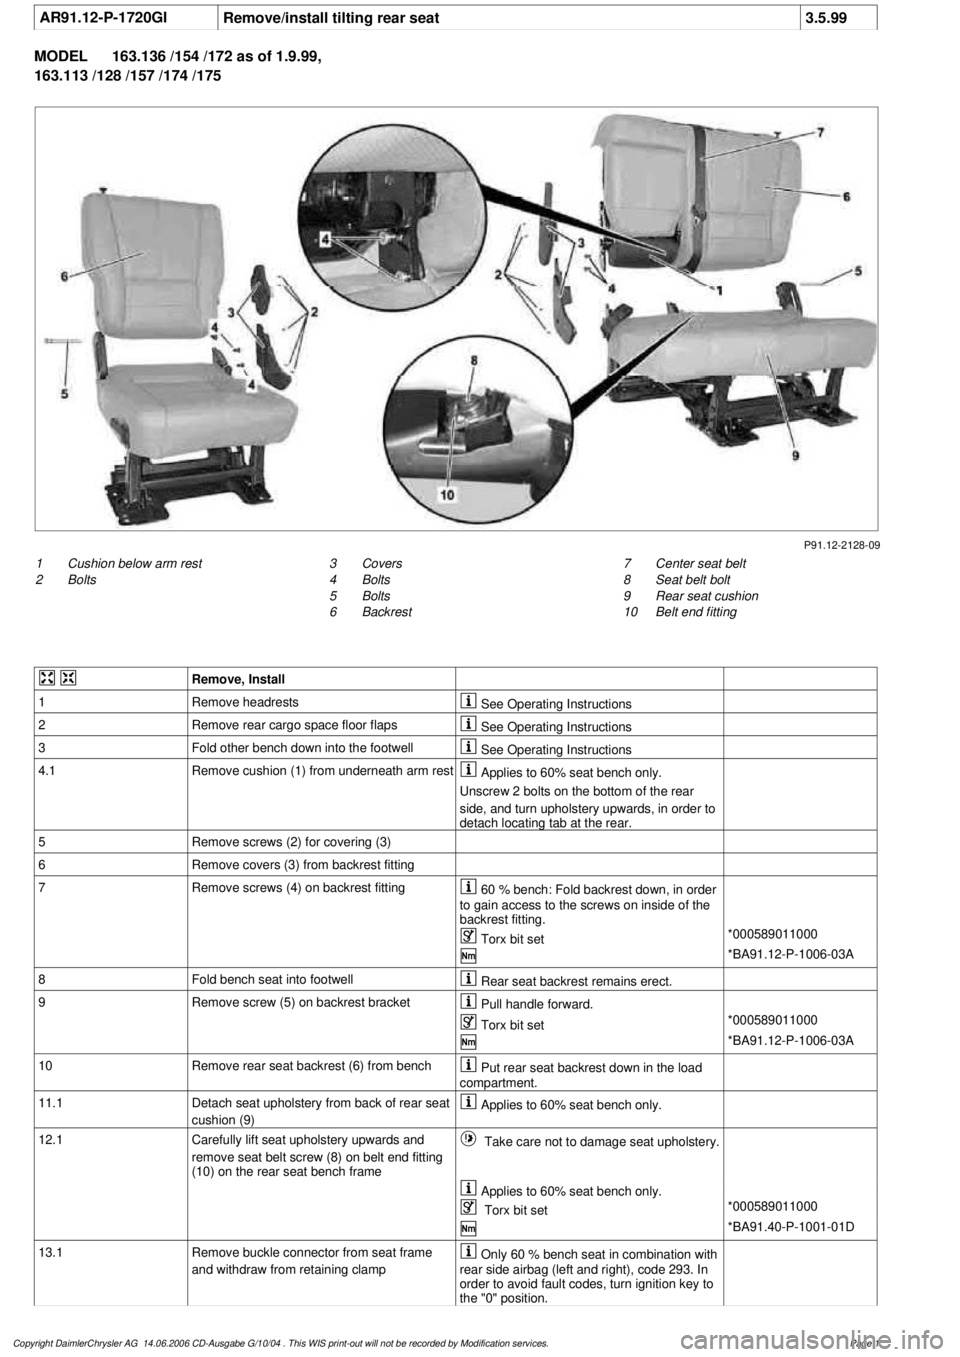
Remove/install tilting rear seat
3.5.99
MODEL
163.136 /154 /172 as of 1.9.99,
163.113 /128 /157 /174 /175
P91.12-2128-09
1
Cushion below arm rest
2
Bolts
7
Center seat belt
8
Seat belt bolt
9
Rear seat cushion
10
Belt end fitting
3
Covers
4
Bolts
5
Bolts
6
Backrest
Remove, Install
1
Remove headrests
See Operating Instructions
2
Remove rear cargo space floor flaps
See Operating Instructions
3
Fold other bench down into the footwell
See Operating Instructions
4.1
Remove cushion (1) from underneath arm rest
Applies to 60% seat bench only.
Unscrew 2 bolts on the bottom of the rear
side, and turn upholstery upwards, in order to
detach locating tab at the rear.
5
Remove screws (2) for covering (3)
6
Remove covers (3) from backrest fitting
7
Remove screws (4) on backrest fitting
60 % bench: Fold backrest down, in order
to gain access to the screws on inside of the
backrest fitting.
Torx bit set
*000589011000
*BA91.12-P-1006-03A
8
Fold bench seat into footwell
Rear seat backrest remains erect.
9
Remove screw (5) on backrest bracket
Pull handle forward.
Torx bit set
*000589011000
*BA91.12-P-1006-03A
10
Remove rear seat backrest (6) from bench
Put rear seat backrest down in the load
compartment.
11.1
Detach seat upholstery from back of rear seat
cushion (9)
Applies to 60% seat bench only.
12.1
Carefully lift seat upholstery upwards and
remove seat belt screw (8) on belt end fitting
(10) on the rear seat bench frame
Take care not to damage seat upholstery.
Applies to 60% seat bench only.
Torx bit set
*000589011000
*BA91.40-P-1001-01D
13.1
Remove buckle connector from seat frame
and withdraw from retaining clamp
Only 60 % bench seat in combination with
rear side airbag (left and right), code 293. In
order to avoid fault codes, turn ignition key to
the "0" position.
Copyright DaimlerChrysler AG 14.06.2006 CD-Ausgabe G/10/04 . This WIS print-out will not be recorde
d by Modification services.
Page 1
Page 3824 of 4133
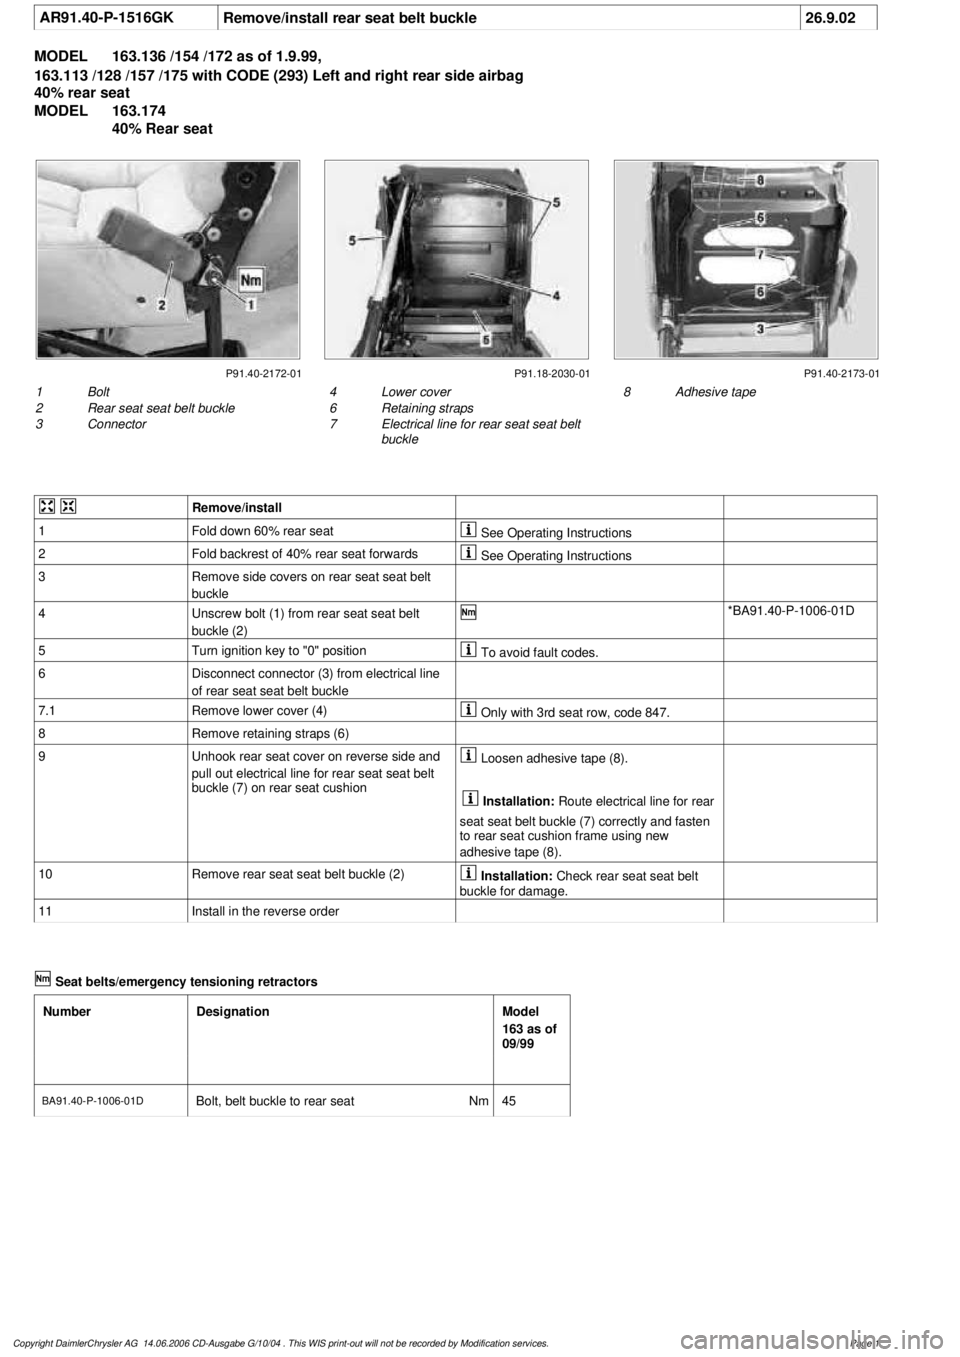
AR91.40-P-1516GK
Remove/install rear seat belt buckle
26.9.02
MODEL
163.136 /154 /172 as of 1.9.99,
163.113 /128 /157 /175 with CODE (293) Left and right rear side airbag
40% rear seat
MODEL
163.174
40% Rear seat
P91.40-2172-01 P91.18-2030-01 P91.40-2173-01
1
Bolt
2
Rear seat seat belt buckle
3
Connector
8
Adhesive tape
4
Lower cover
6
Retaining straps
7
Electrical line for rear seat seat belt
buckle
Remove/install
1
Fold down 60% rear seat
See Operating Instructions
2
Fold backrest of 40% rear seat forwards
See Operating Instructions
3
Remove side covers on rear seat seat belt
buckle
4
Unscrew bolt (1) from rear seat seat belt
buckle (2)
*BA91.40-P-1006-01D
5
Turn ignition key to "0" position
To avoid fault codes.
6
Disconnect connector (3) from electrical line
of rear seat seat belt buckle
7.1
Remove lower cover (4)
Only with 3rd seat row, code 847.
8
Remove retaining straps (6)
9
Unhook rear seat cover on reverse side and
pull out electrical line for rear seat seat belt
buckle (7) on rear seat cushion
Loosen adhesive tape (8).
Installation:
Route electrical line for rear
seat seat belt buckle (7) correctly and fasten
to rear seat cushion frame using new
adhesive tape (8).
10
Remove rear seat seat belt buckle (2)
Installation:
Check rear seat seat belt
buckle for damage.
11
Install in the reverse order
Seat belts/emergency tensioning retractors
Number
Designation
Model
163 as of
09/99
BA91.40-P-1006-01D
Bolt, belt buckle to rear seat
Nm
45
Copyright DaimlerChrysler AG 14.06.2006 CD-Ausgabe G/10/04 . This WIS print-out will not be recorde
d by Modification services.
Page 1
Page 3838 of 4133
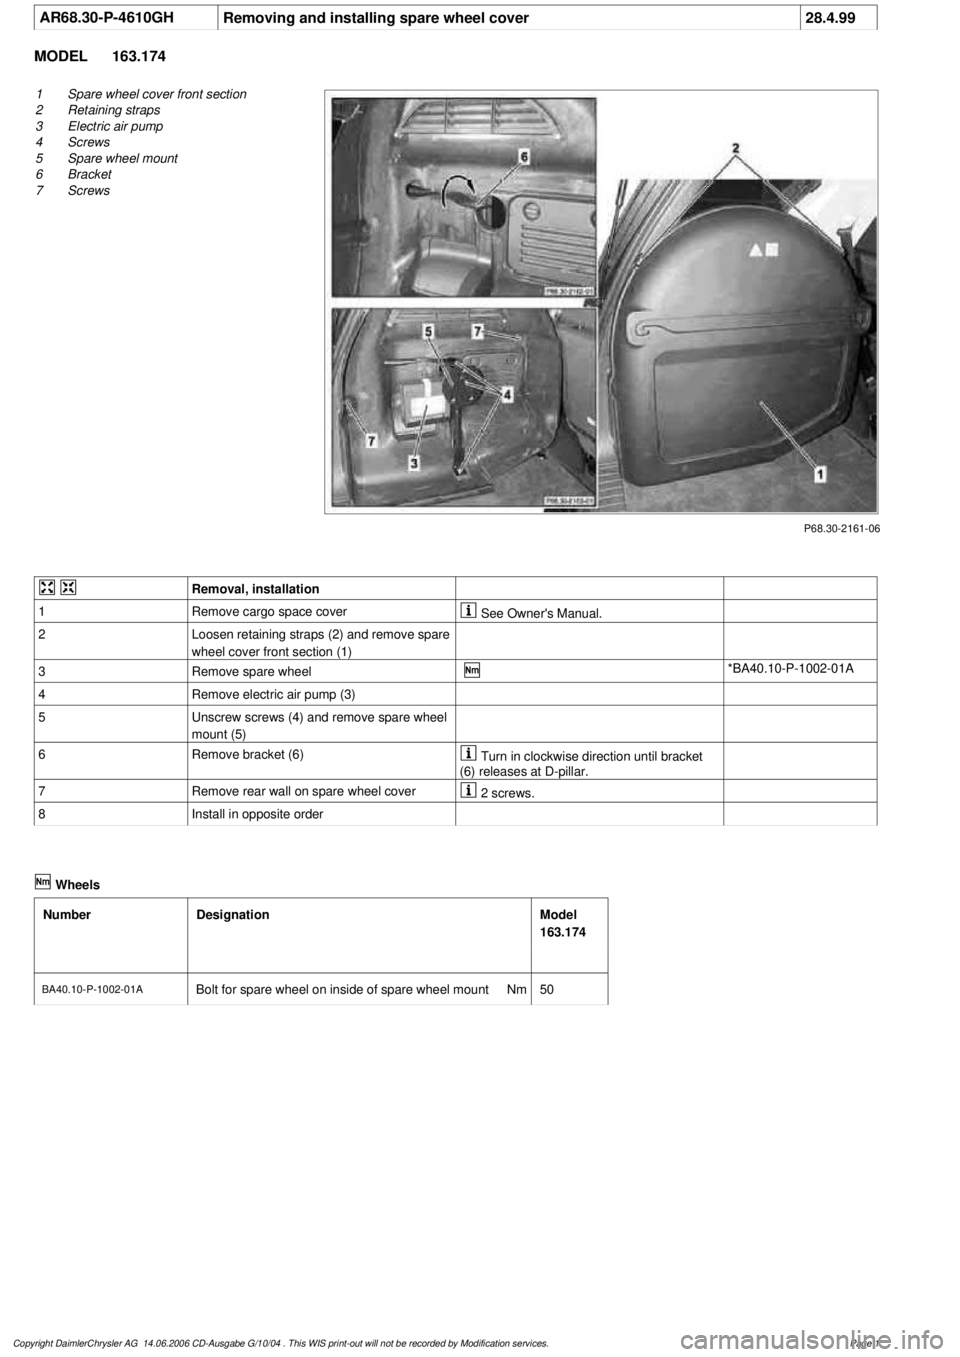
AR68.30-P-4610GH
Removing and installing spare wheel cover
28.4.99
MODEL
163.174
P68.30-2161-06
1
Spare wheel cover front section
2
Retaining straps
3
Electric air pump
4
Screws
5
Spare wheel mount
6
Bracket
7
Screws
Removal, installation
1
Remove cargo space cover
See Owner's Manual.
2
Loosen retaining straps (2) and remove spare
wheel cover front section (1)
3
Remove spare wheel
*BA40.10-P-1002-01A
4
Remove electric air pump (3)
5
Unscrew screws (4) and remove spare wheel
mount (5)
6
Remove bracket (6)
Turn in clockwise direction until bracket
(6) releases at D-pillar.
7
Remove rear wall on spare wheel cover
2 screws.
8
Install in opposite order
Wheels
Number
Designation
Model
163.174
BA40.10-P-1002-01A
Bolt for spare wheel on inside of spare wheel mount
Nm
50
Copyright DaimlerChrysler AG 14.06.2006 CD-Ausgabe G/10/04 . This WIS print-out will not be recorde
d by Modification services.
Page 1
Page 3839 of 4133
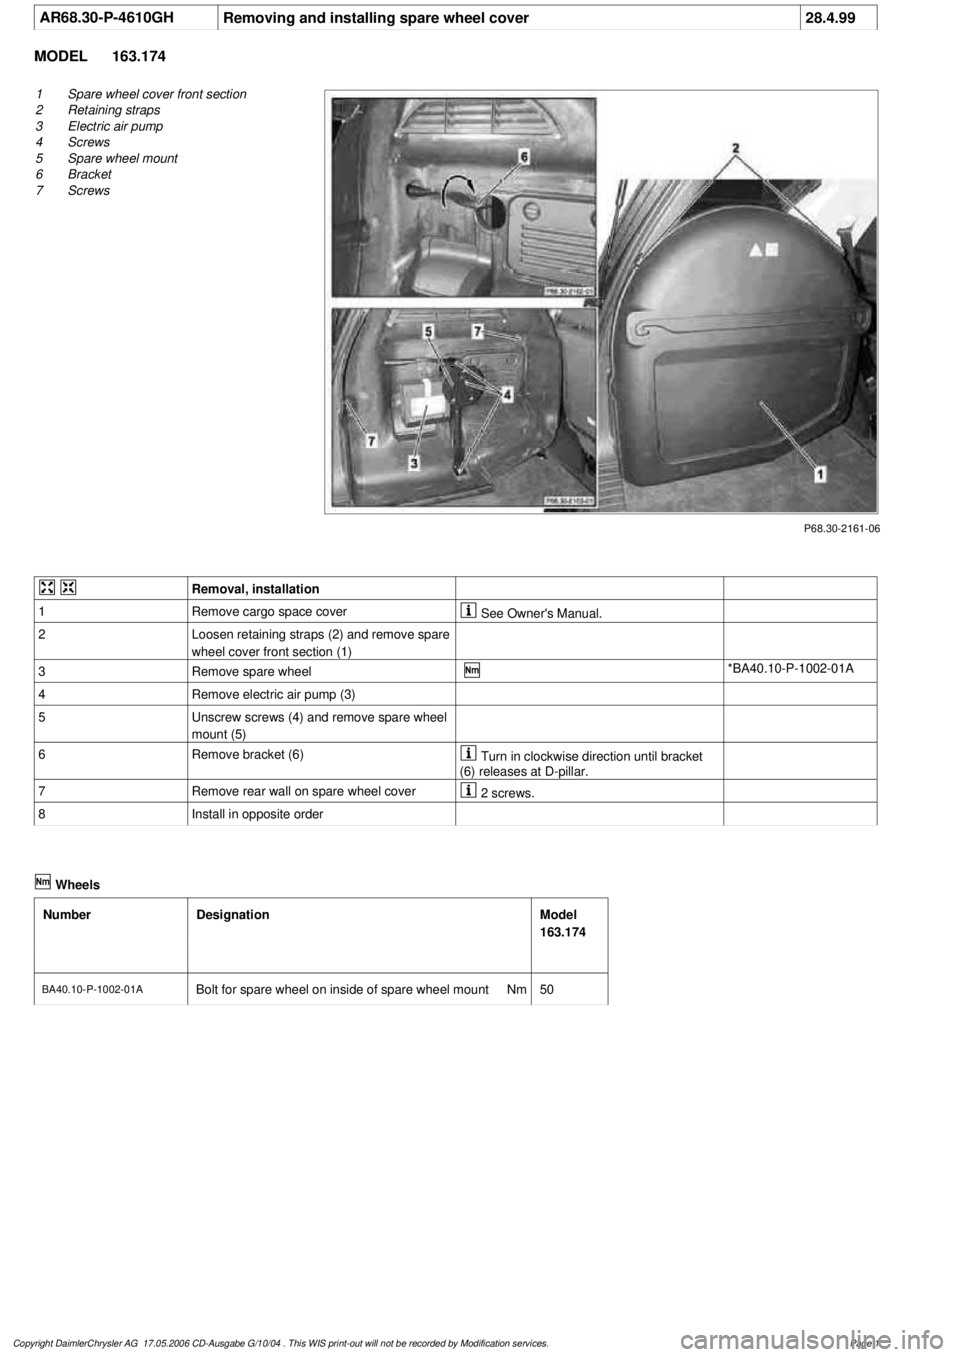
AR68.30-P-4610GH
Removing and installing spare wheel cover
28.4.99
MODEL
163.174
P68.30-2161-06
1
Spare wheel cover front section
2
Retaining straps
3
Electric air pump
4
Screws
5
Spare wheel mount
6
Bracket
7
Screws
Removal, installation
1
Remove cargo space cover
See Owner's Manual.
2
Loosen retaining straps (2) and remove spare
wheel cover front section (1)
3
Remove spare wheel
*BA40.10-P-1002-01A
4
Remove electric air pump (3)
5
Unscrew screws (4) and remove spare wheel
mount (5)
6
Remove bracket (6)
Turn in clockwise direction until bracket
(6) releases at D-pillar.
7
Remove rear wall on spare wheel cover
2 screws.
8
Install in opposite order
Wheels
Number
Designation
Model
163.174
BA40.10-P-1002-01A
Bolt for spare wheel on inside of spare wheel mount
Nm
50
Copyright DaimlerChrysler AG 17.05.2006 CD-Ausgabe G/10/04 . This WIS print-out will not be recorde
d by Modification services.
Page 1
Page 3840 of 4133
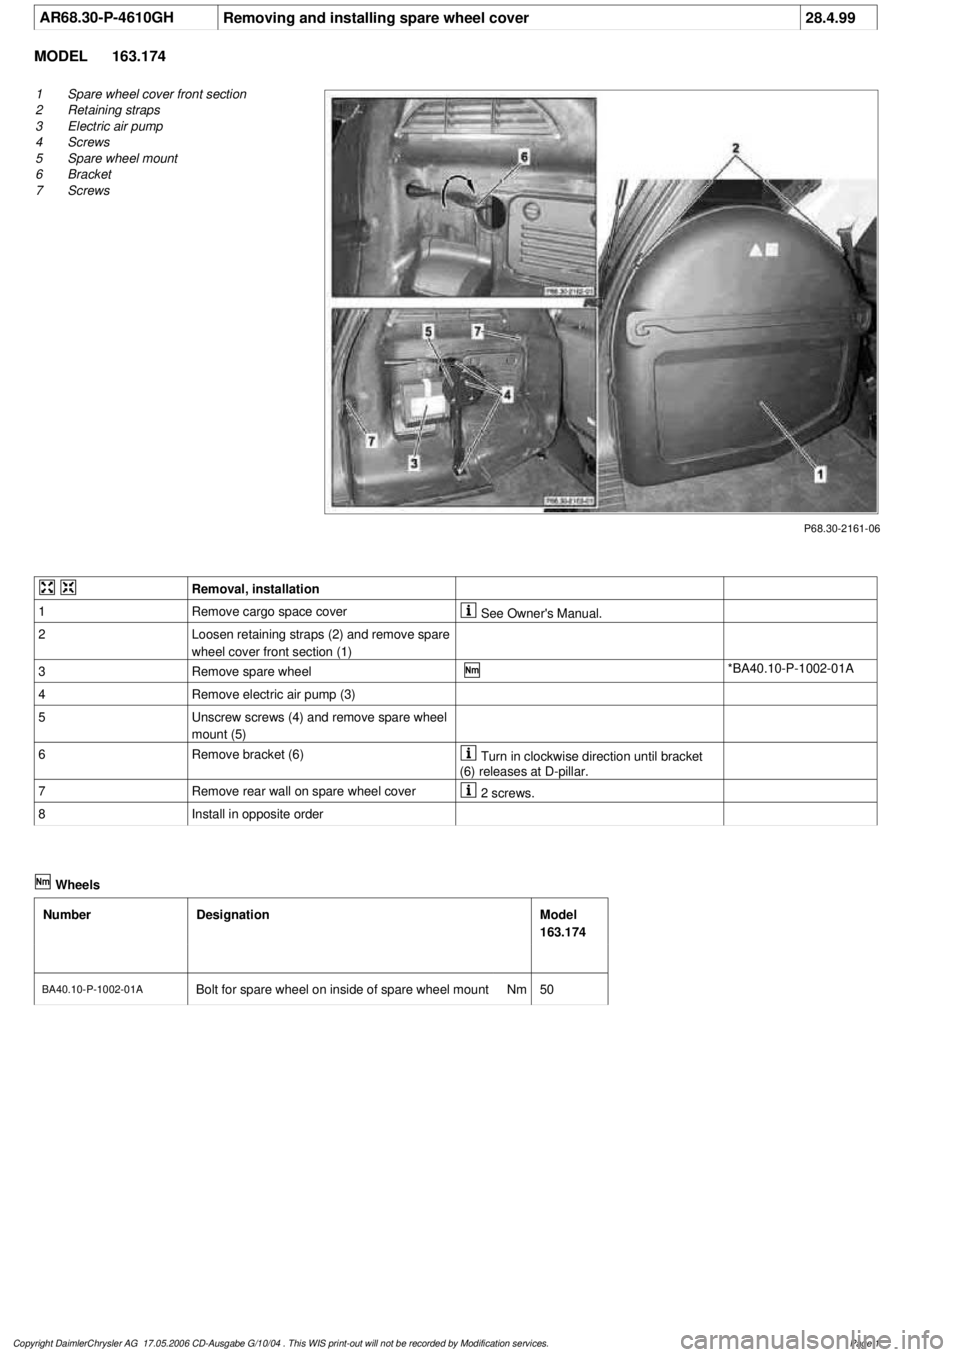
AR68.30-P-4610GH
Removing and installing spare wheel cover
28.4.99
MODEL
163.174
P68.30-2161-06
1
Spare wheel cover front section
2
Retaining straps
3
Electric air pump
4
Screws
5
Spare wheel mount
6
Bracket
7
Screws
Removal, installation
1
Remove cargo space cover
See Owner's Manual.
2
Loosen retaining straps (2) and remove spare
wheel cover front section (1)
3
Remove spare wheel
*BA40.10-P-1002-01A
4
Remove electric air pump (3)
5
Unscrew screws (4) and remove spare wheel
mount (5)
6
Remove bracket (6)
Turn in clockwise direction until bracket
(6) releases at D-pillar.
7
Remove rear wall on spare wheel cover
2 screws.
8
Install in opposite order
Wheels
Number
Designation
Model
163.174
BA40.10-P-1002-01A
Bolt for spare wheel on inside of spare wheel mount
Nm
50
Copyright DaimlerChrysler AG 17.05.2006 CD-Ausgabe G/10/04 . This WIS print-out will not be recorde
d by Modification services.
Page 1