1997 MAZDA MIATA power steering
[x] Cancel search: power steeringPage 310 of 514
A/C-HEATER SYSTEM - MANUAL
1997 Manual A/C-Heater System
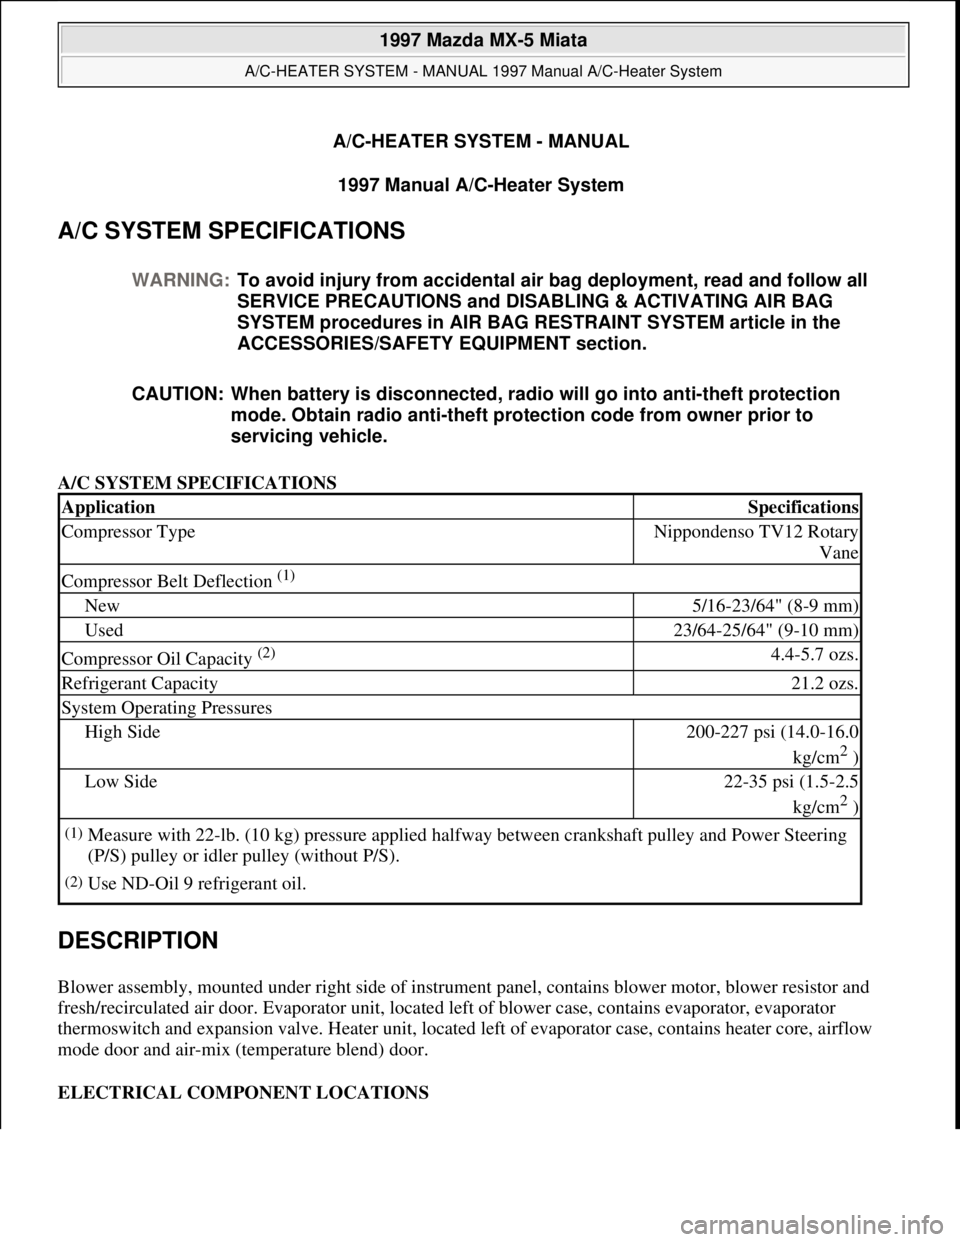
A/C SYSTEM SPECIFICATIONS
A/C SYSTEM SPECIFICATIONS
DESCRIPTION
Blower assembly, mounted under right side of instrument panel, contains blower motor, blower resistor and
fresh/recirculated air door. Evaporator unit, located left of blower case, contains evaporator, evaporator
thermoswitch and expansion valve. Heater unit, located left of evaporator case, contains heater core, airflow
mode door and air-mix (temperature blend) door.
ELECTRICAL COMPONENT LOCATIONS WARNING:To avoid injury from accidental air bag deployment, read and follow all
SERVICE PRECAUTIONS and DISABLING & ACTIVATING AIR BAG
SYSTEM procedures in AIR BAG RESTRAINT SYSTEM article in the
ACCESSORIES/SAFETY EQUIPMENT section.
CAUTION: When battery is disconnected, radio will go into anti-theft protection
mode. Obtain radio anti-theft protection code from owner prior to
servicing vehicle.
ApplicationSpecifications
Compressor TypeNippondenso TV12 Rotary
Vane
Compressor Belt Deflection (1)
New5/16-23/64" (8-9 mm)
Used23/64-25/64" (9-10 mm)
Compressor Oil Capacity (2) 4.4-5.7 ozs.
Refrigerant Capacity21.2 ozs.
System Operating Pressures
High Side200-227 psi (14.0-16.0
kg/cm
2 )
Low Side22-35 psi (1.5-2.5
kg/cm
2 )
(1)Measure with 22-lb. (10 kg) pressure applied halfway between crankshaft pulley and Power Steering
(P/S) pulley or idler pulley (without P/S).
(2)Use ND-Oil 9 refrigerant oil.
1997 Mazda MX-5 Miata
A/C-HEATER SYSTEM - MANUAL 1997 Manual A/C-Heater System
1997 Mazda MX-5 Miata
A/C-HEATER SYSTEM - MANUAL 1997 Manual A/C-Heater System
Microsoft
Sunday, July 05, 2009 1:41:48 PMPage 1 © 2005 Mitchell Repair Information Company, LLC.
Microsoft
Sunday, July 05, 2009 1:41:59 PMPage 1 © 2005 Mitchell Repair Information Company, LLC.
Page 336 of 514
STEERING SYSTEM - POWER RACK & PINION
1997 STEERING Mazda Power Rack & Pinion
DESCRIPTION
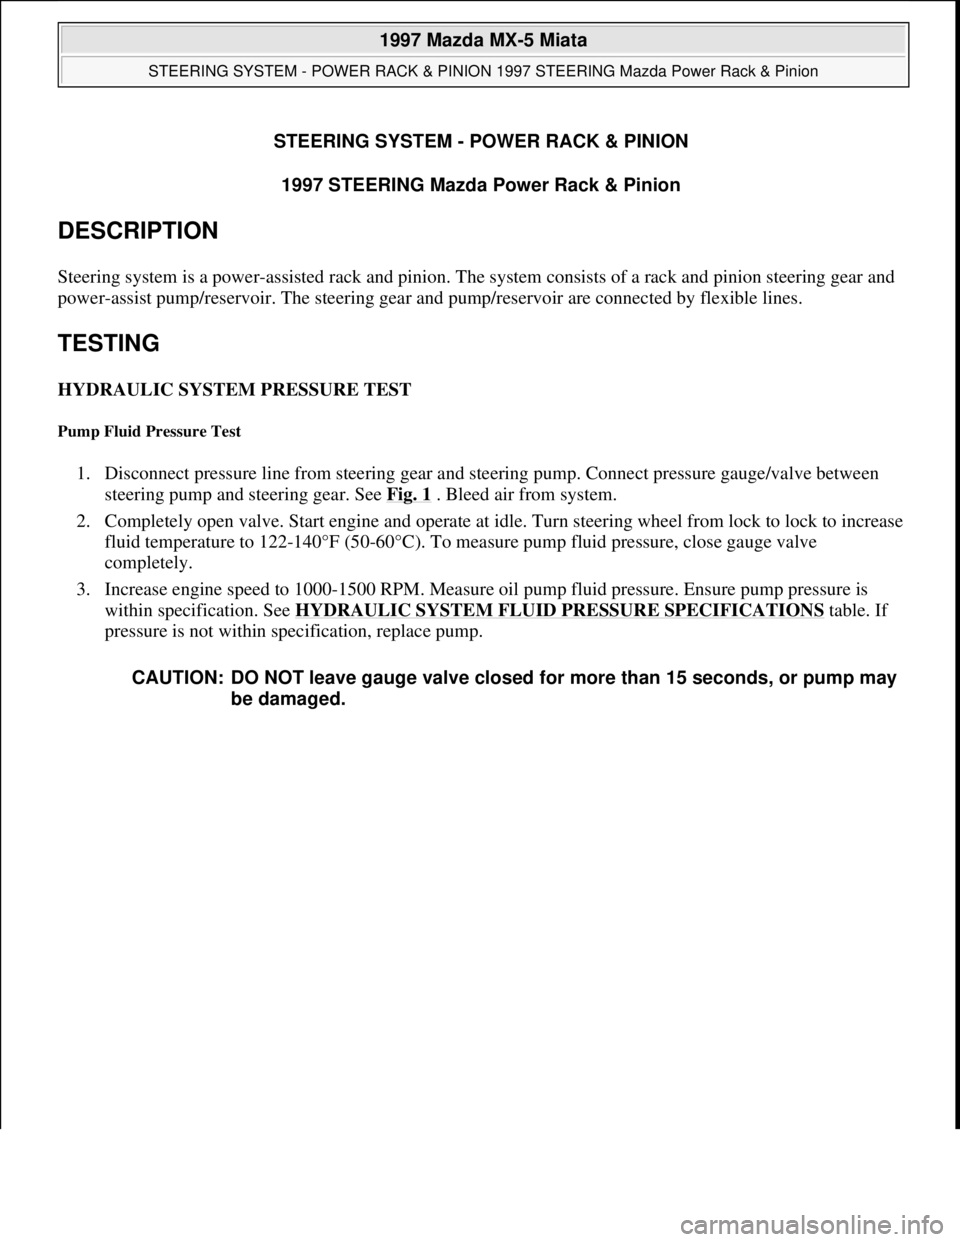
Steering system is a power-assisted rack and pinion. The system consists of a rack and pinion steering gear and
power-assist pump/reservoir. The steering gear and pump/reservoir are connected by flexible lines.
TESTING
HYDRAULIC SYSTEM PRESSURE TEST
Pump Fluid Pressure Test
1. Disconnect pressure line from steering gear and steering pump. Connect pressure gauge/valve between
steering pump and steering gear. See Fig. 1
. Bleed air from system.
2. Completely open valve. Start engine and operate at idle. Turn steering wheel from lock to lock to increase
fluid temperature to 122-140°F (50-60°C). To measure pump fluid pressure, close gauge valve
completely.
3. Increase engine speed to 1000-1500 RPM. Measure oil pump fluid pressure. Ensure pump pressure is
within specification. See HYDRAULIC SYSTEM FLUID PRESSURE SPECIFICATIONS
table. If
pressure is not within specification, replace pump.
CAUTION: DO NOT leave gauge valve closed for more than 15 seconds, or pump may
be damaged.
1997 Mazda MX-5 Miata
STEERING SYSTEM - POWER RACK & PINION 1997 STEERING Mazda Power Rack & Pinion
1997 Mazda MX-5 Miata
STEERING SYSTEM - POWER RACK & PINION 1997 STEERING Mazda Power Rack & Pinion
Microsoft
Sunday, July 05, 2009 1:39:26 PMPage 1 © 2005 Mitchell Repair Information Company, LLC.
Microsoft
Sunday, July 05, 2009 1:39:30 PMPage 1 © 2005 Mitchell Repair Information Company, LLC.
Page 337 of 514
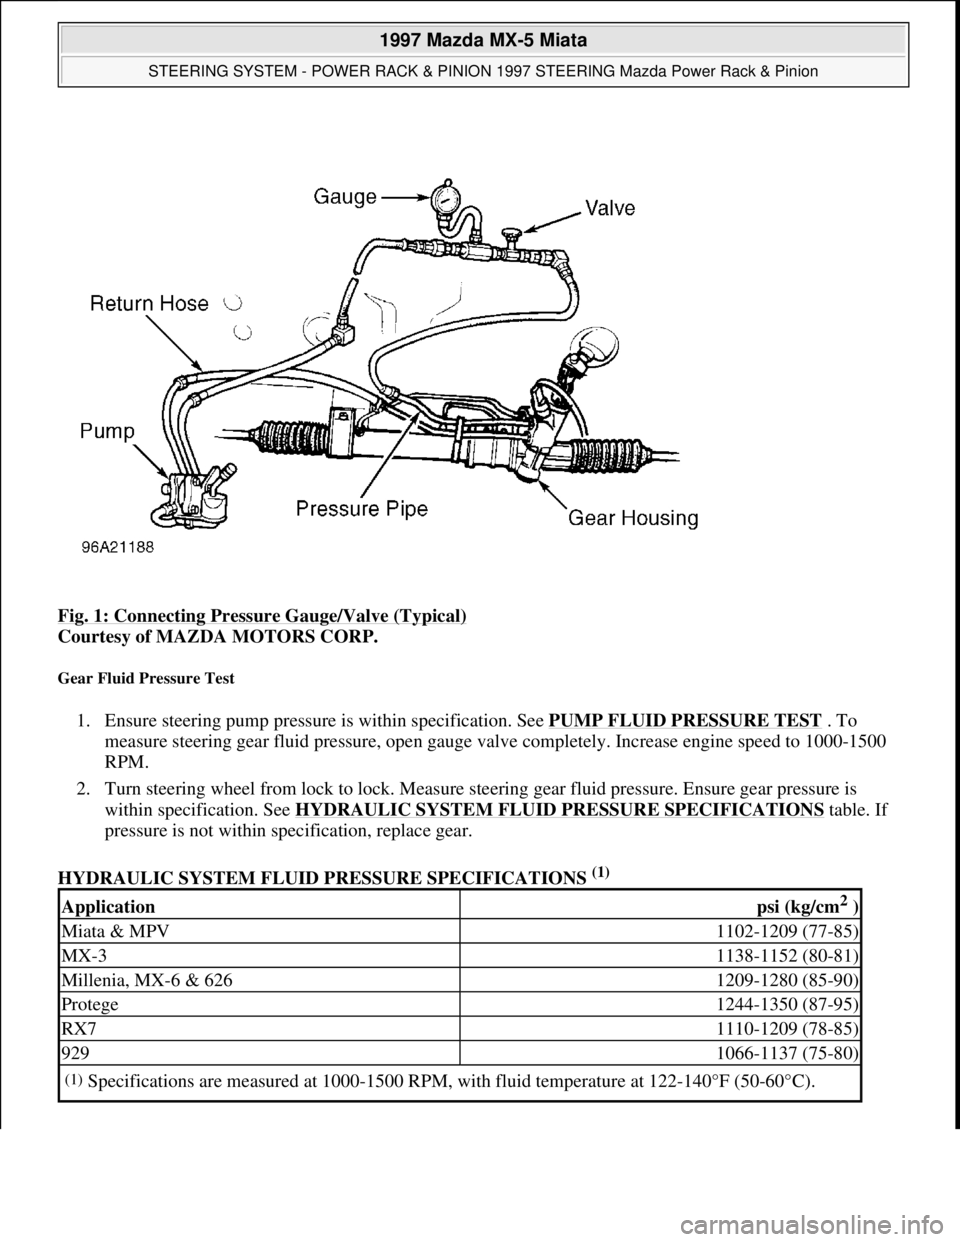
Fig. 1: Connecting Pressure Gauge/Valve (Typical)
Courtesy of MAZDA MOTORS CORP.
Gear Fluid Pressure Test
1. Ensure steering pump pressure is within specification. See PUMP FLUID PRESSURE TEST . To
measure steering gear fluid pressure, open gauge valve completely. Increase engine speed to 1000-1500
RPM.
2. Turn steering wheel from lock to lock. Measure steering gear fluid pressure. Ensure gear pressure is
within specification. See HYDRAULIC SYSTEM FLUID PRESSURE SPECIFICATIONS
table. If
pressure is not within specification, replace gear.
HYDRAULIC SYSTEM FLUID PRESSURE SPECIFICATIONS
(1)
Applicationpsi (kg/cm2 )
Miata & MPV1102-1209 (77-85)
MX-31138-1152 (80-81)
Millenia, MX-6 & 6261209-1280 (85-90)
Protege1244-1350 (87-95)
RX71110-1209 (78-85)
9291066-1137 (75-80)
(1)Specifications are measured at 1000-1500 RPM, with fluid temperature at 122-140°F (50-60°C).
1997 Mazda MX-5 Miata
STEERING SYSTEM - POWER RACK & PINION 1997 STEERING Mazda Power Rack & Pinion
Microsoft
Sunday, July 05, 2009 1:39:26 PMPage 2 © 2005 Mitchell Repair Information Company, LLC.
Page 338 of 514
LUBRICATION
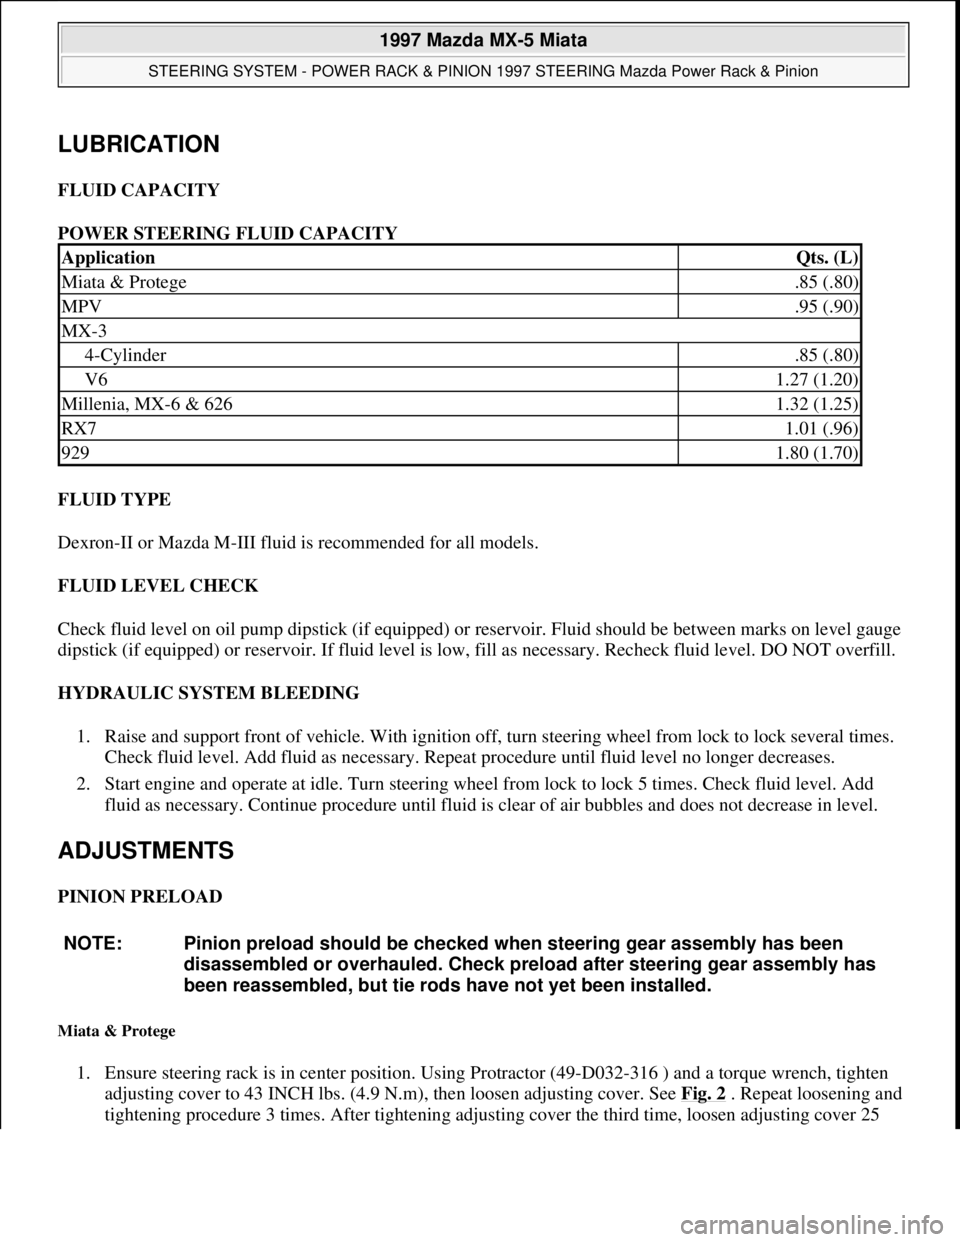
FLUID CAPACITY
POWER STEERING FLUID CAPACITY
FLUID TYPE
Dexron-II or Mazda M-III fluid is recommended for all models.
FLUID LEVEL CHECK
Check fluid level on oil pump dipstick (if equipped) or reservoir. Fluid should be between marks on level gauge
dipstick (if equipped) or reservoir. If fluid level is low, fill as necessary. Recheck fluid level. DO NOT overfill.
HYDRAULIC SYSTEM BLEEDING
1. Raise and support front of vehicle. With ignition off, turn steering wheel from lock to lock several times.
Check fluid level. Add fluid as necessary. Repeat procedure until fluid level no longer decreases.
2. Start engine and operate at idle. Turn steering wheel from lock to lock 5 times. Check fluid level. Add
fluid as necessary. Continue procedure until fluid is clear of air bubbles and does not decrease in level.
ADJUSTMENTS
PINION PRELOAD
Miata & Protege
1. Ensure steering rack is in center position. Using Protractor (49-D032-316 ) and a torque wrench, tighten
adjusting cover to 43 INCH lbs. (4.9 N.m), then loosen adjusting cover. See Fig. 2
. Repeat loosening and
ti
ghtening procedure 3 times. After tightening adjusting cover the third time, loosen adjusting cover 25
ApplicationQts. (L)
Miata & Protege.85 (.80)
MPV.95 (.90)
MX-3
4-Cylinder.85 (.80)
V61.27 (1.20)
Millenia, MX-6 & 6261.32 (1.25)
RX71.01 (.96)
9291.80 (1.70)
NOTE: Pinion preload should be checked when steering gear assembly has been
disassembled or overhauled. Check preload after steering gear assembly has
been reassembled, but tie rods have not yet been installed.
1997 Mazda MX-5 Miata
STEERING SYSTEM - POWER RACK & PINION 1997 STEERING Mazda Power Rack & Pinion
Microsoft
Sunday, July 05, 2009 1:39:26 PMPage 3 © 2005 Mitchell Repair Information Company, LLC.
Page 339 of 514
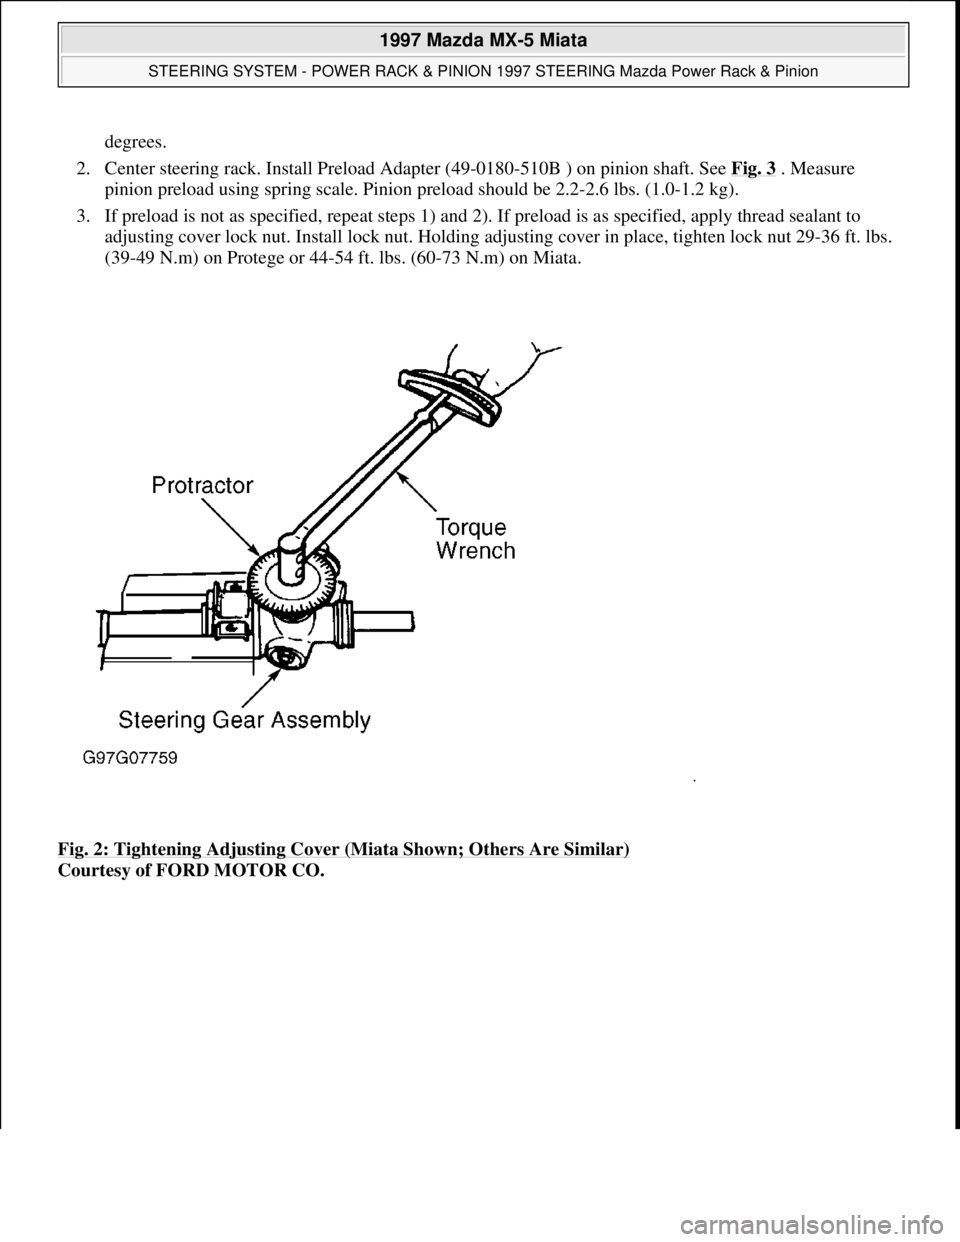
degrees.
2. Center steering rack. Install Preload Adapter (49-0180-510B ) on pinion shaft. See Fig. 3
. Measure
pinion preload using spring scale. Pinion preload should be 2.2-2.6 lbs. (1.0-1.2 kg).
3. If preload is not as specified, repeat steps 1) and 2). If preload is as specified, apply thread sealant to
adjusting cover lock nut. Install lock nut. Holding adjusting cover in place, tighten lock nut 29-36 ft. lbs.
(39-49 N.m) on Protege or 44-54 ft. lbs. (60-73 N.m) on Miata.
Fig. 2: Tightening Adjusting Cover (Miata Shown; Others Are Similar)
Courtesy of FORD MOTOR CO.
1997 Mazda MX-5 Miata
STEERING SYSTEM - POWER RACK & PINION 1997 STEERING Mazda Power Rack & Pinion
Microsoft
Sunday, July 05, 2009 1:39:26 PMPage 4 © 2005 Mitchell Repair Information Company, LLC.
Page 340 of 514
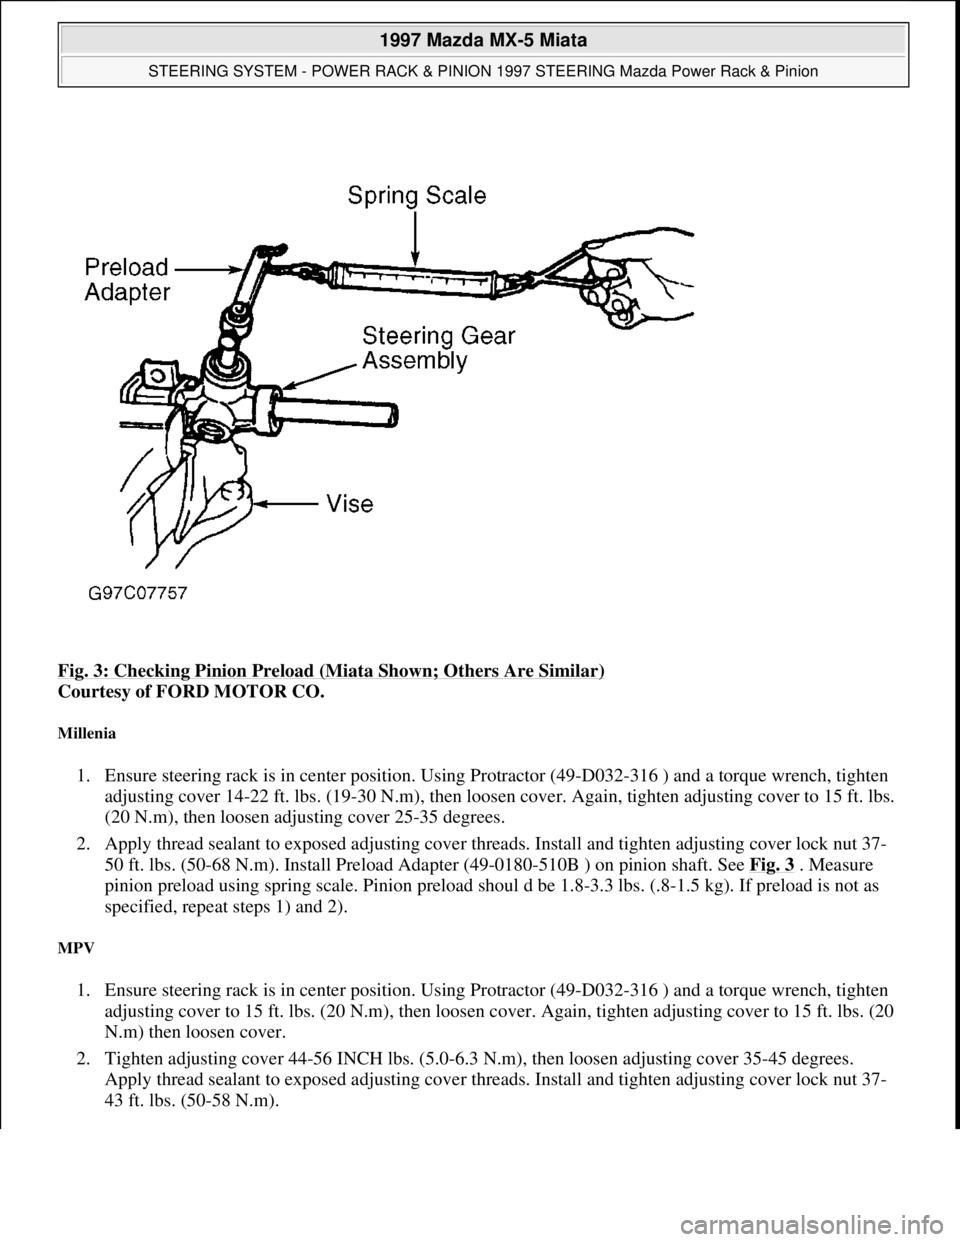
Fig. 3: Checking Pinion Preload (Miata Shown; Others Are Similar)
Courtesy of FORD MOTOR CO.
Millenia
1. Ensure steering rack is in center position. Using Protractor (49-D032-316 ) and a torque wrench, tighten
adjusting cover 14-22 ft. lbs. (19-30 N.m), then loosen cover. Again, tighten adjusting cover to 15 ft. lbs.
(20 N.m), then loosen adjusting cover 25-35 degrees.
2. Apply thread sealant to exposed adjusting cover threads. Install and tighten adjusting cover lock nut 37-
50 ft. lbs. (50-68 N.m). Install Preload Adapter (49-0180-510B ) on pinion shaft. See Fig. 3
. Measure
pinion preload using spring scale. Pinion preload shoul d be 1.8-3.3 lbs. (.8-1.5 kg). If preload is not as
specified, repeat steps 1) and 2).
MPV
1. Ensure steering rack is in center position. Using Protractor (49-D032-316 ) and a torque wrench, tighten
adjusting cover to 15 ft. lbs. (20 N.m), then loosen cover. Again, tighten adjusting cover to 15 ft. lbs. (20
N.m) then loosen cover.
2. Tighten adjusting cover 44-56 INCH lbs. (5.0-6.3 N.m), then loosen adjusting cover 35-45 degrees.
Apply thread sealant to exposed adjusting cover threads. Install and tighten adjusting cover lock nut 37-
43 ft. lbs. (50-58 N.m).
1997 Mazda MX-5 Miata
STEERING SYSTEM - POWER RACK & PINION 1997 STEERING Mazda Power Rack & Pinion
Microsoft
Sunday, July 05, 2009 1:39:26 PMPage 5 © 2005 Mitchell Repair Information Company, LLC.
Page 341 of 514
MX-3 (4-Cylinder)
1. Install and temporarily tighten adjusting cover to 95 INCH lbs. (10.7 N.m). Move steering rack back and
forth about 3 times, then loosen adjusting cover. Tighten adjusting cover 40-47 INCH lbs (4.5-5.3 N.m)
then loosen adjusting cover 0-40 degrees. Apply thread sealant to adjusting cover lock nut. Install lock
nut. Holding adjusting cover in place, tighten lock nut 37-43 ft. lbs. (50-58 N.m).
2. Center steering rack. Install Preload Adapter (49-0180-510B ) on pinion shaft. See Fig. 3
. Measure
pinion preload using spring scale. With steering rack in center position, pinion preload should be 2.2-3.0
lbs. (1.0-1.4 kg). With steering rack in any other position, pinion preload should be a maximum of 3.7 lbs.
(1.7 kg). If preload is not as specified, repeat steps 1) and 2).
MX-3 (V6)
1. Center steering rack. Install and temporarily tighten adjusting cover to 100 INCH lbs. (11.3 N.m), then
loosen cover. Tighten adjusting cover 40-47 INCH lbs. (4.5-5.3 N.m), then loosen cover 45 degrees.
2. Install Preload Adapter (49-0180-510B ) on pinion shaft. See Fig. 3
. Measure pinion preload using
spring scale. With steering rack in center position (plus or minus 90 degrees), preload should be 2.2-2.6
lbs. (1.0-1.2 kg). With steering rack in any other position, preload should be a maximum of 3.7 lbs. (1.7
kg).
3. If preload is as specified, apply thread sealant to adjusting cover lock nut. Install lock nut. Holding
adjusting cover in place, tighten lock nut 37-43 ft. lbs. (50-58 N.m). If preload is not as specified, repeat
steps 1) and 2).
MX-6 & 626
1. Center steering rack. Install and temporarily tighten adjusting cover to 87 INCH lbs. (9.8 N.m), then
loosen adjusting cover. Tighten adjusting cover 39-48 INCH lbs (4.4-5.4 N.m) then loosen adjusting
cover 20 degrees. Apply thread sealant to adjusting cover lock nut. Install lock nut. Holding adjusting
cover in place, tighten lock nut 37-43 ft. lbs. (50-58 N.m).
2. Install Preload Adapter (49-0180-510B ) on pinion shaft. See Fig. 3
. Measure pinion preload using
spring scale. With steering rack in center position (plus or minus 90 degrees), pinion preload should be
2.8-3.3 lbs. (1.3-1.5 kg). If preload is not as specified, repeat steps 1) and 2).
RX7
1. Ensure steering rack is in center position. Using Protractor (49-D032-316 ) and a torque wrench, tighten
adjusting cover 87 INCH lbs. (9.8 N.m), then loosen adjusting cover 20-25 degrees. See Fig. 2
.
2. Install Preload Adapter (49-0180-510B ) on pinion shaft. See Fig. 3
. Measure pinion preload using
spring scale. Pinion preload should be 3.3 lbs. (1.5 kg) maximum.
3. If preload is not as specified, repeat steps 1) and 2). If preload is as specified, apply thread sealant to
adjusting cover lock nut. Install lock nut. Holding adjusting cover in place, tighten lock nut 37-50 ft. lbs.
(50-68 N.m).
929
1. Ensure steering rack is in center position. Using Protractor (49-D032-316 ) and a torque wrench, tighten
1997 Mazda MX-5 Miata
STEERING SYSTEM - POWER RACK & PINION 1997 STEERING Mazda Power Rack & Pinion
Microsoft
Sunday, July 05, 2009 1:39:26 PMPage 6 © 2005 Mitchell Repair Information Company, LLC.
Page 342 of 514
adjusting cover 15-21 ft. lbs. (20-28 N.m), then loosen adjusting cover 25 degrees. See Fig. 2.
2. Install Preload Adapter (49-0180-510B ) on pinion shaft. See Fig. 3
. Measure pinion preload using
spring scale. Pinion preload should be 3.3 lbs. (1.5 kg) maximum.
3. If preload is not as specified, repeat steps 1) and 2). If preload is as specified, apply thread sealant to
adjusting cover lock nut. Install lock nut. Holding adjusting cover in place, tighten lock nut 37-50 ft. lbs.
(50-68 N.m).
PINION SHAFT & VALVE HOUSING ASSEMBLY
Miata
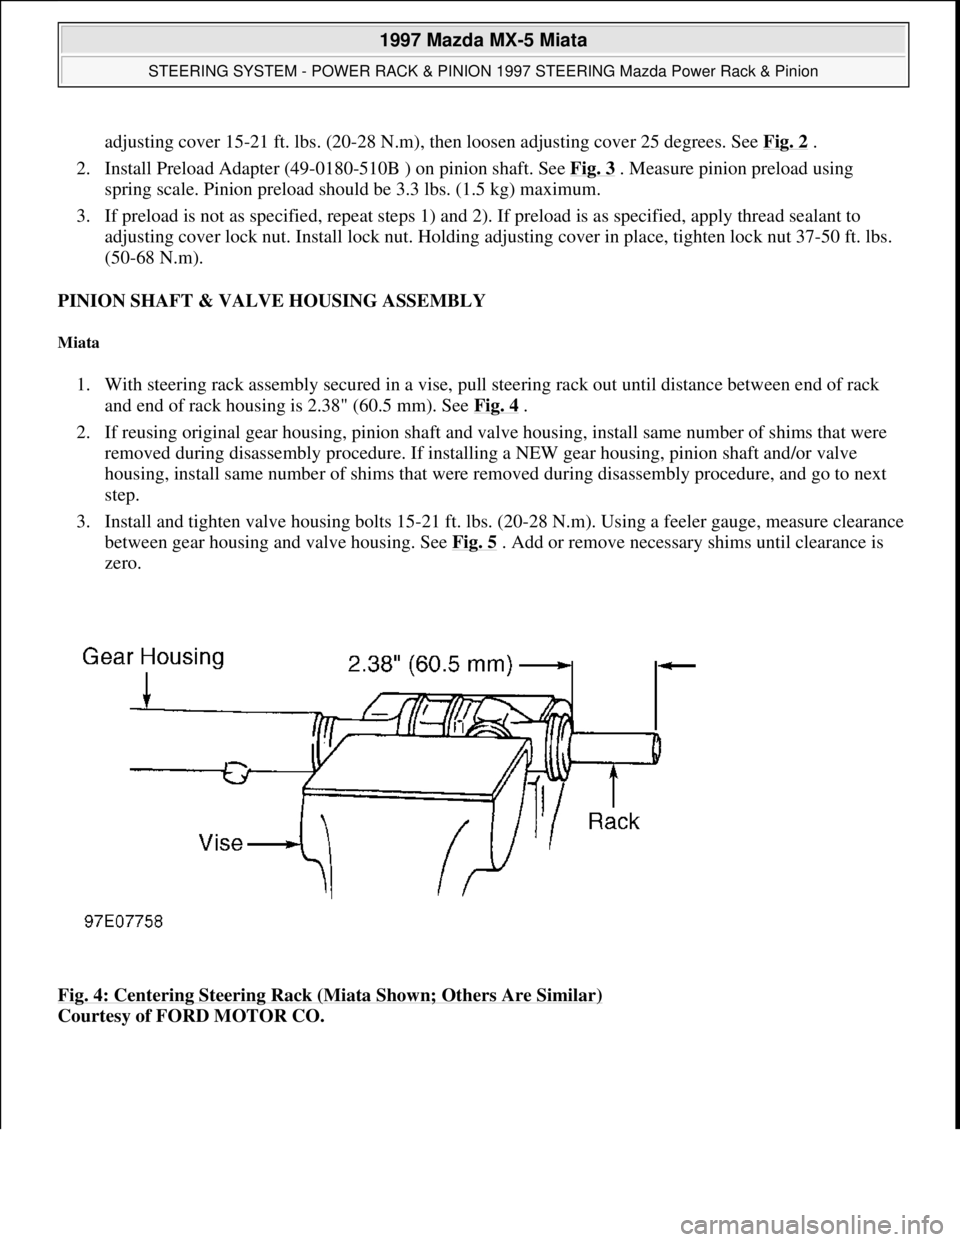
1. With steering rack assembly secured in a vise, pull steering rack out until distance between end of rack
and end of rack housing is 2.38" (60.5 mm). See Fig. 4
.
2. If reusing original gear housing, pinion shaft and valve housing, install same number of shims that were
removed during disassembly procedure. If installing a NEW gear housing, pinion shaft and/or valve
housing, install same number of shims that were removed during disassembly procedure, and go to next
step.
3. Install and tighten valve housing bolts 15-21 ft. lbs. (20-28 N.m). Using a feeler gauge, measure clearance
between gear housing and valve housing. See Fig. 5
. Add or remove necessary shims until clearance is
zero.
Fig. 4: Centering Steering Rack (Miata Shown; Others Are Similar)
Courtesy of FORD MOTOR CO.
1997 Mazda MX-5 Miata
STEERING SYSTEM - POWER RACK & PINION 1997 STEERING Mazda Power Rack & Pinion
Microsoft
Sunday, July 05, 2009 1:39:26 PMPage 7 © 2005 Mitchell Repair Information Company, LLC.