Page 165 of 514
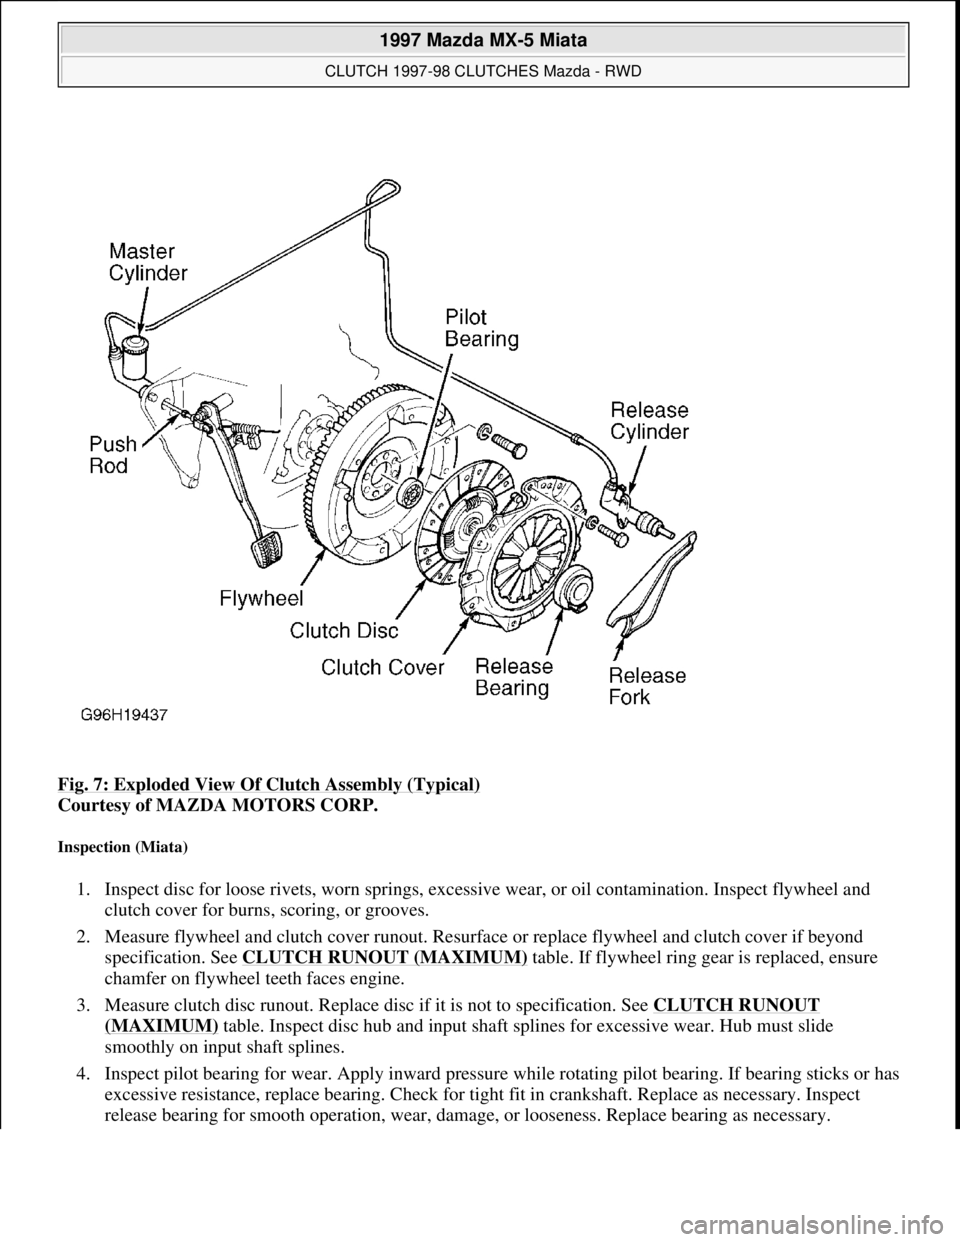
Fig. 7: Exploded View Of Clutch Assembly (Typical)
Courtesy of MAZDA MOTORS CORP.
Inspection (Miata)
1. Inspect disc for loose rivets, worn springs, excessive wear, or oil contamination. Inspect flywheel and
clutch cover for burns, scoring, or grooves.
2. Measure flywheel and clutch cover runout. Resurface or replace flywheel and clutch cover if beyond
specification. See CLUTCH RUNOUT (MAXIMUM)
table. If flywheel ring gear is replaced, ensure
chamfer on flywheel teeth faces engine.
3. Measure clutch disc runout. Replace disc if it is not to specification. See CLUTCH RUNOUT
(MAXIMUM) table. Inspect disc hub and input shaft splines for excessive wear. Hub must slide
smoothly on input shaft splines.
4. Inspect pilot bearing for wear. Apply inward pressure while rotating pilot bearing. If bearing sticks or has
excessive resistance, replace bearing. Check for tight fit in crankshaft. Replace as necessary. Inspect
release bearing for smooth operation, wear, damage, or looseness. Replace bearing as necessary.
1997 Mazda MX-5 Miata
CLUTCH 1997-98 CLUTCHES Mazda - RWD
Microsoft
Sunday, July 05, 2009 1:36:47 PMPage 9 © 2005 Mitchell Repair Information Company, LLC.
Page 166 of 514
Installation (Miata)
1. Lightly coat input shaft splines, release bearing, and fork contact areas with molybdenum disulfide
grease. Align clutch cover dowel holes with flywheel dowels. Tighten clutch cover bolts evenly in a
crisscross pattern to specification. See TORQUE SPECIFICATIONS
.
2. Place a wooden block on jack, and position jack under front of oil pan. Raise front of engine to ease
transmission installation. Install transmission. Tighten transmission-to-engine block bolts to specification.
See TORQUE SPECIFICATIONS
. Place jack (from front of engine) under transmission.
3. Raise transmission until level with engine. Position Power Plant Frame (PPF) in place. Install
PPF/differential mounting spacer, and tighten bolts to 27-38 ft. lbs. (37-51 N.m). Install and tighten PPF
side mounting bolts.
4. Install sleeve into PPF housing block. Install spacer and bolts. Install reamer bolt into front hole, and
tighten bolt. See Fig. 5
.
5. Install transmission-to-PPF bracket. Install remaining PPF bolts, and tighten to specification. See
TORQUE SPECIFICATIONS
. To complete installation, reverse removal procedure.
RELEASE BEARING & FORK
Removal (B2300, B2500, B3000 & B4000)
With transmission removed, twist release bearing and carrier assembly until preload spring pushes bearing
assembly from slave cylinder. See Fig. 8
.
Installation
Lubricate bearing bore and bearing carrier with NIGI No. 2 (lithium base) grease. Push release bearing
assembl
y onto clutch slave cylinder. NOTE: Front PPF-to-differential side mounting bolt is the reamer bolt, used to
align frame.
NOTE: Use only lithium base grease on release bearing. DO NOT use petroleum base
lubricants.
1997 Mazda MX-5 Miata
CLUTCH 1997-98 CLUTCHES Mazda - RWD
Microsoft
Sunday, July 05, 2009 1:36:47 PMPage 10 © 2005 Mitchell Repair Information Company, LLC.
Page 171 of 514
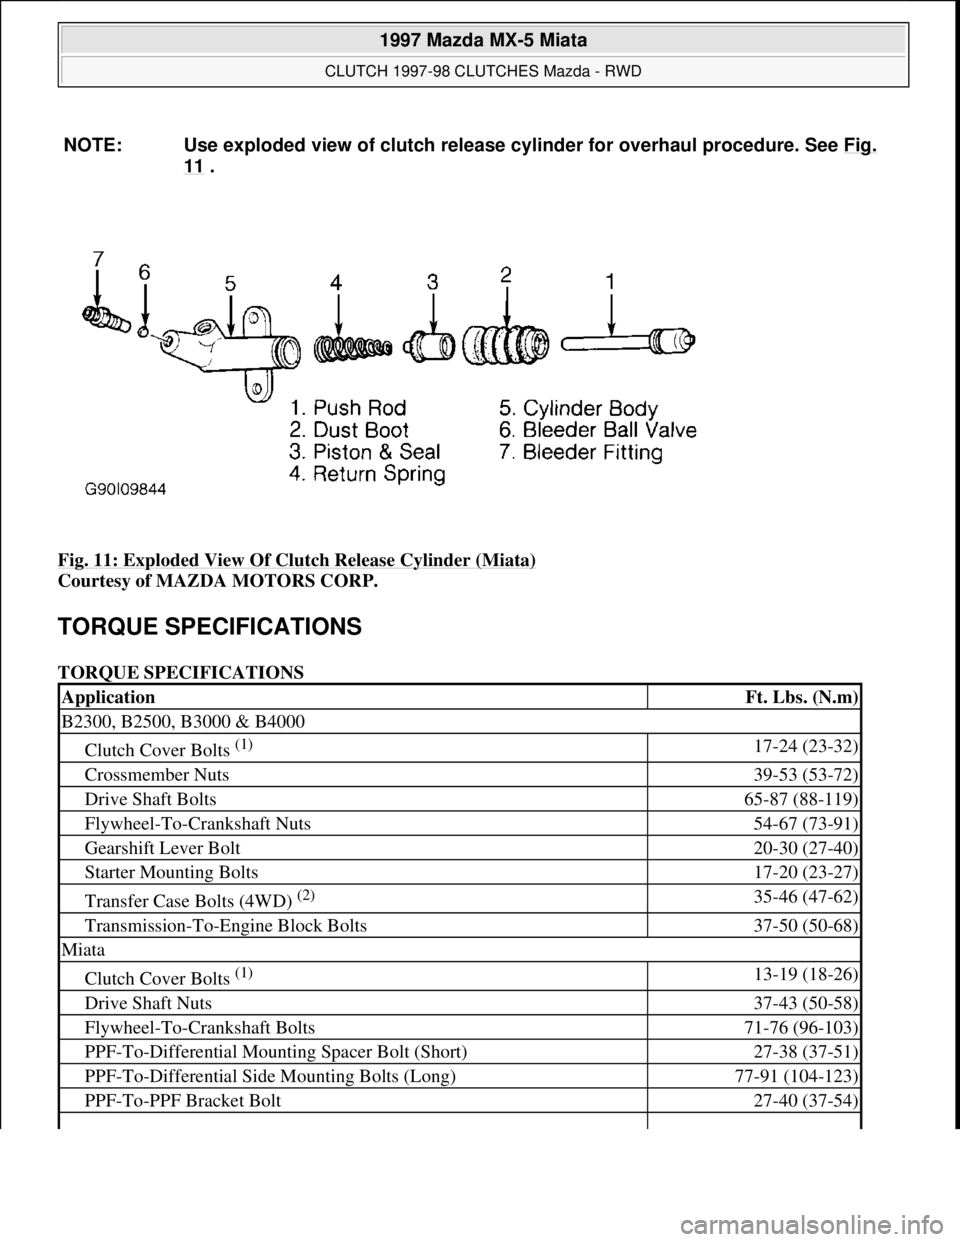
Fig. 11: Exploded View Of Clutch Release Cylinder (Miata)
Courtesy of MAZDA MOTORS CORP.
TORQUE SPECIFICATIONS
TORQUE SPECIFICATIONS NOTE: Use exploded view of clutch release cylinder for overhaul procedure. See Fig.
11 .
ApplicationFt. Lbs. (N.m)
B2300, B2500, B3000 & B4000
Clutch Cover Bolts (1) 17-24 (23-32)
Crossmember Nuts39-53 (53-72)
Drive Shaft Bolts65-87 (88-119)
Flywheel-To-Crankshaft Nuts54-67 (73-91)
Gearshift Lever Bolt20-30 (27-40)
Starter Mounting Bolts17-20 (23-27)
Transfer Case Bolts (4WD) (2) 35-46 (47-62)
Transmission-To-Engine Block Bolts37-50 (50-68)
Miata
Clutch Cover Bolts (1) 13-19 (18-26)
Drive Shaft Nuts37-43 (50-58)
Flywheel-To-Crankshaft Bolts71-76 (96-103)
PPF-To-Differential Mounting Spacer Bolt (Short)27-38 (37-51)
PPF-To-Differential Side Mounting Bolts (Long)77-91 (104-123)
PPF-To-PPF Bracket Bolt27-40 (37-54)
1997 Mazda MX-5 Miata
CLUTCH 1997-98 CLUTCHES Mazda - RWD
Microsoft
Sunday, July 05, 2009 1:36:47 PMPage 15 © 2005 Mitchell Repair Information Company, LLC.
Page 172 of 514
PPF-To-Transmission Side Mounting Bolts (Long)77-91 (104-123)
Starter Mounting Bolts28-38 (38-51)
Transmission-To-Engine Block Bolts48-65 (64-89)
Transmission-To-PPF Bracket Bolts27-40 (37-54)
(1)Tighten in a crisscross pattern.
(2)Tighten in sequence. See Fig. 3 .
1997 Mazda MX-5 Miata
CLUTCH 1997-98 CLUTCHES Mazda - RWD
Microsoft
Sunday, July 05, 2009 1:36:47 PMPage 16 © 2005 Mitchell Repair Information Company, LLC.
Page 173 of 514
GENERAL INFORMATION
Computer Relearn Procedures
COMPUTER RELEARN PROCEDURES
Vehicles equipped with engine or transmission computers may require a relearn procedure after vehicle battery
is disconnected. Many vehicle computers memorize and store vehicle operation patterns for optimum
driveability and performance. When vehicle battery is disconnected, this memory is lost. The computer will use
default data until new data from each key start is stored. As computer memorizes vehicle operation for each
new key start, driveability is restored. Vehicle computers may memorize vehicles operation patterns for 40 of
more key starts.
Customers often complain of driveability problems during relearn stage because vehicle acts differently then
before being serviced. Depending on type and make of vehicle and how it is equipped, the following complaints
(driveability problems) may exist:
Harsh Or Poor Shift Quality
Rough Or Unstable Idle
Hesitation Or Stumble
Rich Or Lean Running
Poor Fuel Mileage
These symptoms and complaints should disappear after a number of drive cycles have been memorized. To
reduce the possibility of complaints, after any service which requires battery power to be disconnected, vehicle
should be road tested.
GENERIC COMPUTER RELEARN PROCEDURES
Some manufacturers identify a specific relearn procedure which will help establish suitable driveability during
relearn stage. These procedures are especially important if vehicle is equipped with and electronically
controlled automatic transmission or transaxle. Always complete procedure before returning vehicle to
customer. The following general procedures are to be used if driveability problems are encountered after power
loss or battery has been disconnected. These procedures may provide an aid in eliminating these problems.
Automatic Transmission
Set parking brake, start engine in "P" or "N" position. Warm-up vehicle to normal operating temperature
or until cooling fan cycles.
Allow vehicle to idle for one minute in "N" position. Select "D" and allow engine to idle for one minute.
Accelerate at normal throttle position (20-50%) until vehicle shifts into top gear.
Cruise at light to medium throttle.
Decelerate to a stop, allowing vehicle to downshift, and use brakes normally.
Process may be repeated as necessary.
1997 Mazda MX-5 Miata
GENERAL INFORMATION Computer Relearn Procedures
1997 Mazda MX-5 Miata
GENERAL INFORMATION Computer Relearn Procedures
Microsoft
Sunday, July 05, 2009 1:47:32 PMPage 1 © 2005 Mitchell Repair Information Company, LLC.
Microsoft
Sunday, July 05, 2009 1:47:35 PMPage 1 © 2005 Mitchell Repair Information Company, LLC.
Page 174 of 514
Manual Transmission
Place transmission in Neutral position.
Ensure emergency brake has been set and all accessories are turned off.
Start engine and bring to normal operating temperature.
Allow vehicle to idle in Neutral for one minute.
Initial relearn is complete, and process will be completed during normal driving.
1997 Mazda MX-5 Miata
GENERAL INFORMATION Computer Relearn Procedures
Microsoft
Sunday, July 05, 2009 1:47:32 PMPage 2 © 2005 Mitchell Repair Information Company, LLC.
Page 183 of 514
Fig. 5: Exploded View Of Rear Axle Shaft (MPV)
Courtesy of MAZDA MOTORS CORP.
DIFFERENTIAL ASSEMBLY
Removal (Front MPV 4WD)
1. Raise and support vehicle. Remove engine skid plate. See Fig. 6 . Drain front differential fluid. Remove
tie rod ends and lower control arms. Remove front axle shafts. See AXLE SHAFTS
- FRONT article.
2. Mark drive shaft and differential carrier flanges for reassembly reference, and remove drive shaft from
differential carrier. See Fig. 6
. Disconnect Automatic Free Wheel (AFW) vacuum hoses and electrical
connector.
3. Place floor jack under differential assembly. Remove differential-to-chassis mounting bolts and AFW
extension housing mounting nuts. Remove differential and AFW extension housing from vehicle.
Remove AFW assembly from left side of differential housing. Pull drive coupler from carrier. Remove
differential carrier-to-housing bolts. Remove differential carrier.
Installation
To install, reverse removal procedure. Apply sealant to carrier mating flange. Align marks made during
removal. Refill differential with lubricant. Tighten all nuts and bolts to specification. See TORQUE
SPECIFICATIONS.
1997 Mazda MX-5 Miata
1997-98 DRIVE AXLES Differentials & Drive Axles - MPV & MX-5 Miata
Microsoft
Sunday, July 05, 2009 1:52:42 PMPage 9 © 2005 Mitchell Repair Information Company, LLC.
Page 188 of 514
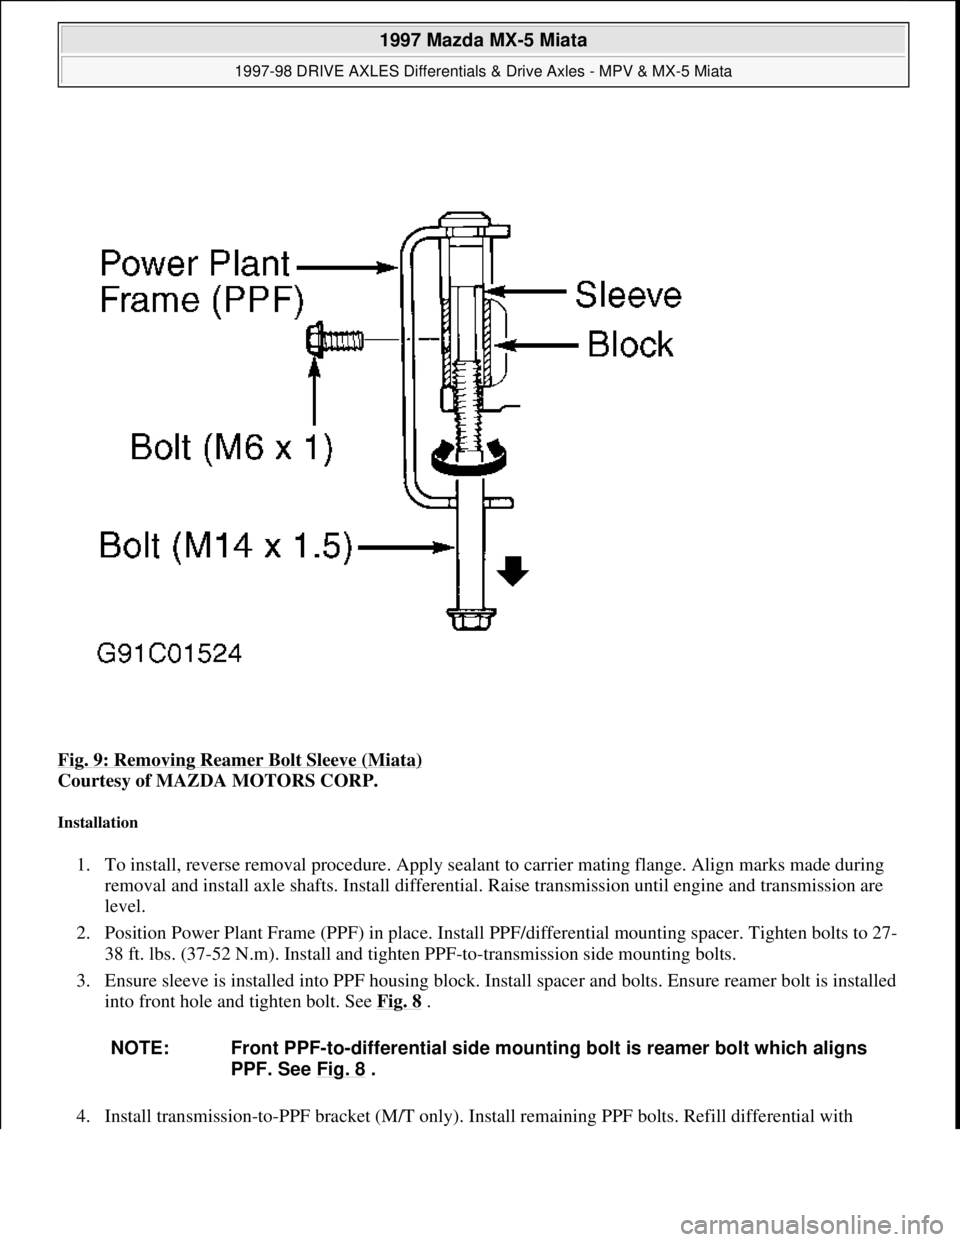
Fig. 9: Removing Reamer Bolt Sleeve (Miata)
Courtesy of MAZDA MOTORS CORP.
Installation
1. To install, reverse removal procedure. Apply sealant to carrier mating flange. Align marks made during
removal and install axle shafts. Install differential. Raise transmission until engine and transmission are
level.
2. Position Power Plant Frame (PPF) in place. Install PPF/differential mounting spacer. Tighten bolts to 27-
38 ft. lbs. (37-52 N.m). Install and tighten PPF-to-transmission side mounting bolts.
3. Ensure sleeve is installed into PPF housing block. Install spacer and bolts. Ensure reamer bolt is installed
into front hole and tighten bolt. See Fig. 8
.
4. Install transmission-to-PPF bracket (M/T only). Install remaining PPF bolts. Refill differential with
NOTE: Front PPF-to-differential side mounting bolt is reamer bolt which aligns
PPF. See Fig. 8
.
1997 Mazda MX-5 Miata
1997-98 DRIVE AXLES Differentials & Drive Axles - MPV & MX-5 Miata
Microsoft
Sunday, July 05, 2009 1:52:42 PMPage 14 © 2005 Mitchell Repair Information Company, LLC.