Page 192 of 514
5. Install front bearing and collar on dummy drive pinion. See COLLAR SELECTION table. Install
companion flange, washer and original drive pinion lock nut. Tighten drive pinion lock nut so dummy
drive pinion assembly can be turned by hand.
COLLAR SELECTION
ApplicationCollar No.
Miata49-8531-567
MPV49-U027-001
1997 Mazda MX-5 Miata
1997-98 DRIVE AXLES Differentials & Drive Axles - MPV & MX-5 Miata
Microsoft
Sunday, July 05, 2009 1:52:42 PMPage 18 © 2005 Mitchell Repair Information Company, LLC.
Page 193 of 514
1997 Mazda MX-5 Miata
1997-98 DRIVE AXLES Differentials & Drive Axles - MPV & MX-5 Miata
Microsoft
Sunday, July 05, 2009 1:52:42 PMPage 19 © 2005 Mitchell Repair Information Company, LLC.
Page 194 of 514

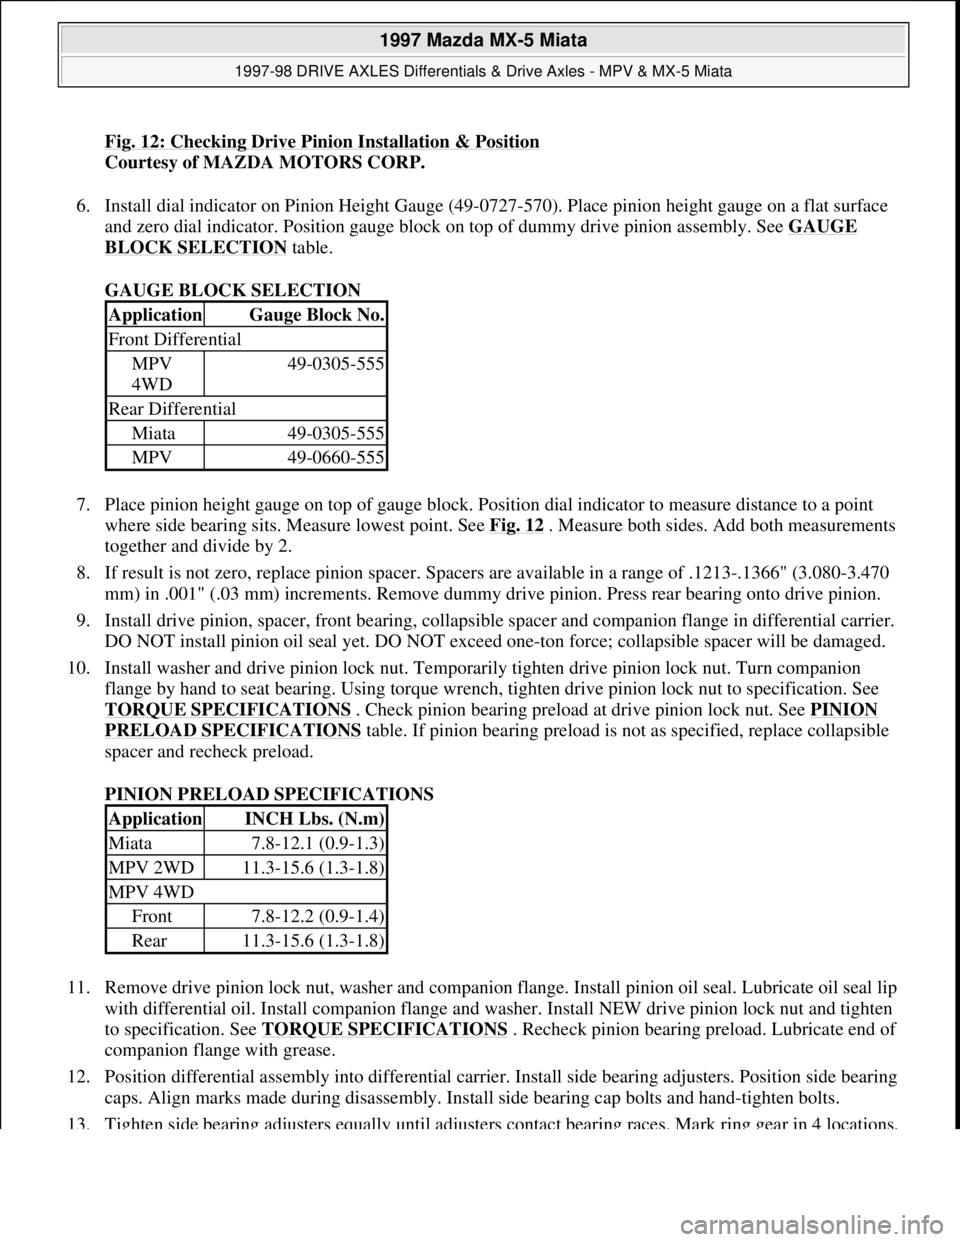
Fig. 12: Checking Drive Pinion Installation & Position
Courtesy of MAZDA MOTORS CORP.
6. Install dial indicator on Pinion Height Gauge (49-0727-570). Place pinion height gauge on a flat surface
and zero dial indicator. Position gauge block on top of dummy drive pinion assembly. See GAUGE
BLOCK SELECTION table.
GAUGE BLOCK SELECTION
7. Place pinion height gauge on top of gauge block. Position dial indicator to measure distance to a point
where side bearing sits. Measure lowest point. See Fig. 12
. Measure both sides. Add both measurements
together and divide by 2.
8. If result is not zero, replace pinion spacer. Spacers are available in a range of .1213-.1366" (3.080-3.470
mm) in .001" (.03 mm) increments. Remove dummy drive pinion. Press rear bearing onto drive pinion.
9. Install drive pinion, spacer, front bearing, collapsible spacer and companion flange in differential carrier.
DO NOT install pinion oil seal yet. DO NOT exceed one-ton force; collapsible spacer will be damaged.
10. Install washer and drive pinion lock nut. Temporarily tighten drive pinion lock nut. Turn companion
flange by hand to seat bearing. Using torque wrench, tighten drive pinion lock nut to specification. See
TORQUE SPECIFICATIONS
. Check pinion bearing preload at drive pinion lock nut. See PINION
PRELOAD SPECIFICATIONS table. If pinion bearing preload is not as specified, replace collapsible
spacer and recheck preload.
PINION PRELOAD SPECIFICATIONS
11. Remove drive pinion lock nut, washer and companion flange. Install pinion oil seal. Lubricate oil seal lip
with differential oil. Install companion flange and washer. Install NEW drive pinion lock nut and tighten
to specification. See TORQUE SPECIFICATIONS
. Recheck pinion bearing preload. Lubricate end of
companion flange with grease.
12. Position differential assembly into differential carrier. Install side bearing adjusters. Position side bearing
caps. Align marks made during disassembly. Install side bearing cap bolts and hand-tighten bolts.
13. Ti
ghten side bearing adjusters equally until adjusters contact bearing races. Mark ring gear in 4 locations,
ApplicationGauge Block No.
Front Differential
MPV
4WD49-0305-555
Rear Differential
Miata49-0305-555
MPV49-0660-555
ApplicationINCH Lbs. (N.m)
Miata7.8-12.1 (0.9-1.3)
MPV 2WD11.3-15.6 (1.3-1.8)
MPV 4WD
Front7.8-12.2 (0.9-1.4)
Rear11.3-15.6 (1.3-1.8)
1997 Mazda MX-5 Miata
1997-98 DRIVE AXLES Differentials & Drive Axles - MPV & MX-5 Miata
Microsoft
Sunday, July 05, 2009 1:52:42 PMPage 20 © 2005 Mitchell Repair Information Company, LLC.
Page 195 of 514

90 degrees apart. Position dial indicator against ring gear to check ring gear backlash.
14. Check backlash at all 4 locations. Tighten side bearing adjusters equally until backlash is .0035-
.0043" (.09-.11 mm). Minimum backlash at any point is .002" (.05 mm). Difference between minimum
and maximum backlash should not exceed .0028" (.07 mm).
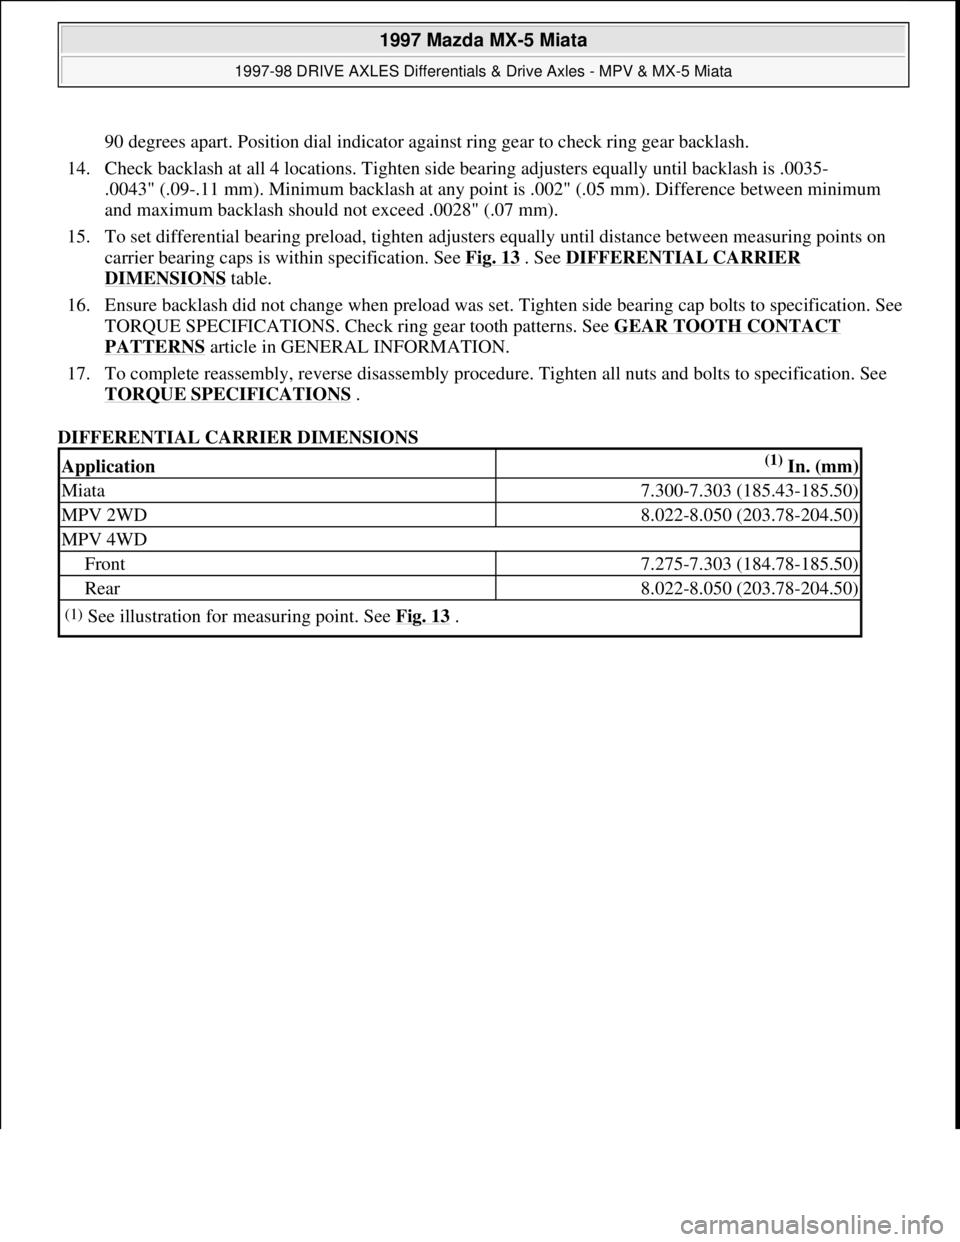
15. To set differential bearing preload, tighten adjusters equally until distance between measuring points on
carrier bearing caps is within specification. See Fig. 13
. See DIFFERENTIAL CARRIER
DIMENSIONS table.
16. Ensure backlash did not change when preload was set. Tighten side bearing cap bolts to specification. See
TORQUE SPECIFICATIONS. Check ring gear tooth patterns. See GEAR TOOTH CONTACT
PATTERNS article in GENERAL INFORMATION.
17. To complete reassembly, reverse disassembly procedure. Tighten all nuts and bolts to specification. See
TORQUE SPECIFICATIONS
.
DIFFERENTIAL CARRIER DIMENSIONS
Application(1) In. (mm)
Miata7.300-7.303 (185.43-185.50)
MPV 2WD8.022-8.050 (203.78-204.50)
MPV 4WD
Front7.275-7.303 (184.78-185.50)
Rear8.022-8.050 (203.78-204.50)
(1)See illustration for measuring point. See Fig. 13 .
1997 Mazda MX-5 Miata
1997-98 DRIVE AXLES Differentials & Drive Axles - MPV & MX-5 Miata
Microsoft
Sunday, July 05, 2009 1:52:42 PMPage 21 © 2005 Mitchell Repair Information Company, LLC.
Page 196 of 514
Fig. 13: Measuring Carrier Case Spread
Courtesy of MAZDA MOTORS CORP.
TORQUE SPECIFICATIONS
TORQUE SPECIFICATIONS (MIATA)
ApplicationFt. Lbs. (N.m)
Differential Carrier Bearings Cap Bolts28-38 (38-52)
Differential Carrier Bearings Lock Plate Bolt13-18 (18-25)
Differential Carrier-To-Housing Bolts17-19 (23-26)
Differential-To-Chassis Mount Nuts
Inner Nut61-72 (83-98)
Outer Nuts (2)13-20 (18-27)
Drive Axle Inner CV Joint Flange Nuts40-47 (54-64)
Drive Pinion Lock Nut94-209 (128-284)
Drive Shaft Companion Flange Nuts20-22 (27-30)
Exhaust Pipe Mount Nuts30-41 (40-55)
Filler Plug29-40 (39-54)
Power Plant Frame Bracket
To-Power Plant Frame Bolt (M/T)77-91 (104-123)
To-Transmission Bolts (M/T)27-40 (37-54)
1997 Mazda MX-5 Miata
1997-98 DRIVE AXLES Differentials & Drive Axles - MPV & MX-5 Miata
Microsoft
Sunday, July 05, 2009 1:52:42 PMPage 22 © 2005 Mitchell Repair Information Company, LLC.
Page 197 of 514

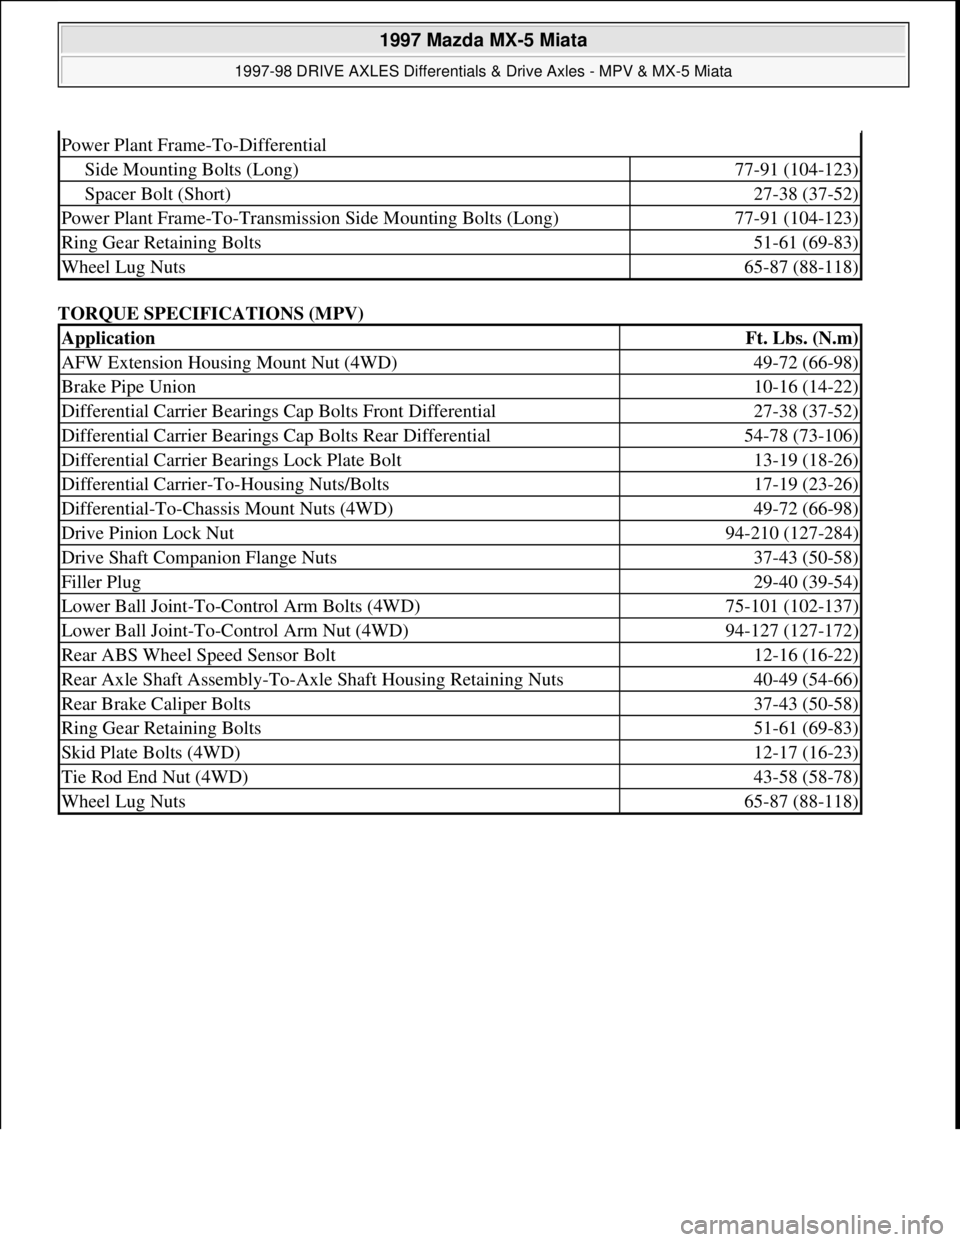
TORQUE SPECIFICATIONS (MPV)
Power Plant Frame-To-Differential
Side Mounting Bolts (Long)77-91 (104-123)
Spacer Bolt (Short)27-38 (37-52)
Power Plant Frame-To-Transmission Side Mounting Bolts (Long)77-91 (104-123)
Ring Gear Retaining Bolts51-61 (69-83)
Wheel Lug Nuts65-87 (88-118)
ApplicationFt. Lbs. (N.m)
AFW Extension Housing Mount Nut (4WD)49-72 (66-98)
Brake Pipe Union10-16 (14-22)
Differential Carrier Bearings Cap Bolts Front Differential27-38 (37-52)
Differential Carrier Bearings Cap Bolts Rear Differential54-78 (73-106)
Differential Carrier Bearings Lock Plate Bolt13-19 (18-26)
Differential Carrier-To-Housing Nuts/Bolts17-19 (23-26)
Differential-To-Chassis Mount Nuts (4WD)49-72 (66-98)
Drive Pinion Lock Nut94-210 (127-284)
Drive Shaft Companion Flange Nuts37-43 (50-58)
Filler Plug29-40 (39-54)
Lower Ball Joint-To-Control Arm Bolts (4WD)75-101 (102-137)
Lower Ball Joint-To-Control Arm Nut (4WD)94-127 (127-172)
Rear ABS Wheel Speed Sensor Bolt12-16 (16-22)
Rear Axle Shaft Assembly-To-Axle Shaft Housing Retaining Nuts40-49 (54-66)
Rear Brake Caliper Bolts37-43 (50-58)
Ring Gear Retaining Bolts51-61 (69-83)
Skid Plate Bolts (4WD)12-17 (16-23)
Tie Rod End Nut (4WD)43-58 (58-78)
Wheel Lug Nuts65-87 (88-118)
1997 Mazda MX-5 Miata
1997-98 DRIVE AXLES Differentials & Drive Axles - MPV & MX-5 Miata
Microsoft
Sunday, July 05, 2009 1:52:42 PMPage 23 © 2005 Mitchell Repair Information Company, LLC.
Page 211 of 514
Fig. 3: Removing Engine Components (Miata)
Courtesy of MAZDA MOTORS CORP.
Installation
1. To install, reverse removal procedure. After installing engine mount nuts, mount PPF to transmission and
tighten long bolts by hand. Ensure bolt sleeve and PPF/differential mounting spacer are installed to
NOTE: Proper installation of Power Plant Frame (PPF) is critical for aligning drive shaft
and eliminating harmonic vibrations.
1997 Mazda MX-5 Miata
1997-98 ENGINES 1.8L 4-Cylinder
Microsoft
Sunday, July 05, 2009 1:55:15 PMPage 5 © 2005 Mitchell Repair Information Company, LLC.
Page 212 of 514

differential housing block.
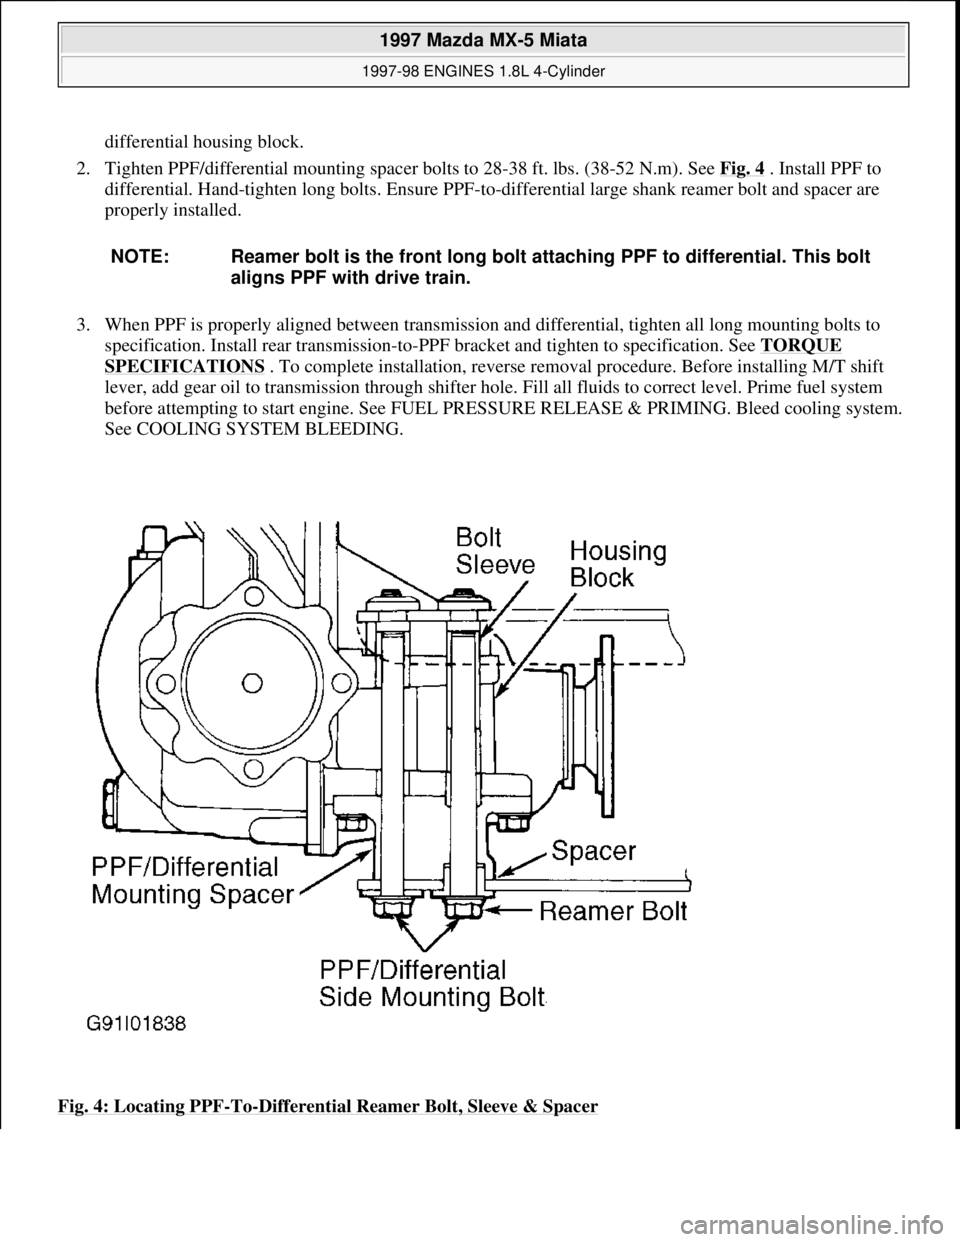
2. Tighten PPF/differential mounting spacer bolts to 28-38 ft. lbs. (38-52 N.m). See Fig. 4
. Install PPF to
differential. Hand-tighten long bolts. Ensure PPF-to-differential large shank reamer bolt and spacer are
properly installed.
3. When PPF is properly aligned between transmission and differential, tighten all long mounting bolts to
specification. Install rear transmission-to-PPF bracket and tighten to specification. See TORQUE
SPECIFICATIONS . To complete installation, reverse removal procedure. Before installing M/T shift
lever, add gear oil to transmission through shifter hole. Fill all fluids to correct level. Prime fuel system
before attempting to start engine. See FUEL PRESSURE RELEASE & PRIMING. Bleed cooling system.
See COOLING SYSTEM BLEEDING.
Fig. 4: Locating PPF
-To-Differential Reamer Bolt, Sleeve & Spacer
NOTE: Reamer bolt is the front long bolt attaching PPF to differential. This bolt
aligns PPF with drive train.
1997 Mazda MX-5 Miata
1997-98 ENGINES 1.8L 4-Cylinder
Microsoft
Sunday, July 05, 2009 1:55:15 PMPage 6 © 2005 Mitchell Repair Information Company, LLC.