Page 15 of 305

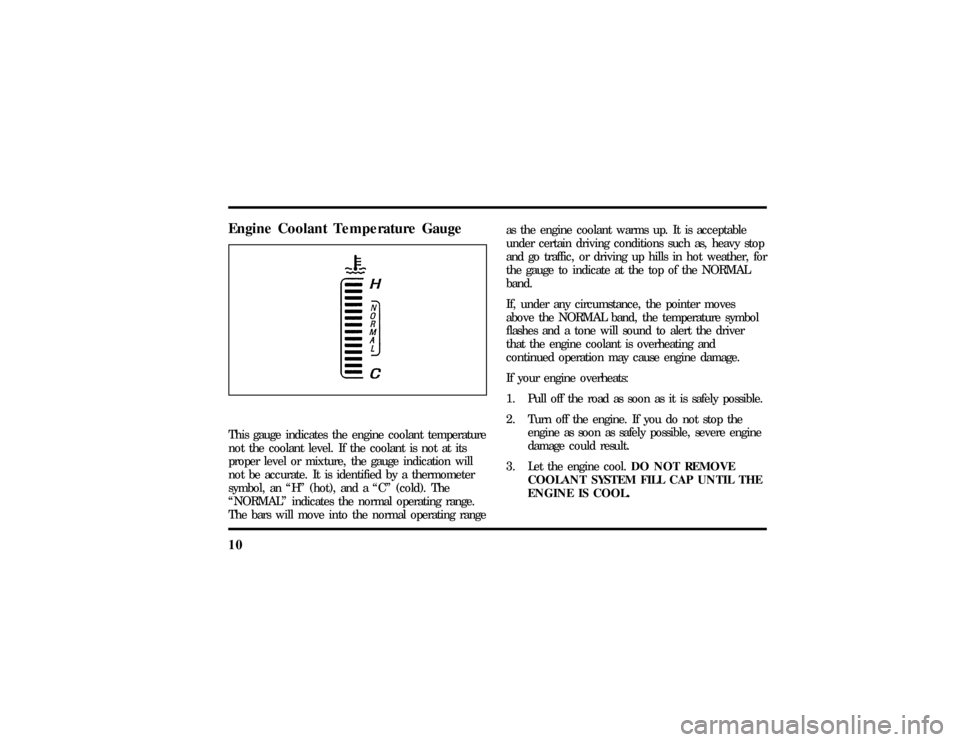
10Engine Coolant Temperature GaugeThis gauge indicates the engine coolant temperature
not the coolant level. If the coolant is not at its
proper level or mixture, the gauge indication will
not be accurate. It is identified by a thermometer
symbol, an ªHº (hot), and a ªCº (cold). The
ªNORMALº indicates the normal operating range.
The bars will move into the normal operating rangeas the engine coolant warms up. It is acceptable
under certain driving conditions such as, heavy stop
and go traffic, or driving up hills in hot weather, for
the gauge to indicate at the top of the NORMAL
band.
If, under any circumstance, the pointer moves
above the NORMAL band, the temperature symbol
flashes and a tone will sound to alert the driver
that the engine coolant is overheating and
continued operation may cause engine damage.
If your engine overheats:
1. Pull off the road as soon as it is safely possible.
2. Turn off the engine. If you do not stop the
engine as soon as safely possible, severe engine
damage could result.
3. Let the engine cool.DO NOT REMOVE
COOLANT SYSTEM FILL CAP UNTIL THE
ENGINE IS COOL.
File:03fnist.ex
Update:Mon Jun 17 13:46:47 1996
Page 16 of 305

11
4. Check the coolant level following the
instructions on checking and adding coolant to
your engine, seeEngine Coolantin the Index.
If you do not follow these instructions, you or
others could be injured.
If the coolant continues to overheat, have the
coolant system serviced.
If only the top two and bottom two bars appear on
the gauge, then the system is indicating that it
requires servicing. Contact your dealer for service as
soon as possible.Anti-Lock Brake System LightThis warning light will go on each time you start
your vehicle. If it remains on for longer than 5
seconds, you should shut off your engine and
restart. If the anti-lock brake light stays on, this
indicates that the anti-lock feature is disabled and
should receive immediate attention by a qualifiedservice technician. Normal braking is not affected
unless the brake warning light is also lit.
The Anti-Lock Brake System has self-check
capabilities. As previously described, the system
turns on the anti-lock light each time you start your
engine. After the engine is started and the anti-lock
light is out, the system performs another test the
first time the vehicle reaches 14 mph (22 km/h).
The system turns on the Anti-Lock Brake System
(ABS) pump motor for approximately 1/2 second.
At this time a mechanical noise may be heard. This
is a normal part of the self-check feature. If a
malfunction is found during this check the anti-lock
light will come on.
File:03fnist.ex
Update:Mon Jun 17 13:46:47 1996
Page 62 of 305

58When in AUTOMATIC and weather conditions
require heat, air will be sent to the floor. But, a
feature is included in your EATC to prevent
blowing cold air to the floor if the engine coolant is
not warm enough to allow heating. For a short
time the fan will be at low speed and air directed
to the windshield. In 3-1/2 minutes or less, the fan
speed will start to increase and the airflow will
change to the floor area.
If unusual conditions exist (i.e., window fogging,
etc.), the six manual override buttons allow you to
select special air discharge locations. A thumbwheel
allows you to adjust the fan speed to suit your
needs.
Temperature selectionThe RED and BLUE buttons at the upper left of the
Control are for temperature selection. The RED
button will increase the set temperature and the
BLUE button will lower the set temperature.
Pressing a button and releasing it will change the
set temperature one degree. Holding either button
in will rapidly change the temperature setting in
one degree increments to either65ÊF(18ÊC)
(BLUE) or85ÊF(29ÊC)(RED).Then, the set
temperature will jump 5 Ê and stop at either60ÊF
(16ÊC)which is maximum cooling or90ÊF(32ÊC)
which is maximum heating.
The average temperature range used is between
68ÊF(20ÊC) and78ÊF(26ÊC).Changing the
temperature setting by several degrees outside this
range or overriding to60ÊF(16ÊC) or90ÊF(32ÊC)
will not speed up the heating or cooling process.
File:05fncft.ex
Update:Mon Jun 17 13:49:49 1996
Page 226 of 305
224
EngineCoolant
WARNING
Th ecoolin gfan is automati can dmay
File:11fnmct.ex
Page 229 of 305

227
Always dispose of used automotive fluids in a
responsible manner. Follow your community's
regulations and standards for recycling and disposing
of automotive fluids.Coolant refill capacityTo find out how much fluid your vehicle's cooling
system can hold, refer to theCapacities and
Specificationschapter.
Have your dealer check the engine cooling system
for leaks if you have to add more than a quart
(liter) of engine coolant per month.Severe winter climateIf you drive in extremely cold climates (less than
-34ÊF[-36ÊC]), it may benecessary to increase the
coolant concentration above 50%. Refer to the chart
on the coolant container to ensure the coolant
concentration in your vehicle is such that the
coolant will not freeze at the temperature level in
which you drive during winter months. Neverincrease the engine coolant concentration above
60%. Leave a 50/50 mixture of engine coolant and
water in your vehicle year-round in non-extreme
climates.
Proper procedures for a complete coolant drain and
flush of the cooling system can be found in theCar
Service Manual.Following these recommended
procedures will ensure that the specified coolant
level and a 50/50 or appropriate mixture of coolant
and water is maintained.
Engine Coolant Refill ProcedureWhen the entire cooling system is drained and
refilled, the following procedure should be used to
ensure a complete fill:
NOTE:It is imperative the following procedure be
adhered to. Failure to do so could result in damage
to your engine.
File:11fnmct.ex
Update:Mon Jun 17 13:54:56 1996
Page 230 of 305

228q
With the engine OFF and cool, remove the
pressure cap, located on the coolant reservoir.
Remove the heater hose and clamp, located on
the rear of the intake manifold.
q
Add a 50/50 mixture of specified coolant and
water to the coolant reservoir. Refer toRefill
Capacitieslater in this chapter for the correct
amount. Add coolant to the reservoir until the
coolant continuously flows out of the tube in
the rear of engine. Reattach hose and secure
clamp.
q
Reinstall the pressure cap to the fully installed
position.
q
Start and idle the engine until the radiator
upper hose is warm (this indicates the
thermostat is open and coolant is flowing
through the entire system).
q
Immediately shut off the engine and let cool.
Cautiously remove the pressure relief cap and
add a 50/50 mixture of specified coolant and
water until the coolant is at the COLD FILL
level in the coolant reservoir.
q
Reinstall the pressure cap securely.
q
Check for leaks at the draincock.
q
Recheck the engine coolant level, using the
recommended procedure, after one or two
occasions of vehicle use.
File:11fnmct.ex
Update:Mon Jun 17 13:54:56 1996
Page 231 of 305

229
Power Steering FluidCheck the level of the power steering fluid at least
twice a year (i.e., every Spring and Fall).Checking and Adding Power Steering
Fluid1. Start the engine and let it run until the power
steering fluid reaches normal operating
temperature. The power steering fluid will be at
the right temperature when the engine coolant
temperature gauge in the instrument cluster is
near the center of the NORMAL operating
temperature range.
2. While the engine idles, turn the steering wheel
back and forth several times. Make sure that
the cap assembly is installed at this time.
3. Turn the engine off and check the level on the
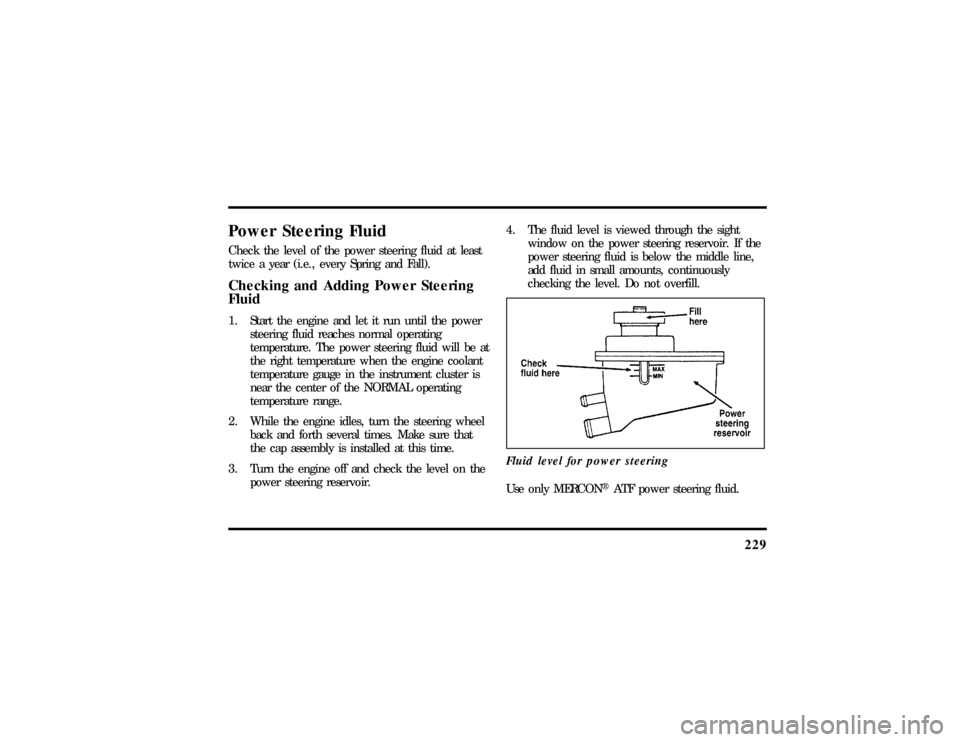
power steering reservoir.4. The fluid level is viewed through the sight
window on the power steering reservoir. If the
power steering fluid is below the middle line,
add fluid in small amounts, continuously
checking the level. Do not overfill.
Fluid level for power steering
Use only MERCONHATF power steering fluid.
File:11fnmct.ex
Update:Mon Jun 17 13:54:56 1996
Page 286 of 305

295
Index
A
ABS warning light (see Anti-lock
brake system)............ 11
Accessory position on the ignition.... 73
Accessory power source, power
point outlet............. 73
Accident damage............ 212
Air bag supplemental
restraint system........... 135
and child safety seats......137, 141
description............. 135
driver air bag............ 135
indicator light............ 14
operation.............. 137
passenger air bag........... 135
service and information labels..... 139
tone generator............ 139Air cleaner filter
location............... 216
specifications............ 257
Air conditioning, electronic automatic
temperature control system....... 55
Air suspension, description........ 170
Alarm, activating remote personal..... 112
Aluminum wheels........... 200
Antenna, radio (see Electronic
sound system)............ 40
Antifreeze (see Engine coolant)...... 224
Anti-lock brake system (ABS)
description............. 167
see also Brake............ 167
warning light............ 11
Anti-theft lug nuts and key........ 203
File:fnixt.ex
Update:Mon Jun 17 13:58:01 1996