1997 LINCOLN CONTINENTAL battery
[x] Cancel search: batteryPage 217 of 321

216Jump-Starting1. Make sure that the jumper cables are not in
the way of moving engine parts, then start the
booster vehicle. Run the engine at a moderate
speed.
2. Let the discharged battery charge for a few
minutes and then start the disabled vehicle. It
may take a couple of tries before the vehicle
starts. If the vehicle does not start after several
attempts, there may be a different problem.
3. When both vehicles are running, let them idle
for a few minutes to charge the discharged
battery.Removing jumper cables1.Always remove the jumper cables in the
reverse order.Remove the negative (s) end
of the jumper cable from the metallic surface
on the engine or frame of the disabled vehicle.2. Remove the negative (s) cable from the
booster battery.
3. Remove the positive (+) cable from the booster
battery.
4. Remove the other end of the positive (+) cable
from the discharged battery.
After the vehicle is started, let it idle for a while to
let the engine ªrelearnº its idle conditions. Drive it
around for a while with all electrical accessories
turned off to let the battery recharge. Driveability
may be deteriorated slightly until all drive modes
are ªrelearned.ºYou may need to use a battery
charger to fully recharge the battery.
If you need to replace your battery, seeBatteryin
theMaintenance and Carechapter.
File:10fnerc.ex
Update:Fri Sep 6 08:49:57 1996
Page 241 of 321

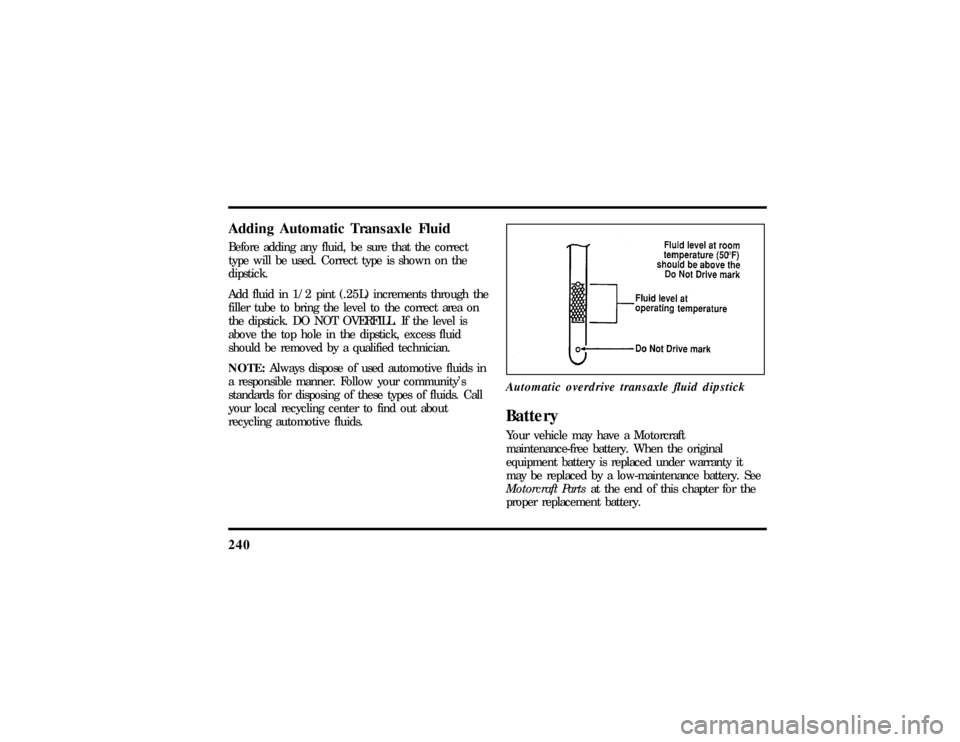
240Adding Automatic Transaxle FluidBefore adding any fluid, be sure that the correct
type will be used. Correct type is shown on the
dipstick.
Add fluid in 1/2 pint (.25L) increments through the
filler tube to bring the level to the correct area on
the dipstick. DO NOT OVERFILL. If the level is
above the top hole in the dipstick, excess fluid
should be removed by a qualified technician.
NOTE:Always dispose of used automotive fluids in
a responsible manner. Follow your community's
standards for disposing of these types of fluids. Call
your local recycling center to find out about
recycling automotive fluids.Automatic overdrive transaxle fluid dipstick
BatteryYour vehicle may have a Motorcraft
maintenance-free battery. When the original
equipment battery is replaced under warranty it
may be replaced by a low-maintenance battery. See
Motorcraft Partsat the end of this chapter for the
proper replacement battery.
File:11fnmcc.ex
Update:Fri Sep 6 08:51:16 1996
Page 242 of 321

241
The low-maintenance battery has removable vent
caps for checking the electrolyte level and adding
water. The electrolyte level should be checked at
least every 24 months or 24,000 miles
(40,000 km) in temperatures up to90ÊF(32ÊC)
and more often in temperatures above90ÊF(32ÊC).
Keep the electrolyte level in each cell up to the
level indicator. Do not overfill.
If the level gets low, refill the battery with distilled
water. If necessary, you can add tap water to the
battery, provided the water is not hard or does not
have a high mineral or alkali content. If the battery
needs water quite often, have the charging system
checked for a possible malfunction.Help Us Protect Our EnvironmentFord Motor Company strongly recommends that
used lead-acid batteries be returned to an
authorized recycling facility for disposal.Battery recycling symbol
Because your vehicle's engine is electronically
controlled by a computer, some control conditions
are maintained by power from the battery. If you
ever disconnect the battery or install a new battery,
you must allow the computer to ªrelearnº its idle
conditions before your vehicle will drive properly.
To let the engine do this, put the gearshift in P
(Park), turn off all the accessories, and start the
vehicle. Let the engine idle for at least one minute.
(Engine must be warm in order to ªlearn.º) Also,
allow approximately 10 miles (16 km) of stop and
go traffic for your vehicle's engine to completely
ªrelearnº its idle.
File:11fnmcc.ex
Update:Fri Sep 6 08:51:16 1996
Page 261 of 321

260Do not make any unauthorized changes to your
vehicle or engine. Changes that cause more
unburned fuel to reach the exhaust system can
increase the temperature of the engine or exhaust
system.
By law, anyone who manufactures, repairs, services,
sells, leases, trades vehicles, or supervises a fleet of
vehicles is not permitted to intentionally remove an
emission control device or prevent it from working.
In some of the United States and in Canada,
vehicle owners may be liable if their emission
control device is removed or is prevented from
working.
Do not drive your vehicle if it does not operate
properly. See your dealer if the engine runs on for
more than five seconds after you shut it off or if it
misfires, surges, stalls, or backfires.Information about your vehicle's emission control
system is on the Vehicle Emission Control
Information decal located on or near the engine.
This decal identifies engine displacement and gives
some tune-up specifications.
How to Prepare Your Vehicle for
Inspection/Maintenance (I/M) TestingIn some localities it may become a legal
requirement to pass an Inspection/Maintenance
(I/M) test of the On-Board Diagnostic (OBD) II
system. If the vehicle's powertrain system or its
battery has just been serviced, the OBD II system is
reset to a not ready for I/M testing condition. To
prepare for I/M testing, the law specifies that
additional mixed city and highway driving is
required to complete the check of the OBD II
system.
File:11fnmcc.ex
Update:Fri Sep 6 08:51:16 1996
Page 277 of 321

276Batteryq
Check and recharge as necessary.
q
Keep connections clean and covered with a
light coat of grease.
q
If storing your vehicle for more than 30 days
without recharging the battery, disconnect the
battery cables to ensure battery charge is
maintained for quick starting. NOTE: If battery
cables are disconnected, it will be necessary to
reset any memory features (eg. radio presets).
Brakesq
Make sure brakes and parking brake are fully
released.
Tiresq
Maintain recommended air pressures.
Miscellaneousq
Make sure all linkages, cables, levers and clevis
pins under vehicle are covered with grease to
prevent rust.
q
Move vehicles at least 25 feet (8 m) every 15
days to lubricate working parts and prevent
corrosion.
File:12fncsc.ex
Update:Mon Sep 9 10:15:52 1996
Page 305 of 321

307
Anti-theft system (continued)
disarming an untriggered system.... 128
disarming a triggered system...... 129
triggering...........126, 128
warning light............ 16
Appeals (see Dispute settlement board) . . 280
Assistance (see Customer assistance) . . . 279
Audio system (see Electronic
sound system)............ 25
Autolamp system (see Headlamps).... 56
Automatic transaxle
driving with............. 177
fluid, adding..........238, 240
fluid, checking.........238, 239
fluid, refill capacities......... 272
fluid, specification.......... 273
B
Basic vehicle warranty........... 4
Battery................ 240
acid, treating emergencies....... 241
battery saver............. 126
charging system warning light..... 13
disconnecting............ 216
how to service............ 240
jumping a disabled battery....... 211
maintenance-free........... 240
proper disposal, recycling....... 241
replacement, specifications....... 271
servicing.............. 240
voltage gauge............ 13
when storing your vehicle....... 276
Brake fluid............... 229
brake warning light.......... 10
checking and adding......... 229
File:fnixc.ex
Update:Tue Sep 17 08:28:54 1996
Page 317 of 321

319
Safety seats for children (continued)
in rear seat............. 149
tether anchorage hardware...... 160
Seat belts (see Safety restraints)..... 135
Seats................. 131
adjusting the seats, power....... 132
child safety seats........... 149
cleaning upholstery.......... 270
head restraints............ 131
Service concerns............ 279
Servicing your vehicle.......... 219
precautions when servicing...... 221
servicing when you tow........ 217
Shift positions (see Gearshift) . . . 178, 179
Shoulder and lap belts
(see Safety restraints)......135, 137
Shoulder belts
(see Safety restraints)......137, 138
Side mirrors.............. 92
adjusting.............. 110
heated............... 112
Sliding moon roof (see Moon roof).... 91Snow tires and chains.......... 250
Spare tire............... 205
changing the tire........205, 207
conventional spare.......... 206
finding the spare........... 206
removing the spare tire........ 206
storing the flat tire.......206, 208
temporary spare........... 205
Spark plugs, specifications........ 271
Specification chart, lubricants....... 273
Speed control
turning off............. 72
when towing a trailer......... 189
Speedometer.............. 17
Starting your vehicle
preparing to start your vehicle..... 165
starting a cold engine......... 166
starting after a collision........ 191
starting a warm engine........ 166
starting your vehicle if the battery
is disabled............. 211
Steering, power............ 177
File:fnixc.ex
Update:Tue Sep 17 08:28:54 1996
Page 319 of 321

321
Trailer towing (continued)
trailer lamps............. 188
Transaxle
automatic operation......177, 178
fluid, checking and adding
(automatic).........238, 239
fluid, refill capacities......... 272
lubricant specifications........ 273
Transaxle control switch......... 181
Trunk, using the remote entry system
to open............... 123
Tune-up specifications (VECI)...... 260
Turn signal.............. 64
indicator lights...........14,65
lever...............64,65
U
Used engine oil, disposal.....220, 240
V
Variable interval wipers......... 66
VECI (Vehicle Emission Control Information)
decal................ 260
Vehicle loading
automatic transaxles......... 184
automatic transmissions........ 184
calculating the load.......... 184
manual transaxles.......... 184
manual transmissions......... 184
understanding loading information . . . 183
Vehicle storage............. 274
Ventilating your vehicle
(see Climate control)....... 45,51
Viscosity (see Engine oil)........ 226
Visor (see Sun visor).......... 94
Voltmeter (see Battery voltage gauge) . . . 13
File:fnixc.ex
Update:Tue Sep 17 08:28:54 1996