Page 54 of 241
Keys and Locks
Glove Box
Open the glove box by pulling the
bottom of the handle. Close it with a
firm push. Lock or unlock the glove
box with the master key.
Instruments and Controls
An open glove box can cause
serious injury to your passenger in a crash, even if the
passenger is wearing the seat
belt.
Always keep the glove box
closed while driving.ProCarManuals.comMain Menu Table of Contents s t
Page 56 of 241

Seats
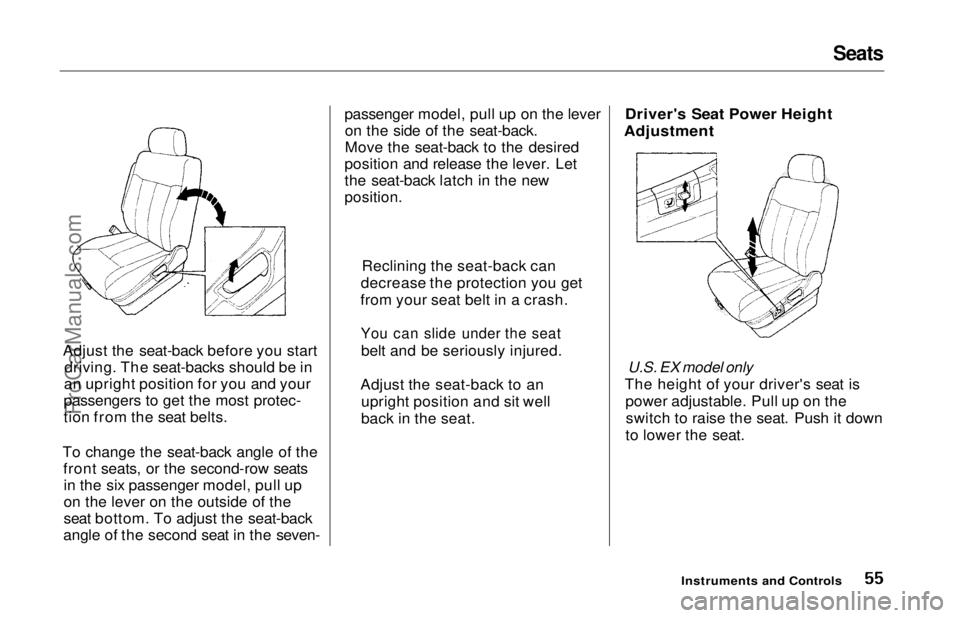
Adjust the seat-back before you start driving. The seat-backs should be in
an upright position for you and your
passengers to get the most protec-
tion from the seat belts.
To change the seat-back angle of the front seats, or the second-row seatsin the six passenger model, pull up
on the lever on the outside of the
seat bottom. To adjust the seat-back
angle of the second seat in the seven- passenger model, pull up on the lever
on the side of the seat-back.
Move the seat-back to the desired
position and release the lever. Let
the seat-back latch in the new
position.
Driver's Seat Power Height
Adjustment
U.S. EX model only
The height of your driver's seat is power adjustable. Pull up on theswitch to raise the seat. Push it down
to lower the seat.
Instruments and Controls
Reclining the seat-back can
decrease the protection you get
from your seat belt in a crash.
You can slide under the seat
belt and be seriously injured.
Adjust the seat-back to an upright position and sit well
back in the seat.ProCarManuals.comMain Menu Table of Contents s t
Page 116 of 241

Loading Cargo
The maximum load you can carry in your Honda is 1,150 Ibs (535 kg). It
includes the total weight of all
passengers and their belongings, any
accessories, and the tongue weight
of a trailer. This 1,150 Ibs (535 kg)
figure is shown as the Vehicle Capacity Weight on the tire infor-
mation label attached to the driver's doorjamb.
To figure out how much cargo you
can cany: Figure the total "occupant weight"
you will be transporting. To do this, multiply the number of people (driver and all passengers) by 150
Ibs (70 kg). Subtract this number from the
Vehicle Capacity Weight (1,150 lbs/535 kg). If you are towing a trailer, subtract
the tongue weight. See Towing a
Trailer on page 130 .
This final number is the total weight of cargo you can load in or on the car.
With seven occupants (driver and six passengers), the maximum recom-
mended weight for cargo is 100 Ibs
(45 kg).
Where you store this cargo, and how
well you secure it, are just as important as how much it weighs.
Make sure you load cargo so it will
not shift while driving. Items stored
in the cargo area behind the third
seat should be stored as far forward
as possible. You could store addi-
tional items on the floor behind the
front seats. Make sure they cannot roll under the front seat and
interfere with the pedals.
For greater cargo capacity, the thirdseat can be folded into the floor and
the second row seats can either be removed or folded up (depending onmodel). Passengers should never sit
in the open cargo area while the car
is moving. They should sit in one of
the seats and wear their seat belts.
If you must carry large objects that
prevent you from closing the tailgate,
be aware that exhaust gas can enter the interior. See Carbon Monoxide
Hazard on page 29 .
Before DrivingProCarManuals.comMain Menu Table of Contents s t
Page 118 of 241

Preparing to Drive
You should do the following checks and adjustments every day before
you drive your car.
1. Make sure all windows, mirrors, and outside lights are clean and
unobstructed. Remove frost, snow,or ice.
2. Check that the hood and tailgate are fully closed.
3. Visually check the tires. If a tire looks low, use a gauge to check its
pressure.
4. Check that any items you may be carrying with you inside are stored
properly or fastened down securely. 5. Check the adjustment of the seat
(see page 54).
6. Check the adjustment of the inside and outside mirrors (see
page 64).
7. Check the adjustment of the steering wheel (see page 44).
8. Make sure the doors are securely
closed and locked.
9. Fasten your seat belt. Check that your passengers have fastenedtheir seat belts (see page 7). 10.Turn the ignition ON (II). Check
the indicator lights in the instru-
ment panel.
11. Start the engine (see page 119).
12. Check the gauges and indicator lights in the instrument panel (seepage 33).
DrivingProCarManuals.comMain Menu Table of Contents s t
Page 136 of 241

Maintenance
This section explains why it is important to keep your car well
maintained and to follow basic
maintenance safety precautions.
This section also includes Maintenance Schedules for normaldriving and severe driving conditions,
a Maintenance Record, and instruc-
tions for simple maintenance tasks
you may want to take care of
yourself.
If you have the skills and tools to per-
form more complex maintenance
tasks on your Honda, you may want to purchase the Service Manual. See
page 235 for information on how toobtain a copy, or see your Honda
dealer.
Maintenance Safety....................... 138
Important Safety Precautions.. 139
Maintenance Schedule.................. 140
Maintenance Record..................... 144
Owner Maintenance Checks........ 146
Fluid Locations............................... 147
Engine Oil....................................... 148
Adding Oil................................... 148Recommended Oil..................... 148
Synthetic Oil............................... 149
Additives..................................... 150
Changing the Oil and Filter...... 150
Cooling System.............................. 152
Adding Engine Coolant............. 152Replacing Engine Coolant........ 154
Windshield Washers..................... 156
Automatic Transmission Fluid..... 157
Brake Fluid..................................... 158
Brake System............................. 158
Anti-lock Brake System............ 159
Power Steering............................... 159
Air Cleaner Element...................... 160
Spark Plugs..................................... 162
Replacement............................... 162
Specifications............................. 163
Battery............................................ 164
Windshield Wipers........................ 166
Air Conditioning System............... 169
Drive Belts...................................... 170
Timing Belt..................................... 170
Tires................................................ 171 Inflation....................................... 171
Inspection................................... 173
Maintenance............................... 173
Tire Rotation.............................. 174 Replacing Tires and Wheels .... 174
Wheels and Tires....................... 175
Winter Driving........................... 175 Snow Tires.............................. 176
Tire Chains............................. 176
Lights.............................................. 177
Headlight Aiming...................... 177
Replacing Bulbs......................... 179
Storing Your Car............................ 184
MaintenanceProCarManuals.comMain Menu s t
Page 169 of 241
Drive Belts, Timing Belt
Drive Belts
Check the condition of the two drive
belts. Examine the edges of each
belt for cracks or fraying. Check the tension of each belt by
pushing on it with your thumb
midway between the pulleys.
The belts should have the following "play" or deflection.
Alternator belt:
0.31 — 0.41 in(8.0 — 10.5 mm)
Power steering belt:
0.51 — 0.63 in(13.0 — 16.0 mm)
If you see signs of wear or looseness,
have your dealer adjust or replace
the belts.
Timing Belt
The timing belt and balancer belt should normally be replaced at the
intervals shown in the maintenance
schedule.
Replace these belts at 60,000 miles (U.S.) or 100,000 km (Canada) if you
regularly drive your car in one or more of these conditions:
In very high temperatures(over 110°F, 43° C).
In very low temperatures
(under — 20°F, — 29°C).
Maintenance POWER STEERING BELT
ALTERNATOR BELTProCarManuals.comMain Menu Table of Contents s t
Page 184 of 241

Appearance Care
Regular cleaning and polishing of
your Honda helps to keep it "new"
looking. This section gives you hints on how to clean your car and
preserve its appearance: the paint,
brightwork, wheels and interior. Also included are several things you cando to help prevent corrosion. Exterior Care.................................. 186
Washing...................................... 186
Waxing........................................187
Aluminum Wheels..................... 187Paint Touch-up........................... 187
Interior Care................................... 188 Carpeting.................................... 188
Fabric.......................................... 188
Vinyl............................................ 188
Seat Belts.................................... 189
Windows..................................... 189
Air Fresheners........................... 189
Corrosion Protection..................... 190
Body Repairs.................................. 191
Appearance CareProCarManuals.comMain Menu s t
Page 188 of 241

Interior Care
Seat Belts
If your seat belts get dirty, you can
use a soft brush with a mixture of
mild soap and warm water to clean
them. Do not use bleach, dye, or cleaning solvents. They can weaken
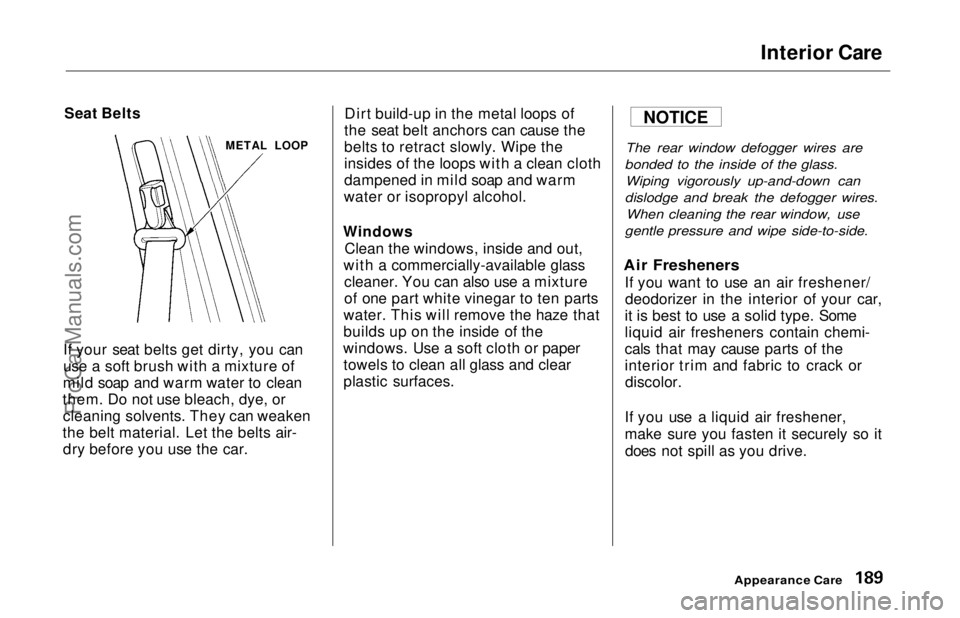
the belt material. Let the belts air- dry before you use the car. Dirt build-up in the metal loops of
the seat belt anchors can cause the
belts to retract slowly. Wipe the
insides of the loops with a clean cloth
dampened in mild soap and warm
water or isopropyl alcohol.
Windows Clean the windows, inside and out,
with a commercially-available glass cleaner. You can also use a mixture
of one part white vinegar to ten parts
water. This will remove the haze that
builds up on the inside of the
windows. Use a soft cloth or paper towels to clean all glass and clear
plastic surfaces.
The rear window defogger wires are
bonded to the inside of the glass. Wiping vigorously up-and-down can
dislodge and break the defogger wires. When cleaning the rear window, use
gentle pressure and wipe side-to-side.
Air Fresheners
If you want to use an air freshener/deodorizer in the interior of your car,
it is best to use a solid type. Some
liquid air fresheners contain chemi-
cals that may cause parts of the
interior trim and fabric to crack or discolor.
If you use a liquid air freshener,
make sure you fasten it securely so it does not spill as you drive.
Appearance Care
METAL LOOP
NOTICEProCarManuals.comMain Menu Table of Contents s t