Page 1246 of 2189
Doors
Door Panel Replacement
NOTE: Take care not to scratch the door panel andother pa rts.
'1. Remove:
. Inner handle trim (see page 20-14). Mirror mount cover panel (see page 20-24)
2. lf applicable, remove the regulator handle bypulling the clip out with a wire hook.
REGULATOR HANDLE
WIRE HOOK
Remove the armrest pocket, then disconnect thepower window switch connector.
ARMRESTPOCKET
4. Remove the speaker cover, then remove lhe screws.
3.
I
>: Screw locations, 3
| 6b:a,'
L"_
COVER
20-16
TRIM PADREMOVER(Commercially
available)Snap-on#A'177, orequivalent1mm{0.04 in.)
5. Release the clips that hold the door panel. Removethe door panel by pulling it upward. Disconnect thespeaker connector.
NOTE: Remove the door panel with as little bendingas possible to avoid creasing or breaking it.
.L12 fim(0.47 in.) T-
>: Clip locations,
l^
J[
=l$
ll,\*
atr-
,,)
REMoVER tl-)
11.77 in.l
O) CONNECTOR
6. lnstallation is the reverse of the removat oroceoure.
DOOR PANEL
Page 1257 of 2189
b
Rear Window l3Dl:
SPACER,
I
| ,o"r.".". o
{ff*'*'YPe
bod'side)
FASTENER,4(Self-adhesive-type, glass side)
RUBBER DAM,2
tIISEAL A, 1
=@
SEAL B, 2
e
Ouarter Glass:
3D:
OUARTER GLASSRemoval, page 20-40Installation, page 20 4lOUARTERGLASS TRIM
LOWER CLIPlSelf adhesive'type)
2D:
FASTENER(Self-adhesive-type,glass side)
FASTENER(Self-adhesave type,body side)
\
\
)f\
n,
$(
\il]
LOWER RUBBERDAM
LOWER CLIP(Self adhesive-type)
J
20-27
Page 1262 of 2189

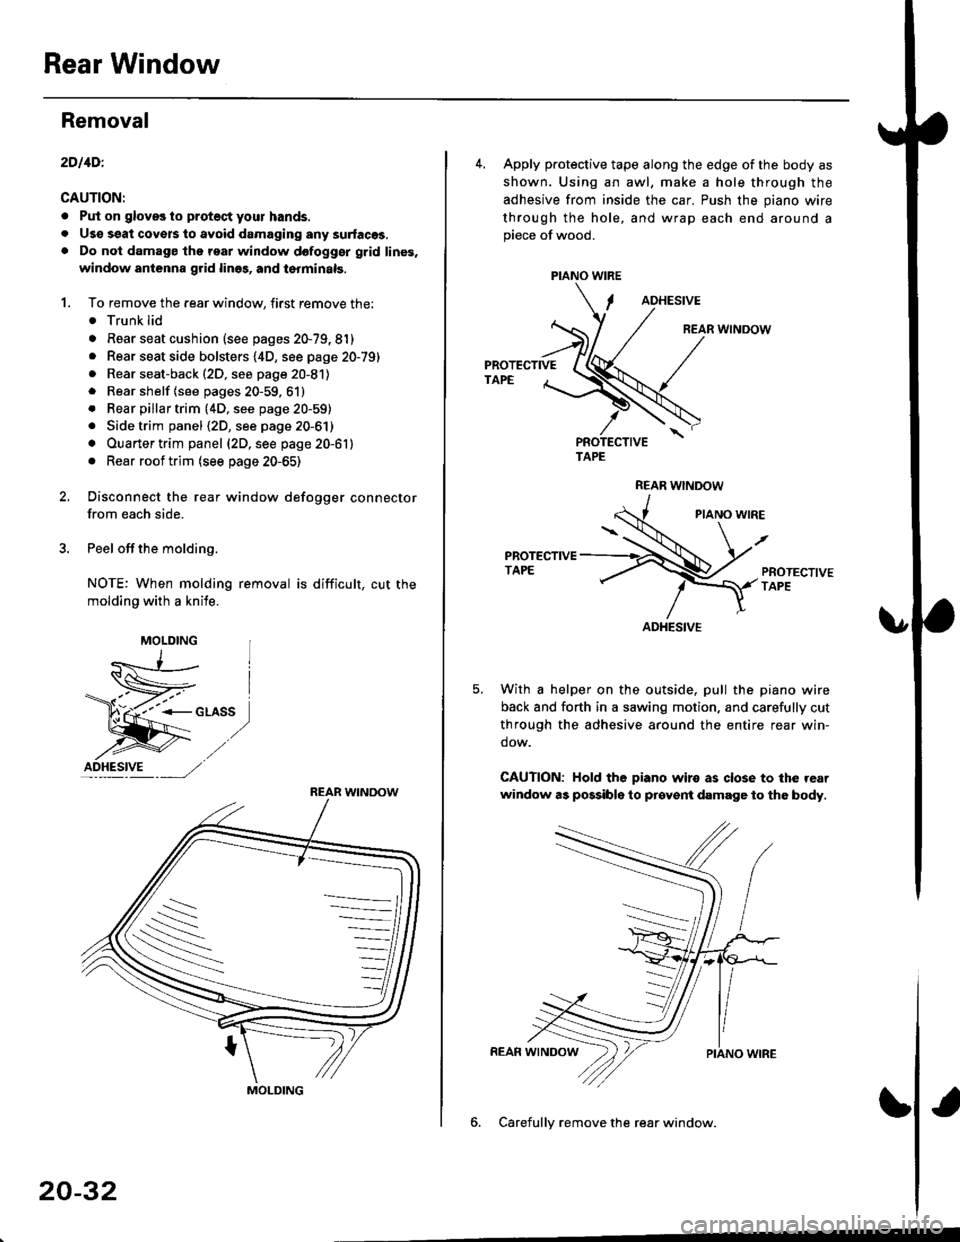
Rear Window
Removal
2DllDl
CAUTION:
. Put on gloves to protect your hands.
. Uso ssat covers to avoid damaging any surlaces,. Do not damage thg roar window dofogggr grid linss,
window antenna grid lines, and tsrminalg.
1. To remove the rear window, first remove the:. Trunk lid
. Rear seat cushion (see pages 20-79, 81). Rear seat side bolsters {4D, see page 20-79). Rear seat-back (2D, see page 20-81)
. Rear shelf {see pages 20-59, 61}
. Rear pillar trim {4D, see page 20-59). Side trim panel (2D, see page 20-61)
. Ouarter trim panel (2D, see page 20-61)
. Rear roof trim (see page 20-65)
2, Disconnect the rear window defogger connector
from each side.
3. Peel off the molding.
NOTE: When molding removal is difficult, cut the
molding with a knile.
F"*t,
MOLDING
ID_HESI.VE ---, ,/,/
REAR WINDOW
S
MOLDING
20-32
PIANO WIRE
4. Apply protective tape along the edge of the body as
shown. Using an awl, make a hole through the
adhesive from inside the car. Push the piano wire
through the hole, and wrap each end around apiece of wood.
ADHESIVE
REAR WINDOW
PROTECTIVETAPE
TAPE
REAR WNDOW
PIANO WIRE
PROTECTIVETAPE
With a helper on the outside, pull the piano wire
back and forth in a sawing motion, and carefully cut
through the adhesive around the entire rear win-
dow.
CAUTION: Hold the piano wiro as close to the rear
window as possibls to prcyent damage to the body.
6. Carefullv remove the rear window.
ADHESIVE
Page 1266 of 2189

Rear Window
Removal
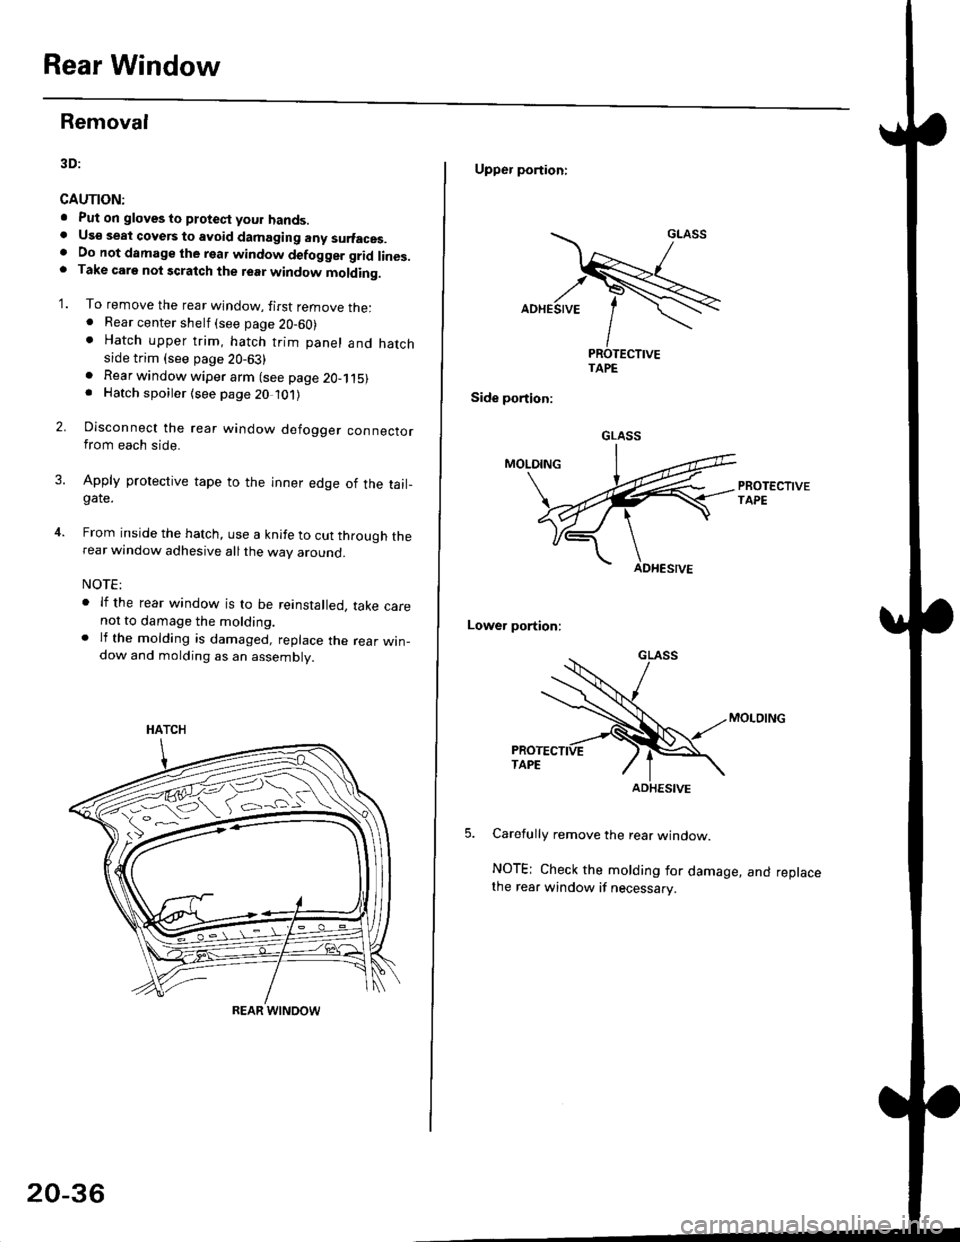
3D:
CAUTION:
. Put on gloves to ptotect your hands.. Us€ seat cove6 to avoid damaging any surfaces.. Do not damage the rear window defogger grid lines.. Take carg nol scratch the terr window molding.
'1. To remove the rear window, firsr remove the:. Rear center shelf (see page 20-60). Hatch upper trim, hatch trim panel and hatchside trim (see page 20-63)
2.
. Rear window wiper arm (see page 2O-115). Hatch spoiler (see page 20 101)
Disconnect the rear window defogger connectorfrom each side.
Apply protective tape to the inner edge of the tail_gate.
From inside the hatch, use a knife to cut through therear window adhesive all the way around.
NOTE:
. lf the rear window is to be reinstalled, take carenot to damage the molding.. lf the molding is damaged, replace the rear win_dow and molding as an assembly.
HATCH
ffi#
REAR WINOOW
20-36
Upper portioni
TAPE
Side portion:
Lower portion;
Carefully remove the rear window.
NOTE; Check the molding for damage, and replacethe rear window if necessary.
GLASS
ADHESIVE
Page 1270 of 2189

Rear WindowOuarter Glass
Installation {cont'd)
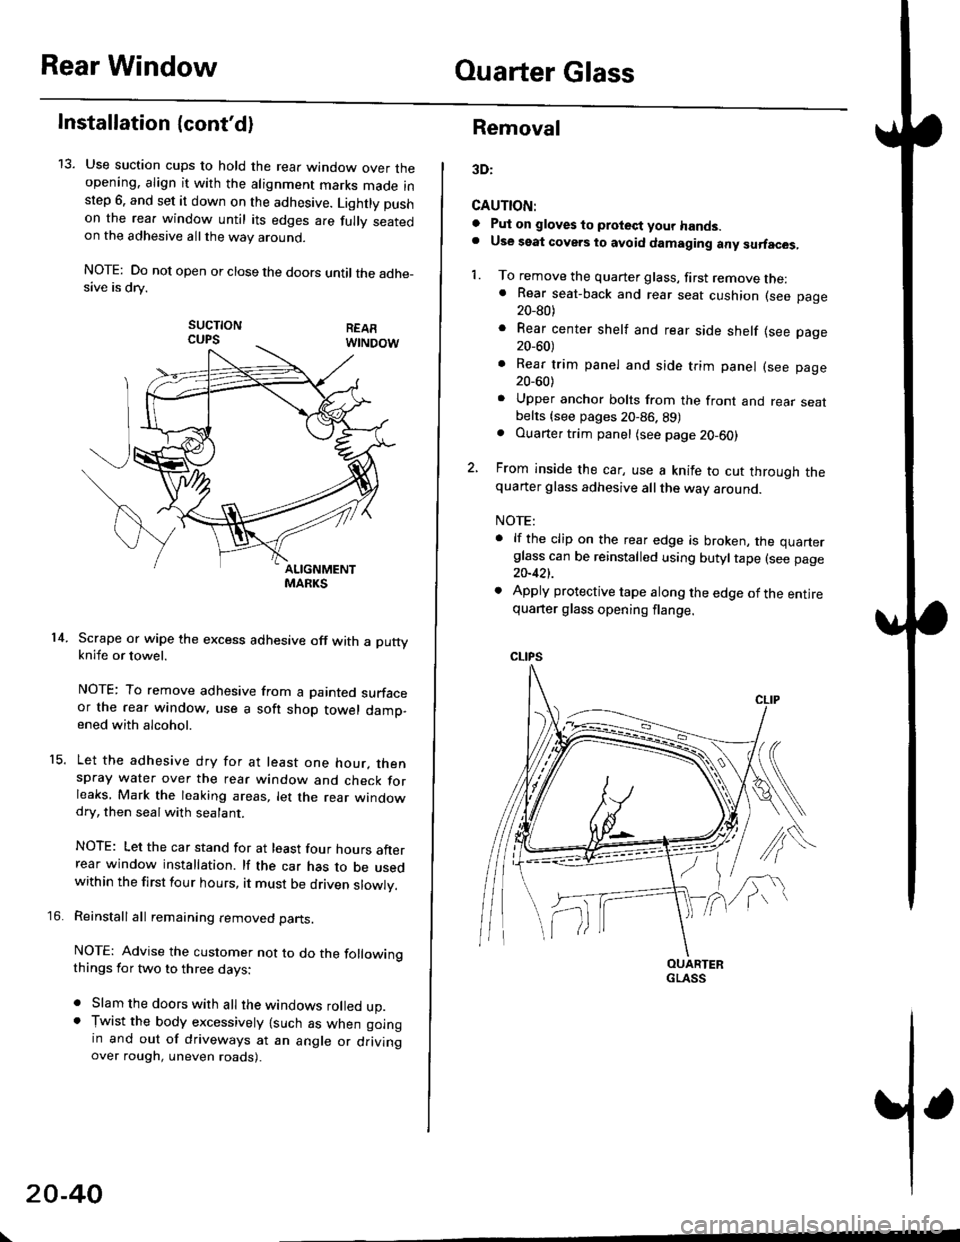
13. Use suction cups to hold the rear window over theopening. align it with the alignment marks made inslep 6. and set it down on the adhesive. Lightly pushon the rea. window until its edges are fully seatedon the adhesive allthe way around.
NOTE: Do not open or close the doors until the adhe_sive is drv.
sucTtoNCUPS
Scrape or wipe the excess adhesive off with a puttyknife or towel.
NOTE: To remove adhesive from a painted surfaceor the rear window. use a soft shop towel damp-ened with alcohol.
Let the adhesive dry for at least one hour. thenspray water over the rear window and check forleaks, Mark the leaking areas, let the rear windowdry, then seal with sealant.
NOTE: Let the car stand for at least four hours afterrear window installation. lf the car has to be usedwithin the first four hours, it must be driven slowly.
Reinstall all remaining removed parts.
NOTE: Advise the customer not to do the followingthings for two to three days:
. Slam the doors with all the windows rolled up.. Tr,vist the body excessively lsuch as when goingin and out of driveways at an angle or drivingover rough, uneven roads).
14.
15.
\
20-40
Removal
3D:
CAUTION:
a Pul on gloves to protect your hands.. Use seat covers to avoid damaging any surfaces,
1. To remove the quarter glass, first remove the:. Rear seat-back and rear seat cushion (see page20_80)
. Rear center shelf and rear side shelf lsee page20_60)
. Rear trim panel and side trim panel (see page20_60)
. Upper anchor bolts from the front and rear seatbelts {see pages 20-86. 89). Ouarter trim panel (see page20-60)
2, From inside the car, use a knife to cut through thequarter glass adhesive all the way around.
NOTE:
. lf the clip on the rear edge is broken, the quarterglass can be reinstalled using butyltape (see page20-421.
. Apply protective tape along the edge of the entirequarter glass opening flange.
OUARTERGLASS
Page 1274 of 2189

Ouarter Glass
Installation (cont'd)
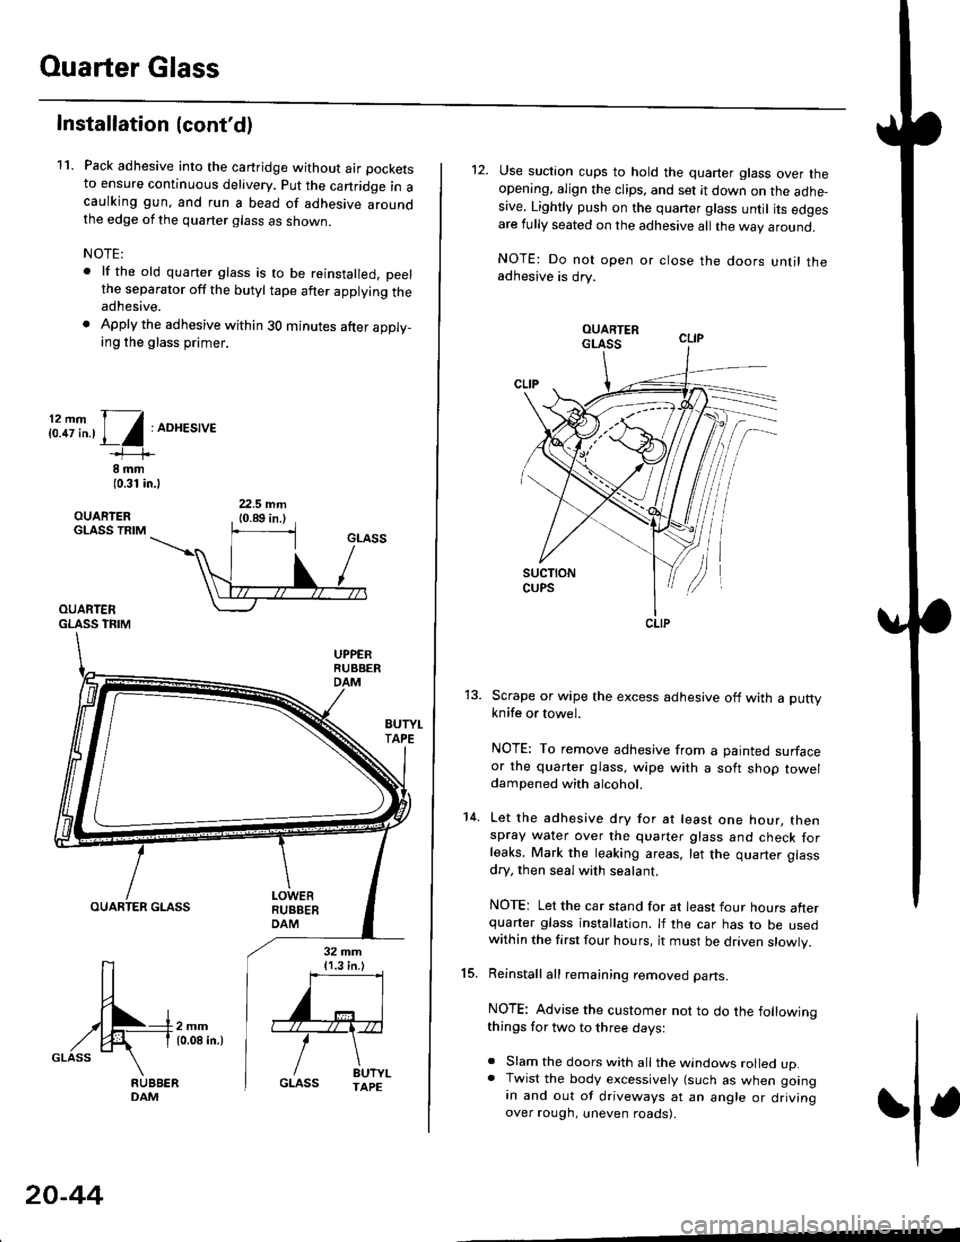
11. Pack adhesive into the cartridge without air pockets
to ensure continuous delivery. put the canridge in acaulking gun, and run a bead of adhesive aroundthe edge of the quarter glass as shown.
NOTE:
. lf the old quarter glass is to be reinstalled, peelthe separator off the butyl tape after applying theadhesive.
. Apply the adhesive within 30 minutes after apply_ing the glass primer.
i:.8i".,1/:ADHES,'E
8 rnm(0.31 in.l
OUARIERGLASS TRIM
OUARTERGLASS TFIM
BUTYI.TAPE
OUARTER GLASS
[-4m,^,GLASS \
32 mm{1.3 in.)
''='I
'"r"\
/ drt".GLASS TAPE
20-44
12. Use suction cups to hold the quarter glass over theopening, align the clips, and set it down on the adhe-sive. Lightly push on the quaner glass until its edgesare fully seated on the adhesive all the way around.
NOTE: Do not open or close the doors until theadhesive is drv.
Scrape or wipe the excess adhesive off with a puttyknife or towel.
NOTE: To remove adhesive from a painted surfaceor the quarter glass, wipe with a soft shop toweldampened with alcohol.
Let the adhesive dry for at least one hour, thenspray water over the quarter glass and check forleaks. Mark the leaking areas, let the quarter glass
dry, then seal with sealant.
NOTE: Let the car stand for at least four hours afterquarter glass installation. lf the car has to be usedwithin the first four hours, it must be driven slowly.
Reinstall all remaining removed parts.
NOTE: Advise the customer not to do the followingthings for two to three days:
. Slam the doors with all the windows rolled up.. Twist the body excessively (such as when goingan and out of driveways at an angle or drivingover rough, uneven roads).
15.
14.
CLIP
Page 1323 of 2189
Exterior
Component Location Index
NOTE: Refer to the Civic BodV Repair Manual, '1996 Model Series, P/N.6150330,forthe hood, trunk lid and hatch removal.
2Dl30llDl
LICENSE PLATETRIM TRUNK LIDROOF MOLOINGReplacement,
SIDE WINDOWMOLDINGSReplacement,page 20-102Replacement,page 20-100Adjustment, page 20-97Tolsion Bar Removal,page 20-10220 99
HOODAdiustment, page 20 96Hood Edge protector
Replacement, page 20 99
TRUNK LIDWEATHERSTRIPReplacement,page 20-100
REAR BUMPERReplacement,page 2O-95
SILL PANELReplacement, page 20 105
REAR AIR OUTLETReplacement,page 20-106
FUEL PIPEPROTEfiORReplacement,page 20-106
FENDERWELL TRIMReplacement, page 20-106
Replacement,page 20-106
3D:
HATCH
HATCHAdjustment,page 20-98
WEATHERSTRIP
20-93
Page 1331 of 2189
Hatch Spoiler
Removal
NOTE: Take care not to scratch the hatch and body
1. Remove the hatch upper trim (see page 20-63)
2. Remove the nuts, and detach the clip, then lift the
hatch spoiler uP.
a: Nut locations, 4
1 2lbt.ftl _ j/
GROMMET
HIGH MOUNT BRAKELIGHT CONNECTOR
Disconnect the high mount brake light connector and
rear window washer tube, then remove the hatch
spoiler.
------,*;)
4. lf necessary. remove the spoiler trim from the spoiler
frame.
NOTE: The hatch spoiler trim for Canada produced
cars cannot be disassembled.
>: Clip locations
A>,4
>: Scr€w
5. Installation is the reverse of the removal procedure'
NOTEi
. lf necessary, replace any damaged clips.
a Make sure the connector and washer tube are
connected ProPerlY.
20-101