1997 CHEVROLET TAHOE flat tire
[x] Cancel search: flat tirePage 275 of 433
Downloaded from www.Manualslib.com manuals search engine D
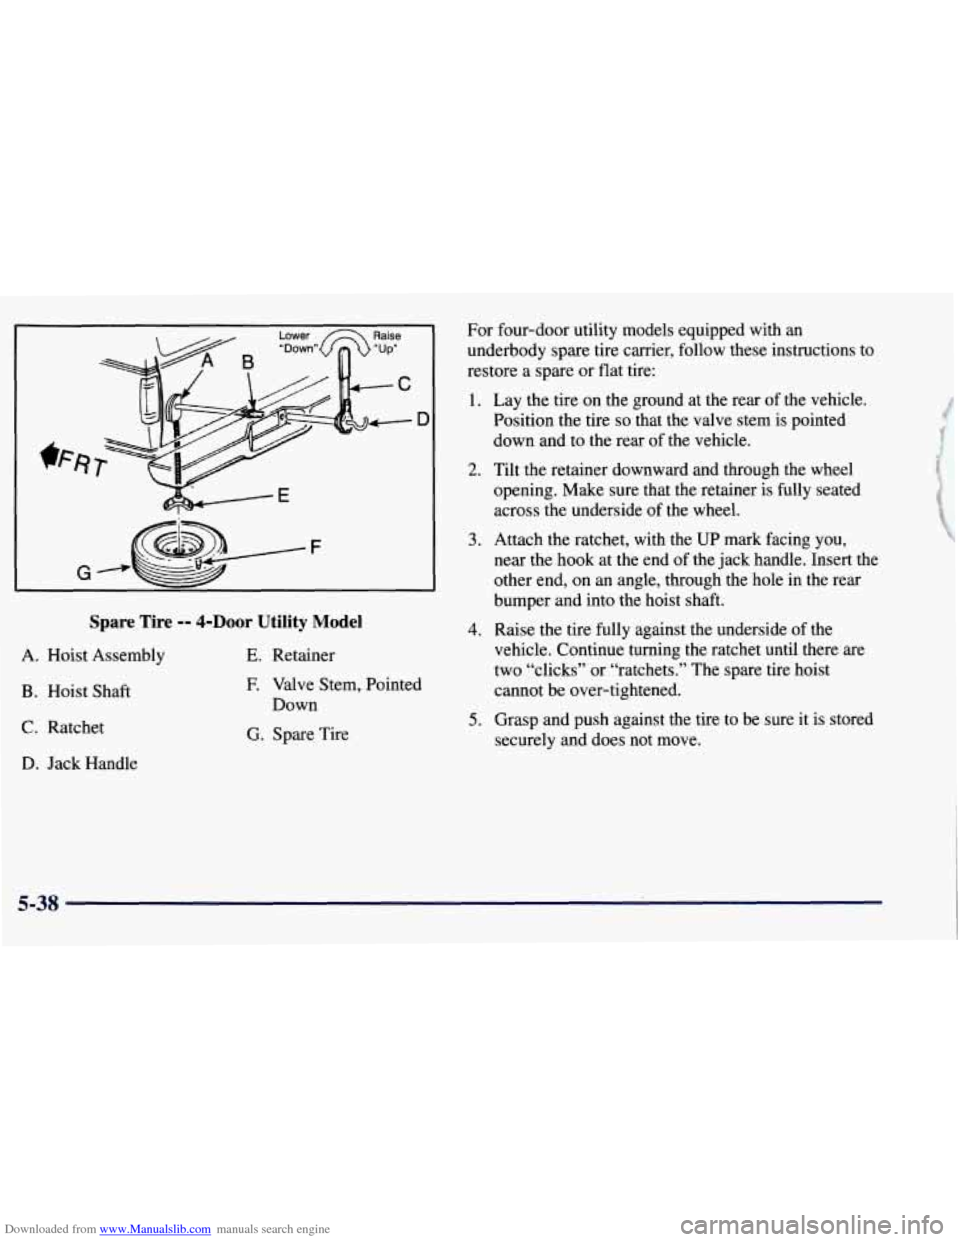
Spare Tire -- 4-Door Utility Model
A.
Hoist Assembly
B. Hoist Shaft
C. Ratchet
D. Jack Handle
E. Retainer
E Valve Stem, Pointed
Down
G. Spare Tire For four-door utility
models equipped with an
underbody spare tire carrier, follow these instructions to
restore a spare or flat tire:
1. Lay the tire on the ground at the rear of the vehicle.
Position the tire
so that the valve stem is pointed
down and to the rear of the vehicle.
2. Tilt the retainer downward and through the wheel
opening. Make sure that the retainer is fully seated
across the underside of the wheel.
3. Attach the ratchet, with the UP mark facing you,
near the hook at the end
of the jack handle. Insert the
other end, on an angle, through the hole in the rear
bumper and into the hoist shaft.
4. Raise the tire fully against the underside of the
vehicle. Continue turning the ratchet until there are
two “clicks” or “ratchets.” The spare tire hoist
cannot be over-tightened.
securely and does not move.
5. Grasp and push against the tire to be sure it is stored
5-38
Page 324 of 433
Downloaded from www.Manualslib.com manuals search engine CAUTION: (Co
0 Underinflated tires pose the same danger as
overloaded tires. The resulting accident
could cause serious injury. Check all tires
frequently to maintain the recommended
pressure. Tire pressure should be checked
when your tires are cold.
0 Overinflated tires are more likely to be cut,
punctured or broken by a sudden impact
--
such as when you hit a pothole. Keep tires
at the recommended pressure.
0 Worn, old tires can cause accidents. If your
tread is badly worn, or if your tires have
been damaged, replace them.
Inflation -- Tire Pressure
The Certificatioflire label, which is on the rear edge of
the driver’s door, or on the incomplete vehicle document
in the cab, shows the correct inflation pressures for your tires when they’re cold. “Cold” means your vehicle has
been sitting for at least three hours or driven no more
than
1 mile (1.6 km).
You can operate some vehicles at reduced inflation
pressures only when you’ll be carrying reduced loads.
On those vehicles, the minimum cold inflation pressures
for a typical reduced load are printed on the Improved
Ride Tire Pressure label located
on the driver’s door.
Weigh the vehicle to find the load on each tire and see
the label for the minimum cold inflation pressures for
that load.
6-45
Page 325 of 433
Downloaded from www.Manualslib.com manuals search engine NOTICE:
Don’t let anyone tell you that underinflation or
overinflation is all right. It’s not.
If your tires
don’t have enough air (underinflation), you can
get the following:
Too much flexing
Too much heat
Tire overloading
Bad wear
0 Bad handling
Bad fuel economy.
If your tires have too much air (overinflation),
you can get the following:
Unusual wear
Bad handling
Rough ride
Needless damage from road hazards.
When to Check
Check your tires once a month or more. Also, check the
tire pressure of the spare tire.
How to Check
Use a good quality pocket-type gage to check tire
pressure. You can’t tell
if your tires are properly inflated
simply by looking at them. Radial tires may look
properly inflated even when they’re underinflated.
Be sure to put the valve caps back on the valve stems.
They help prevent
leaks by keeping out dirt and moisture.
Tire Inspection and Rotation
Tires should be rotated every 6,000 to 8,000 miles
(10 000 to 13 000 km). Any time you notice unusual
wear, rotate your tires as soon as possible and check
wheel alignment. Also check for damaged tires or
wheels. See “When It’s Time for New Tires” and
“Wheel Replacement” later in this section for
more information.
The purpose
of regular rotation is to achieve more
uniform wear for all tires on the vehicle. The first
rotation is the most important. See “Scheduled
Maintenance Services” in the Index for scheduled
rotation intervals.
Page 326 of 433
Downloaded from www.Manualslib.com manuals search engine FRT
f DO5
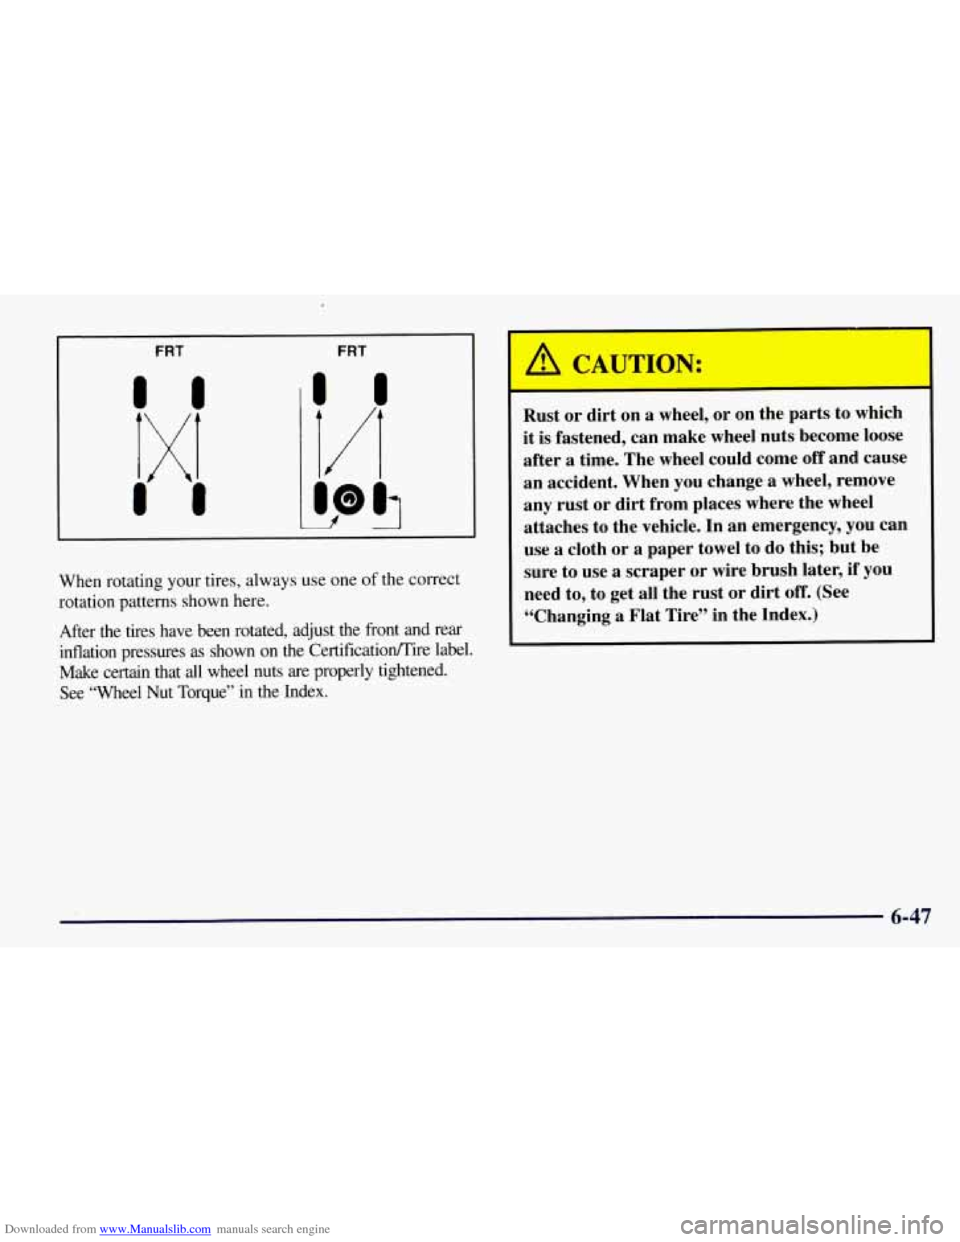
When rotating your tires, always use one of the correct
rotation patterns shown here.
After the tires have been rotated, adjust the front and rear
inflation pressures as shown
on the Certificatioflire label.
Make certain that
all wheel nuts are properly tightened.
See “Wheel Nut Torque” in the Index.
I A C. UTION:
Rust or dirt on a wheel, or on the parts to which
it is fastened, can make wheel nuts become loose
after
a time. The wheel could come off and cause
an accident. When you change a wheel, remove
any rust
or dirt from places where the wheel
attaches to the vehicle. In an emergency, you can
use a cloth or a paper towel to do this; but be
sure to use a scraper or wire brush later,
if you
need to, to get all the rust or dirt
off. (See
“Changing a Flat Tire” in the Index.)
6-47
Page 329 of 433

Downloaded from www.Manualslib.com manuals search engine Temperature -- A, B, C
The temperature grades are A (the highest), B, and C,
representing the tire’s resistance to the generation of
heat and its ability to dissipate heat when tested under
controlled conditions on a specified indoor laboratory
test wheel. Sustained high temperature can cause the
material
of the tire to degenerate and reduce tire life, and
excessive temperature can lead
to sudden tire failure.
The grade
C corresponds to a level of performance
which all passenger car tires must meet under the
Federal Motor Vehicle Safety Standard
No. 109. Grades
B and A represent higher levels of performance on the
laboratory test wheel than the minimum required by law.
Warning: The temperature grade for this tire
is
established for a tire that is properly inflated and not
overloaded. Excessive speed, underinflation, or
excessive loading, either separately or in combination,
can cause heat buildup and possible tire failure.
Wheel Alignment and Tire Balance
The wheels on your vehicle were aligned and balanced
carefully at the factory to give you the longest tire life
and best overall performance. Scheduled wheel alignment and
wheel balancing are not
needed. However,
if you notice unusual tire wear or
your vehicle pulling one way or the other,
the alignment
may need to
be reset. If you notice your vehicle
vibrating when driving on a smooth road, your wheels
may need to be rebalanced.
Wheel Replacement
Replace any wheel that is bent, cracked, or badly rusted
or corroded. If wheel nuts keep coming loose, the wheel,
wheel bolts and wheel
nuts should be replaced. If the
wheel leaks air, replace it (except some aluminum
wheels, which can sometimes be repaired). See your
GM dealer if any of these conditions exist.
Your dealer will know the kind of wheel you need.
Each new wheel should have the same load-carrying
capacity, diameter, width, offset and be mounted the
same way as the one it replaces.
If you need to replace any of your wheels, wheel bolts
or wheel nuts, replace them only with new
GM original
equipment parts. This way, you will be sure to have the
right wheel, wheel bolts and wheel nuts for your vehicle.
6-50
Page 330 of 433
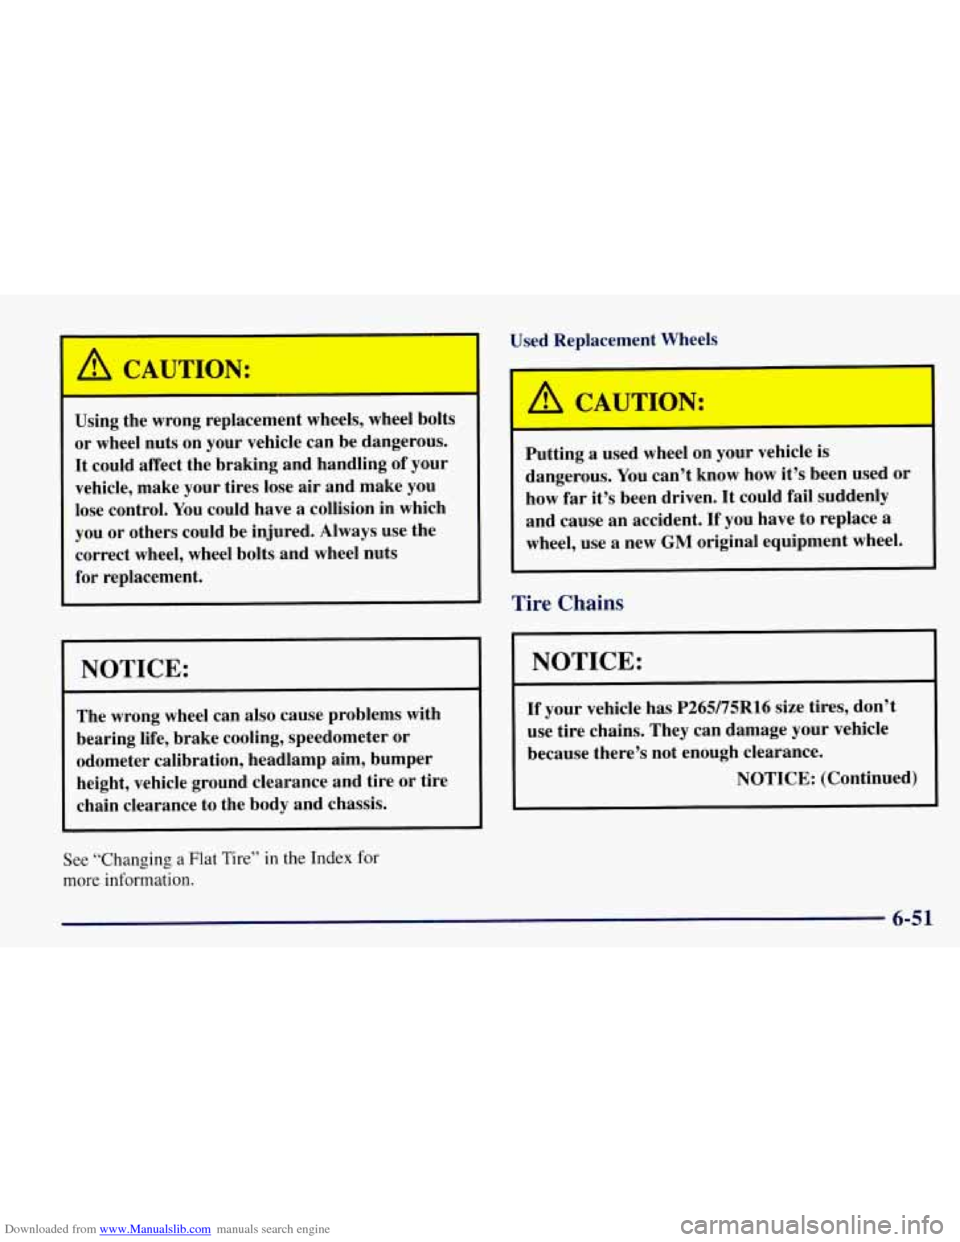
Downloaded from www.Manualslib.com manuals search engine I A CAUTION:
Using the wrong replacement wheels, wheel bolts
or wheel nuts on your vehicle can be dangerous.
It could affect the braking and handling of your
vehicle, make your tires lose air and make you
lose control. You could have a collision in which
you or others could be injured. Always use the
correct wheel, wheel bolts and wheel nuts
for replacement.
-
I NOTICE:
The wrong wheel can also cause problems with
bearing life, brake cooling, speedometer or
odometer calibration, headlamp aim, bumper
height, vehicle ground clearance and tire or tire
chain clearance to the body and chassis.
See “Changing a Flat
Tire” in the Index for
more information. Used
Replacement Wheels
I
Putting a used wheel on your vehicle is
dangerous. You can’t know how
it’s been used or
how far it’s been driven. It could fail suddenly
and cause an accident. If you have to replace
a
wheel, use a new GM original equipment wheel.
Tire Chains
NOTICE:
If your vehicle has P265/75R16 size tires, don’t
use tire chains. They can damage your vehicle
because there’s not enough clearance.
NOTICE: (Continued)
6-51
Page 355 of 433
Downloaded from www.Manualslib.com manuals search engine IMPORTANT:
KEEP ENGINE OIL
AT THE PROPER
LEVEL AND CHANGE AS
RECOMMENDED
1.
Protection
Plan
Have you purchased the GM Protection Plan? The Plan
supplements
your new vehicle warranties. See your
Warranty and Owner Assistance booklet, or your
GM dealer for details.
Introduction
Your Vehicle and the Environment
Proper vehicle maintenance not only helps to keep your
vehicle in
good working condition, but also helps the
environment. All recommended maintenance procedures
are important. Improper vehicle maintenance can even
affect the quality
of the air we breathe. Improper fluid
levels or the wrong tire inflation can increase the level
of emissions from your vehicle.
To help protect our
environment, and to keep your vehicle in good
condition, please maintain your vehicle properly.
Page 396 of 433
Downloaded from www.Manualslib.com manuals search engine Part B: Owner Checks and Services
Listed below are owner checks and services which
should be performed at the intervals specified to help
ensure the safety, dependability and emission control
performance of your vehicle.
Be sure any necessary repairs
are completed at once.
Whenever any fluids or lubricants are added to your
vehicle, make sure they are the proper ones, as shown
in Part
D.
At Each Fuel Fill
It is important for you or a service station attendant to
pe$orm these underhood checks at each fuel
fill.
Engine Oil Level Check
Check the engine oil level and add the proper oil if
necessary. See “Engine Oil” in the Index for
further details.
Engine Coolant Level Check
Check the engine coolant level and add the proper
coolant mix
if necessary. See “Engine Coolant” in the
Index for further details.
Windshield Washer Fluid Level Check
Check the windshield washer fluid level in the
windshield washer tank and add the proper fluid if
necessary. See “Windshield Washer Fluid” in the Index
for further details.
At Least Once a Month
Tire Inflation Check
Make sure tires are inflated to the correct pressures. See
“Tires” in the Index for further details.
Cassette Deck Service
Clean cassette deck. Cleaning should be done every
50 hours of tape play. See “Audio Systems” in the Index
for further details.
7-43