Page 269 of 433
Downloaded from www.Manualslib.com manuals search engine 7
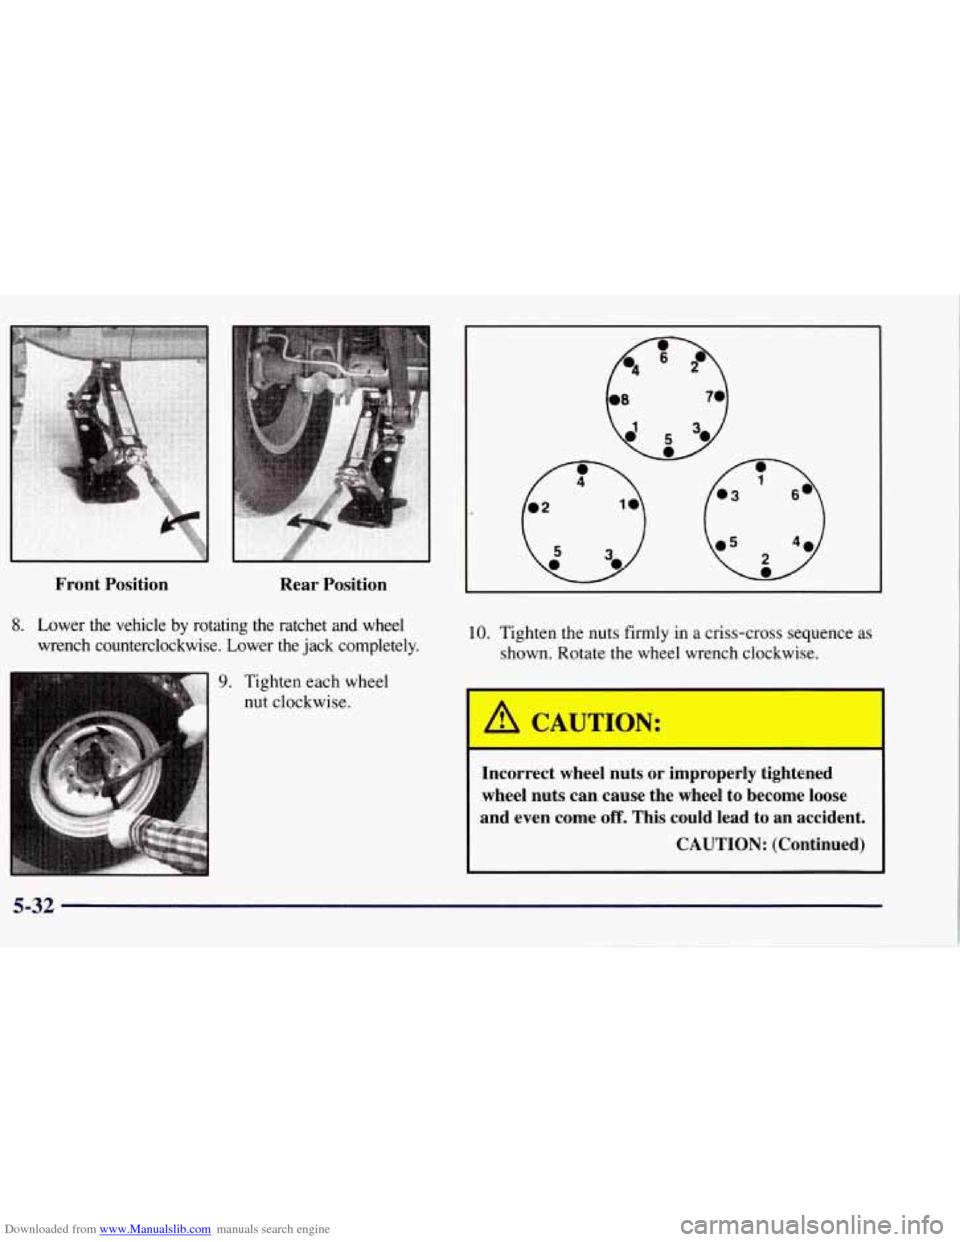
Front Position Rear Position
10. Tighten the nuts firmly in a criss-cross sequence as
shown. Rotate the wheel wrench clockwise.
Incorrect wheel nuts or improperly tightened
wheel nuts can cause the wheel to become loose
and even come
off. This could lead to an accident.
CAUTION: (Continued)
5-32
Page 270 of 433
Downloaded from www.Manualslib.com manuals search engine I CAU‘IWN: (Continued)
Be sure to use the correct wheel nuts. If you have
to replace them, be sure to get new
GM original
equipment wheel nuts.
Stop somewhere as soon as you can and have the
nuts tightened with a torque wrench to the
proper torque. For proper torque, see
“Capacities and Specifications” in the Index.
L
NOTICE:
Improperly tightened wheel nuts can lead to
brake pulsation and rotor damage.
To avoid
expensive brake repairs, evenly tighten the wheel
nuts
in the proper sequence and to the proper
torque specification.
11. Put the wheel trim back on. For vehicles with
plastic wheel nut caps, tighten the caps until
they
are finger tight, then tighten them an additional
one-half turn with the ratchet and wheel wrench.
Storing a Flat or Spare Tire and Tools
I I
’
C TION:
-
Storing a jack, a tire or other equipment in the
passenger compartment
of the vehicle could
cause injury. In
a sudden stop or collision, loose
equipment could strike someone. Store all these
in the proper place.
Store the flat tire where the spare tire is stored.
Put the tools into the storage box and close it tightly. Fit
the storage box on the bracket with the bolt through the
box. Put the jack onto the box. Be sure the jack is stored
as shown in the following illustrations. The jack handle
attachment point is circled in the following illustrations
to show the direction the jack should face when it is
stored properly. Secure the emergency gloves, if your
vehicle has them,
to the jack using the provided strap.
Slide the retainer over the bolt onto the jack and put the
wing nut
on it. Turn the nut clockwise until it is tight
against the retainer.
5-33
Page 273 of 433
Downloaded from www.Manualslib.com manuals search engine A B
n
C
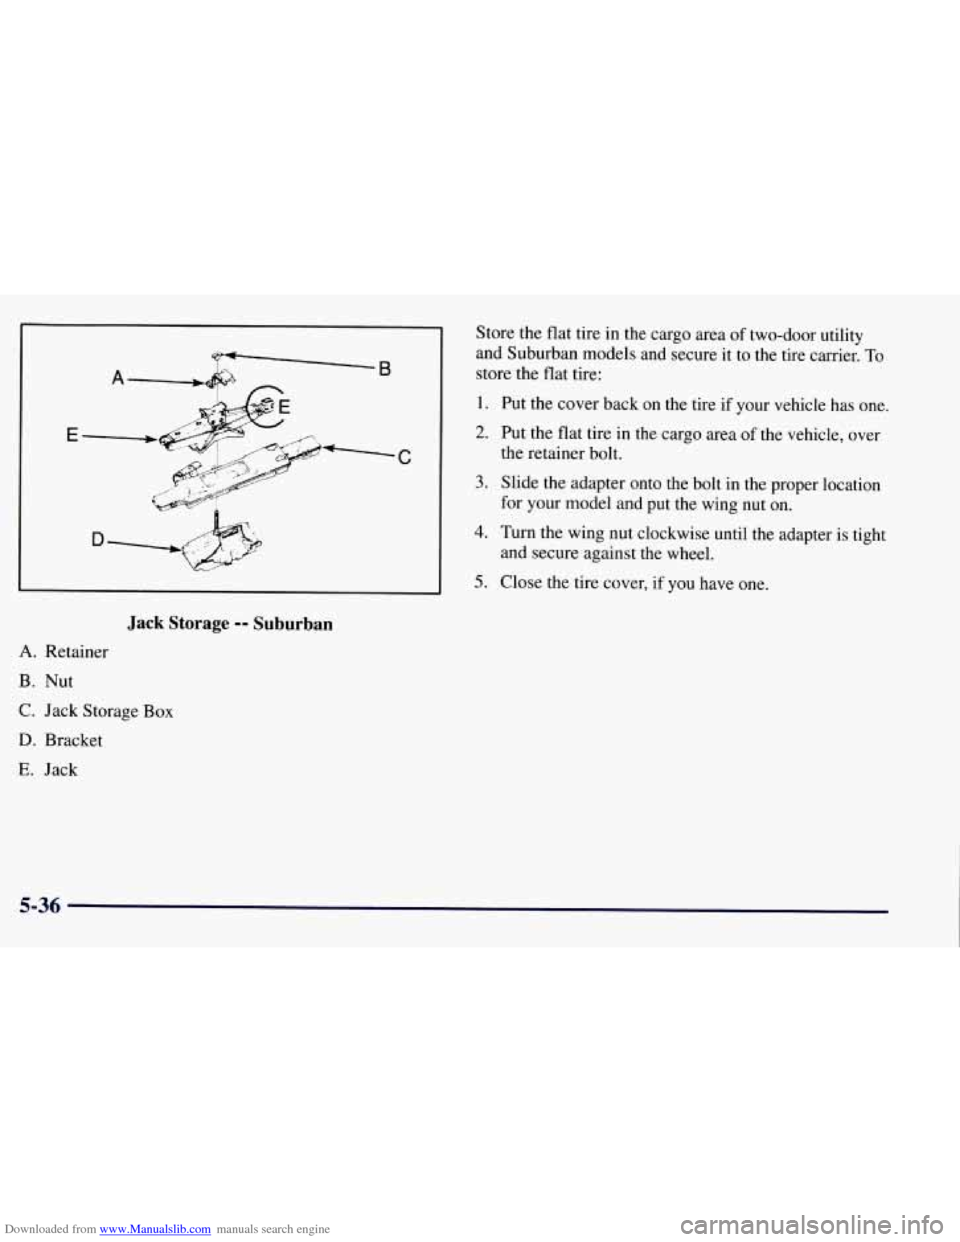
Jack Storage -- Suburban
A. Retainer
B. Nut
C. Jack Storage
Box
D. Bracket
E. Jack Store
the flat tire in the cargo area of two-door utility
and Suburban models and secure it to the tire carrier.
To
store the flat tire:
1.
2.
3.
4.
5.
Put the cover back on the tire if your vehicle has one.
Put the flat tire in the cargo area of the vehicle, over
the retainer bolt.
Slide
the adapter onto the bolt in the proper location
for your model and put
the wing nut on.
Turn the wing nut clockwise until the adapter is tight
and secure against the wheel.
Close the tire cover, if you have
one.
5-36
Page 286 of 433
Downloaded from www.Manualslib.com manuals search engine While refueling, hang the
cap inside the fuel door.
To take off the cap, turn it slowly to the left
(counterclockwise).
A CAUTION:
I
If you get gasoline on yourself and then
something ignites it, you could be badly burned.
.
Gasoline can spray out on you if you open the
fuel filler cap too quickly. This spray can happen
if your tank is nearly full, and is more likely in
hot weather. Open the fuel filler cap slowly and
wait for any “hiss” noise to stop. Then unscrew
the cap all the way.
,
Be careful not to spill gasoline. Clean gasoline from
painted surfaces as soon as possible. See “Cleaning the
Outside of Your Vehicle” in the Index.
6-7
Page 287 of 433
Downloaded from www.Manualslib.com manuals search engine When you put the cap back on, turn it to the right
(clockwise) until you hear a clicking sound.
Make sure
you fully install the cap.
NOTICE:
If you need a new cap, be sure to get the right
type. Your dealer can get one for you.
If you get
the wrong type, it may not
fit or have proper
venting, and your fuel tank and emissions system
might be damaged.
Checking Things Under the Hood
'
A CAUTION:
If your vehicle has air conditioning, the auxiliary
engine fan under
the hood can start up and
injure you even when the engine is not running.
Keep hands, clothing and tools
away from any
underhood electric fan.
A CAUTION:
I I
Things that burn can get on hot engine parts and
start a fire. These include liquids like gasoline or
diesel fuel, oil, coolant, brake fluid, windshield
washer and other fluids, and plastic or rubber.
You or others could be burned. Be careful not to
drop or spill things that will burn onto a hot
engine.
6-8
Page 302 of 433

Downloaded from www.Manualslib.com manuals search engine 3. Check both sides of the dipstick, and read the lower
level. The fluid level must be in the COLD area for a
cold check or in the
HOT area or cross-hatched area
for a hot check.
4. If the fluid level is in the acceptable range, push the
dipstick back in all the way; then flip the handle
down to lock the dipstick in place.
How to Add Fluid
Refer to the Maintenance Schedule to determine what
kind
of transmission fluid to use. See “Recommended
Fluids and Lubricants” in the Index. Add
fluid only after checking the transmission fluid
HOT. (A COLD check is used only as a reference.) If the
fluid level is low, add only enough of the proper fluid to
bring the level up to the HOT area for
a hot check. It
doesn’t take much fluid, generally less
than one pint
(0.5 L). Don’t ove$ll.
NOTICE:
We recommend you use only fluid labeled
DEXRON@-111, because fluid with that label is
made especially for your automatic transmission.
Damage caused by fluid other than DEXRON-I11
is not covered by your new vehicle warranty.
After adding fluid, recheck the fluid level as
When the correct fluid level is obtained, push the
described under “How
to Check.”
dipstick back in all the way; then flip the handle
down to lock the dipstick in place.
6-23
Page 319 of 433
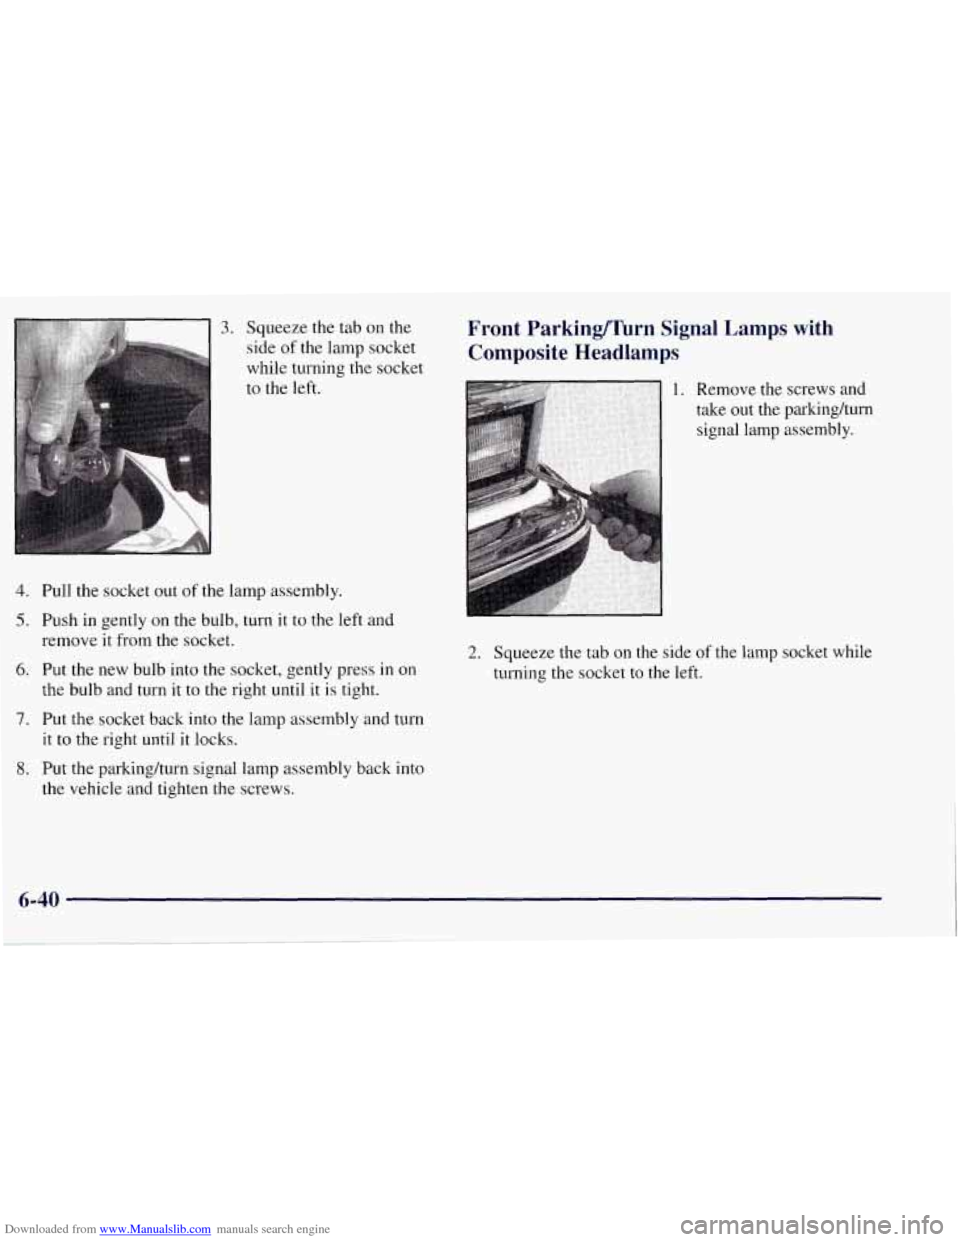
Downloaded from www.Manualslib.com manuals search engine 3. Squeeze the tab on the
side of the lamp socket
while turning the socket
to the left.
4. Pull the socket out of the lamp assembly.
5. Push in gently on the bulb, turn it to the left and
remove it from the socket.
6. Put the new bulb into the socket, gently press in on
the bulb and turn
it to the right until it is tight.
7. Put the socket back into the lamp assembly and turn
it
to the right until it locks.
8. Put the parkingkurn signal lamp assembly back into
the vehicle and tighten the screws.
Front Parkinnrn Signal Lamps with
Composite Headlamps
2. Squeeze the tab on the side of the lamp socket while
turning the socket to the left.
Page 320 of 433
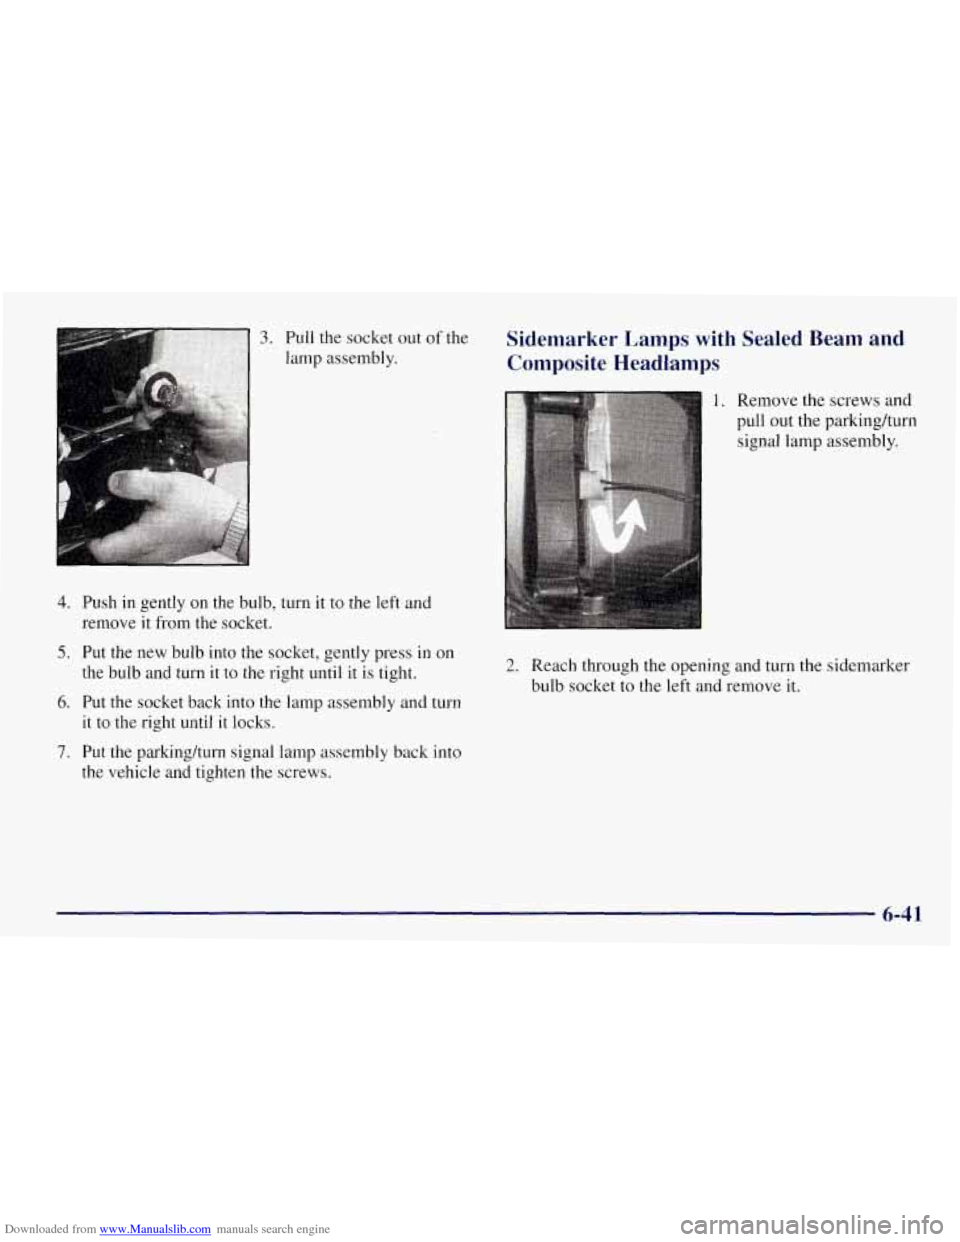
Downloaded from www.Manualslib.com manuals search engine 3. Pull the socket out of the
lamp assembly.
4. Push in gently on the bulb, turn it to the left and
remove it from the socket.
5. Put the new bulb into the socket, gently press in on
the bulb and turn it to the right until it is tight.
6. Put the socket back into the lamp assembly and turn
it to the right until it locks.
7. Put the parkinghurn signal lamp assembly back into
the vehicle and tighten the screws.
Sidemarker Lamps with Sealed Beam and
Composite Headlamps
1. Remove the screws and
pull out the parkinghurn
signal lamp assembly.
2. Reach through the opening and turn the sidemarker
bulb socket to the left and remove it.
6-41