1997 CADILLAC ELDORADO CD player
[x] Cancel search: CD playerPage 174 of 361
Downloaded from www.Manualslib.com manuals search engine UM: Ths setting is similar to LIVE,
however, more echo is present. The LIVE and
AUDITORIUM settings are best used for music.
LEVEL: Press the plus or minus symbol on this button
to adjust the amount
of effect desired when in DSP
mode. Some experimenting with this button will help
you determine the best sound.
usting the Speakers
AX,: Press this knob lightly so it extends. Turn the
knob clockwise to adjust sound to the right speakers and
counterclockwise for the left speakers. The middle
position balances the sound between
the speakers.
E: Press ths knob lightly so it extends. Turn the
knob clockwise
to adjust the sound to the front speakers
and counterclockwise
for the rear speakers. The middle
position balances the sound between
the speakers.
Push these knobs
back into their stored positions when
you’re
not using them.
laying a Cassette Tape
With the radio on, insert a cassette tape. The tape will
begin playing as
SOQII as it is inserted.
While
the tape is playing, we the VOL, FADE, BAL,
BASS and TREB controls just as you do for the radio.
Other controls
may have different functions when a tape
is inserted. The display will show
TAPE with an arrow
to indicate which side of the tape is playing. PLAY will
appear
on the display temporarily when a tape is
playing. The display will then revert back to showing
the time.
If an error occurs while trying to play a cassette tape, it
could be that:
The cassette tape is tight and the cassette player
cannot turn the hubs
of the tape. Hold the cassette
tape with the open end down and
try turning the right
hub counterclockwise with a pencil. Flip
the tape
over and repeat.
If the hubs do not turn easily, your
cassette tape may be damaged and should not be
used in the player. Try a new tape to be sure YQUI-
player is working properly.
The cassette tape is broken. (Check to see
if your
tape is broken.
Try a new tape.)
Page 175 of 361
Downloaded from www.Manualslib.com manuals search engine Br: Press the left mow to reverse the tape rapidly.
Press it again
to return to playing speed. The radio will
play while the tape reverses and
REV will appear on the
display. You may use your station pushbuttons to tune to
another radio station while in
REV mode.
FF: Press the right arrow to fast forward to another part
of the tape. Press it again to return to playing speed. The
radio will play while
the tape advances and FF will
appear
on the display. You may ~lse your station
pushbuttons to tune to another radio station
while in
mode.
SEEK-TUNE: Press the right arrow to seek to the next
selection
on the tape. Press the left arrow to search for
the previous selection
on the tape (REP will appear on
the display). Your tape must have at least three
seconds
of silence between each selection for SEEM-TUNE to
work. The sound will mute while seeking.
SCAN: Press this button. SCAN FF will appear on the
display until the next selection
is found and then SCAN
PLAY will appear on the display. Use SCAN to listen to
selections for
a few seconds. The tape will go to a
selection, stop for
a few seconds, then go on to the next
selection. Press this button again to stop scanning.
SIDE: Press this button to change the side of the tape
that
is playing. (PLAY shows on the display.)
SOURCE: Press this button to switch from radio to
cassette tape play.
If no cassette tape is in the tape
player,
CASS appears on the display and then the radio
station appears
briefly. The display then reverts back to
showing the
time of day. Press this button again or
BAND to switch back to the radio.
A EJECT: Press the upward triangle button to remove
a tape. The radio will play. Eject may be activated with
the radio
off if the ignition is on. Cassette tapes may be
loaded with the radio
off but they will not start playing
until the PWR button is pressed. Press PWR or turn the
ignition key
off to stop the cassette tape player. The tape
will stay in
the player and resume play at the point where
it stopped.
If you leave a cassette tape in the player while
listening to the radio, it may become wm.
CLN: If this message appears on the display, the
cassette tape player needs to
be cleaned. It will still play
tapes, but you should clean
it as soon as possible to
prevent damage
to the tapes and player. See “Care of
Your Cassette Tape Player”
in the Index. After you clean
the player, press
and hold EJECT hr five seconds to
reset
the CLN indicator. The radio will display --- to
show the indicator was reset.
Dolby@
Noise Reduction is manufactured under a
license from Dolby Laboratories Licensing Corporation.
Dolby and the double-D symbol are trademarks of
Dolby Laboratories Licensing Corporation.
Page 177 of 361
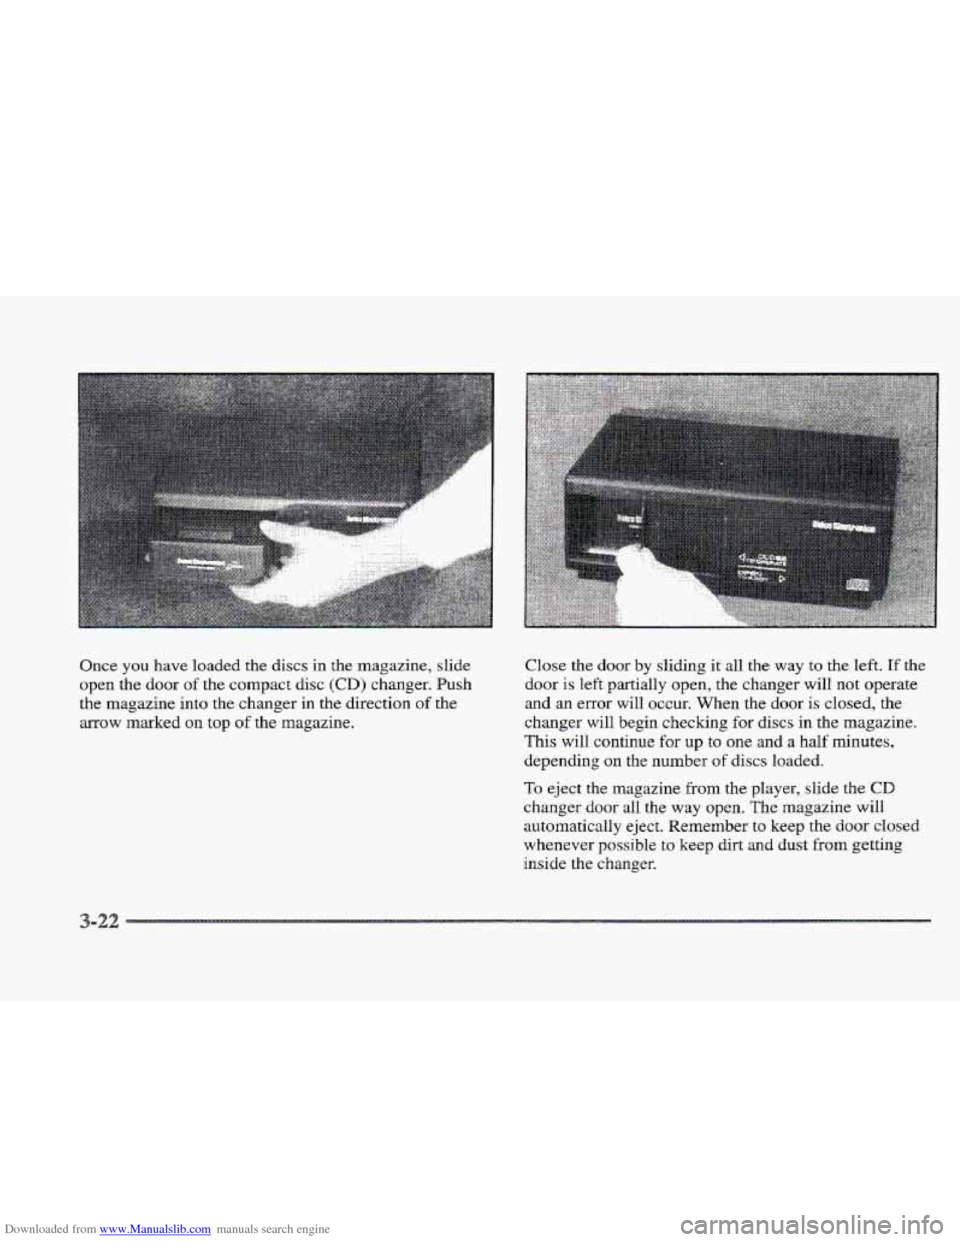
Downloaded from www.Manualslib.com manuals search engine Once you have loaded the discs in the magazine, slide
open the door of the compact disc
(CD) changer. Push
the magazine into the changer
in the direction of the
arrow marked on top of the magazine. Close
the door
by sliding it all the way to the left. If the
door
is left partially open, the changer will not operate
and an error will occur. When the door
is closed, the
changer will begin checking for discs in the magazine.
This will continue for up to one and a half minutes,
depending on the number
of discs loaded.
To eject the magazine from the player, slide the CD
changer door all the way open. The magazine will
automatically eject. Remember to keep the door closed
whenever
possible to keep dirt and dust from getting
inside the changer.
Page 180 of 361
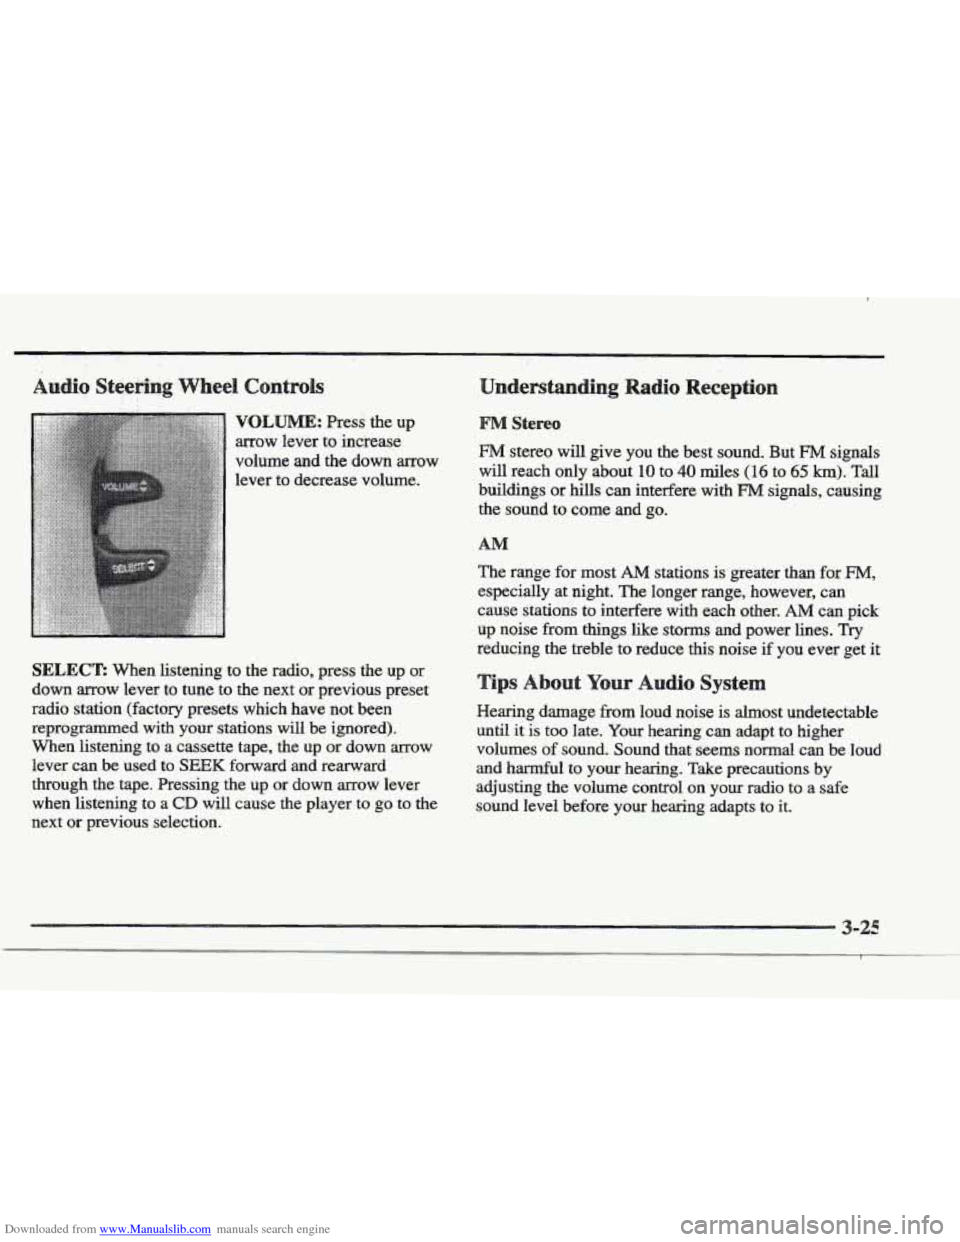
Downloaded from www.Manualslib.com manuals search engine VQLBJME: Press the up
arrow lever to increase
volume and the down arrow
lever to decrease volume.
SELECT: When listening to the radio, press the up or
down arrow lever to tune to the next or previous preset
radio station (factory presets which have not been
reprogrammed with your stations
will be ignored).
When listening to a cassette tape, the
up or down arrow
lever can be used to
SEEK forward and rearward
through the tape. Pressing the up
or down arrow lever
when listening to a
CD will cause the player to go to the
next or previous selection.
§&!reo
FM stereo will give you the best sound. But FM signals
will reach only about 10 to 40 miles (1 6 to 65 km). Tall
buildings or hills can interfere with
FM signals, causing
the sound to come
and go.
The range for most
AM stations is greater than for FM,
especially at night. The longer range, however, can
cause stations
to interfere with each other. AM can pick
up noise from
things like storms and power lines. Try
reducing the treble to reduce this noise if you ever get it
r Audio Syste
Hearing damage from loud noise is almost undetectable
until it
is too late. Your hearing can adapt to higher
volumes
of sound. Sound that seems normal can be loud
and harmful to
your hearing. Take precautions by
adjusting the volume control on your radio to
a safe
sound level before your hearing adapts to it.
Page 181 of 361
Downloaded from www.Manualslib.com manuals search engine TO help avoid hearing loss or damage:
Adjust the volume control to the
lowest setting.
Increase volume slowly until you hear Comfortably
and clearly. A tape player that is not cleaned regularly can cause
reduced
sound quality, mined cassettes or a damaged
mechanism. Cassette tapes should be stored in their
cases away
from contaminants, direct sunlight and
extreme heat. If they aren’t, they may not operate
properly or
may cause failure of the tape player.
Your tape player should be cleaned regularly after every
50 hours of use. Your radio may display CLN or CLEAN
TAPE to indicate that you have used YOLK tape player for
50 hours without resetting the tape clean timer. Each time
the cassette is cleaned, the 50 hour cassette timer should
be reset.
~s is done by holding down the eject button
for three seconds until the TAPE CLEAN message is
displayed. If you notice a reduction in sound quality, try a
known good cassette to see if it is the tape or the tape
player
at fault. If this other cassette has no improvement
in sound quality, clean the tape player.
Cleaning may
be done with a scrubbing action,
non-abrasive cleaning
cassette with pads which scrub the
tape head
as the hubs sf the cle.aner cassette turn. It is
IKXI~ for the cassette to eject while cleaning. Insert the
cassette at least six times to ensure thorough cleaning.
3-2
Page 182 of 361
Downloaded from www.Manualslib.com manuals search engine Some cleaning cassettes or CD adapter kits may appear
as
a broken tape. If the cleaning cassette is ejected
immediately from the tape player, follow these steps
for
the TAPE CLEAN OVE
E. Turn the ignition to RUN or ACC.
2. Turn the radio off.
3. Press and hold the SOURCE button for three
seconds. After thee seconds, the tape icon will flash
indicating the cut tape feature
is now turned off.
4. Turn the radio on and insert the cleaning cassette (CX
the CD adapter kit).
5. Eject the tape after the tape player has been cleaned.
When
the cleaning cassette has been ejected, the broken
tape detection feature
is active again.
YOU may also choose a non-scrubbing action, wet-type
cleaner which uses a cassette with
a fabric belt to clean
the
tape head. This type of cleaning cassette will not
eject and, it may
not clean as thoroughly as the
scrubbing
type cleaner.
Cassettes are subject to
wear and the sound quality
may degrade over time. Always make sure the cassette
tape
is in good condition. before YOU have your tape
player serviced. Handle discs carefully. Store
them in their original case:
or other protective cases
and away from direct sunlight
and dust. If the surface
of a disc is soiled, dampen a
clean, soft cloth in a mild, neutral detergent solution anc
clean it, wiping from the center to the edge.
Be sure never to touch the signal surface when handling
discs. Pick up discs by grasping the outer edges or the
edge
of the hole and the outer edge.
Your power antenna will look its best and work
well if it’s cleaned
from time to time. To clean the
antenna mast:
1. Turn on the ignition and radio to raise the antenna.
2. Dampen a clean cloth with mineral spirits or
equivalent solvent.
3. Wipe the cloth over the mast sections, removing
any dirt.
3-27
Page 325 of 361

Downloaded from www.Manualslib.com manuals search engine The fuse block is located on the front wall of the trunk
(behind
the rear seat) on the driver’s side. Lqosen the
four trunk trim fasteners and pull the trim away from the
fuse block to gain access.
RLY IGN 1 SIR . ELC,. TURN 1 CONSOLE I-1 BRAKE uuuu--- , ASS , IGN I 0 -BODY , I COMFORT , , AMP , , PZM I , , , , RADIO/PHONE CLUSTER
HTD MIR HTD SEAT R HTD SEAT L PULL DOWN HDLP WASH ACC-----r-
Cluster, Cruise in Stalk, PZM,
Catalytic Converter Overtemp
Amplifier
(Export), TCC Switches
E- I SDM, Left and Ftight Door Sensor I
lELc
ELC Relay, Auto Level Sensor
(Eldorado Only), Vacuum Pump,
AEC Sensor
Fuse
TURN
CONSOLE
BRAKE
RSS
IGN 0-BODY
COMFORT
Usage
Electronic Flasher, Turn/Hazard Switch
Rear Zone Blower, Right
and Left
Heated Seat Switches (Optional)
Vacuum Pump (VP) Relay,
VP Motor, VP Pressure Switch
CV-RTD (CV-RSS)
(ETC Only)
PRNDL, Dual Zone Switch, PZM,
Cluster, Air Control Module
(ACM), Upper Zone Motor, Lower
Zone Motor
(Optional), WAC
Solenoids, Climate Control Panel
Analog Cluster (Console
Shift
Only), Rear Defog Relay, ELC
Relay
CD Player, Remote Keyless Entry
(RKE), Controlled Power Relay,
Air Control Module (ACM), PZM
Page 347 of 361

Downloaded from www.Manualslib.com manuals search engine attery ...................................... 6-30
Charging System Indicator Light
................. 2-7 1
Jump Starting
................................. 5-4
No Charge Message ........................... 2-85
Replacement, Remote Keyless Entry
.............. 2- 10
Volts High Message ........................... 2-85
Volts
Low Message ........................... 2-85
Battery Guard Storage
........................... 2-48
Battery Saver
.................................. 2-47
Exterior Lighting
............................. 2-47
Inadvertent Power
............................ 2-48
BBB Auto Line
................................ 7- 11
Better Business Bureau Mediation
.................. 7-1 1
Brake Adjustment
.................................. 6-29
Master Cylinder
.............................. 6-27
Replacing System
Parts ........................ 6-30
System Warning Light ......................... 2-72
Trailer
...................................... 4- 36
Transaxle Shift Interlock
....................... 2-3 1
Vacuum Problem Message ...................... 2-85
Wear
....................................... 6-2 9
Brakes, Anti-Lock ............................... 4-7
Braking ........................................ 4-6
Braking in Emergencies
.......................... 4- 10
Break-In, New Vehicle
.......................... 2-19
Brightness Control
.............................. 2-47
BTSI ......................................... 2-31
Bulb Replacement
.............................. 6-3 1
Warnings ................................ 5-4, 5-6
Fluid ....................................... 6-27
Parking
..................................... 2-26
Peddlravel ................................. 6-29
Capacities and Specifications .................... 6-45
Carbon Monoxide
.................... 2.32.4.29. 4.35
Cassette Tape Player
.................. 3.10.3.13. 3.17
Cassette Tape Player Care
........................ 3-26
Cellular Telephone
.............................. 2-58
Center Console Storage Area
...................... 2-56
Center Passenger Position
........................ 1-30
Central Door Unlocking System
.................... 2-4
Certitication Label
.............................. 4-31
Chains. Safety
................................. 4-36
Chains. Tire
................................... 6-45
Change Engine
Oil Message ...................... 2-85
Change Trans Fluid Message
...................... 2-85
Changing a Flat Tire ............................. 5-26
Charging System Indicator Light
................... 2-71
Check Brake Fluid Level Message
................. 2-86
Check Coolant Level Message ..................... 2-86
Check Fuel Gage Message
........................ 2-86
Check Oil Level Message ........................ 2-86
Check Washer Fluid Message ..................... 2-86
Checking Your Restraint Systems .................. 1-43
Chemical Paint Spotting
.......................... 6-52
Child Restraints
................................ 1-33
Securing in
a Rear Outside Seat Position ........... 1-34
Securing in the Center Rear Seat Position
.......... 1-36
Securing in
the Right Front Seat Position .......... 1-38
Wheretoput
................................ l-33
Center High-Mounted Stoplamp. Bulb Replacement ... 4-35
. TopStrap ................................... 1-34
Chrome Wheels. Cleaning
........................ 6-51
Cigarette Lighter
............................... 2-57
CHMSL ...................................... 6.35
Circuit Breakers
and Fuses ....................... 6-58
-2