Page 12 of 188

11
To open the back door from the out-
side, insert the key and turn it clock- wise.
See ``Luggage stowage precautionsº in
Part 2 for precautions to observe in load- ing luggage.
To close the back door, lower it and press
down on it. After closing the back door, try
pulling it up to make sure it is securely closed.
Keep the back door closed while
driving. This not only keeps the
luggage from being thrown out but
also prevents exhaust gases from
entering the vehicle.
CAUTION!
To open the back door from the driv-
er's seat, pull up on the lock release
lever.To open the hood, pull the hood lock
release lever under the dash. The hood
will spring up slightly. In front of the
vehicle, press up on the auxiliary
catch lever and lift the hood. Then
hold the hood open by inserting the
support rod into the slot.
Before closing the hood, check to see that
you have not forgotten any tools, rags,
etc. and return the support rod to its clipÐthis prevents rattles.
Your Supra has two hood locks at the front
edge of the hood. Hood
ÐLock release lever
Back doorÐ
Page 13 of 188
12
To close the hood, lower the hood until it is about 30 cm (12 in.) above the engine
compartment and release it. If the hood is
still not fully closed, press down on it
above the two hood locks. Make sure the
hood is locked securely.
If you notice while driving that the hood is not securely locked, stop the vehicle at
once and close the hood.
CAUTION!
� After inserting the rod, make sure
it supports the hood securely.
� When closing the hood, be care- ful not to get your hands caught
between the hood and the vehicle
body.
NOTICE
Do not press hard on the hood except above the hood locks, or you
may deform the hood.
Page 29 of 188

28
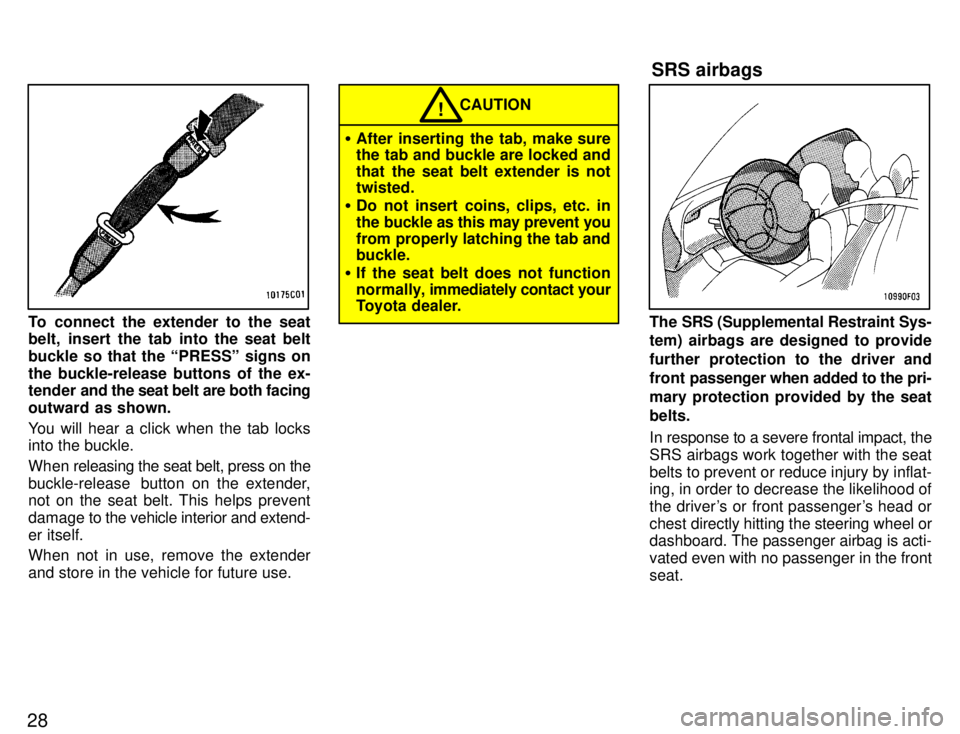
To connect the extender to the seat
belt, insert the tab into the seat belt
buckle so that the PRESSº signs onthe buckle-release buttons of the ex-
tender and the seat belt are both facing
outward as shown.
You will hear a click when the tab locks into the buckle.
When releasing the seat belt, press on the
buckle-release button on the extender, not on the seat belt. This helps prevent
damage to the vehicle interior and extend-er itself.
When not in use, remove the extender
and store in the vehicle for future use.
� After inserting the tab, make sure
the tab and buckle are locked and
that the seat belt extender is not twisted.
� Do not insert coins, clips, etc. in
the buckle as this may prevent you
from properly latching the tab and buckle.
� If the seat belt does not function
normally, i mmediately contact your
Toyota dealer.
CAUTION!
The SRS (Supplemental Restraint Sys-
tem) airbags are designed to provide
further protection to the driver and
front passenger when added to the pri-
mary protection provided by the seatbelts.
In response to a severe frontal impact, the
SRS airbags work together with the seatbelts to prevent or reduce injury by inflat- ing, in order to decrease the likelihood of
the driver's or front passenger's head or
chest directly hitting the steering wheel or dashboard. The passenger airbag is acti- vated even with no passenger in the frontseat. SRS airbags
Page 146 of 188

144You can be confident that your Toyota
dealer's service department performs the
best
job to meet the maintenance require-
ments on your vehicleÐreliably and eco-
nomically.
Your copy of the repair order is proof that
all required maintenance has been per-
formed for warranty coverage. And if any
problems should arise with your vehicle
while under warranty, your Toyota dealer
will promptly take care of it. Again, be sure
to keep a copy of the repair order for any
service performed on your Toyota.
What about do-it-yourself mainte- nance?
Many of the maintenance items are easy
to do yourself if you have a little mechani-
cal ability and a few basic automotive
tools. Simple instructions for how to per-
form them are presented in Part 7.
If you are a skilled do-it-yourself me-
chanic, the Toyota service manuals are recommended. Please be aware that do-
it-yourself maintenance can affect your
warranty coverage. See Owner's Guide,
Owner 's Manual Supplement or W arranty
Booklet for the details. Listed
below are the general maintenance
items that should be performed as fre- quently as specified. In addition to check-
ing the items listed, if you notice any un-
usual noise, smell or vibration, you should
investigate the cause or take your vehicle
to your T oyota dealer or a qualified service
shop immediately. It is recommended thatany problem you notice be brought to theattention of your dealer or the qualified service shop for their advice.
Make these checks only where
adequate ventilation can be ob-
tained if you run the engine. CAUTION
!
OUTSIDE THE VEHICLE
Items listed below should be per-
formed from time to time, unless other-
wise specified.
Tire pressure Check the pressure with a gauge every
two weeks, or at least once a month. See Chapter 7-2 for additional information. Tire surface and wheel nuts Check the tires carefully
for cuts, damage
or excessive wear. See Chapter 7-2 for
additional information. When checking the tires, make sure no nuts are missing,
and check the nuts for looseness. T ighten
them if necessary. Fluid leaks Check underneath for leaking fuel, oil, wa-
ter or other fluid after the vehicle has been
parked for a while. If you smell fuel fumes
or notice any leak, have the cause found
and corrected immediately. Doors and engine hood
Check that all doors including back door
operate smoothly and all latches lock se-
curely. M ake sure the engine hood secon-
dary latch secures the hood from opening
when the primary latch is released. INSIDE THE VEHICLE Items listed below should be checked
regularly, e.g. while performing period-
ic services, cleaning the vehicle, etc. Lights Make sure the headlights, stop lights, tail lights, turn signal lights, and other lights are all working. Check headlight aim.
General maintenance
Page 172 of 188
170Light Bulbs
Bulb No.WType
Stop and tail lights115727/8D
Back-up lights115627D
License plate lightsÐ5E
Interior lightsÐ8D
Glovebox lightÐ1.2E
Luggage compartment lightÐ5F
A: HB4 halogen bulbs B: HB3 halogen bulbs C: H3 halogen bulbsD: Single end bulbs
E: Wedge base bulbs F: Double end bulbs
1. Open the hood.
RIGHT SIDE HEADLIGHT: Release the
clips of the air cleaner and remove the
air cleaner cover.2. Unplug the connector while de-
pressing the lock release. If the connector is tight, wiggle it.
ÐHeadlights (low beam)
Page 173 of 188
171
3. Turn the bulb clockwise and re- move it. Install a new bulb, turn it
counterclockwise, then plug in the
connector.
To install a bulb, align the tab of the bulb
socket with the cutouts of the mountinghole.
RIGHT SIDE HEADLIGHT: Install the air
cleaner cover securely.
Aiming is not necessary after replacing
the bulb. When aiming adjustment is nec-
essary, contact your Toyota dealer.1. Open the hood.
RIGHT SIDE HEADLIGHT: Release the
clips of the air cleaner and remove the
air cleaner cover.2. Unplug the connector while de-
pressing the lock release. If the connector is tight, wiggle it.
ÐHeadlights (high beam)
Page 174 of 188
172
3. Turn the bulb counterclockwise
and remove it. Install a new bulb, turn
it clockwise, then plug in the connec-
tor.
To install a bulb, align the tab of the bulb
socket with the cutouts of the mountinghole.
RIGHT SIDE HEADLIGHT: Install the air
cleaner cover securely.
Aiming is not necessary after replacing
the bulb. When aiming adjustment is nec-
essary, contact your Toyota dealer.1. Open the hood.
RIGHT SIDE HEADLIGHT: Release the
clips of the air cleaner and remove the
air cleaner cover.2. Turn the cover counterclockwise
and remove it.
ÐFront fog lights