Page 3 of 203
As the installation of a mobile two-way radio system
in your vehicle could affect electronic systems such
as multiport fuel injection system/sequential multiport
fuel injection system, cruise control system, anti-lock
brake system and SRS airbag system, be sure to
check with your T oyota dealer for precautionary mea-
sures or special instructions regarding installation.
The SRS airbag device in your T oyota contains explo-
sive chemicals. If the vehicle is scrapped with the air-
bags left as they are, it may cause an accident such
as a fire. Be sure to have the SRS airbag system re-
moved and disposed of by a qualified service shop or
by your Toyota dealer before you dispose of your ve-
hicle.
Scrapping of your Toyota
Installation of a mobile two-way radio system
ProCarManuals.com
Page 8 of 203
3
1. Headlight and turn signal switch
2. Wiper and washer switches
3. Emergency flasher switch
4. Clock
5. Center vents
6. Car audio
7. Air conditioning controls
8. Rear window defoggers switch
9. Coupe and liftbackÐPower rear view mirror control
switch (without power windows)
ConvertibleÐ
Convertible top control switch and
quarter window control switches
10. Cigarette lighter
11. Ignition switch
12. Cruise control switch
13. Tilt steering lock release lever
14. Instrument panel light control knob
ProCarManuals.com
Page 10 of 203
5
Indicator symbols on the instrument panel
Anti-lock
brake system warning light *1
Brake system warning light *1
Seat belt reminder light*1
Discharge warning light*1
Low oil pressure warning light*1
Malfunction indicator lamp*1
Low fuel level warning light *1
Open door warning light*1
SRS airbag warning light*1
Turn signal indicator lights
Headlight high beam indicator light
Overdrive-of f indicator light
Cruise control indicator light*2
*1: For details, see Service reminder indicators and warning
buzzersº in Chapter 1-5.
*
2: If this light flashes, see Cruise controlº in Chapter 1-6.
ProCarManuals.com
Page 64 of 203

Part 1
Ignition switch with steering
lock57
OPERATION OF
INSTRUMENTS AND
CONTROLSÐ
Chapter 1-6
Ignition switch,
Transmission
and Parking brake
�Ignition swi tch with steering lock
� Automatic transmission
� Manual transmission
� Parking brake
� Cruise control
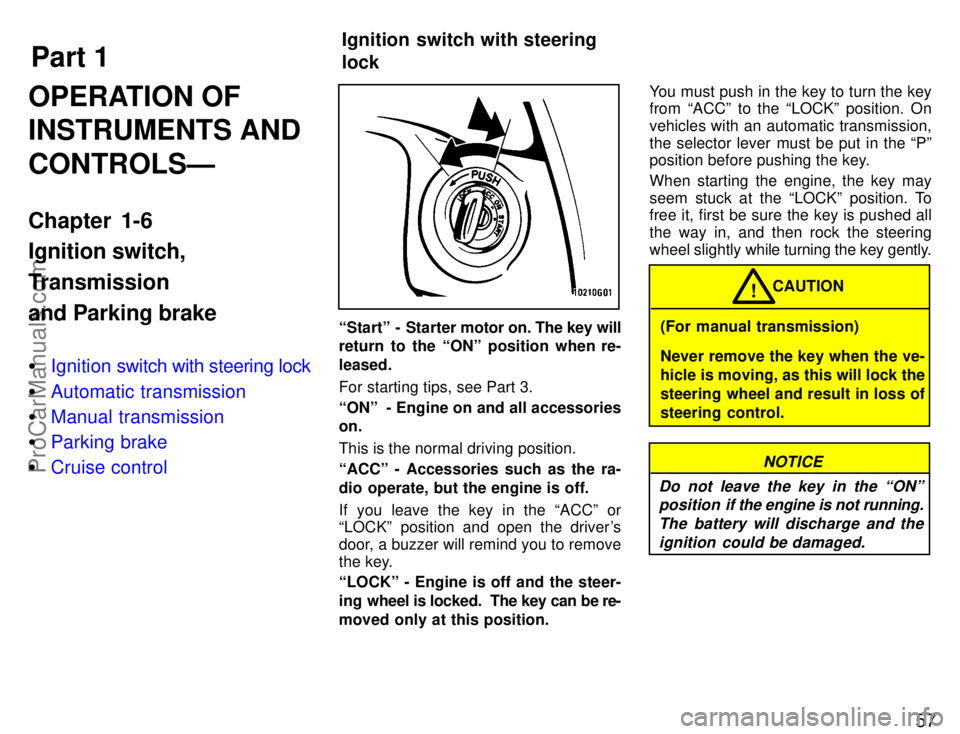
Startº - Starter motor on. The key will
return to the ONº position when re-
leased.
For starting tips, see Part 3.
ONº - Engine on and all accessories
on.
This is the normal driving position.
ACCº - Accessories such as the ra-
dio operate, but the engine is off.
If you leave the key in the ACCº or
LOCKº position and open the driver's
door, a buzzer will remind you to remove
the key.
LOCKº - Engine is off and the steer-
ing wheel is locked. The key can be re-
moved only at this position. You must push in the key to turn the key
from ACCº to the LOCKº position. On
vehicles with an automatic transmission,
the selector lever must be put in the Pº
position before pushing the key.
When starting the engine, the key may
seem stuck at the LOCKº position. To
free it, first be sure the key is pushed all
the way in, and then rock the steering
wheel slightly
while turning the key gently.(For manual transmission)
Never remove the key when the ve-
hicle is moving, as this will lock the
steering wheel and result in loss of
steering control. CAUTION
!
NOTICE
Do not leave the key in the ONº position if the engine is not running.
The battery will discharge and theignition could be damaged.
ProCarManuals.com
Page 69 of 203

62
U.S.A.
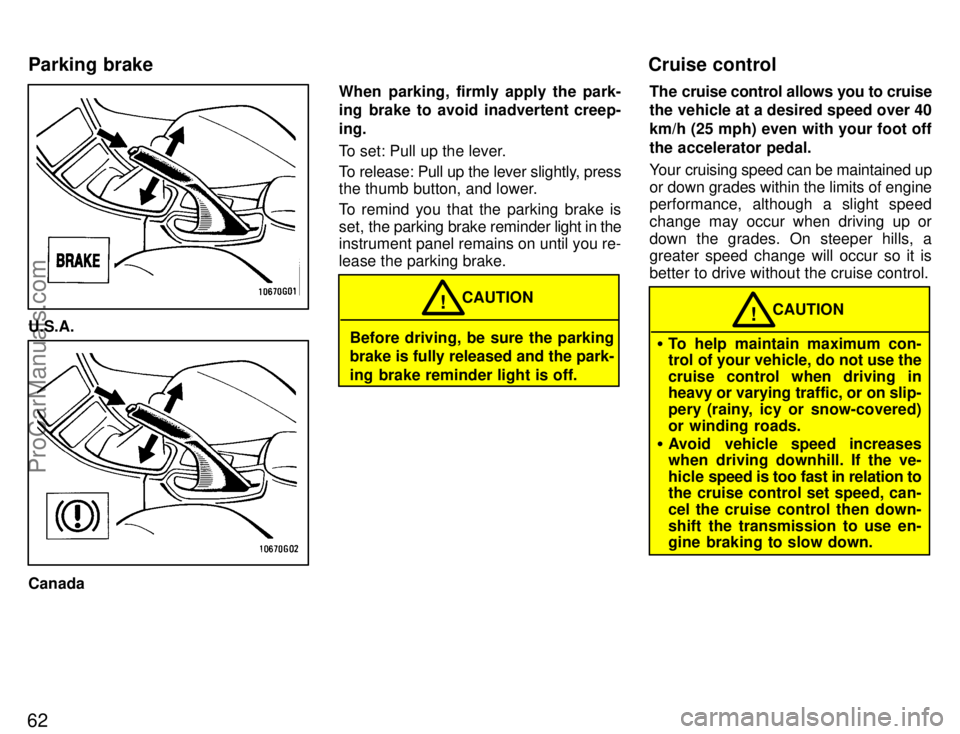
CanadaWhen parking, firmly apply the park-
ing brake to avoid inadvertent creep-
ing.
To set: Pull up the lever.
To release: Pull up the lever slightly, press
the thumb button, and lower.
To remind you that the parking brake is
set,
the parking brake reminder light in the
instrument panel remains on until you re-
lease the parking brake.
Before driving, be sure the parking
brake is fully released and the park-
ing brake reminder light is off. CAUTION
!
The cruise control allows you to cruise
the vehicle at a desired speed over 40
km/h (25 mph) even with your foot off
the accelerator pedal.
Your cruising speed can be maintained up
or down grades within the limits of engine
performance, although a slight speed
change may occur when driving up or
down the grades. On steeper hills, a
greater speed change will occur so it is
better to drive without the cruise control.
�
To help maintain maximum con-
trol of your vehicle, do not use the
cruise control when driving in
heavy or varying traffic, or on slip-
pery (rainy, icy or snow-covered)
or winding roads.
� Avoid vehicle speed increases
when driving downhill. If the ve-
hicle speed is too fast in relation to
the cruise control set speed, can-
cel the cruise control then down-
shift the transmission to use en-
gine braking to slow down. CAUTION
!
Parking brake Cruise control
ProCarManuals.com
Page 70 of 203

63
TURNING ON THE SYSTEM
To operate the cruise control, press the
CRUISE ON-OFFº switch. This turns the
system on. The indicator light in the instru-
ment panel shows that you can now set
the vehicle at a desired cruising speed.
Another press will turn the system com-
pletely off.
To avoid accidental cruise control
engagement, keep the CRUISE
ON-OFFº switch off when not using
the cruise control. CAUTION
!
SETTING AT A DESIRED SPEED
On vehicles with automatic transmission,
the transmission must be in Dº before
you set the cruise control speed.
Bring your vehicle to the desired speed,
push the lever down in the SET/COASTº
direction and release it. This sets the ve-
hicle at that speed. If the speed is not sat-
isfactory, tap the lever up for a faster
speed, or tap it down for a slower speed.
Each tap changes the set speed by 1.6
km/h (1.0 mph). You can now take your
foot off the accelerator pedal. If you need accelerationÐfor example,
when passingÐdepress the accelerator
pedal
enough for the vehicle to exceed the
set speed. When you release it, the ve-
hicle will return to the speed set prior to the
acceleration.
(For manual transmission)
While driving with the cruise cont-
rol on, do not shift to neutral with-
out depressing the clutch pedal, as
this may cause engine racing or
overreving. CAUTION
!
CANCELLING THE PRESET SPEED
You can cancel the preset speed by:
a. Pulling the lever in the CANCELº di-
rection and releasing it.
b. Depressing the brake pedal.
c. Depressing the clutch pedal (manual
transmission).
If the vehicle speed falls below about 40
km/h (25 mph), the preset speed will auto-
matically cancel out.
If the vehicle speed drops 16 km/h (10
mph) below the preset speed, the preset
speed will also automatically cancel out.
If the preset speed automatically cancels
out other than for the above cases, have
your
vehicle checked by your Toyota deal-
er at the earliest opportunity.
ProCarManuals.com
Page 71 of 203

64
RESETTING AT A FASTER SPEED
Push the lever up in the RES/ACCº direc-
tion and hold it. Release the lever when
the desired speed is attained. While the
lever is held up, the vehicle will gradually
gain speed.
However, a faster way to reset is to accel-
erate the vehicle and then push the lever
down in the SET/COASTº direction.
RESETTING AT A SLOWER SPEED
Push the lever down in the SET/COASTº
direction and hold it. Release the lever
when the desired speed is attained. While
the lever is held down, the vehicle speed
will gradually decrease.
However, a faster way to reset is to de-
press the brake pedal and then push the
lever down in the SET/COASTº direction.
RESUMING THE PRESET SPEED
If the preset speed is cancelled by pulling
the control lever or by depressing the
brake pedal or clutch pedal, pushing the
lever up in the RES/ACCº direction will
restore the speed set prior to cancellation.
However, once the vehicle speed falls be-
low about 40 km/h (25 mph), the preset
speed will not be resumed. CRUISE CONTROL FAILURE WARNING
If the CRUISEº indicator light in the in-
strument cluster flashes when using the
cruise control, press the CRUISE ON-
OFFº button to turn the system off and
then press it again to turn it on.
If any of the following conditions then oc-
curs, there is some trouble in the cruise
control system.
�
The indicator light does not come on.
� The indicator light flashes again.
� The indicator light goes out after it
comes on.
If this is the case, contact your Toyota
dealer and have your vehicle inspected.
ProCarManuals.com
Page 200 of 203
193
Fuses (type A)
1 AM2 30 A: Starting system
2 HAZARD 10A: Emergency flashers
3 HORN 7.5 A: Horns
4 Radio NO.1 20 A: Car audio system
5 ECU-B 15 A: Anti-lock brake system,
cruise control system
6 DOME 10 A: Interior lights, personal
lights, luggage compartment light, trunk
light, door courtesy lights, clock
7 HEAD (LH) 15 A: Left-hand headlight
8 HEAD (RH) 15 A: Right-hand head-
light9 SPARE: Spare fuse
10 SPARE: Spare fuse
11 SPARE: Spare fuse
12 ALT-S 7.5 A: Charging system
13 SRS WRN 7.5 A: SRS airbag warning
light
14 EFI 15 A: Multiport fuel injection sys-
tem/sequential multiport fuel injection
system
15 HEAD (LH) LO 15 A: Left-hand head-
light (low beam)
16 HEAD (RH) LO 15 A: Right-hand
headlight (low beam)
17 HEAD-HI (RH) 15 A: Right-hand
headlight (high beam)
ProCarManuals.com