1996 TOYOTA 4RUNNER key
[x] Cancel search: keyPage 53 of 217

50To adjust a mirror, use the switches.
1. Master switchÐTo select the mirror to
be adjusted.
Place the switch at Lº (le
ft) or Rº (rightº).
2. Control switchÐTo move the mirror.Push the switch in the desired direction.
If the engine is not running, the key must be in the ACCº position.
NOTICE
If ice should jam the mirror, do not operate the control or scrape the
mirror face. Use a spray de-icer tofree the mirror.
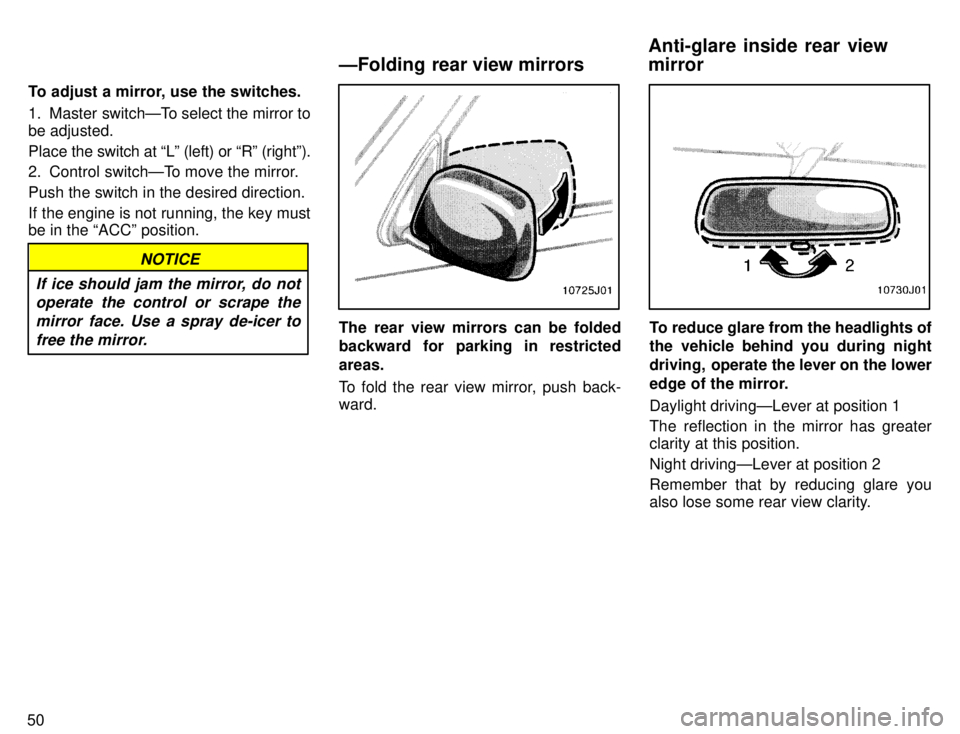
The rear view mirrors can be folded
backward for parking in restricted areas.
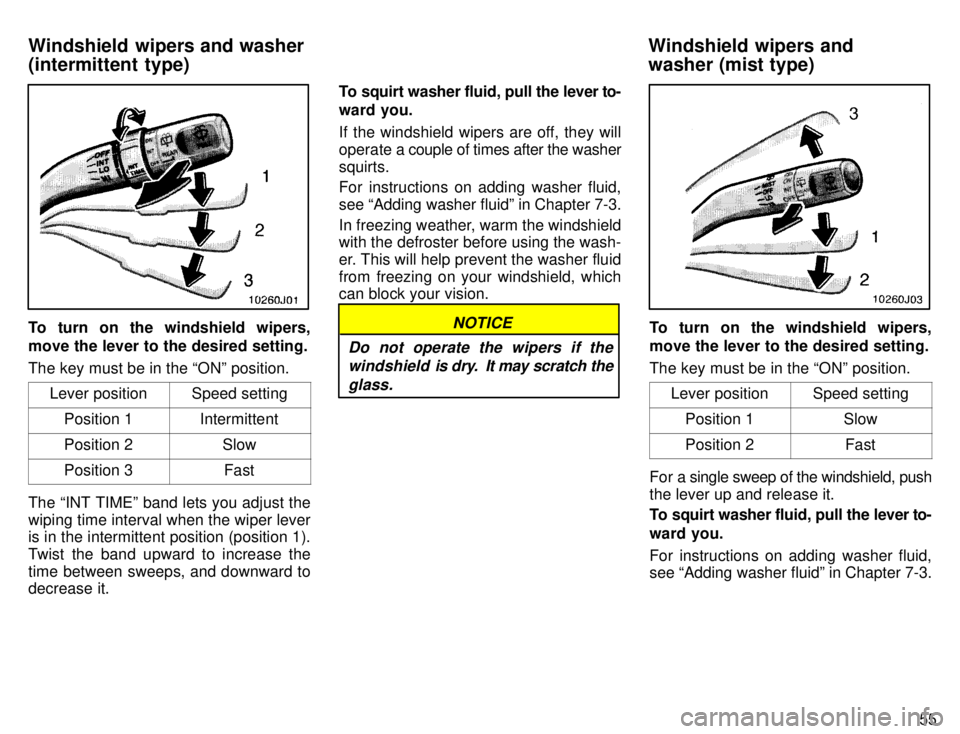
To fold the rear view mirror, push back- ward.To reduce glare from the headlights of
the vehicle behind you during night
driving, operate the lever on the lower
edge of the mirror. Daylight drivingÐLever at position 1
The reflection in the mirror has greater
clarity at this position. Night drivingÐLever at position 2 Remember that by reducing glare you
also lose some rear view clarity.
ÐFolding rear view mirrors
Anti-glare inside rear view mirror
Page 55 of 217

52
High-Low beamsÐFor high beams,
turn the headlights on and push the lever away from you (position 1). Pull the lever
toward you (position 2) for low beams.
The headlight high beam indicator light
(blue light) on the instrument panel will tell
you that the high beams are on.
Flashing the high beam headlights
(position 3)ÐPull the lever all the way
back. The high beam headlights turn off
when you release the lever.
You can flash the high beam headlights with the knob turned to OFFº.TURN SIGNAL
To signal a turn, push the headlight/
turn signal lever up or down to posi-
tion 1. The key must be in the ONº position. The lever automatically returns after you make a turn, but you may have to returnit by hand after you change lanes.
To signal a lane change, move the lever
up or down to the pressure point (position2) and hold it.
If the turn signal indicator lights (green
lights) on the instrument panel flash faster
than normal, a front or rear turn signal bulb is burned out.To turn on the emergency flashers,
push the switch.
All the turn signal lights will flash. To turn
them off, push the switch once again.
Turn on the emergency flashers to warn other drivers if your vehicle must be
stopped where it might be a traf fic hazard.
Always pull as far off the road as possible.
The turn signal light switch will not work
when the emergency flashers are operat-ing.
Emergency flashers
Page 58 of 217

55
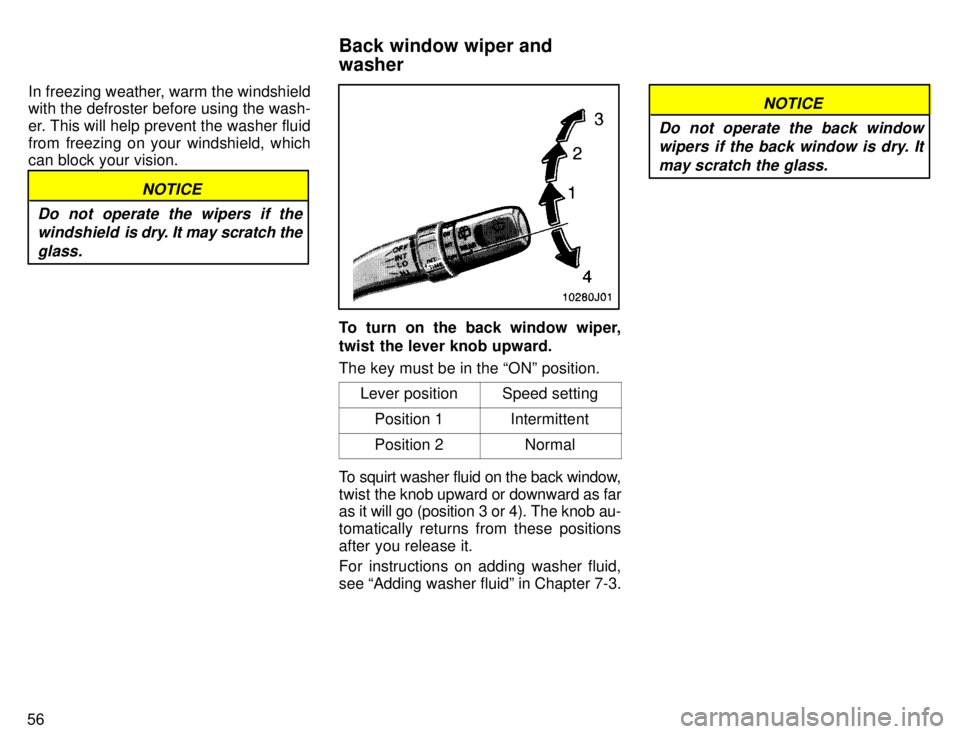
To turn on the windshield wipers, move the lever to the desired setting. The key must be in the ONº position.Lever position
Speed setting
Position 1Intermittent
Position 2Slow
Position 3Fast
The INT TIMEº band lets you adjust the wiping time interval when the wiper lever is in the intermittent position (position 1).
Twist the band upward to increase the
time between sweeps, and downward to
decrease it. To squirt washer fluid, pull the lever to-
ward you.
If the windshield wipers are off, they will
operate a
couple of times after the washer
squirts.
For instructions on adding washer fluid, see Adding washer fluidº in Chapter 7-3.
In freezing weather, warm the windshield with the defroster before using the wash-
er. This will help prevent the washer fluid
from freezing on your windshield, which can block your vision.
NOTICE
Do not operate the wipers if the windshield is dry. It may scratch the
glass.To turn on the windshield wipers, move the lever to the desired setting. The key must be in the ONº position.
Lever position
Speed setting
Position 1Slow
Position 2Fast
For a single sweep of the windshield, push the lever up and release it.
To squirt washer fluid, pull the lever to-
ward you.
For instructions on adding washer fluid, see Adding washer fluidº in Chapter 7-3.
Windshield wipers and washer (intermittent type)
Windshield wipers andwasher (mist type)
Page 59 of 217

56In freezing weather, warm the windshield with the defroster before using the wash-
er. This will help prevent the washer fluid
from freezing on your windshield, which can block your vision.
NOTICE
Do not operate the wipers if the windshield is dry. It may scratch the
glass.
To turn on the back window wiper,
twist the lever knob upward. The key must be in the ONº position.
Lever position
Speed setting
Position 1Intermittent
Position 2Normal
To squirt washer fluid on the back window,
twist the knob upward or downward as far
as it will go (position 3 or 4). The knob au-
tomatically returns from these positions
after you release it.
For instructions on adding washer fluid, see Adding washer fluidº in Chapter 7-3.
NOTICE
Do not operate the back window wipers if the back window is dry. It
may scratch the glass.
Back window wiper and washer
Page 60 of 217

57
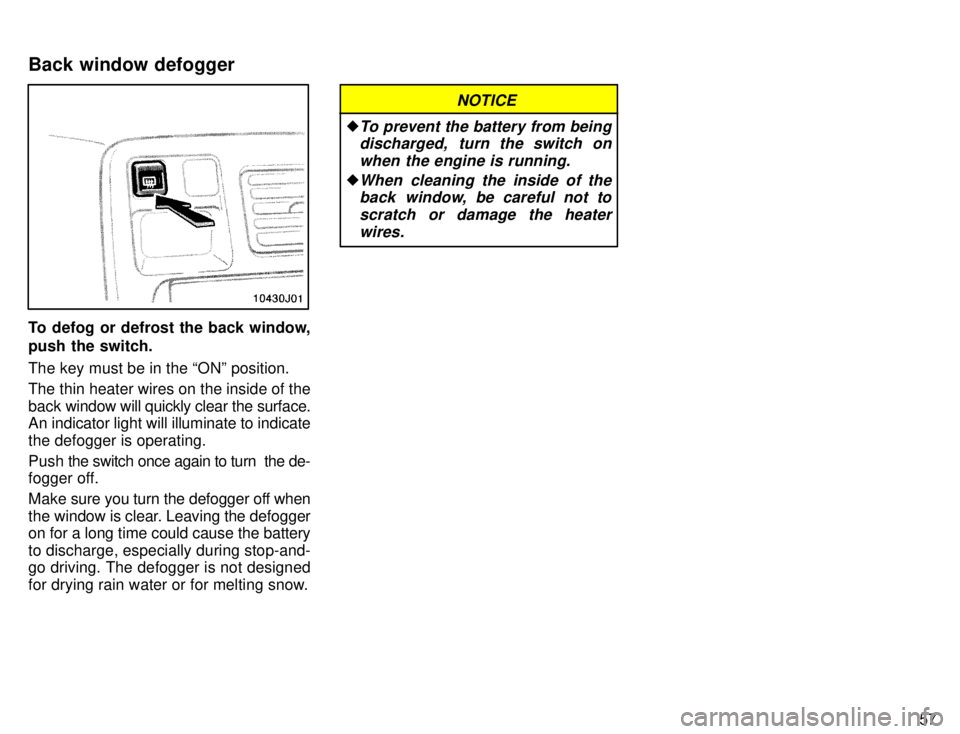
To defog or defrost the back window,
push the switch. The key must be in the ONº position.
The thin heater wires on the inside of the back window will quickly clear the surface.
An indicator light will illuminate to indicatethe defogger is operating. Push the switch once again to turn the de-
fogger off.
Make sure you turn the defogger off when
the window is clear. Leaving the defogger on for a long time could cause the battery
to discharge, especially during stop-and-
go driving. The defogger is not designed
for drying rain water or for melting snow.
NOTICE
�To prevent the battery from being
discharged, turn the switch on
when the engine is running.
�When cleaning the inside of theback window, be careful not to
scratch or damage the heaterwires.
Back window defogger
Page 65 of 217

62
(a) Brake System Warning Light This light has the following functions: Parking brake reminder
If this light is on, make sure the parking
brake is fully released. The light should go
off.
Low brake fluid level warning
If this light comes on and stays on while
you are driving, slow down and pull off the
road. Then stop the vehicle carefully.There may be a problem somewhere in
the brake system. Check the fluid level of
the see-through reservoir.
To make sure the parking brake has not
caused the warning light to come on,
check to see that the parking brake is fully
released.
If the brake fluid level is low...
At a safe place, test your brakes by start-
ing and stopping. � If you judge that the brakes still work
adequately, drive cautiously to yournearest dealer or shop for repairs.
� If the brakes are not working, have the
vehicle towed in for repairs. (For tow- ing information, see Part 4.)
It is dangerous to continue driving
normally when the brake fluid level
is low. CAUTION
!
If the brake fluid level is correct...
Have the warning system checked by
your Toyota dealer.
(b) Seat Belt Reminder Light and Buzz-
er
Once the ignition key is turned to ONº or
STARTº, the reminder light and buzzer
come on if the driver's seat belt is not fas-
tened. Unless the driver fastens the belt, the light stays on and the buzzer sounds for about 4 to 8 seconds.
(c) Discharge Warning Light
This light warns that the battery is being discharged.
If it comes on while you are driving, there
is a problem somewhere in the charging system.
The engine ignition will continue to oper-
ate, however, until the battery is dis-
charged. Turn off the air conditioning,
blower, ra dio, etc., and drive directly to the
nearest Toyota dealer or repair shop.
Page 66 of 217

63
NOTICE
Do not continue driving if the engine drive belt is broken or loose.
(d) Low Oil Pressure Warning Light
This light warns that the engine oil pres-
sure is too low.
If it flickers or stays on while you are driv-
ing, pull off the road to a safe place and
stop the engine immediately. Call a Toyota
dealer or qualified repair shop for assis- tance.
The light may occasionally flicker when
the engine is idling or it may come on brief-
ly after a hard stop. There is no cause for concern if it then goes out when the en-
gine is accelerated slightly.
The light may come on when the oil level
is extremely low. It is not designed to indi-cate low oil level, and the oil level must be checked using the level dipstick.
NOTICE
Do not drive the vehicle with the warning light onÐeven for one
block. It may ruin the engine.
(e) Malfunction Indicator Lamp
This lamp comes on in the following cases.
a. The fuel tank is completely empty. (See Fuel gaugeº in Chapter 1-5 for in- structions.)
b. The fuel tank cap is not tightened se-
curely. (See Fuel tank capº in Chapter
1-2 for instructions.)
c. There is a problem somewhere in your
engine or automatic transmission electri- cal system.
If it comes on while you are driving in case
c, have your vehicle checked/repaired by
your Toyota dealer as soon as possible.
(f) Low Fuel Level Warning Light
This light comes on when the fuel level in
the tank becomes nearly empty. Fill up the
tank as soon as possible.
(g) ABSº Warning Light
This light warns that there is a problem
somewhere in your anti-lock brake sys- tem.
If the light comes on while you are driving,
have your vehicle checked by your T oyota
dealer as soon as possible. The light will come on when the ignition key is turned to the ONº position. After
about 3 seconds, the light will go off. When the ABSº warning light is on (and
the brake system warning light is off), the brake system
operates conventionally but
without anti-lock function.
(h) Open Door Warning Light
This light remains on until all the doors
and back door are completely closed.
(i) SRS Airbag Warning Light
This light will come on when the igni-
tion key is turned to the ACCº or ONº
position. After about 6 seconds, the
light w ill go off. This means the airbag
system is operating properly.
The warning light system monitors the air-
bag sensor assembly, inflators, warning
light, interconnecting wiring and power sources.
If either of the following conditions occurs, this indicates a malfunction somewhere in the parts monitored by the warning light
system. Contact your Toyota dealer as
soon as possible to service the vehicle. � The light does not come on when the
ignition key is turned to the ACCº or
ONº position or remains on.
� The light comes on while driving.
Page 67 of 217

64(j) Light Reminder Buzzer
This buzzer will sound if the driver's door is opened while the ignition switch isturned to the LOCKº position with the
headlight
switch on. Removing the key will
not stop the buzzer as long as the head- light switch is on.
(k) Key Reminder Buzzer
This buzzer reminds you to remove the
key when you open the driver's door with the ignition key in the ACCº or LOCKº position.
(l) Unengaged Parkº Warning Light (vehicles with automatic transmis- sion)
This light warns that the transmission
Parkº mechanism is not engaged. If the
front drive control lever is in the Nº posi-
tion while the selector lever is in the Pº
position, the transmission will disengage
and the wheels will not lock.
To restore the park function, shift
the front drive control lever out of Nº. CAUTION
! (m) Automatic Transmission Fluid
Temperature Warning Light
This light warns that the automatic trans- mission fluid temperature is too high.
If this light comes on while you are driving,
slow down and pull off the road. Stop the
vehicle at a safe place and put the selector
lever in Pº. With the engine idling, wait
until the light goes off. If the light goes off,
you may start the vehicle again. If the light
does not go off, call a Toyota dealer or
qualified repair shop for assistance.
NOTICE
Continued driving with the warning light on may damage the automatic
transmission.
(n) Low Windshield Washer Fluid Lev- el Warning Light (Canada)
The light warns that the windshield wash-
er fluid level is too low. Add washer fluid at
your earliest opportunity. (For instruc-
tions, see Adding washer fluidº in Chap-ter 7-3.) CHECKING SERVICE REMINDER
INDI-
CATORS
1. Apply the parking brake.
2. Open one of the side doors or the back
door.
The open door warning light should come on.
3. Close the door. The open door warning light should go
off.
4. Turn ignition key to ACCº. The SRS airbag warning light should
come on. It goes off after about 6 sec-onds.
5. Turn the ignition key to ONº, but do not start the engine.
All the service reminder indicators ex-
cept the open door warning light and
SRS airbag warning light should come
on. The ABSº warning light goes off
after about 3 seconds.
If any service reminder indicator or warn-
ing buzzer does not function as described above, either the bulb is burned out or the
circuit is in need of repair. Have it checked
by your Toyota dealer as soon as pos-sible.