Page 193 of 217

190Remove and replace the reservoir cover by hand. Use only newly opened brake fluid. Once
opened, brake fluid absorbs moisture
from the air, and excess moisture can cause a dangerous loss of braking.
CAUTION!
Take care when filling the reservoir
because brake fluid can harm your
eyes and damage painted surfaces.If fluid gets in your eyes, flush your
eyes with clean water.
NOTICE
If you spill the fluid, be sure to wash it off with water to prevent it from
damaging the parts or paint.
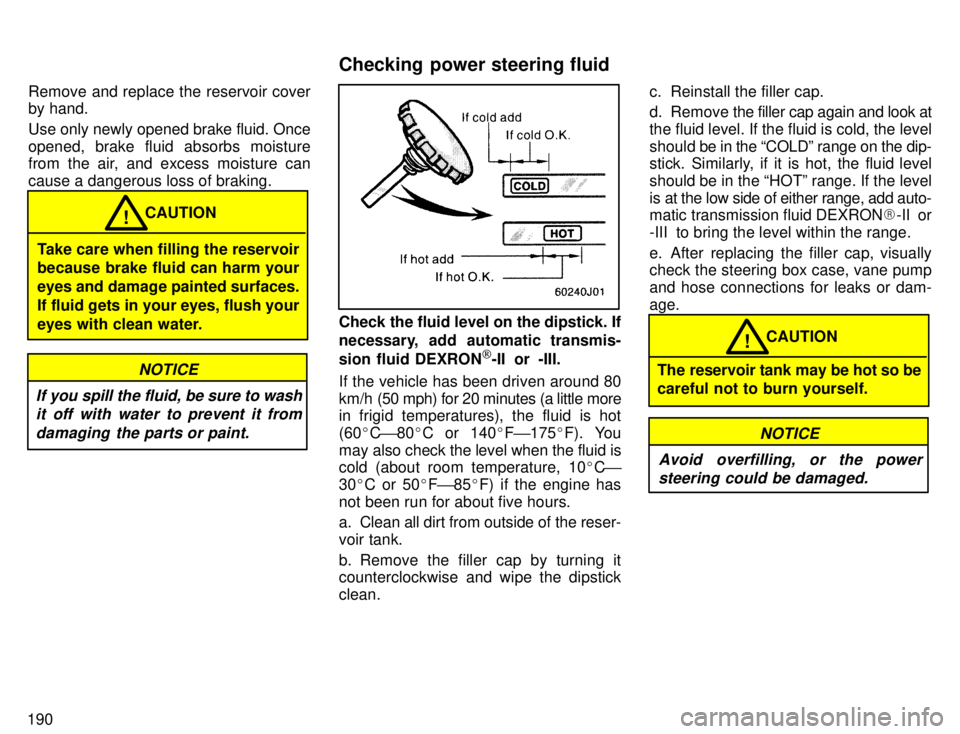
Check the fluid level on the dipstick. If
necessary, add automatic transmis-
sion fluid DEXRON [
-II or -III.
If the vehicle has been driven around 80
km/h (50 mph) for 20 minutes (a little more
in frigid temperatures), the fluid is hot(60 �C ' 80 �C or 140 �F ' 175 �F). You
may also check the level when the fluid is
cold (about room temperature, 10 �C '
30 �C or 50 �F ' 85 �F) if the engine has
not been run for about five hours.
a. Clean all dirt from outside of the reser- voir tank.
b. Remove the filler cap by turning it
counterclockwise and wipe the dipstick clean. c. Reinstall the filler cap.
d. Remove
the filler cap again and look at
the fluid level. If the fluid is cold, the level
should be in the COLDº range on the dip-
stick. Similarly, if it is hot, the fluid level
should be in the HOTº range. If the level
is at the low side of either range, add auto-
matic transmission fluid DEXRON �-II or
-III to bring the level within the range.
e. After replacing the filler cap, visually check the steering box case, vane pump
and hose connections for leaks or dam-age.CAUTION!
The reservoir tank may be hot so be
careful not to burn yourself.
NOTICE
Avoid overfilling, or the power steering could be damaged.
Checking power steering fluid
Page 204 of 217
201
Light bulbs
Bulb
No.WType
HeadlightÐ60/55A
Parking and front side marker lightsÐ5C
Front turn signal lights115627B
Rear turn signal lightsÐ21C
Stop and tail lightsÐ21/5C
Back-up lightsÐ21C
License plate lightÐ5C
High mounted stop light92118C
Interior lightÐ8D
Personal lightsÐ8D
Glovebox lightÐ1.4C
Luggage compart- ment lightÐ8D
A: HB2 halogen bulbs
B: Single end bulbs
C: Wedge base bulbs
D: Double end bulbs
1. Open the hood. Unplug the connec-
tor. Remove the rubber cover. If the connector is tight, wiggle it.2. Release the bulb retaining spring
and remove the bulb. Install a new
bulb and the bulb retaining spring.
To install a bulb, align the tabs of the bulb with the cutouts of the mounting hole.
ÐHeadlights
Page 214 of 217
211
19. ECU-B 7.5 A:
SRS airbag warning
light
20. 4WD 20 A: A.D.D. control system,
four-wheel drive control system, rear dif- ferential lock system
21. TURN 10 A: Turn signals lights, emer-
gency flashers
22. GAUGE 10 A: Gauges and meters,
back window defogger, daytime running
light system, air conditioning system, electric moon roof
23. ECU-IG 10 A: Cruise control system,
anti-lock brake system, electronically
controlled automatic transmission sys-
tem, power antenna
24. WIPER 20 A: Windshield wipers and
washer, back window wiper
25. IGN 7.5 A: SRS airbag system, multi-
port fuel injection system / sequential mul-
tiport fuel injection system, discharge
warning light Fuses (type B)
26. HEATER 50 A:
Air conditioning sys-
tem, A.Cº fuse
27. AM1 40 A: Starting system
28. AM2 30 A: Starting system, IGNº
fuse
29. POWER 30 A: Power window, power
back window, electric moon roofFuses (type C)
30. ABS 60 A: Anti-lock brake system
31. ALT 100 A: Charging system