Page 72 of 388

Remember, the theft-deterrent system won’t be activated
if you lock the doors with a key or manual door lock. It
only activates if you use a power door lock switch or
Remote Lock Control System.
You should also
remember that you can start your vehicle with the
correct ignition key if the alarm has been set
off, but this
does not shut off the alarm.
Here’s how to avoid setting
off the alarm by accident:
If you don’t want to activate the theft-deterrent
system, the vehicle should be locked
after the doors
are closed.
Always unlock a door with a key, or use the Remote
Lock Control System. Unlocking a door any other
way will set off
the alarm.
Testing the Alarm
The alarm can be tested by first having the driver’s
window down. ’Activate the system by locking the doors
with the power door lock switch
or the Remote Lock
Control System. Get out
of the car and close the door and
wait for the SECURITY light to
go out. Then reach in
through the window, unlock the door with the manual door
lock, and open the door.
This should set off the alarm.
If the alarm does not sound when it should, check to
see if the horn works. The horn fuse may be blown.
To replace the fuse, see “Fuses and Circuit Breakers”
in the Index.
To reduce the possibility of theft, always activate the
theft-deterrent system when leaving your vehicle.
If you set off the alarm by accident, unlock any door
with
your key.
You can also turn off the alarm by using the Remote
Lock Control System. The alarm won’t stop if you try
to
unlock a door any other way.
2-16
ProCarManuals.com
Page 73 of 388

PASS-hti
Your vehicle is equipped
with the PASS-Key
I1
(Personalized Automotive
Security System)
theft-deterrent system.
PASS-Key
I1 is a passive
theft-deterrent system.
It works when you insert
or remove the key from
the ignition.
PASS-Key
I1 uses a resistor pellet in the ignition key
that matches a decoder in your vehicle.
When the PASS-Key
II system senses that someone is
using the wrong key, it shuts down the vehicle’s starter an\
d
fuel systems. For about three minutes, the starter won’t work and fuel won’t go to
the engine. If someone tries to
start your vehicle again or uses another key during this
time, the vehicle will not start.
This discourages someone
from randomly trying different keys with different resistor
pellets
in an attempt to make a match. The
ignition key must be clean and dry before it’s
inserted in the ignition or the engine may not start. If
the engine does not start and the SECURITY light is
on or
you get the CLEAN KEY...WAIT 3 MINUTES
message on the DIC, the key may be dirty or wet. Turn
the ignition off.
Clean and dry the key. Wait about three minutes and try
again. The SECURITY light may remain on during this
time. If the starter still won’t work, and the key appears
to be clean and dry, wait about three minutes and try
another ignition key. At this time, you may also want to
check the fuses
(see “Fuses and Circuit Breakers” in the
Index). If the starter won’t work with the other key, your
vehicle needs service.
If your vehicle does start, the first
ignition key may be faulty.
See your Aurora retailer or a
locksmith who can service the PASS-Key
11.
ProCarManuals.com
Page 74 of 388

If you accidentally use a key that has a damaged or
missing resistor pellet, the starter won’t work and the
SECUFUTY light will flash and the CLEAN KEY.. WAIT
3 MINUTES message will appear.
See your Aurora retailer
or a locksmith who can service
the PASS-Key
11 to have a new key made.
If you’re ever driving and the SECURITY light comes
on or PASS-KEY SYSTEM FAULT appears, you will
be able to restart your engine
if you turn it off. Your
PASS-Key
I1 system, however, is not working properly
and must be serviced by your Aurora retailer. Your
vehicle is not protected by the PASS-Key
I1 system.
If you lose or damage a PASS-Key I1 ignition key, see
your Aurora retailer or
a locksmith who can service
PASS-Key
I1 to have a new key made.
New Vehicle “Break-In”
NOTICE:
Your modern Aurora doesn’t need an elaborate
“break-in.” But it will perform better in the long
run if you follow these guidelines:
e Don’t drive at any one speed -- fast or
slow -- for the first 500 miles (804 km).
Don’t make full-throttle starts.
200 miles (322 km) or so. During this time
your new brake linings aren’t yet broken
in. Hard stops with new linings can mean
premature wear and earlier replacement.
Follow this breaking-in guideline every
time you get new brake linings.
See “Towing
a Trailer’’ in the Index for
more information.
Avoid making hard stops for the first
Don’t tow a trailer during break-in.
ProCarManuals.com
Page 75 of 388

Ignition Positions
A
C
I
E
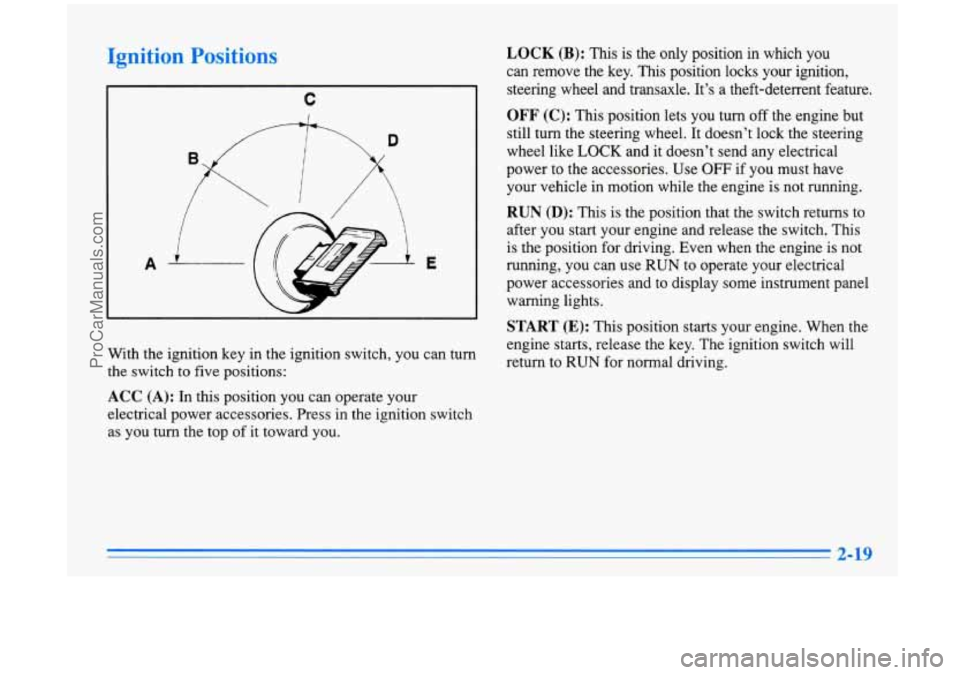
With the ignition key in the ignition switch, you can turn
the switch
to five positions:
ACC (A): In this position you can operate your
electrical power accessories. Press in the ignition switch
as you
turn the top of it toward you.
LOCK (B): This is the only position in which you
can remove the key. This position locks your ignition,
steering wheel and transaxle. It’s a theft-deterrent feature. \
OFF (C): This position lets you turn off the engine but
still turn the steering wheel. It doesn’t lock the steering
wheel like
LOCK and it doesn’t send any electrical
power to the accessories. Use
OFF if you must have
your vehicle in motion while the engine is not running.
RUN (D): This is the position that the switch returns to
after you start your engine and release the switch. This
is the position for driving. Even when the engine is not
running, you can
use RUN to operate your electrical
power accessories and to display some instrument panel
warning lights.
START (E): This position starts your engine. When the
engine
starts, release the key. The ignition switch will
return to
RUN for normal driving.
ProCarManuals.com
Page 82 of 388
Selectable Shift
This button lets you change from a normal driving mode
to
a power mode. For general driving conditions, use the
normal mode.
Press the’ button on your shift lever
so that it’s either in
the NORMAL or POWER position. When it’s
in the
NORMAL position, the line on the button will be
showing. When in POWER, the line is not showing.
In the NORMAL position, the transaxle shifts at lower
engine speeds. For increased performance, you may
choose the POWER mode.
Parking Brake
Setting the parking brake: Hold the regular brake
pedal down with your right foot. Push down the parking
brake pedal with your left
foot. If the ignition is on, you
will hear a single chime and the parking brake indicator
light will come
on.
ProCarManuals.com
Page 83 of 388

Releasing the parking brake:You will need to use the
PUSH TO RELEASE parking brake pedal. Hold the
regular brake down and push the parking brake pedal with your left foot. This will unlock the pedal. When
you lift your left foot, the parking brake pedal will
follow it to the released position.
If you try to drive off with the parking brake
on, the parking brake indicator light stays
on. The
PARK BRAKE
SET message will appear in the Driver
Information Center, and a chime will sound until you
release the parking brake or recycle the ignition.
rNOTICE:
Driving with the parking brake on can cause
your rear brakes to overheat. You may have to
replace them, and you could also damage other
parts
of your vehicle.
If you are towing a trailer and are parking
on any hill,
see “Towing a Trailer” in the Index. That part shows
what to
do first to keep the trailer from moving.
Shifting Into PARK (Ph
I
A CAT TTION:
It can be dangerous to get out of your vehicle if
the shift lever is not fully in
PARK (P) with the
parking brake firmly set. Your vehicle can roll.
If you have left the engine running, the vehicle
can move suddenly. You or others could’be
injured.
To be sure your vehicle won’t move, even
when you’re on fairly level ground, use the steps
that follow.
If you’re pulling a trailer, see
“Towing
a Trailer” in the Index.
J
1. Hold the brake pedal down with your right foot and
set the parking brake.
ProCarManuals.com
Page 91 of 388
lhrn Signal On Chime
If your turn signal is left on for more than 3/4 of a mile
(1.2 km), a chime will sound at each flash of the turn
signal. To turn off the chime, move the turn signal lever
to the off position.
Headlamps
0 Parking Lamps
Sidemarker Lamps
Taillamps
0 Instrument Panel Lights
0 License Plate Lamps
#, Turn the band to this symbol to turn on:
Headlamps
0 Parking Lamps
-‘a-
0 Sidemarker Lamps
0 Taillamps
0 Instrument Panel Lights
m License Plate Lamps
Turn the band to
OFF to turn off the lampshights.
2-35
ProCarManuals.com
Page 92 of 388

Flash-To-Pass
I
If the headlamp switch is left on you’ll hear a warning
chime when you turn the ignition
off, remove the key
from the ignition and open the driver’s door.
Headlamp High/Low Beam
To change the headlamps
from low beam to high or
high to low, pull the turn
signal lever all the way
toward you. Then release it.
When the high beams are on, a light on the instrument
panel also will be on.
This feature lets you use your high-beariheadlamps to
signal .a driver
in front of you that you want to pass. It
works even if your headlamps are
off.
To use it, pull the turn signal lever toward you.
If your headlamps are
off, your high-beam headlamps
will turn on. They’ll stay on as long as you hold the
lever there. Release the lever to turn them
off.
If your headlamps are on, but on low beam, the system
works normally. Just pull the lever until it clicks. Your
headlamps will shift to high beam and stay there.
To
return to low beam, just pull the lever toward you.
If your headlamps are on, and on high beam, your
headlamps will switch to low beam.
To get back to high
beam, pull the lever toward you.
2-36
ProCarManuals.com