1996 NISSAN SENTRA ECO mode
[x] Cancel search: ECO modePage 93 of 191

cAccelerate slowly and smoothly. Main-
tain cruising speeds with a constant ac-
celerator position.
cDrive at moderate speeds on the high-
way. Driving at high speed lowers fuel
economy.
cAvoid unnecessary stopping and brak-
ing. Maintain a safe distance behind
other vehicles.
cUse a proper gear range which suits road
conditions. On level roads, shift into high
gear as soon as possible.
cAvoid unnecessary engine idling.cKeep your engine tuned up.
cFollow the recommended periodic main-
tenance schedule.
cKeep the tires inflated at the correct
pressure. Low pressure increases tire
wear and waste fuel.
cKeep the front wheels in correct align-
ment. Improper alignment causes not
only tire wear but also lower fuel
economy.
cAir conditioner operation lowers fuel
economy. Use the air conditioner only
when necessary.
cWhen cruising at highway speeds, it is
more economical to use the air condi-
tioner and leave the windows closed to
reduce drag.
SD1001M
INCREASING FUEL
ECONOMY
4-14
ZX
Page 106 of 191
tire placard affixed to the driver side
center pillar.
cRetighten the wheel nuts when the
vehicle has been run for 600 miles
(1,000 km).
5. Securely store the spare tire and jacking
equipment in the vehicle.
WARNING
cAlways make sure that the spare tire
and jacking equipment are properly
secured after use. The jack rod may
be used to securely tighten the hold-
down bolts. Such items can become
dangerous projectiles in an accident
or sudden stop.
cThe T-type spare tire and small size
spare tire are designed for emer-
gency use. See specific instructions
under the heading ``Wheels and
tires'' in the ``Do-it-yourself opera-
tions'' section.To start your engine with a booster battery,
the instructions and precautions below must
be followed.
CAUTION
cIf done incorrectly, jump starting can
be hazardous.
cExplosive hydrogen gas is always
present in the vicinity of the battery.
Keep all sparks and flames away
from the battery.
c
Do not allow battery fluid to come into
contact with eyes, skin, cloth or painted
surfaces. Battery fluid is a corrosive
sulfuric acid solution which can cause
severe burns. If the fluid should come
into contact with anything, immediately
flush the contacted area with water.
cA battery rated at above 12 volts
should not be used for a booster.
cWhenever working on or near a bat-
tery, always wear suitable eye protec-
tors (e.g., goggles or industrial safety
spectacles) and remove rings, metal
bands, or any other metal jewelry.
c
Keep battery out of the reach of chil-
dren.
Always follow the instructions below.
Failure to do so could result in damage
to the charging system and cause per-
sonal injury.
1.
If the booster battery is in another vehicle,
position the two vehicles to bring their
batteries into close proximity to each other.
Do not allow the two vehicles to touch.
2. Apply the parking brake. Move the shift
lever to Neutral (On automatic transmis-
sion models, move the lever to P). Switch
off all unnecessary electrical systems
(lights, heater, air conditioner, etc.).
3. Remove vent caps on the battery (if so
equipped). Cover the battery with an old
cloth to reduce explosion hazard.
4. Connect jumper cables in the sequence
as illustrated.
CAUTION
cAlways connect positive (+) to posi-
tive (+) and negative (þ) to body
ground (e.g., strut mounting bolt, etc.
Ðnot to the battery).
JUMP STARTING
5-7
ZX
Page 107 of 191
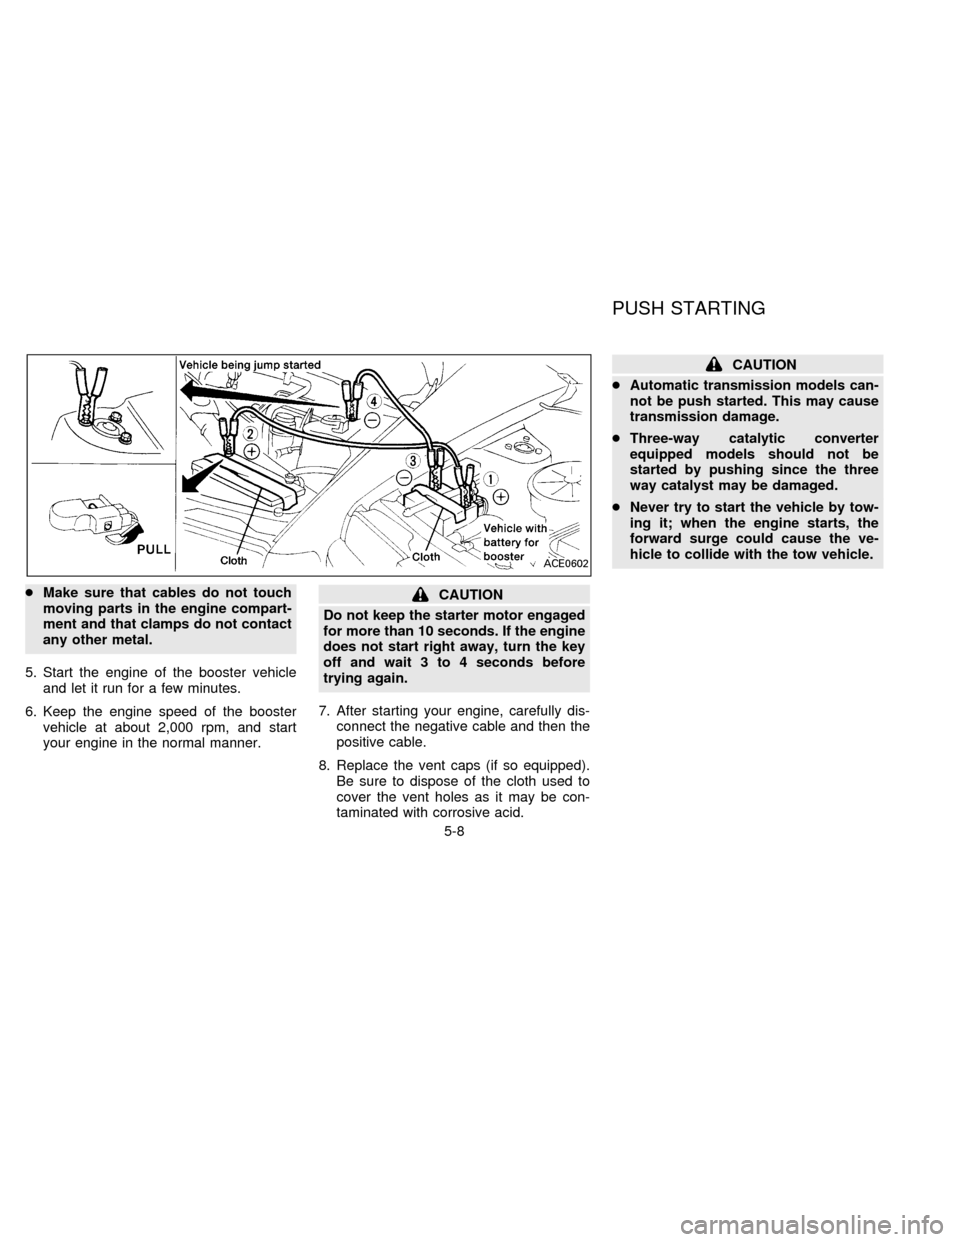
cMake sure that cables do not touch
moving parts in the engine compart-
ment and that clamps do not contact
any other metal.
5. Start the engine of the booster vehicle
and let it run for a few minutes.
6. Keep the engine speed of the booster
vehicle at about 2,000 rpm, and start
your engine in the normal manner.CAUTION
Do not keep the starter motor engaged
for more than 10 seconds. If the engine
does not start right away, turn the key
off and wait 3 to 4 seconds before
trying again.
7. After starting your engine, carefully dis-
connect the negative cable and then the
positive cable.
8. Replace the vent caps (if so equipped).
Be sure to dispose of the cloth used to
cover the vent holes as it may be con-
taminated with corrosive acid.
CAUTION
cAutomatic transmission models can-
not be push started. This may cause
transmission damage.
cThree-way catalytic converter
equipped models should not be
started by pushing since the three
way catalyst may be damaged.
cNever try to start the vehicle by tow-
ing it; when the engine starts, the
forward surge could cause the ve-
hicle to collide with the tow vehicle.
ACE0602
PUSH STARTING
5-8
ZX
Page 109 of 191
When towing your vehicle, all State (Provin-
cial in Canada) and local regulations for
towing must be followed. Incorrect towing
equipment could damage your vehicle.
Towing instructions are available from your
NISSAN dealer. Local service operators are
generally familiar with the applicable laws
and procedures for towing. To assure
proper towing and to prevent accidental
damage to your vehicle, NISSAN recom-
mends having a service operator tow your
vehicle. It is advisable to have the service
operator carefully read the following precau-
tions.
CAUTION
cWhen towing, make sure that the
transmission, axles, steering system
and powertrain are in working condi-
tion. If any unit is damaged, a dolly
must be used.
cWhen towing with the front wheels on
the ground:
Turn the ignition key to the ``OFF''
position and secure the steering
wheel in a straight ahead position
with a rope or similar device. Never
place the ignition key in the ``LOCK''position. This will result in damage
to the steering lock mechanism.
Move the gearshift lever to the Neu-
tral (``N'') position.
On automatic transmission models,
to move the shift lever to the Neutral
(``N'') position turn the ignition key
to the ``ACC'' position.
After moving the shift lever to the
Neutral (``N'') position, be sure to
turn the ignition key to the ``OFF''
position.
cWhen towing with the rear wheels on
the ground, release the parking
brake.
On automatic transmission models,
to move the shift lever to the Neutral
(``N'') position, turn the ignition key
to the ``ACC'' position. After moving
the shift lever to the Neutral position,
be sure to turn the ignition key to the
``OFF'' position.
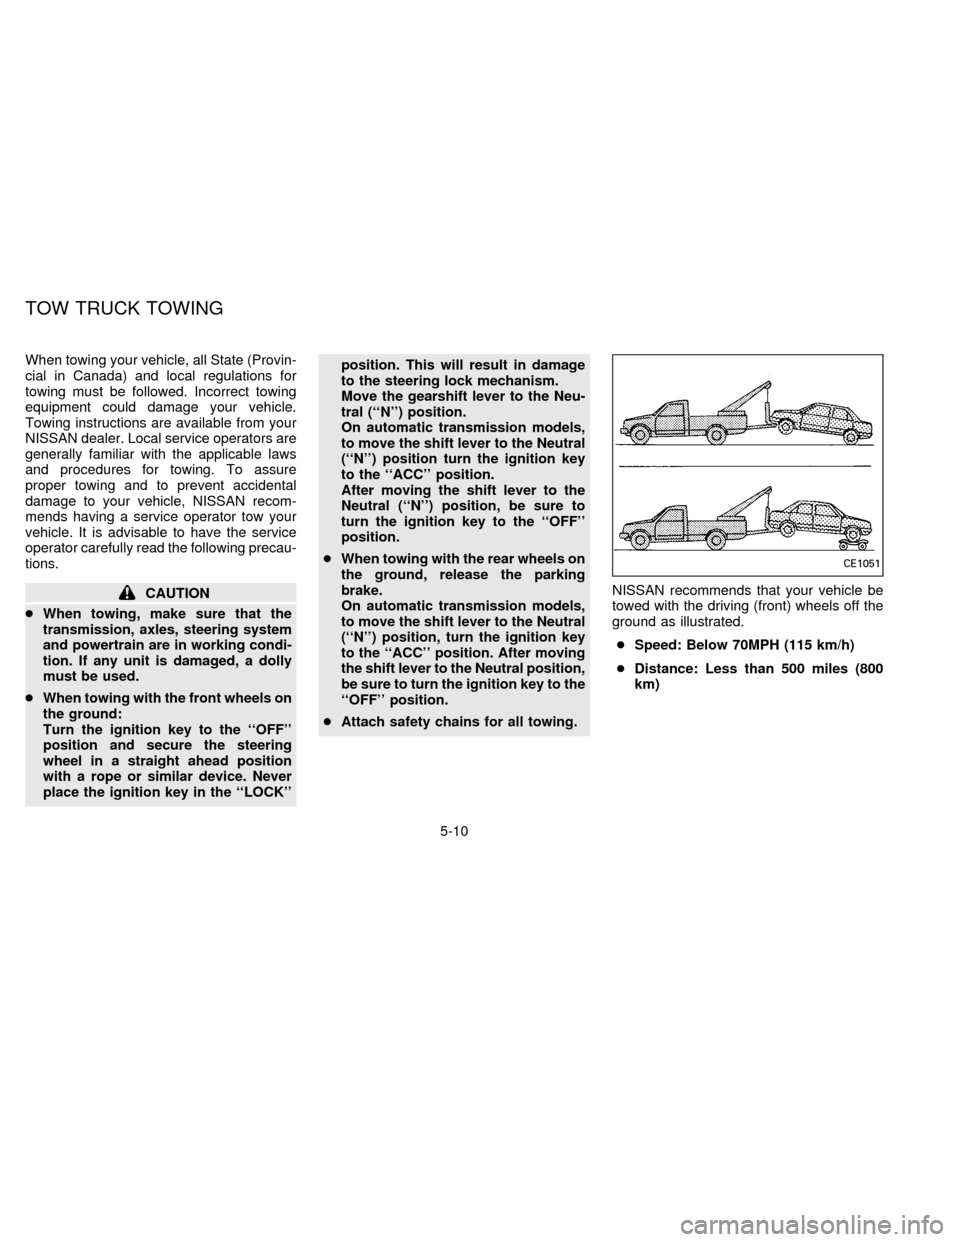
cAttach safety chains for all towing.NISSAN recommends that your vehicle be
towed with the driving (front) wheels off the
ground as illustrated.
cSpeed: Below 70MPH (115 km/h)
cDistance: Less than 500 miles (800
km)
CE1051
TOW TRUCK TOWING
5-10
ZX
Page 110 of 191
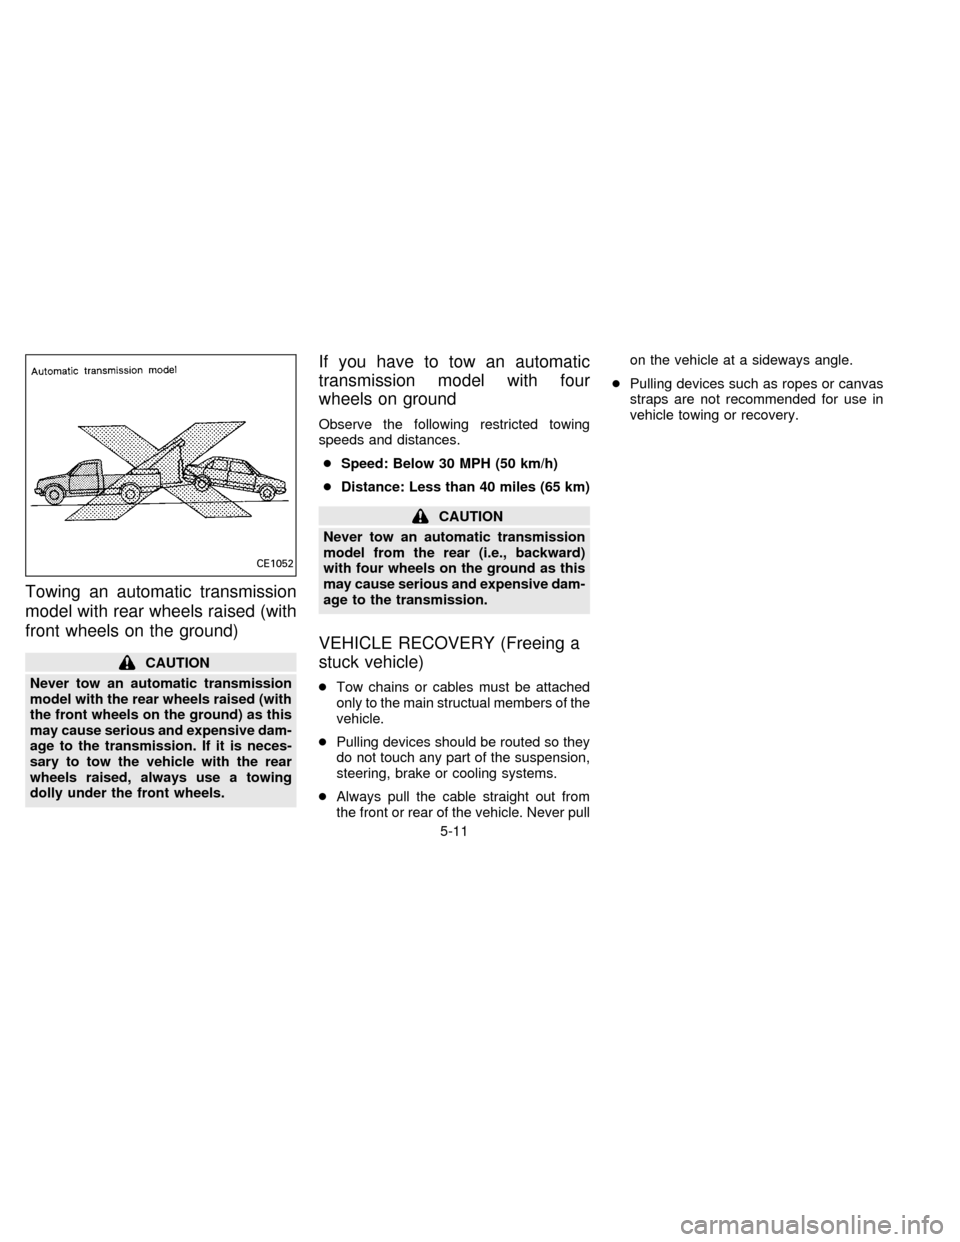
Towing an automatic transmission
model with rear wheels raised (with
front wheels on the ground)
CAUTION
Never tow an automatic transmission
model with the rear wheels raised (with
the front wheels on the ground) as this
may cause serious and expensive dam-
age to the transmission. If it is neces-
sary to tow the vehicle with the rear
wheels raised, always use a towing
dolly under the front wheels.
If you have to tow an automatic
transmission model with four
wheels on ground
Observe the following restricted towing
speeds and distances.
cSpeed: Below 30 MPH (50 km/h)
cDistance: Less than 40 miles (65 km)
CAUTION
Never tow an automatic transmission
model from the rear (i.e., backward)
with four wheels on the ground as this
may cause serious and expensive dam-
age to the transmission.
VEHICLE RECOVERY (Freeing a
stuck vehicle)
cTow chains or cables must be attached
only to the main structual members of the
vehicle.
cPulling devices should be routed so they
do not touch any part of the suspension,
steering, brake or cooling systems.
cAlways pull the cable straight out from
the front or rear of the vehicle. Never pullon the vehicle at a sideways angle.
cPulling devices such as ropes or canvas
straps are not recommended for use in
vehicle towing or recovery.
CE1052
5-11
ZX
Page 115 of 191
Cleaning interior
Occasionally remove loose dust from the
interior trim and seats using a vacuum
cleaner or soft brush. Wipe the vinyl and
leather surfaces with a clean, soft cloth
dampened in mild soap solution, then wipe
clean with a dry soft cloth. Before using any
fabric protector, read the manufacturer's
recommendations. Some fabric protectors
contain chemicals that may stain or bleach
the seat material.
CAUTION
cNever use benzine, thinner, or any
similar material.
cThe leather seats should be regularly
coated with a leather wax like saddle
soap. Never use car wax.
cNever use fabric protectors unless
recommended by the manufacturer.
Floor mat positioning aid
(Driver side only)
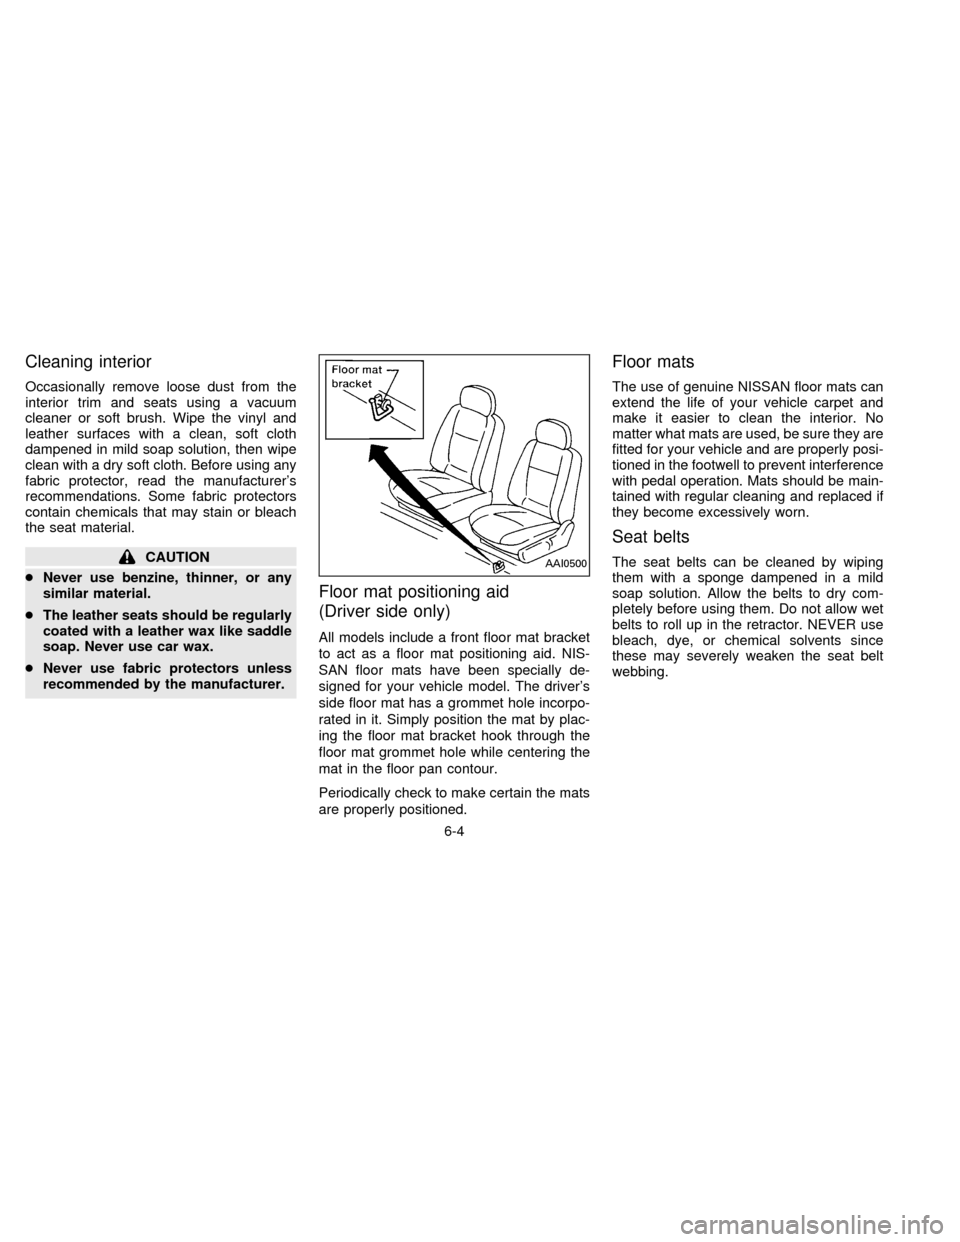
All models include a front floor mat bracket
to act as a floor mat positioning aid. NIS-
SAN floor mats have been specially de-
signed for your vehicle model. The driver's
side floor mat has a grommet hole incorpo-
rated in it. Simply position the mat by plac-
ing the floor mat bracket hook through the
floor mat grommet hole while centering the
mat in the floor pan contour.
Periodically check to make certain the mats
are properly positioned.
Floor mats
The use of genuine NISSAN floor mats can
extend the life of your vehicle carpet and
make it easier to clean the interior. No
matter what mats are used, be sure they are
fitted for your vehicle and are properly posi-
tioned in the footwell to prevent interference
with pedal operation. Mats should be main-
tained with regular cleaning and replaced if
they become excessively worn.
Seat belts
The seat belts can be cleaned by wiping
them with a sponge dampened in a mild
soap solution. Allow the belts to dry com-
pletely before using them. Do not allow wet
belts to roll up in the retractor. NEVER use
bleach, dye, or chemical solvents since
these may severely weaken the seat belt
webbing.AAI0500
6-4
ZX
Page 127 of 191
WARNING
Be careful not to burn yourself, as the
engine oil is hot.
CAUTION
cWaste oil must be disposed of prop-
erly. Check your local regulations.
cAvoid direct contact with used en-
gine oil.
6. Clean and re-install the drain plug and
washer. Securely tighten the drain plug
with a wrench.Drain plug tightening torque:
22 to 29 ft-lb
(29 to 39 N²m)
Do not overtighten.
7. Refill engine with recommended oil and
install the cap securely.
See the ``Technical and consumer infor-
mation'' section for refill capacity.
8. Start the engine.
Check for leakage around the drain plug
and oil filter. Correct as required.
9. Turn the engine off and wait several
minutes. Check the oil level with the
dipstick. Add engine oil if necessary.
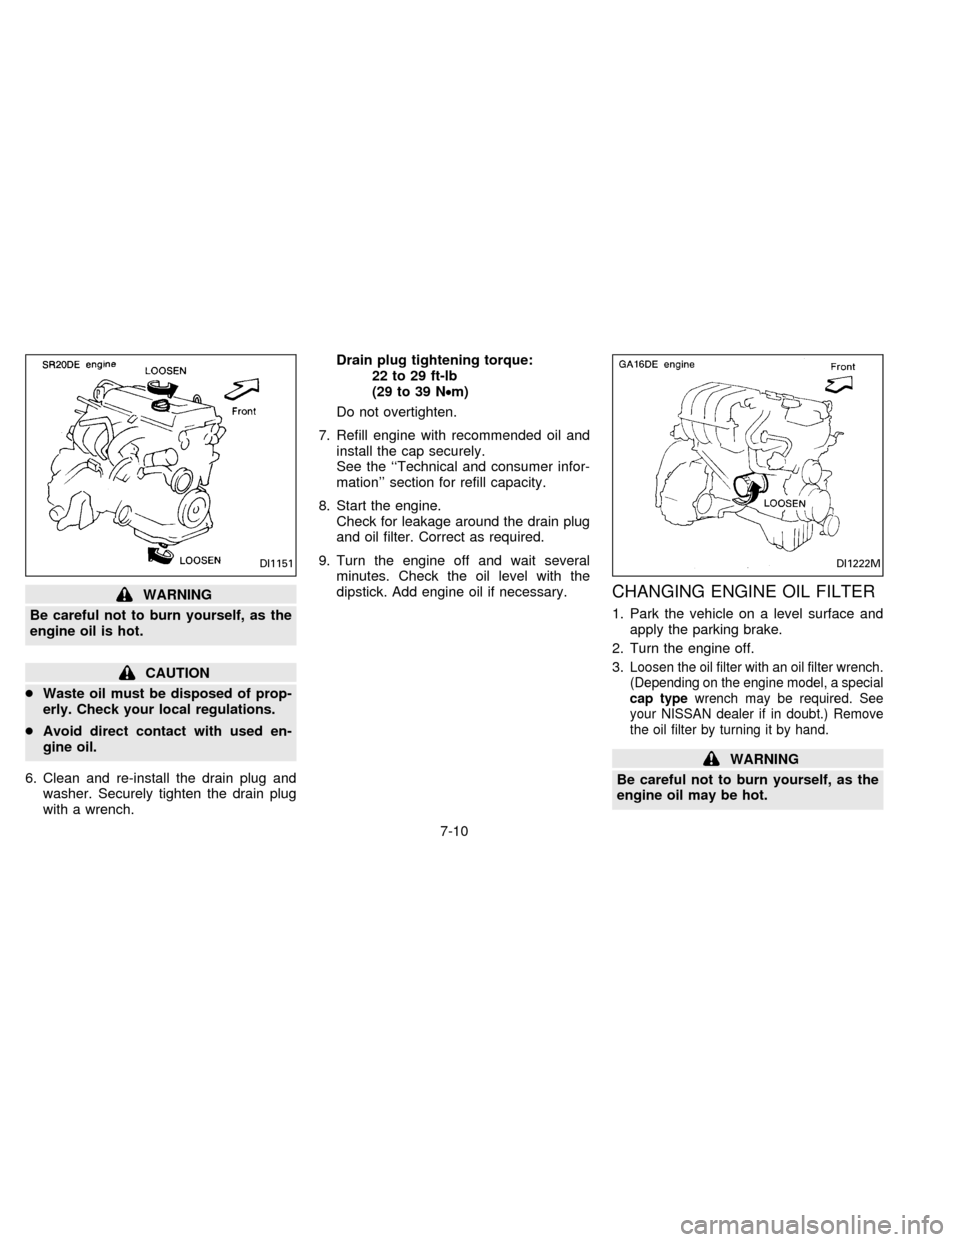
CHANGING ENGINE OIL FILTER
1. Park the vehicle on a level surface and
apply the parking brake.
2. Turn the engine off.
3.
Loosen the oil filter with an oil filter wrench.
(Depending on the engine model, a special
cap typewrench may be required. See
your NISSAN dealer if in doubt.) Remove
the oil filter by turning it by hand.
WARNING
Be careful not to burn yourself, as the
engine oil may be hot.
DI1151DI1222M
7-10
ZX
Page 139 of 191
normal, it may be due to a lack of adjust-
ment of the rear drum brakes. Apply the
parking brake several times.
WARNING
See your NISSAN dealer and have it
checked if the brake pedal height does
not return to normal.
Brake pad wear indicators
The disc brake pads on your vehicle have
audible wear indicators. When a brake pad
requires replacement, it makes a high
pitched scraping or screeching sound when
the vehicle is in motion whether or not the
brake pedal is depressed. Have the brakes
checked as soon as possible if the wear
indicator sound is heard.
Under some driving or climate conditions,
occasional brake squeak, squeal or other
noise may be heard. Occasional brake
noise during light to moderate stops is nor-
mal and does not affect the function or
performance of the brake system.
The rear drum brakes (if so equipped) do
not have audible wear indicators. Should
you ever hear an unusually loud noise fromthe rear drum brakes, have them inspected
as soon as possible by your NISSAN
dealer.
Proper brake inspection intervals should
be followed.For more information regard-
ing brake inspections, see the appropriate
maintenance schedule information in the
``Maintenance Schedule'' section of this
manual.Check the brake booster function as fol-
lows:
1. With the engine off, press and release
the brake pedal several times. When
brake pedal movement (distance of
travel) remains the same from one pedal
application to the next, continue on to the
next step.
2. While depressing the brake pedal, start
the engine. The pedal height should drop
a little.
3. With the brake pedal depressed, stop the
engine. Keeping the pedal depressed for
about 30 seconds, the pedal height
should not change.
4. Run the engine for one minute without
depressing the brake pedal, then turn it
off. Depress the brake pedal several
times. The pedal travel distance will de-
crease gradually with each depression
as the vacuum is released from the
booster.
If the brakes do not operate properly, see
your NISSAN dealer.
BRAKE BOOSTER
7-22
ZX