1996 NISSAN QUEST seats
[x] Cancel search: seatsPage 102 of 235

properly positioned over the child's left
shoulder.
11. Check that the shoulder harness is in
the automatic locking mode by trying to
pull the shoulder harness out of the
retractor. If you cannot pull any of the
shoulder harness webbing out of the
retractor, the shoulder harness is in the
automatic locking mode. If the shoulder
harness is not locked, repeat step 10. If,
after repeated attempts, the integrated
child safety seat shoulder harness can-
not be placed in the automatic locking
mode, do not use the integrated child
safety seat and have it inspected by
your NISSAN dealer.
To cancel the automatic locking mode, un-
buckle the chest clip and both shoulder
harness tongues. Allow the shoulder har-
nesses to retract completely. The automatic
locking mode is now canceled and the
shoulder harness retractor is in the emer-
gency locking mode.
The automatic locking mode (child re-
straint mode) must be reactivated each
time you place a child in the integrated
child safety seats.In addition to the automatic locking retrac-
tors, the integrated child safety seat shoul-
der harnesses are equipped with emer-
gency locking retractors. The automatic
locking mode is best to use, especially for
children who need help staying properly
positioned in the seat and its harnesses (for
example, children who are younger and
smaller), because the belts are always
locked. In the emergency locking mode, the
shoulder belts only lock in a sudden stop or
accident, allowing a child more freedom of
movement. Use the emergency locking
mode only if you judge your child able to
remain properly positioned in the integrated
child safety seat.
Removing the Child
1. Release the chest clip.
2. Release the left and right shoulder har-
ness tongues from the belt buckle by
pressing the red belt buckle button.
3. Move the left and right shoulder har-
nesses aside and assist the child from
the integrated child safety seat.
Storing the Integrated Child Safety
Seat
1. Be sure the shoulder harnesses are fully
retracted and resting inside the inte-
grated child safety seat recess. It is not
necessary to reconnect the shoulder har-
nesses and belt buckle prior to storing
the integrated child safety seat.
2. While holding onto, but not pulling, the
cushion release strap, rotate the cushion
upward until it fits flush with the second
row seat back cushion and locks into
position.
3. Be sure the integrated child safety seat is
locked in the stowed position by grasping
the safety seat cushion and attempting to
lower it without pulling the cushion re-
lease strap. If the integrated child safety
seat is not locked in the stowed position,
repeat steps 1 through 3.
Integrated Child Safety Seat Main-
tenance
cTo clean the shoulder harnesses and belt
buckle webbing, apply a mild soap solu-
tion or any solution recommended for
cleaning upholstery or carpets. Then
2-73
ZX
Page 103 of 235

brush the webbing, wipe it with a cloth
and allow it to dry in the shade. Do not
allow the shoulder harnesses to retract
until they are completely dry.
cThe integrated child safety seats cloth
removable pads may be cleaned with
mild soap and water. The cloth remov-
able pads are attached to the seats with
fastener strips, and may be easily re-
moved. The pads are machine washable.
Follow the instructions attached to the
cloth removable pads.
CAUTION
Failure to follow the washing instruc-
tions provided on the cloth removable
pads may result in premature wear or
damage.
cPeriodically inspect the belt and metal
components of the integrated child safety
seats, such as the buckles, tongues,
shoulder harness webbings, and latching
indicators. Periodically check the func-
tion of the integrated child safety seat
shoulder harness retractor functions. If
loose parts, deterioration, cuts, frays,
malfunctions or other damage to the beltwebbings or metal parts are found, see
your NISSAN dealer for repairs.
Inspection After An Accident
If your vehicle was involved in an accident,
before using the integrated child safety
seats, all related components should be
inspected by a NISSAN dealer for damage.
Damage to the integrated child safety seats
or related components must be repaired.
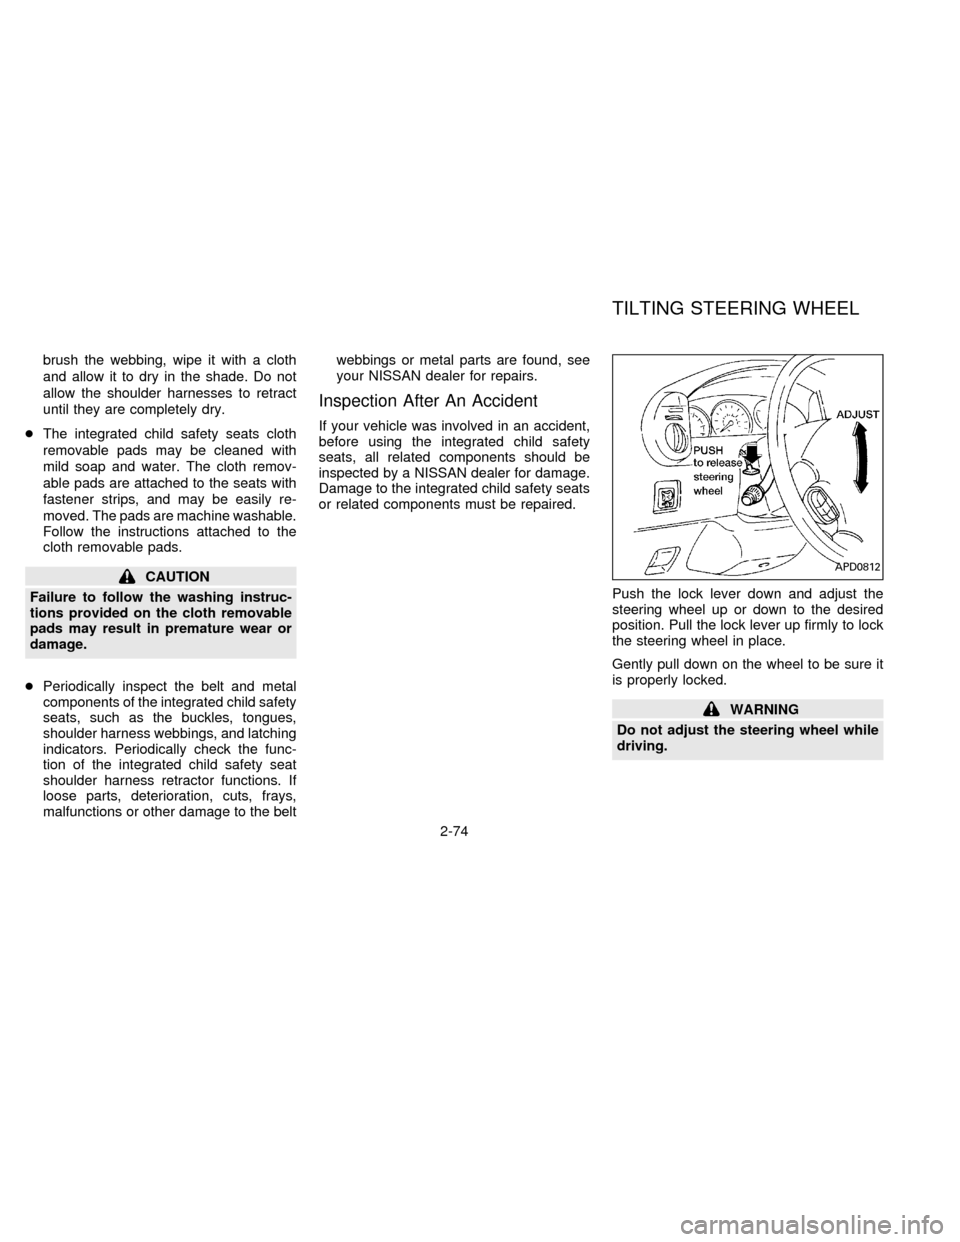
Push the lock lever down and adjust the
steering wheel up or down to the desired
position. Pull the lock lever up firmly to lock
the steering wheel in place.
Gently pull down on the wheel to be sure it
is properly locked.
WARNING
Do not adjust the steering wheel while
driving.
APD0812
TILTING STEERING WHEEL
2-74
ZX
Page 164 of 235

may dull the finish or leave swirl marks.
Removing spots
Remove tar and oil spots, industrial dust,
insects, and tree sap as quickly as possible
from the surface of the paint to avoid lasting
damage or staining. Special cleaning prod-
ucts are available at your NISSAN dealer or
any automotive accessory store.
Underbody
In areas where road salt is used in winter,
the underbody must be cleaned regularly.
This prevents dirt and salt from building up
and causing underbody and suspension
corrosion. Before the winter period and
again in the spring, the underseal must be
checked and, if necessary, re-treated.
Cleaning glass
Use glass cleaner to remove smoke and
dust film from the glass surfaces. It is nor-
mal for glass to become coated with a film
after the vehicle is parked in the hot sun.
Glass cleaner and a soft cloth easily remove
this film.
CAUTION
When cleaning the inside of the win-
dow, do not use sharp-edged tools,
abrasive cleaners or chlorine-based
disinfectant cleaners. They could dam-
age electrical conductors or rear win-
dow defogger elements.
Cleaning alloy wheels
Wash regularly, especially during winter
months in areas where road salt is used.
Salt could discolor the wheel if not removed.
Chrome parts
Clean all chrome parts regularly with a
non-abrasive chrome polish to maintain the
finish.
Plastic parts
Plastic parts can be cleaned with a mild
soap solution. If the dirt cannot be easily
removed, use a plastic cleaner. Do not use
solvents.
Cleaning interior
Occasionally remove loose dust from the
interior trim and seats using a vacuumcleaner or soft brush. Wipe the vinyl and
leather surfaces with a clean, soft cloth
dampened in mild soap solution, then wipe
clean with a dry, soft cloth. Before using any
fabric protector, read the manufacturer's
recommendations. Some fabric protectors
contain chemicals that may stain or bleach
the seat material.
CAUTION
cNever use benzine, thinner, or any
similar material.
cLeather seats should be regularly
coated with a leather wax like saddle
soap. Never use car wax.
cNever use fabric protectors unless
recommended by the manufacturer.
Front floor mat positioning aid
This model includes a front floor mat
bracket to act as a floor mat positioning aid.
NISSAN floor mats, specially designed for
your vehicle, incorporate grommets. To in-
stall, simply position the mat using the floor
mat bracket hook through the floor mat
grommet hole while centering the mat in the
floor pan contour.
6-3
ZX
Page 200 of 235

make sure no nuts are missing, and check
for any loose nuts. Tighten if necessary.
Tire rotation*Ð Tires should be rotated
every 7,500 miles (12,000 km).
Wheel alignment and balanceÐIfthe
vehicle should pull to either side while driv-
ing on a straight and level road, or if you
detect uneven or abnormal tire wear, there
may be a need for wheel alignment.
If the steering wheel or seat vibrates at
normal highway speeds, wheel balancing
may be needed.
Windshield wiper blades*Ð Check for
cracks or wear if they do not wipe properly.
Doors and engine hoodÐ Check that all
doors and the engine hood operate prop-
erly. Also ensure that all latches lock se-
curely. Lubricate hinges, latches, rollers and
links if necessary. Make sure the secondary
latch keeps the hood from opening when
the primary latch is released.
When driving in areas using road salt or
other corrosive materials, check lubrication
frequently.INSIDE THE VEHICLE
The maintenance items listed here should
be checked on a regular basis, such as
when performing periodic maintenance,
cleaning the vehicle, etc.
Lights*Ð Make sure the headlights, stop
lights, tail lights, turn signal lights, and other
lights are all operating properly and installed
securely. Also check headlight aim.
Warning lights and buzzers/chimesÐ
Make sure all warning lights and
buzzers/chimes are operating properly.
Windshield wiper and washer*Ð Check
that the wipers and washer operate properly
and that the wipers do not streak.
Windshield defrosterÐ Check that the air
comes out of the defroster outlets properly
and in sufficient quantity when operating the
heater or air conditioner.
Steering wheelÐ Check for changes in
the steering conditions, such as excessive
freeplay, hard steering or strange noises.
SeatsÐ Check seat position controls such
as seat adjusters, seatback recliner, etc. to
ensure they operate smoothly and all
latches lock securely in every position.Check that the head restraints move up and
down smoothly and the locks hold securely
in all latched positions. Check that the seat
leg latches lock securely in every anchor
position for the folding down rear seat and
detachable rear seat (if so equipped).
Seat beltsÐ Check that all parts of the seat
belt system (e.g. buckles, anchors, adjust-
ers and retractors) operate properly and
smoothly, and are installed securely. Check
the belt webbing for cuts, fraying, wear or
damage.
Accelerator pedalÐ Check the pedal for
smooth operation and make sure the pedal
does not catch or require uneven effort.
Keep the floor mats away from the pedal.
BrakesÐ Check that the brakes do not pull
the vehicle to one side when applied.
Brake pedal*Ð Check the pedal for
smooth operation and make sure it has the
proper distance under it when depressed
fully. Check the brake booster function. Be
certain to keep floor mats away from the
pedal.
Parking brake*Ð Check that the pedal is
adjusted to specification and confirm that
your vehicle is held securely on a fairly
8-3
ZX
Page 221 of 235

VEHICLE LOADING INFORMATION
WARNING
cIt is extremely dangerous to ride in a
cargo area inside of a vehicle. In a
collision, people riding in these ar-
eas are more likely to be seriously
injured or killed.
cDo not allow people to ride in any
area of your vehicle that is not
equipped with seats and seat belts.
c
Be sure everyone in your vehicle is in
a seat and using a seat belt properly.
Terms
It is important to familiarize yourself with the
following terms before loading your vehicle:
cCurb Weight (actual weight of your ve-
hicle) - vehicle weight including: standard
and optional equipment, fluids, emer-
gency tools, and spare tire assembly.
This weightdoes notinclude passen-
gers and cargo.
cGVW (Gross Vehicle Weight) - curb
weight plus the combined weight of pas-
sengers and cargo.cGVWR (Gross Vehicle Weight Rating) -
maximum total weight (load) limit speci-
fied for the vehicle.
cGAWR (Gross Axle Weight Rating) -
maximum weight (load) limit specified for
the front or rear axle.
cGross combined weight - GVW plus the
total weight of the trailer and all its cargo.
Determining Vehicle Load Capacity
The load capacity of this vehicle is deter-
mined by weight, not by available cargo
space. For example, a luggage rack, bike
carrier, cartop carrier or similar equipment
does not increase load carrying capacity of
your vehicle.
To determine vehicle load capacity:
Vehicle weight can be determined by using
a commercial-grade scale, found at places
such as a truck stop, gravel quarry, grain
elevator, or a scrap metal recycling facility.
1)
Determine the curb weight of your vehicle.
2) Compare the curb weight amount to the
GVWR specified for your vehicle to de-
termine how much more weight your
vehicle can carry.3) After loading (cargo & passengers), re-
weigh your vehicle to determine if either
GVWR or GAWR for your vehicle is
exceeded. If GVWR is exceeded, re-
move cargo as necessary. If either the
front or rear GAWR is exceeded, shift
the load or remove cargo as necessary.
Loading Tips
cThe GVW must not exceed GVWR or
GAWR specified on the FMVSS Certifi-
cation Label.
cDo not load the front and rear axle to the
GAWR. Doing so will exceed the GVWR.
CAUTION
c
Properly secure all cargo to help pre-
vent it from sliding or shifting. In a
sudden stop or collision, unsecured
cargo could cause personal injury.
cDo not load your vehicle any heavier
than the GVWR or the maximum
front and rear GAWRs. If you do,
parts on your vehicle can break, or it
can change the way your vehicle
handles. This could result in loss of
control and cause personal injury.
9-12
ZX
Page 233 of 235

Periodic maintenance schedules ................. 8-5
Personal reading light ................................ 1-23
Power
Power antenna ..................................... 3-21
Power door lock...................................... 2-5
Power rear windows ............................. 1-21
Power steering fluid ........................ 7-9, 9-2
Power support front seat ...................... 2-27
Power window ...................................... 1-19
Precautions
Maintenance precautions ....................... 7-2
Precautions on seat belt usage............ 2-47
Precautions when driving ..................... 4-13
Precautions when starting and driving ... 4-2
Q
Quick reference (See gas station information)
R
Radio.......................................................... 3-15
AM-FM radio with cassette player ........ 3-15
CB radio or car phone .......................... 3-26
Rear door lock ........................................... 2-11
Rear power point ....................................... 1-18
Rear seat heater and air conditioner......... 3-14
Rear window defogger switch ................... 1-12
Rear window wiper and washer switches . 1-11
Refrigerant recommendation ....................... 9-6
Registering your vehicle in another country. 9-9Remote keyless entry (See multi-remote control
system)
Reporting safety defects (USA) ................. 9-19
S
Safety
Child safety sliding door lock ................. 2-4
Reporting safety defects (USA) ............ 9-19
Seats
Five passenger seating ........................ 2-18
Five passenger seating with cargo
room...................................................... 2-18
Flexible seating..................................... 2-33
Integrated child safety seats ................ 2-68
Manual front seat adjustment ............... 2-26
Power support front seat ...................... 2-27
Seat positions ....................................... 2-21
Second row bench seat........................ 2-21
Second row bucket seats ..................... 2-24
Seven passenger seating ................... 2-17
Sliding three-passenger seat .............. 2-39
Three-passenger bench seat in fully
forward position ................................... 2-19
Three passenger bench seat in storage
position ................................................ 2-17
Seat belt
Precautions on seat belt usage............ 2-47
Seat belt extenders .............................. 2-57
Seat belt maintenance.......................... 2-57
Seat belts.............................................. 2-47
2-point type without retractor................ 2-563-point type with retractor..................... 2-49
Seat positions ............................................ 2-21
Seating arrangements ............................... 2-15
Seats/floor mats ......................................... 2-15
Self-adjusting brakes ................................. 7-16
Service manual order form ........................ 9-20
Seven passenger seating .......................... 2-17
Shifting ......................................................... 4-6
Sliding three-passenger seat ..................... 2-39
Spark plug replacement............................. 7-12
Speedometer ............................................... 1-4
Spotlights ................................................... 1-15
SRS warning label ..................................... 2-45
Starting
Before starting the engine ...................... 4-5
Jump starting................................. 5-7, 7-11
Precautions when starting and driving ... 4-2
Starting the engine ................................. 4-8
Steering
Power steering fluid ................................ 7-9
Tilting steering wheel............................ 2-74
Storage
Coin tray ............................................... 1-18
Compact disc storage........................... 1-19
Underseat storage tray ......................... 2-30
Sunroof ...................................................... 1-20
Sun shade.................................................. 1-21
Supplemental restraint system
(air bag) ..................................................... 2-42
Switch
Autolamp switch ................................... 1-13
Hazard warning flasher switch ............. 1-16
10-4
ZX
Page 234 of 235

Headlight control switch ....................... 1-12
Ignition switch ......................................... 4-4
Overdrive switch ..................................... 4-7
Rear window defogger switch .............. 1-12
Rear window wiper and washer
switches ................................................ 1-11
Turn signal switch ............................... 1-15
Windshield wiper lever and washer
switch .................................................... 1-10
T
Tabletop seats ........................................... 2-30
Tachometer .................................................. 1-4
Three-passenger bench seat..................... 2-55
Three-passenger bench seat in fully
forward position ......................................... 2-19
Three-passenger bench seat in storage
position....................................................... 2-17
Three way catalyst....................................... 4-2
Tilting steering wheel ................................. 2-74
Timing belt ................................................... 9-7
Tire
Flat tire.................................................... 5-2
Tire chains ............................................ 7-26
Tire placard........................................... 9-11
Tire pressure ........................................ 7-25
Tire rotation .......................................... 7-27
Types of tires ........................................ 7-26
Uniform tire quality grading .................. 9-18
Wheel/tire size ........................................ 9-8
Wheels and tires................................... 7-25Tool kit .................................................... 5-2
Towing
Tow truck towing .................................. 5-11
Towing load/specification chart ............ 9-14
Trailer tow harness and module ................ 9-16
Trailer towing ............................................. 9-13
Transmission
Automatic transmission fluid ................... 7-8
Driving with an automatic transmission .. 4-5
Travel (see registering your vehicle in another
country)
Trip odometer .............................................. 1-4
Turn signal switch ................................... 1-15
U
Underseat storage tray .............................. 2-30
Uniform tire quality grading ....................... 9-18
V
Vanity mirror (if so equipped) .................... 2-76
Vehicle dimensions and weights ................. 9-8
Vehicle identification .................................... 9-9
Vehicle identification number plate.............. 9-9
Vehicle loading information ....................... 9-12
Vehicle recovery ........................................ 5-13
Ventilators .................................................... 3-2W
Warning
Air bag warning light............................. 2-45
Hazard warning flasher switch ............. 1-16
Warning/indicator lights and chimes ...... 1-6
Warning labels (for SRS)........................... 2-45
Weights (See dimensions and weights)
Wheel/tire size ............................................. 9-8
Wheels and tires ........................................ 7-25
Window washer fluid.................................. 7-10
Windows
Locking passenger's window ................ 1-20
Manual rear windows ........................... 1-21
Power rear windows ............................. 1-21
Windshield wiper lever and washer switch. 1-10
Wiper
Rear window wiper and washer
switches ................................................ 1-11
Windshield wiper lever and washer
switch .................................................... 1-10
Wiper blades......................................... 7-14
10-5
ZX