1996 NISSAN QUEST turn signal
[x] Cancel search: turn signalPage 123 of 235

the frequency band. To change frequencies
quickly, press and hold either side of the
SEEK button.
SCAN tuning
Push SCAN to enter the scan tuning mode.
The radio searches up the frequency band,
stopping and playing each strong frequency
station for five seconds. This continues until
the SCAN button is pushed a second time
or a different tuning function is selected.
The AM or FM1 or FM2 symbol in the
display window flashes while each station is
being played.
AM/FM
Press the AM/FM button to select the de-
sired band: AM, FM1, or FM2. The stereo
indicator shows in the display window dur-
ing FM stereo reception. When the stereo
broadcast signal is weak, the radio auto-
matically changes from stereo to monaural
reception.
Station memory operations
Your radio comes equipped with six
memory buttons, which are used to preset
up to six AM stations and 12 FM stations.NOTE: If the vehicle's battery is discon-
nected, the memory buttons need to be
reset.
To set the memory buttons:
1. Select the desired band (AM, FM1, or
FM2) by pressing the AM/FM button.
2. Tune to the desired frequency.
3. Press one of the memory buttons and
hold the button in. The sound mutes out
for about two seconds, then returns. That
station is now held in memory on that
button.
Repeat the three steps above for each
memory button you want to set.
The memory buttons also control the rear
audio controls. Push memory buttons 3 and
5 simultaneously to turn the rear audio
controls on. Push them again to turn the
rear audio controls off. A headphone sym-
bol appears in the display window when the
rear controls are activated.
ADJUSTING TONE QUALITY
BASS
Bass control allows you to adjust the lower,
bass frequencies to your preference.Push the BASS button either
or
; BASS and the setting indicator bar
appear in the display window. Pressing the
BASS button either
orin-
creases or decreases the level of bass, as
indicated by the number of bar segments
showing in the display window.
Following bass adjustment, the display win-
dow shows the current setting for three
seconds, then returns to the display prior to
adjustment.
TREB
Treble control allows you to adjust the
higher, treble frequencies to your prefer-
ence.
Push the TREB button either
or
; TREB and the setting indicator bar
appear in the display window. Pressing the
TREB button either
orin-
creases or decreases the level of treble, as
indicated by the number of bar segments
showing in the display window.
Following treble adjustment, the display
window shows the current setting for three
seconds, then returns to the display prior to
adjustment.
3-18
ZX
Page 149 of 235

If you have a flat tire, follow the instructions
below:
Stopping the vehicle
1. Safely move the vehicle off the road and
away from traffic.
2. Turn on the hazard warning flashers.
3. Park on a level surface and apply the
parking brake. Move the gearshift lever
to the P (Park) position.
4. Turn off the engine.
WARNING
cMake sure the parking brake is se-
curely applied and the automatic
transmission is shifted into P.
cNever change tires when the vehicle
is on a slope, ice or slippery areas.
This is dangerous.
cNever change tires if oncoming traf-
fic is close to your vehicle. Wait for
professional road assistance.cRaise the hood to warn other traffic,
and to signal professional road as-
sistance personnel that you need
assistance.
c
Have all passengers get out of the
vehicle and stand in a safe place, away
from traffic and clear of the vehicle.
Getting the tools and spare tire
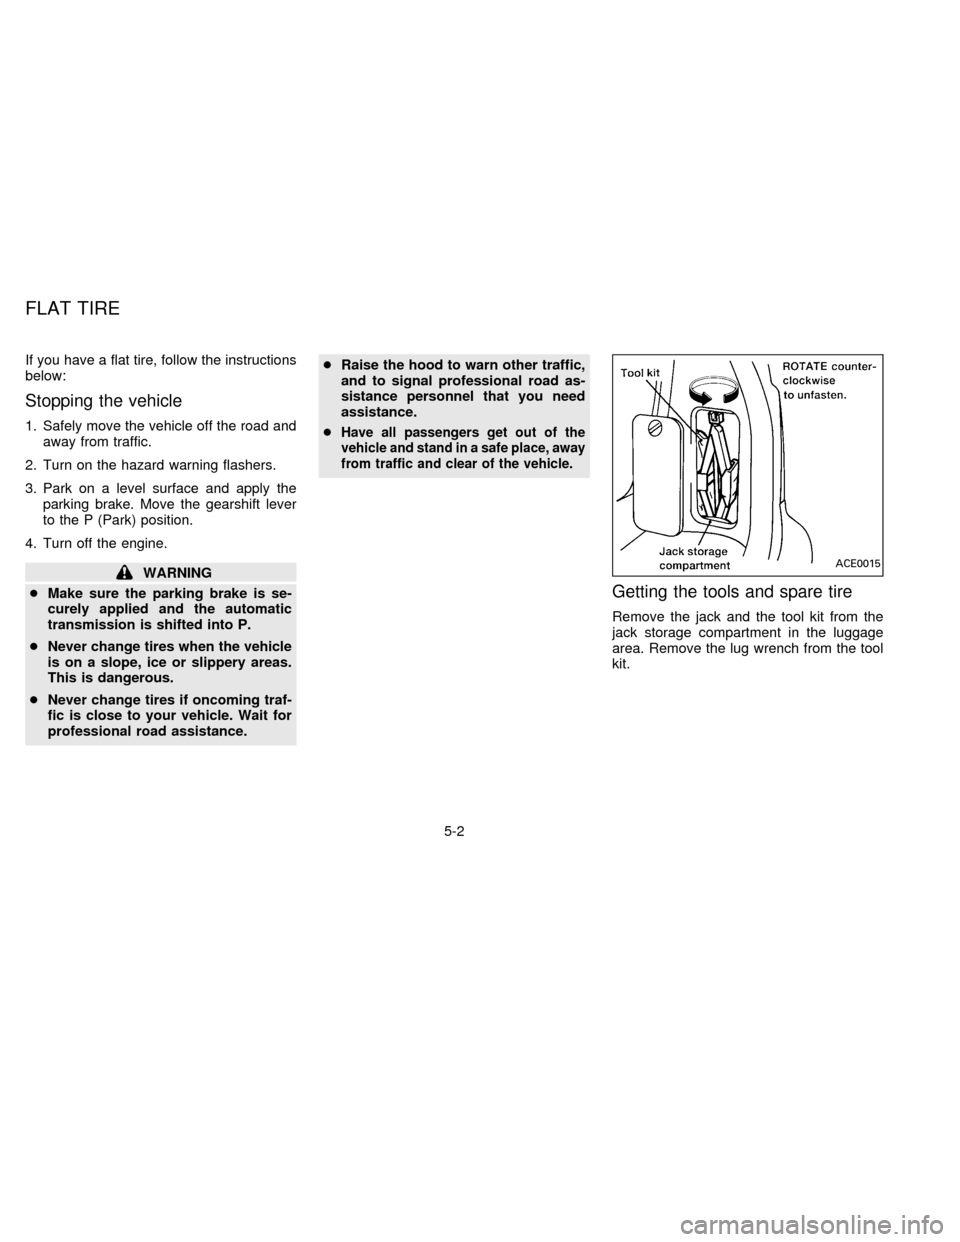
Remove the jack and the tool kit from the
jack storage compartment in the luggage
area. Remove the lug wrench from the tool
kit.
ACE0015
FLAT TIRE
5-2
ZX
Page 188 of 235

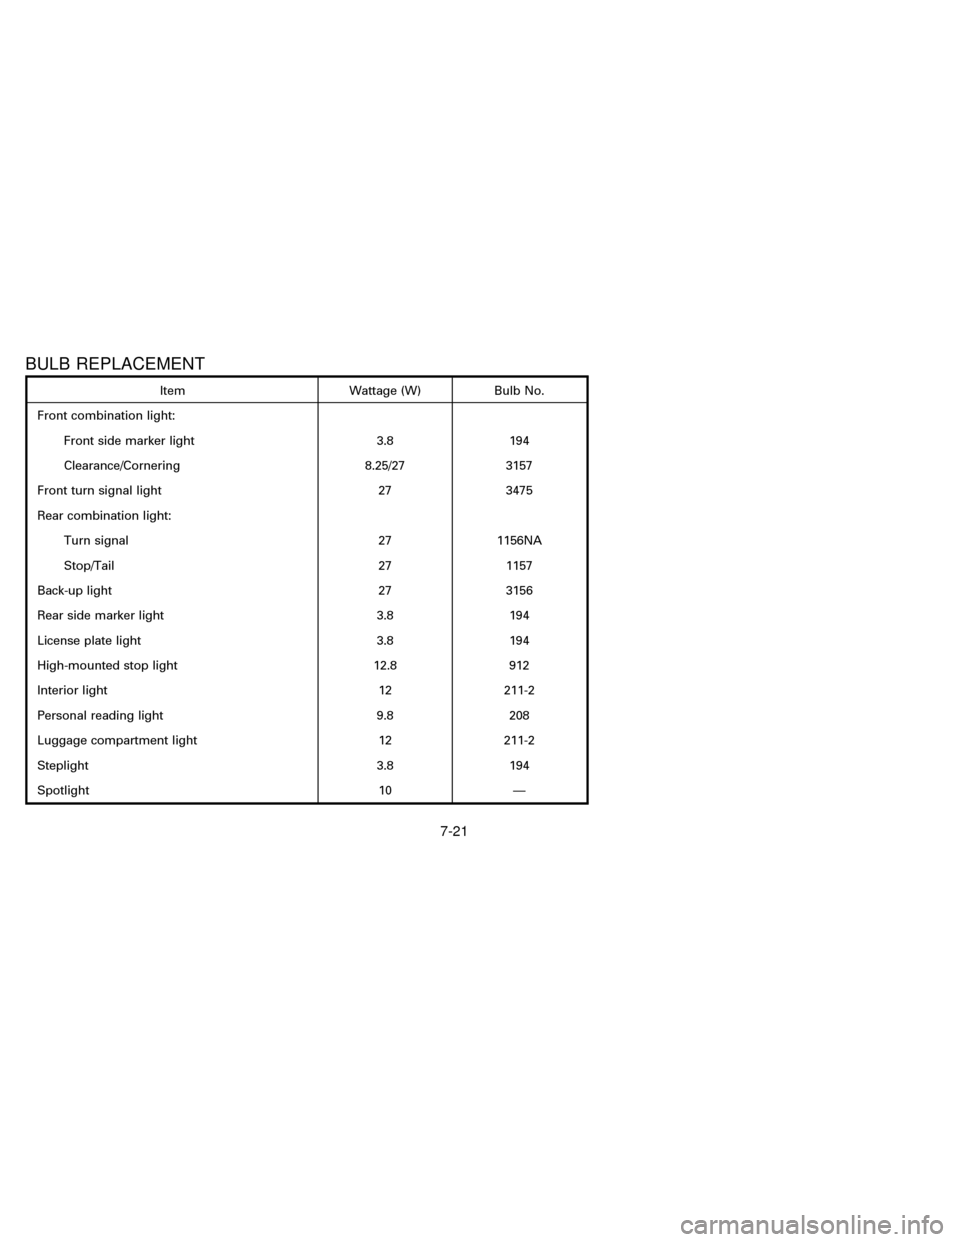
BULB REPLACEMENT
Item Wattage (W) Bulb No.
Front combination light:
Front side marker light 3.8 194
Clearance/Cornering 8.25/27 3157
Front turn signal light 27 3475
Rear combination light:
Turn signal 27 1156NA
Stop/Tail 27 1157
Back-up light 27 3156
Rear side marker light 3.8 194
License plate light 3.8 194
High-mounted stop light 12.8 912
Interior light 12 211-2
Personal reading light 9.8 208
Luggage compartment light 12 211-2
Steplight 3.8 194
Spotlight 10 Ð
7-21
ZB13-DX
Page 200 of 235

make sure no nuts are missing, and check
for any loose nuts. Tighten if necessary.
Tire rotation*Ð Tires should be rotated
every 7,500 miles (12,000 km).
Wheel alignment and balanceÐIfthe
vehicle should pull to either side while driv-
ing on a straight and level road, or if you
detect uneven or abnormal tire wear, there
may be a need for wheel alignment.
If the steering wheel or seat vibrates at
normal highway speeds, wheel balancing
may be needed.
Windshield wiper blades*Ð Check for
cracks or wear if they do not wipe properly.
Doors and engine hoodÐ Check that all
doors and the engine hood operate prop-
erly. Also ensure that all latches lock se-
curely. Lubricate hinges, latches, rollers and
links if necessary. Make sure the secondary
latch keeps the hood from opening when
the primary latch is released.
When driving in areas using road salt or
other corrosive materials, check lubrication
frequently.INSIDE THE VEHICLE
The maintenance items listed here should
be checked on a regular basis, such as
when performing periodic maintenance,
cleaning the vehicle, etc.
Lights*Ð Make sure the headlights, stop
lights, tail lights, turn signal lights, and other
lights are all operating properly and installed
securely. Also check headlight aim.
Warning lights and buzzers/chimesÐ
Make sure all warning lights and
buzzers/chimes are operating properly.
Windshield wiper and washer*Ð Check
that the wipers and washer operate properly
and that the wipers do not streak.
Windshield defrosterÐ Check that the air
comes out of the defroster outlets properly
and in sufficient quantity when operating the
heater or air conditioner.
Steering wheelÐ Check for changes in
the steering conditions, such as excessive
freeplay, hard steering or strange noises.
SeatsÐ Check seat position controls such
as seat adjusters, seatback recliner, etc. to
ensure they operate smoothly and all
latches lock securely in every position.Check that the head restraints move up and
down smoothly and the locks hold securely
in all latched positions. Check that the seat
leg latches lock securely in every anchor
position for the folding down rear seat and
detachable rear seat (if so equipped).
Seat beltsÐ Check that all parts of the seat
belt system (e.g. buckles, anchors, adjust-
ers and retractors) operate properly and
smoothly, and are installed securely. Check
the belt webbing for cuts, fraying, wear or
damage.
Accelerator pedalÐ Check the pedal for
smooth operation and make sure the pedal
does not catch or require uneven effort.
Keep the floor mats away from the pedal.
BrakesÐ Check that the brakes do not pull
the vehicle to one side when applied.
Brake pedal*Ð Check the pedal for
smooth operation and make sure it has the
proper distance under it when depressed
fully. Check the brake booster function. Be
certain to keep floor mats away from the
pedal.
Parking brake*Ð Check that the pedal is
adjusted to specification and confirm that
your vehicle is held securely on a fairly
8-3
ZX
Page 234 of 235

Headlight control switch ....................... 1-12
Ignition switch ......................................... 4-4
Overdrive switch ..................................... 4-7
Rear window defogger switch .............. 1-12
Rear window wiper and washer
switches ................................................ 1-11
Turn signal switch ............................... 1-15
Windshield wiper lever and washer
switch .................................................... 1-10
T
Tabletop seats ........................................... 2-30
Tachometer .................................................. 1-4
Three-passenger bench seat..................... 2-55
Three-passenger bench seat in fully
forward position ......................................... 2-19
Three-passenger bench seat in storage
position....................................................... 2-17
Three way catalyst....................................... 4-2
Tilting steering wheel ................................. 2-74
Timing belt ................................................... 9-7
Tire
Flat tire.................................................... 5-2
Tire chains ............................................ 7-26
Tire placard........................................... 9-11
Tire pressure ........................................ 7-25
Tire rotation .......................................... 7-27
Types of tires ........................................ 7-26
Uniform tire quality grading .................. 9-18
Wheel/tire size ........................................ 9-8
Wheels and tires................................... 7-25Tool kit .................................................... 5-2
Towing
Tow truck towing .................................. 5-11
Towing load/specification chart ............ 9-14
Trailer tow harness and module ................ 9-16
Trailer towing ............................................. 9-13
Transmission
Automatic transmission fluid ................... 7-8
Driving with an automatic transmission .. 4-5
Travel (see registering your vehicle in another
country)
Trip odometer .............................................. 1-4
Turn signal switch ................................... 1-15
U
Underseat storage tray .............................. 2-30
Uniform tire quality grading ....................... 9-18
V
Vanity mirror (if so equipped) .................... 2-76
Vehicle dimensions and weights ................. 9-8
Vehicle identification .................................... 9-9
Vehicle identification number plate.............. 9-9
Vehicle loading information ....................... 9-12
Vehicle recovery ........................................ 5-13
Ventilators .................................................... 3-2W
Warning
Air bag warning light............................. 2-45
Hazard warning flasher switch ............. 1-16
Warning/indicator lights and chimes ...... 1-6
Warning labels (for SRS)........................... 2-45
Weights (See dimensions and weights)
Wheel/tire size ............................................. 9-8
Wheels and tires ........................................ 7-25
Window washer fluid.................................. 7-10
Windows
Locking passenger's window ................ 1-20
Manual rear windows ........................... 1-21
Power rear windows ............................. 1-21
Windshield wiper lever and washer switch. 1-10
Wiper
Rear window wiper and washer
switches ................................................ 1-11
Windshield wiper lever and washer
switch .................................................... 1-10
Wiper blades......................................... 7-14
10-5
ZX