1996 NISSAN FRONTIER run flat
[x] Cancel search: run flatPage 80 of 198

2) Turn the ignition key slightly in the ON
direction.
3) Turn the key toward the LOCK position.
4) Remove the key.
The shift lever is designed so it cannot be
moved out of P and into any of the other
gear positions if the ignition key is turned to
OFF or if the key is removed from the
switch.The shift lever can be moved if the
ignition switch is in the ACC position.
The shift lever can also be moved if the
ignition switch is in the ON position and
the foot brake pedal is depressed.
WARNING
cTo lock the steering wheel, remove
the key. To unlock the steering
wheel, insert the key and turn it gen-
tly while rotating the steering wheel
slightly right and left.
cNever remove the key while driving.
If the key is removed, the steering
wheel will lock. This may cause the
driver to lose control of the vehicle
and could result in serious vehicle
damage or personal injury.
Key positions
LOCK Normal parking position (0)
OFF (Manual transmission model) (1)
The engine can be turned off without locking
the steering wheel. When removing the key
from the key cylinder, push the key release
button at this position and turn the key to
LOCK.
ACC (Accessories) (2)
This position activates electrical accesso-
ries such as the radio when the engine is
not running.
ON (Normal operating position) (3)
This position turns on the ignition system
and electrical accessories.
START (4)
This position starts the engine. As soon as
the engine has started, release the key. It
automatically returns to the ON position.cMake sure the area around the vehicle is
clear.
cCheck fluid levels such as engine oil,
coolant, brake and clutch fluid, and win-
dow washer fluid as frequently as pos-
sible, at least whenever you refuel.
cCheck that all windows and lights are
clean.
cVisually inspect tires for their appearance
and condition. Also check tires for proper
inflation.
cLock all doors.
cPosition seat and adjust head restraints.
cAdjust inside and outside mirrors.
cFasten seat belts and ask all passengers
to do likewise.
cCheck the operation of warning lights
when key is turned to the ON (3) position.
BEFORE STARTING THE
ENGINE
4-5
ZX
Page 112 of 198

Installing wheel
The spare tire is designed for emergency
use. See specific instructions under the
heading ``Wheels and tires'' in the ``Do-
it-yourself operations'' section.
1. Clean any mud or dirt from the surface
between the wheel and hub.
2. Carefully put the spare tire on and tighten
the wheel nuts finger tight.
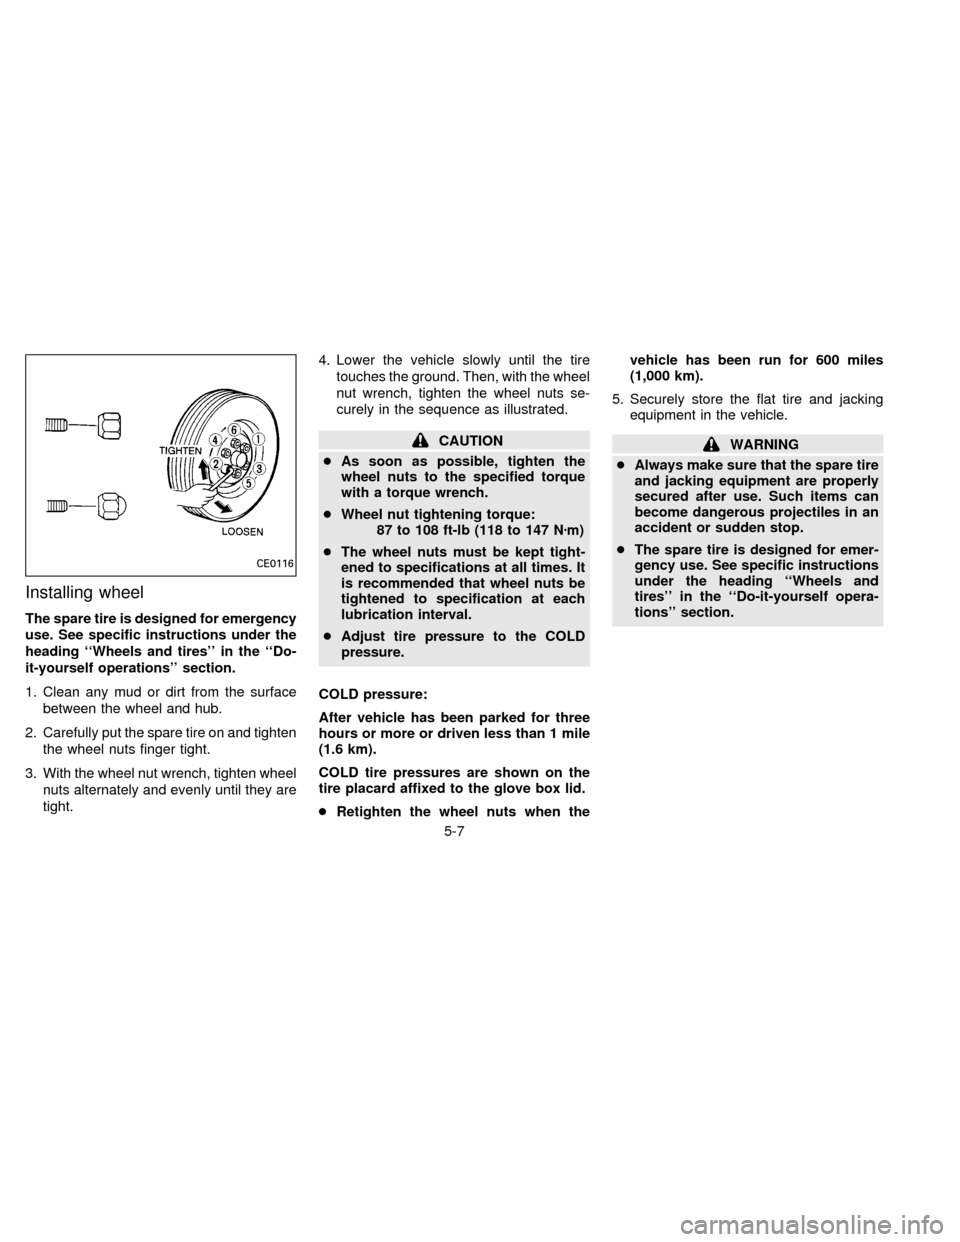
3. With the wheel nut wrench, tighten wheel
nuts alternately and evenly until they are
tight.4. Lower the vehicle slowly until the tire
touches the ground. Then, with the wheel
nut wrench, tighten the wheel nuts se-
curely in the sequence as illustrated.
CAUTION
cAs soon as possible, tighten the
wheel nuts to the specified torque
with a torque wrench.
cWheel nut tightening torque:
87 to 108 ft-lb (118 to 147 Nzm)
cThe wheel nuts must be kept tight-
ened to specifications at all times. It
is recommended that wheel nuts be
tightened to specification at each
lubrication interval.
cAdjust tire pressure to the COLD
pressure.
COLD pressure:
After vehicle has been parked for three
hours or more or driven less than 1 mile
(1.6 km).
COLD tire pressures are shown on the
tire placard affixed to the glove box lid.
cRetighten the wheel nuts when thevehicle has been run for 600 miles
(1,000 km).
5. Securely store the flat tire and jacking
equipment in the vehicle.WARNING
cAlways make sure that the spare tire
and jacking equipment are properly
secured after use. Such items can
become dangerous projectiles in an
accident or sudden stop.
cThe spare tire is designed for emer-
gency use. See specific instructions
under the heading ``Wheels and
tires'' in the ``Do-it-yourself opera-
tions'' section.
CE0116
5-7
ZX
Page 149 of 198

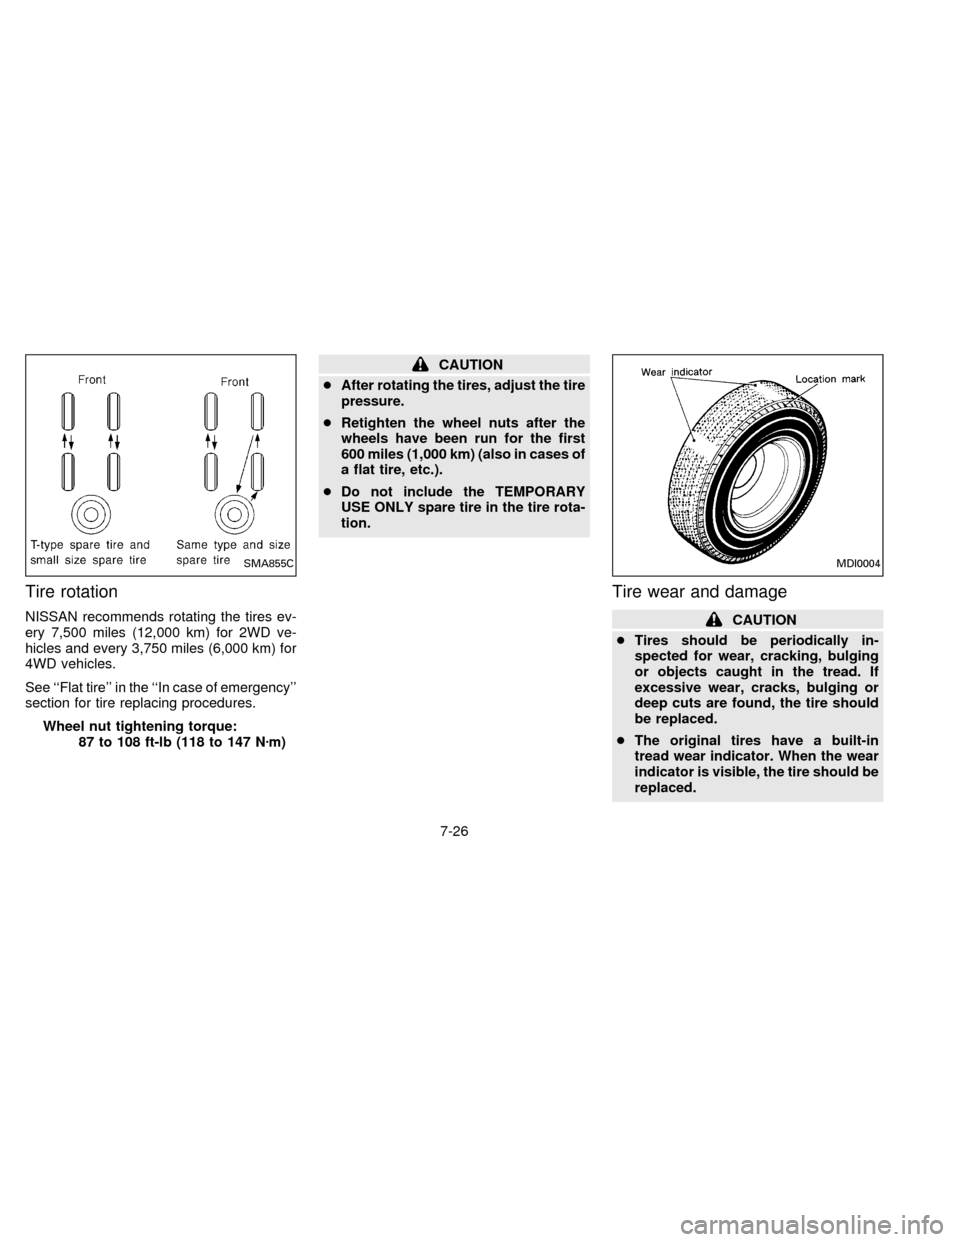
Tire rotation
NISSAN recommends rotating the tires ev-
ery 7,500 miles (12,000 km) for 2WD ve-
hicles and every 3,750 miles (6,000 km) for
4WD vehicles.
See ``Flat tire'' in the ``In case of emergency''
section for tire replacing procedures.
Wheel nut tightening torque:
87 to 108 ft-lb (118 to 147 Nzm)
CAUTION
cAfter rotating the tires, adjust the tire
pressure.
cRetighten the wheel nuts after the
wheels have been run for the first
600 miles (1,000 km) (also in cases of
a flat tire, etc.).
cDo not include the TEMPORARY
USE ONLY spare tire in the tire rota-
tion.
Tire wear and damage
CAUTION
cTires should be periodically in-
spected for wear, cracking, bulging
or objects caught in the tread. If
excessive wear, cracks, bulging or
deep cuts are found, the tire should
be replaced.
cThe original tires have a built-in
tread wear indicator. When the wear
indicator is visible, the tire should be
replaced.
SMA855CMDI0004
7-26
ZX
Page 193 of 198

Driving
Auto-lock free-running hubs ................. 4-15
Cold weather driving cautions .............. 4-27
Driving with automatic transmission ....... 4-6
Driving with manual transmission ........... 4-9
Driving your 4-wheel drive safely ......... 4-22
Manual-lock free-running hubs ............. 4-19
Precautions when driving ..................... 4-25
Precautions when starting and driving ... 4-2
E
Economy, fuel ............................................ 4-13
Emission control information label............. 9-14
Emission control system warranty ............. 9-22
Engine
Before starting the engine ...................... 4-5
Capacities and recommended
fuel/lubricants.......................................... 9-2
Changing engine coolant........................ 7-5
Changing engine oil................................ 7-7
Changing engine oil filter........................ 7-8
Checking engine coolant level ............... 7-4
Checking engine oil level ....................... 7-6
Engine compartment check locations .... 7-3
Engine coolant temperature gauge ........ 1-4
Engine cooling system ........................... 7-4
Engine oil ................................................ 7-6
Engine oil and oil filter
recommendation ..................................... 9-6
Engine oil viscosity ................................. 9-7
Engine serial number ........................... 9-13Engine specifications .............................. 9-9
Starting the engine ............................... 4-10
Exhaust gas (Carbon monoxide) ................. 4-2
F
Flashers (See hazard warning flasher switch)
Flat tire ......................................................... 5-2
Floor mat positioning aid ............................. 6-4
Fluid (Checking)
Automatic transmission fluid ................... 7-9
Brake and clutch fluid ........................... 7-11
Engine coolant ........................................ 7-4
Engine oil ................................................ 7-6
Power steering fluid .............................. 7-11
Window washer fluid ............................ 7-12
F.M.V.S.S. certification label ..................... 9-13
Front seats
Bench.................................................... 2-10
Separate ................................................. 2-8
Fuel
Capacities and recommended
fuel/lubricants.......................................... 9-2
Fuel economy ....................................... 4-13
Fuel filler cap .......................................... 2-5
Fuel gauge.............................................. 1-4
Fuel octane rating................................... 9-5
Fuel recommendation ............................. 9-4
Fuses ......................................................... 7-20G
Gas station information............................ 10-11
Gauge
Engine coolant temperature gauge ........ 1-4
Fuel gauge.............................................. 1-4
Odometer ................................................ 1-3
Speedometer .......................................... 1-3
Tachometer............................................. 1-3
Trip odometer ......................................... 1-3
Gear selection (See shifting)
General maintenance .................................. 8-2
Glove box lock ............................................. 2-4
H
Hazard warning flasher switch .................. 1-12
Head restraints ............................................ 2-9
Headlight and turn signal switch ............... 1-10
Headlights .................................................. 7-20
Heater
Heater and air conditioner controls ........ 3-3
Heater operation ..................................... 3-4
Hood release ............................................... 2-4
Hubs
Auto-lock free-running hubs ................. 4-15
Manual-lock free-running hubs ............. 4-19
I
Ignition switch .............................................. 4-4
10-2
ZX