1996 HONDA ODYSSEY battery
[x] Cancel search: batteryPage 31 of 240

Safety Labels
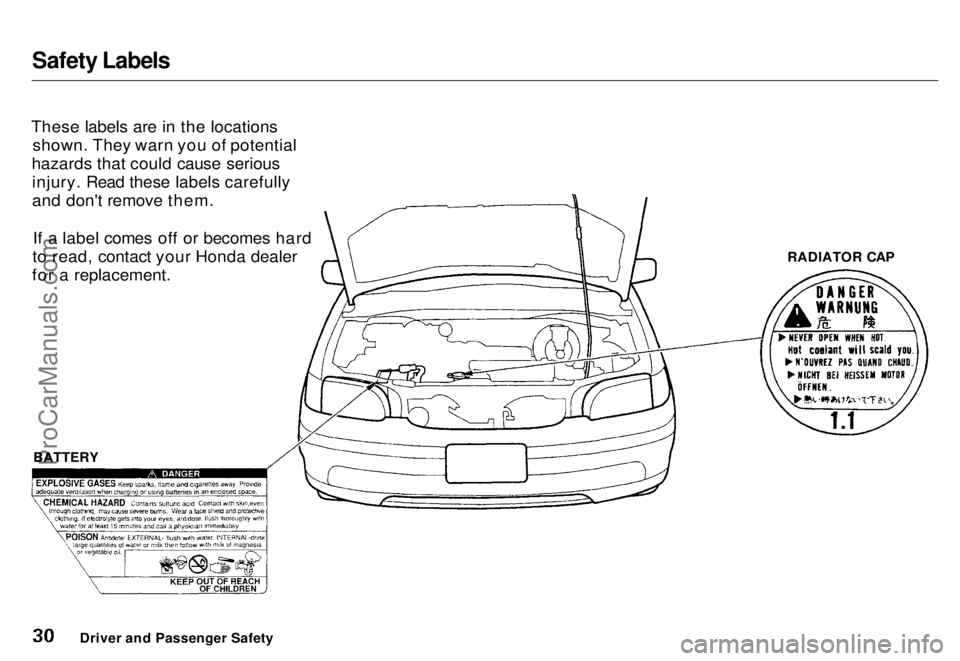
These labels are in the locations shown. They warn you of potential
hazards that could cause serious injury. Read these labels carefully
and don't remove them.
If a label comes off or becomes hard
to read, contact your Honda dealer
for a replacement.
Driver and Passenger Safety
BATTERY RADIATOR CAPProCarManuals.comMain Menu s t Table of Contents
Page 35 of 240

Indicator Lights
Seat Belt Reminder Light
This indicator lights when you turn the ignition ON (II). It is a reminder
to you and your passengers to
protect yourselves by fastening theseat belts. A beeper also sounds if
you have not fastened your seat belt.
If you do not fasten your seat belt,
the beeper will stop after a fewseconds but the light stays on until
you do. Both the light and the beeper stay off if you fasten your seat belt
before turning on the ignition.
See page 206. Malfunction Indicator
Lamp Low Oil Pressure
Indicator
The engine can be severely damaged if this light flashes or stays on when
the engine is running. For complete
information, see page 204.
Charging System
Indicator
If this light comes on when the engine is running, the battery is not
being charged. For complete
information, see page 205.
See page 16. Supplemental Restraint
System Indicator Parking Brake
and Brake
System
Indicator
This light has two functions:
1. It lights as a reminder that you have set the parking brake.
Driving with the parking brake set
can damage the brakes and tires,
and cause the Anti-lock brakesystem to turn off (see page 125).
2. It can indicate the brake fluid level is low if it remains lit after you
release the parking brake orcomes on while driving. This is
normally due to worn brake pads. Have your dealer check the
braking system for worn pads or
fluid leaks.
Instruments and Controls
S R S U.S.
Canada
BRAKE
ProCarManuals.comMain Menu s t Table of Contents
Page 85 of 240

Audio System
You can use any of three methods to find radio stations on the selectedband: TUNE, SEEK, or the Preset
buttons.
TUNE — Use the TUNE/SEEK buttons to tune the radio to a desired frequency. Press ( ) to change
to a higher frequency, and press ( ) to tune to a lower frequency.
The frequency numbers will start to change rapidly. Release the switch
when the display reaches the desired frequency. To change the frequency
in small increments, press and
release the appropriate TUNE/SEEK button. SEEK — The SEEK function
searches the band for a station with
a strong signal. To activate it, push
the TUNE/SEEK button until you
hear a beep, then release it.
Depending on which TUNE/SEEK
button you pushed, the system scans
upward or downward from the
current frequency. It stops when it
finds a station with a strong signal.
Preset — You can store the fre- quencies of your favorite radio
stations in the six preset buttons.
Each button will store one frequency
on the AM band, and two on the FM
band.
To store a frequency:
1. Select the desired band, AM or FM. FM1 and FM2 let you store
two frequencies with each Preset
button.
2. Use the TUNE or SEEK function to tune the radio to a desired
station.
3. Pick the Preset button you want for that station. Press the button
and hold it until you hear a beep.
4. Repeat steps 1 to 3 to store a total of six stations on AM and twelve
on FM.
Once a station's frequency is stored,
simply press and release the proper
preset button to tune to it.
The preset frequencies will be lost if your vehicle's battery goes dead or is
disconnected.
Comfort and Convenience FeaturesProCarManuals.comMain Menu s t Table of Contents
Page 92 of 240

Audio System
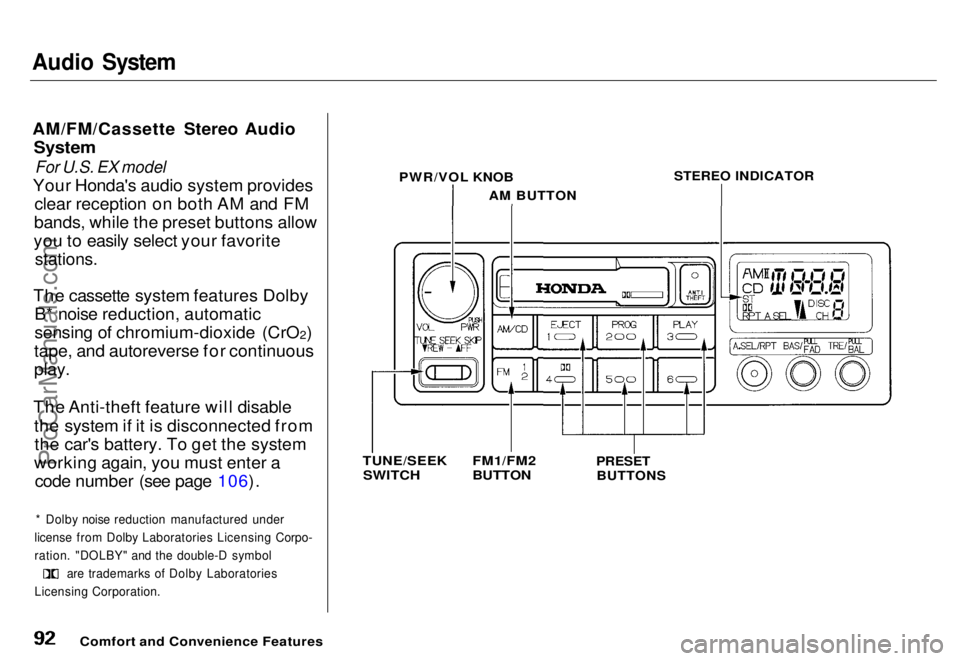
AM/FM/Cassette Stereo Audio
System
For U.S. EX model
Your Honda's audio system provides clear reception on both AM and FM
bands, while the preset buttons allow
you to easily select your favorite
stations.
The cassette system features Dolby B* noise reduction, automatic
sensing of chromium-dioxide (CrO 2)
tape, and autoreverse for continuous
play.
The Anti-theft feature will disable the system if it is disconnected fromthe car's battery. To get the system
working again, you must enter a code number (see page 106).
* Dolby noise reduction manufactured under
license from Dolby Laboratories Licensing Corpo-
ration. "DOLBY" and the double-D symbol are trademarks of Dolby Laboratories
Licensing Corporation.
Comfort and Convenience Features
PWR/VOL KNOB
AM BUTTON
STEREO INDICATOR
TUNE/SEEK
SWITCH
FM1/FM2
BUTTON
PRESET
BUTTONSProCarManuals.comMain Menu s t Table of Contents
Page 94 of 240

Audio System
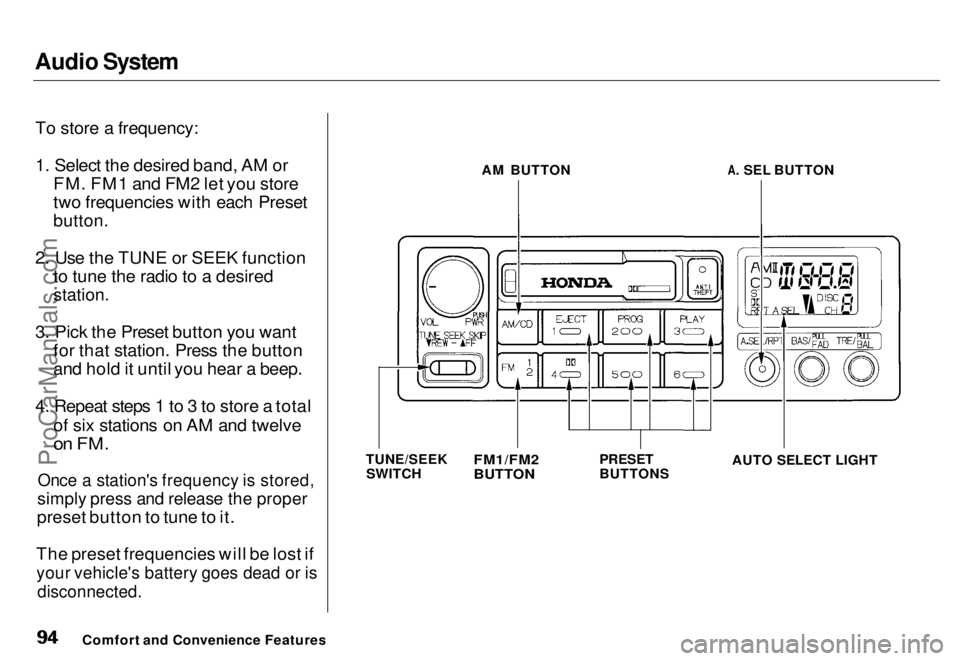
To store a frequency:
1. Select the desired band, AM or FM. FM1 and FM2 let you store
two frequencies with each Preset
button.
2. Use the TUNE or SEEK function to tune the radio to a desired
station.
3. Pick the Preset button you want for that station. Press the button
and hold it until you hear a beep.
4. Repeat steps 1 to 3 to store a total of six stations on AM and twelve
on FM.
Once a station's frequency is stored,
simply press and release the proper
preset button to tune to it.
The preset frequencies will be lost if
your vehicle's battery goes dead or is
disconnected.
Comfort and Convenience Features AM BUTTON
A. SEL BUTTON
TUNE/SEEK SWITCH
PRESET
BUTTON
S
FM1/FM2
BUTTON
AUTO SELECT LIGHTProCarManuals.comMain Menu s t Table of Contents
Page 106 of 240

Audio System
Theft Protection
On U.S. EX model
Your car's audio system will disable itself if it is disconnected fromelectrical power for any reason. To
make it work again, the user must enter a specific five-digit code in the
Preset buttons. Because there are
hundreds of number combinations possible from five digits, making the system work without knowing the
exact code is nearly impossible.
You should have received a card that lists your audio system's code number and serial number. It is best
to store this card in a safe place at
home, or to keep it in your wallet or
purse. In addition, you should write the audio system's serial number in
this Owner's Manual. If you should
happen to lose the card, you must
obtain the code number from yourHonda dealer. To do this, you will
need the system's serial number. If your car's battery is disconnected
or goes dead, the audio system will
disable itself. If this happens, you
will see "Code" in the frequency display the next time you turn on the
system. Use the Preset buttons toenter the five-digit code. If it is
entered correctly, the radio will start
playing.
If you make a mistake entering thecode, do not start over or try to
correct your mistake. Complete the
five-digit sequence, then enter the correct code. You have three tries toenter the correct code. If you are
unsuccessful in three attempts, you
must then leave the system on for one hour before trying again. You will have to store your favorite
stations in the Preset buttons after
the system begins working. Your original settings were lost when
power was disconnected.
Comfort and Convenience FeaturesProCarManuals.comMain Menu s t Table of Contents
Page 119 of 240

Starting the Engine
1. Apply the parking brake.
2. In cold weather, turn off all electrical accessories to reduce
the drain on the battery.
3. Make sure the shift lever is in Park. Press on the brake pedal.
4. Without touching the accelerator pedal, turn the ignition key to the
START (III) position. If the engine
does not start right away, do not
hold the key in START (III) for
more than 15 seconds at a time.
Pause for at least 10 seconds
before trying again.
5. If the engine does not start within 15 seconds, or starts but stalls
right away, repeat step 4 with the
accelerator pedal pressed half-way
down. If the engine starts, release
pressure on the accelerator pedal
so the engine does not race.
6. If the engine still does not start,
press the accelerator pedal all the
way down and hold it there while
starting in order to clear flooding.
As before, keep the ignition key in
the START (III) position for no
more than 15 seconds. Return to
step 5 if the engine does not start.
If it starts, lift your foot off the
accelerator pedal so the engine
does not race.
Starting in Cold Weather at High
Altitude (Above 2,400 meters/ 8,000 feet)
An engine is harder to start in cold weather. The thinner air found at
high altitude above 2,400 meters (8,000 feet) adds to the problem.
Use the following procedure:
1. Turn off all electrical accessories to reduce the drain on the battery. 2. Push the accelerator pedal half-
way to the floor and hold it there
while starting the engine. Do not
hold the ignition key in START
(III) for more than 15 seconds.
When the engine starts, release
the accelerator pedal gradually as
the engine speeds up and smooths
out.
3. If the engine fails to start in step 2, push the accelerator pedal to the
floor and hold it there while you
try to start the engine for no more
than 15 seconds. If the engine
does not start, return to step 2.
DrivingProCarManuals.comMain Menu s t Table of Contents
Page 134 of 240

Maintenance
This section explains why it is important to keep your car well
maintained and to follow basic
maintenance safety precautions.
This section also includes Maintenance Schedules for normaldriving and severe driving conditions,
a Maintenance Record, and instruc-
tions for simple maintenance tasks
you may want to take care of
yourself.
If you have the skills and tools
required to perform more complex
maintenance tasks on your Honda,
you may want to purchase the Service Manual. See page 233 for
information on how to obtain a copy,or see your Honda dealer.
Maintenance Safety....................... 136
Important Safety Precautions.. 137
Maintenance Schedule.................. 138
Maintenance Record..................... 142
Periodic Checks............................. 144
Fluid Locations............................... 145
Engine Oil....................................... 146
Checking Engine Oil................. 146
Adding Oil................................... 146 Recommended Oil..................... 147
Synthetic Oil............................... 148
Additives..................................... 148
Oil and Filter Changes.............. 148
Cooling System.............................. 150
Checking the Engine Coolant
Level........................................ 150
Adding Engine Coolant............. 151 Replacing Engine Coolant........ 152
Windshield Washers..................... 154
Automatic Transmission Fluid..... 155
Brake Fluid..................................... 156
Brake System............................. 156
Anti-lock Brake System............ 157
Power Steering............................... 157
Air Cleaner..................................... 158 Spark Plugs..................................... 160
Replacement............................... 160
Specifications............................. 161
Battery............................................ 162
Windshield Wipers........................ 165
Air Conditioning............................. 168 Drive Belts...................................... 169
Tires................................................ 169 Inflation....................................... 170
Inspection................................... 171
Maintenance............................... 171
Tire Rotation.............................. 172 Replacing Tires and Wheels .... 172
Wheels and Tires....................... 173
Winter Driving........................... 173 Snow Tires.............................. 174
Tire Chains............................. 174
Lights.............................................. 175 Headlight Aiming...................... 175Replacing Bulbs......................... 177
Storing Your Car............................ 182
MaintenanceProCarManuals.comMain Menu s t