Page 164 of 340

Downloaded from www.Manualslib.com manuals search engine I ! CAUTION:
Things you put inside your vehicle can strike and
injure people in a sudden stop or turn, or in
a crash.
0
0
0
0
0
Put things in the trunk of your vehicle. In a
trunk, put them as far forward as you can.
Try to spread the weight evenly.
Never stack heavier things, like suitcases,
inside the vehicle
so that some of them are
above the tops of the seats.
Don’t leave an unsecured child restraint in
your vehicle.
When you carry something inside the
vehicle, secure
it whenever you can.
Don’t leave a seat folded down unless you
need to.
If you don’t use the correct,equipment and drive
properly, you can lose control when you pull a
trailer. For example,
if the trailer is too heavy, the
brakes may not‘work well
-- or even at all. You
and your passengers could be seriously injured.
Pull a trailer only
if you have followed all the
steps in this section. Ask your Chevrolet dealer
for advice and information about towing a trailer
with your vehicle.
NOTICE:
Pulling a trailer improperly can damage your
vehicle and result in costly repairs not ,covered
by
your warranty. To pull a trailer correctly, follow
the advice in this part, and see your Chevrolet
dealer for important information about towing a
trailer
with your vehicle.
Page 167 of 340

Downloaded from www.Manualslib.com manuals search engine If you’re using a weight-carrying hitch, the trailer
tongue (A) should weigh 10% of
the total loaded trailer
weight
(B). If you have a weight-distributing hitch, the
trailer tongue
(A) should weigh 12% of the total loaded
trailer weight
(B).
After you’ve loaded your trailer, weigh the trailer and
then the tongue, separately, to see
if the weights are
proper.
If they aren’t, you may be able to get them right
simply by moving some items around
in the trailer.
Total Weight on Your Vehicle’s Tires
Be sure your vehicle’s tires are inflated to the
recommended pressure for cold tires. You’ll find these
numbers on the Certification label at the rear edge of the
driver’s door Tire-Loading Information label (found
inside the trunk lid) or see “Loading Your Vehicle”
in the Index. Then be sure you don’t go over the
GVW limit for your vehicle, including the weight of
the trailer tongue.
Hitches
It’s important to have the correct hitch equipment.
Crosswinds, large trucks going by and rough roads are
a
few reasons why you’ll need the right hitch. Here are
some rules to follow:
0
a
Will you have to make any holes in the body of your
vehicle when you install a trailer hitch? If you do,
then be sure to seal the holes later when you remove
the hitch. If you don’t seal them, deadly carbon
monoxide (CO) from your exhaust can get into your
vehicle (see “Carbon Monoxide”
in the Index). Dirt
and water
can, too.
The bumpers on your vehicle are not intended for
hitches.
Do not attach rental hitches or other
bumper-type hitches to them. Use only a
frame-mounted hitch that does not attach to
the bumper.
Safety Chains
You should always attach chains between your vehicle
and your trailer. Cross the safety chains under the tongue
of the trailer so that the tongue will not drop to the road
if it becomes separated from the hitch. Instructions
about safety chains may be provided by the hitch
manufacturer or by the trailer manufacturer. Follow the
manufacturer’s recommendation for attaching safety
chains and do not attach them to the bumper. Always
leave just enough slack
so you can turn with your rig.
And, never allow safety chains to drag on the ground.
Page 202 of 340

Downloaded from www.Manualslib.com manuals search engine Storing the Flat Tire and Tools
NOTICE:
Improperly tightened wheel nuts can lead to
brake pulsation and rotor damage.
To avoid
expensive brake repairs, evenly tighten the wheel
nuts in the proper sequence and to the proper
torque specification.
10. Don't try to put a wheel cover on your compact spare
tire, It won't
fit. Store the wheel cover in the trunk
until you have the flat tire repaired or replaced.
I NOTICE:
Wheel covers won't fit on your compact spare. If
you try to put a wheel cover on your compact
spare, you could damage the cover or the spare.
I
' A CAUTI(
I
Storing a jack, a tire or other equipment in the
passenger compartment
of the vehicle could
cause injury. In
a sudden stop or collision, loose
equipment could strike someone. Store all these
in the proper place.
After you've put the compact spare tire on your vehicle
you'll need to store the flat tire in your trunk. Use the
following procedure to secure the flat tire in the trunk.
Put the flat tire in the trunk
so the side that faces out
when it is on the vehicle is facing down. The full-size
tire will not fit down into the well. Place
it so the front is
in the well and the rear is out of the well.
5-30
Page 203 of 340
Downloaded from www.Manualslib.com manuals search engine Put the bolt through one of the wheel nut holes, install
the retainer over the bolt, then install
the wing nut. Put
the spacer and
nut next to the tire in the well. Store the
cover
as far forward as possible.
The compact spare
is for temporary use only. Replace
the compact spare tire with a full-size tire as soon as you
can. See “Compact Spare”
in the Index. See the storage
instructions label to replace your compact spare into
your trunk properly.
When you install
the wheel cover on the full-size tire,
tighten the
nut caps to 5 Ib-ft (7 Nsm).
Page 241 of 340
Downloaded from www.Manualslib.com manuals search engine 2.
3.
4.
5.
6.
7.
Pull the sidemarker lens away from the body.
Turn the socket counterclockwise until it stops. Then
pull the socket and bulb from the assembly.
Center High-Mounted Stoplamp
(Shelf-Mounted)
To reach the center high-mounted stoplamp, you must
go through the
trunk.
I Pull the bulb out of the socket. Do not twist the bulb.
Plug the new bulb in the socket.
Replace the bulb and socket.
Replace the assembly in the vehicle. Replace the screw.
1. Open the trunk lid. Locate the stoplamp behind the
rear seats, in front of the tmnk hinges.
Page 242 of 340

Downloaded from www.Manualslib.com manuals search engine 2.
3.
4.
5.
Turn the socket counterclockwise until it stops and
pull the bulb and socket out of the assembly.
Push
in the bulb, turn it counterclockwise and pull it
out of the socket.
Push the new bulb into the socket and turn
it clockwise.
Replace the bulb and socket in the assembly.
Center High-Moun.kd. Stoplamp
(Spoiler-Mounted)
1. Remove the two screws from the stoplamp assembly.
2. Pull the assembly forward out of the spoiler.
3. Remove the three screws from the back of the
stoplamp assembly.
4. Pull the lamp strip out of the stoplamp assembly.
5. Remove the bulb.
6. Install the new bulb and reverse Steps 1-4.
TaiVStop/Turn Signal Lamp
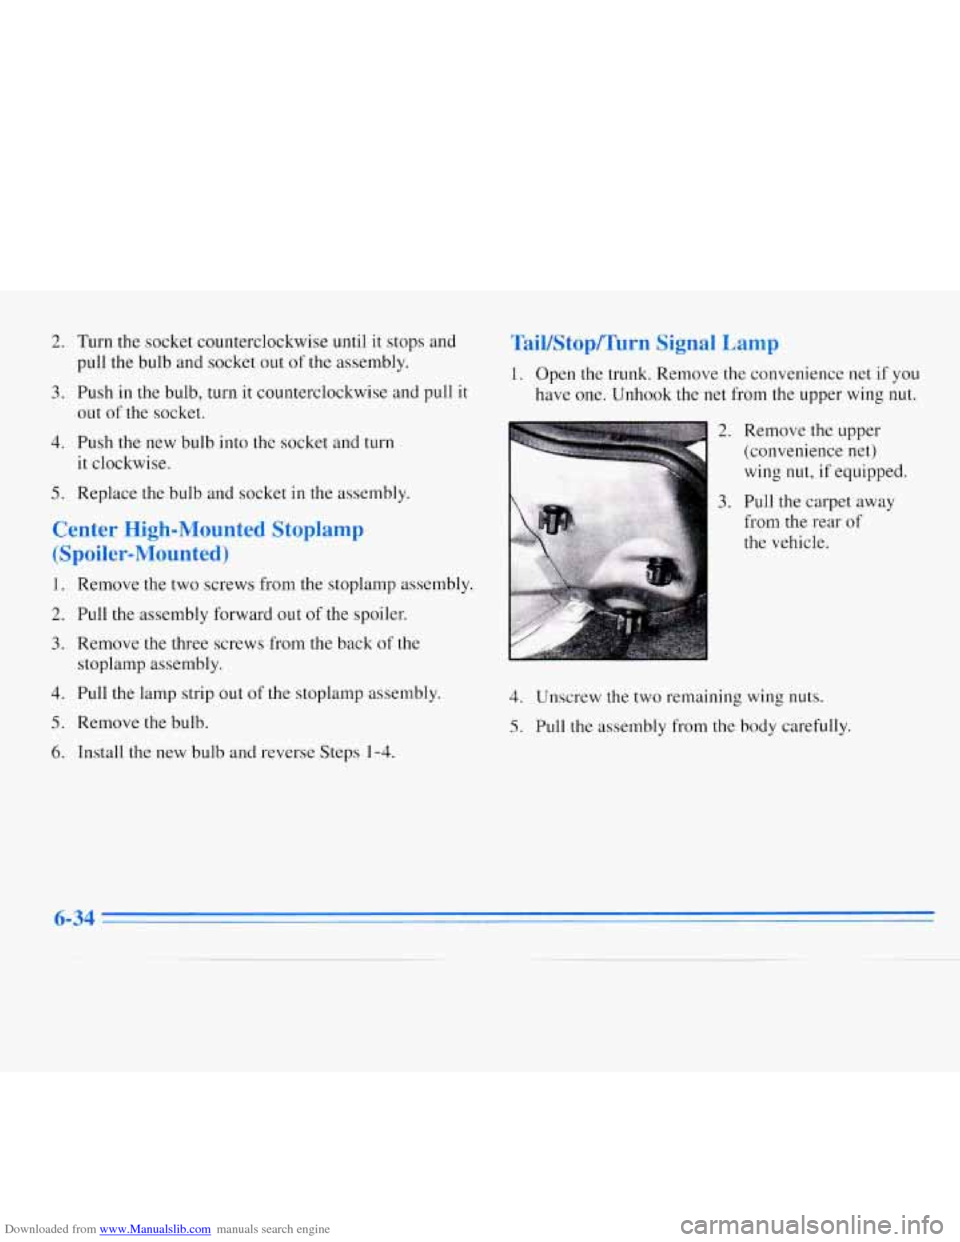
1. Open the trunk. Remove the convenience net if you
have one. Unhook the net from the upper wing
nut.
2.
3.
Remove the upper
(convenience net)
wing
nut, if equipped.
Pull the carpet away
from the rear
of
the vehicle.
4. Unscrew the two remaining wing nuts.
5. Pull the assembly from the body carefully.
6-34
Page 243 of 340
Downloaded from www.Manualslib.com manuals search engine 6. To remove a socket,
press the tab, turn the socket counterclockwise
and pull it out.
7. Pull the bulb out. Do not
twist
it.
8. Push the new bulb into the socket.
9. Replace the socket in the assembly.
10. Tighten the socket (both kinds) by turning
it clockwise.
11. Install the assembly and the two lower wing nuts.
12. Replace the carpeting.
13. Replace the upper (convenience net) wing
nut,
if equipped.
14. Replace the convenience net, if equipped.
Back-up Lamp
1. Open the trunk. The back-up lamp bulbs are in the
rear
of the trunk lid.
2. Press the tab on the
socket, turn the socket
counterclockwise and
pull it out.
3.
To remove the bulb, pull it out of the socket. Do not
twist
the bulb.
4. Push the new bulb into the socket.
5. Reverse Steps 1-3 to replace the socket.
6-35
Page 245 of 340

Downloaded from www.Manualslib.com manuals search engine 0 0
0
Underinflated tires pose the same danger
as overloaded tires. The resulting accident
could cause serious injury. Check all tires
frequently to maintain the recommended
pressure. Tire pressure should be checked
when your tires are cold.
Overinflated tires are more likely to be
cut, punctured or broken by
a sudden
impact
-- such as when you hit a pothole.
Keep tires at the recommended pressure.
Worn, old tires can cause accidents.
If your
tread
is badly worn, or if your tires have
been damaged, replace them.
Inflation - Tire Pressure
The Tire-Loading Information label which is on the
{inside of the trunk lid shows the correct inflation
pressures for your tires when they’re cold. “Cold”
means your vehicle has been sitting for at least three
hours or driven
no more than a mile.
NOTICE:
Don’t let anyone tell you that underinflation or
overinflation
is all right. It’s not. If your tires
don’t have enough air (underinflation), you can
get the following:
Too much flexing
Too much heat
Tire overloading
Bad wear
0 Bad handling
Bad fuel economy.
If your tires have too much air (overinflation),
you can get the following:
Unusual wear
Bad handling
0 Rough ride
0 Needless damage from road hazards.
6-37 ,