1996 BUICK CENTURY cooling
[x] Cancel search: coolingPage 65 of 340

TrunkLiftgate Trunk Lock
- ~- c-
A CAUTION:
It can be dangerous to drive with the liftgate,
liftglass or trunk lid open because carbon
monoxide (CO) gas can come into your vehicle.
You can’t see or smell
CO. It can cause
unconsciousness and even death.
If you must drive with the liftgate, liftglass or
trunk lid open or
if electrical wiring or other cable
connections must pass through the seal between
the body and the liftgate, liftglass or trunk lid:
Make sure all windows are shut.
Turn the fan on your heating or cooling
system to its highest speed with the setting
on
NORM or VENT. That will force outside
air into your vehicle. See “Comfort
Controls” in the Index.
If you have air outlets on or under the
instrument panel, open them all the
way.
See “Engine Exhaust” in the Index.
To unlock the trunk from
the outside, insert the door
key and turn it clockwise.
Remote Trunk or Liftgate Release
You’ll find the release
button in the glove box.
The trunk will unlock
anytime the ignition is on
or
off. If you have the
wagon, the liftgate wi1.l
unlock when the ignition is
on, and the transaxle is in
PARK (P).
2-7
ProCarManuals.com
Page 111 of 340

Anti-Lock Brake S A
LOW
TRACTION
When your anti-lock system
is adjusting brake pressure
to help avoid a braking skid,
the anti-lock brakg system active light will come on.
Slippery road conditions may exist if this light comes
on,
so adjust your driving accordingly. The light will
stay
on for a few seconds after the system stops
adjusting brake pressure.
The anti-lock brake system active light also comes on
briefly when
you turn the ignition key to RUN. If the
light doesn’t come
on then, have it fixed so it will be
there to tell you when the system
is active.
Engine Coolant Temperature
Warning
Light
This warning light is
designed to tell you that
your engine coolant has
overheated or your radiator
cooling fan is not working.
If you have been operating your vehicle under normal
driving conditions, you should pull
off the road, stop
your vehicle and turn the engine off as soon as possible.
The section “Problems on the Road,” in this manual
explains what to do. See “Engine Overheating” in
the Index.
2-53
ProCarManuals.com
Page 119 of 340

Section 3 Comfort Controls and Audio Systems
In this section you'll find out how to operate the comfort
control and audio systems offered with your Buick. Be
sure to read about the particular systems supplied with
your vehicle.
Comfort Controls
With this system, you can control the heating, cooling
and ventilation in your vehicle. The system works best if
you keep your windows closed while using it. Your
vehicle
also has a flow-through ventilation system,
described later in this section.
System Controls
Fan Lever
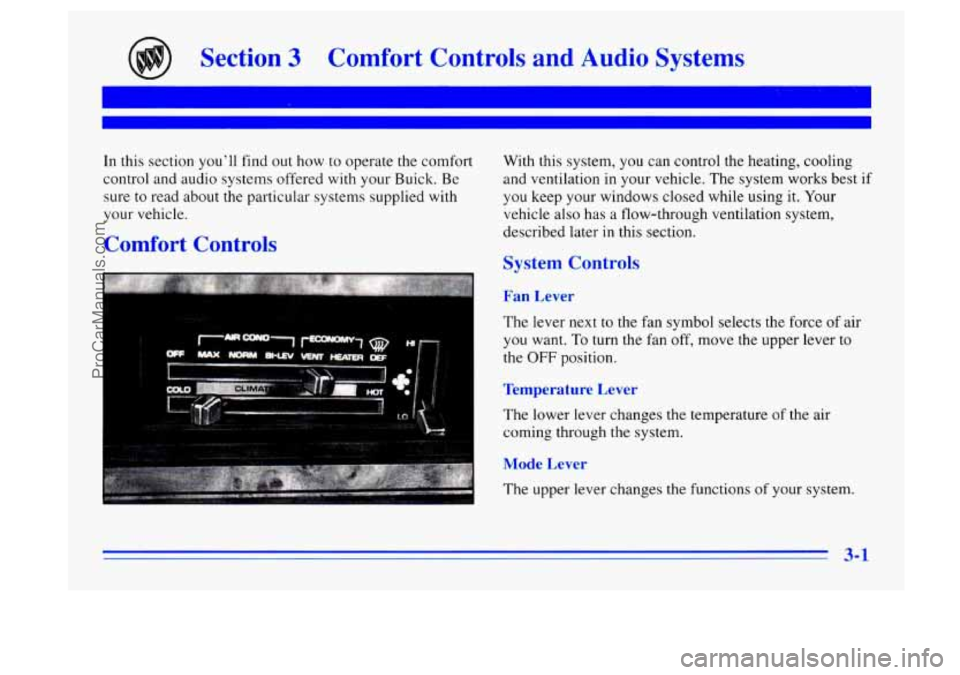
The lever next to the fan symb 01 select s the forc 'e of ai
you want. To turn the fan off, move the upper lever to
the
OFF position.
Temperature Lever
The lower lever changes the temperature of the air
coming through the system.
Mode Lever
The upper lever changes the functions of your system.
ProCarManuals.com
Page 120 of 340

When outside temperatures are cold, sliding the upper
lever to HEATER and the lower lever to HOT will
send heated air through the heater ducts, and some
through the defroster vents. VENT and
HEATER
are labeled ECONOMY positions because the air
conditioner compressor doesn't run
in these two
settings. This reduces engine load, resulting in
improved fuel economy. If either setting fails to keep
you comfortable, or causes your windows to fog up,
slide the upper lever to one
of the air conditioning
positions, or to DEF (defrost).
The
upper lever has three air conditioner settings. On
very hot days, open the windows long enough to let hot,
inside air escape. This reduces the amount
of work your
air conditioner's compressor will have
to do, which
should help fuel economy.
MAX: Provides maximum cooling with the least
amount
of work. This setting recirculates much of the
air inside your vehicle
so it maximizes your air
conditioner's performance and fuel economy.
NORM: Use for normal cooling on hot days. This
setting cools outside air and directs it through the
instrument panel outlets.
BI-LEV: Use this on cool, but sunny days. This setting
brings
in the outside air, and directs it in two ways. The
cool air is directed to the upper portion of your body
through the instrument panel outlets, and warmed air is
directed through the heater ducts and defroster vents. At
times, this temperature difference may be more apparent
than others.
The air conditioner compressor operates in all air
conditioning positions, and in
DEF (defrdst) when the
outside temperature is above about
40°F (4.5"C).
r gii
The DEF setting directs most of the air through the
defroster vents and some through the heater dl
s.
To quickly defog the windshield, set the upper le ~ r to
DEF and move the fan switch to HI. Slide the lower
lever to HOT.
In damp, cool weather (temperatures about 45"to
65"F,
7 " to 18 " C), you can use BI-LEV to defog the side
windows. Set the upper lever to BI-LEV and the fan
switch to HI. Aim the side vents toward the side
windows, For increased airflow to the side vents, close
the center vents.
3-2
ProCarManuals.com
Page 121 of 340

Rear Window Defogger
REAR
!
The rear window defogger
uses
a warming grid to
remove fog from the rear
window. In winter, it can
also keep ice from forming
on the rear window.
Press the
ON portion of the switch. The indicator light
will glow. The rear window defogger
will turn off
automatically after about 10 minutes of use. You can
also
turn it off by turning off the ignition or pressing the
OFF portion of the switch.
I NOTICE:
Don’t use a razor blade or something else sharp
on the inside
of the rear window. If you do, you
could cut or damage the warming grid, and the
repairs wouldn’t be covered by your warranty.
Ventilation System
Your Buick’s flow-through ventilation system supplies
outside air into the vehicle when
it is moving. Outside
air
will also enter the vehicle when the heater or the air
conditioning fan is running.
For mild outside temperatures, when
little heating or
cooling is needed, slide the upper lever to VENT.
Airflow is through the instrument panel outlets. Rotate
the control next to the outlets to turn on, adjust or turn
off the airflow. Adjust the lower lever
on the control
panel
to the temperature desired.
3-3
ProCarManuals.com
Page 153 of 340

If you drive regularly in steep country, or if you’re
planning
to visit there, here are some tips that can make
your trips safer and more enjoyable.
0 Keep your vehicle in good shape. Check all fluid
levels and also the brakes, tires, cooling system
and transaxle. These parts can work hard on
mountain roads.
Know how to go down hills. The most important
thing to know is this:
let your engine do some of the
slowing down. Shift to a lower gear when you go
down a steep or long hill.
If you don’t shift down, your brakes could get
so hot that they wouldn’t work well. You would
then have poor braking or even none going
down
a hill. You could crash. Shift down to let
your engine assist your brakes on
a steep
downhill slope.
A CAUTION:
Coasting downhill in NEUTRAL (N) or with the
ignition
off is dangerous. Your brakes will have to
do all the work
of slowing down. They could get so
hot that they wouldn’t work well. You would then
have poor braking or even none going down
a hill.
You could crash. Always have your engine running
and your vehicle in gear when you
go downhill.
I
Know how to go uphill. You may want to shift down
to a lower gear.
The lower gears help cool your engine
and transaxle, and you can climb the hill better.
Stay in your own lane when driving on two-lane
roads
in hills or mountains. Don’t swing wide or cut
across
the center of the road. Drive at speeds that let
you stay in your own lane.
As you go over the top of a hill, be alert. There could be
something
in your lane, like a stalled car or an accident.
You may see highway signs on mountains that warn
of special problems. Examples are long grades,
passing or no-passing zones,
a falling rocks area
or winding roads. Be alert to these and take
appropriate action.
4-23
ProCarManuals.com
Page 161 of 340

If You Do Decide To Pull A Trailer
If you do, here are some important points:
e There are many different laws, including speed limit
restrictions, having to do with trailering. Make sure
your rig will be legal, not only where you live but
also where you’ll be driving. A good source for this
information can be state or provincial police.
Consider using a sway control. You can ask a hitch
dealer about sway controls.
Don’t tow a trailer at all during the first 1,000 miles
(1 600 km) your new vehicle is driven. Your engine,
axle or other parts could be damaged.
Then, during the first 500 miles (800 km) that you
tow a trailer, don’t drive over
50 mph (80 kmh) and
don’t make starts at full throttle. This helps your
engine and other parts of your vehicle wear in at
the
heavier loads.
Obey speed limit restrictions when towing a trailer.
Don’t drive faster than the maximum posted speed
for trailers (or no more than
55 mph (88 km/h)) to
save wear on your vehicle’s parts.
Three important considerations have to do with weight:
the weight of the trailer,
the weight of the trailer tongue
and the total weight on your vehicle’s tires.
Weight of the Trailer
Your vehicle can tow normally up to 1,000 lbs. (450 kg).
If your vehicle has a
3.1 L V6 engine with a four-speed
automatic transaxle and is equipped with the optional
heavy-duty engine cooling system, it can tow up to
2,000 lbs. (900 kg).
It depends on how you plan to use your rig. For
example, speed, altitude, road grades, outside
temperature and how much your vehicle is used to pull a
trailer are all important. And,
it can also depend on any
special equipment that
you have on your vehicle.
You can ask your dealer for our trailering information or
advice, or you can write
us at:
Buick Motor Division
Customer Assistance Center
902 E. Hamilton Ave.
Flint, MI
48550
In Canada, write to:
General Motors of Canada Limited
Customer Assistance Center
1908 Colonel Sam Drive
Oshawa, Ontario
LlH 8P7
4-31
ProCarManuals.com
Page 166 of 340

Parking on Hills
You really should not parK your vehicle, with a trailer
attached,
on a hill. If something goes wrong, your rig
could start to move. People can be injured, and both
your vehicle and the trailer can be damaged.
But if
you ever have to park your rig on a hill, here’s
how to do it:
1. Apply your regular brakes, but don’t shift into
2. Have someone place chocks under the trailer wheels.
PARK
(P) yet.
3. When the wheel
chocks are in place, release the
regular brakes until the chocks absorb the load.
4. Reapply the regular brakes. Then, apply your
parking brake, and then shift
to PARK (P).
5. Release the regular brakes.
When You Are Ready to Leave After
Parking on
a Hill
1. Apply your regular brakes and hold the pedal down
while
you:
m Start your engine;
0 Shift into a gear; and
Release the parking brake.
2. Let up on the brake pedal.
3. Drive slowly until the trailer is clear of the chocks.
4. Stop and have someone pick up and store the chocks.
Maintenance When Trailer Towing
Your vehicle will need service more often when you’re
pulling a trailer. See the Maintenance Schedule for more
on this. Things that are especially important in trailer
operation are automatic transaxle fluid (don’t overfill),
engine oil, belt, cooling system and brake adjustment.
Each of these is covered in this manual, and the Index
will help
you find them quickly. If you’re trailering, it’s
a good idea to review these sections before you start
your trip.
Check periodically to see that all hitch nuts and bolts
are tight.
4-
ProCarManuals.com