Page 17 of 33
13-18
Crankshaft seal, replacing
Toothed belt side
Lock carrier in service position page 13
-1
Ribbed belt, removing and installing page 13
-
8 .
Toothed belt, removing and installing page 13
-
12
.
- Remove sealing plug from left-side of cylinder
block.
- Turn crankshaft to TDC for cylinder 3. The TDC
mark on crankshaft must be visible or felt behind
bore for sealing plug.
- Install 3242 crankshaft holder in bore to secure crankshaft.
Pa
ge 17 of 33 C
ylinder block, crankshaft and fl
ywheel, servicin
g
11/21/2002 htt
p://127.0.0.1:8080/audi/servlet/Dis
play?action=Goto&t
yp
e=re
pair&id=AUDI.B5.GE03.13.2
Page 18 of 33
13-19
- Remove crankshaft/toothed belt gear.
- Unscrew inner part of 3203 seal puller two turns
(approx. 3 mm) and secure using knurled bolt.
Installing - Grease threaded head of 2085 seal puller, position and with forced
pressure screw into oil seal as far as possible.
- Loosen knurled bolt and turn inner part against crankshaft until oil seal
is removed.
- Place 3202/1 guide sleeve on crankshaft pin.
- Slide dry oil seal over guide sleeve.
The rest of the installation follows is the reverse of removal. - Press in oil seal to stop using 3265 seal installer.
Pa
ge 18 of 33 C
ylinder block, crankshaft and fl
ywheel, servicin
g
11/21/2002 htt
p://127.0.0.1:8080/audi/servlet/Dis
play?action=Goto&t
yp
e=re
pair&id=AUDI.B5.GE03.13.2
Page 19 of 33
13-20
Dual-mass flywheel
Notes:
Only replace oil seal with sealing flange.
Drain coolant before removing sealing flange
page 19
-11
.
If sealing flange is not available, proceed as
follows:
- Remove clutch and dual-mass flywheel or
driveplate.
Notes: - Pry out seal using 10-221 extractor.
- Clean running and sealing surfaces.
- Push seal onto crankshaft using assembly aid.
Do not lubricate sealing lip or outer edge of seal before pressing in.The assembly aid is supplied with the seal.
- Press in seal up to stop using 2003/3 seal installer and bolts for dual-
mass flywheel or driveplate.
Pa
ge 19 of 33 C
ylinder block, crankshaft and fl
ywheel, servicin
g
11/21/2002 htt
p://127.0.0.1:8080/audi/servlet/Dis
play?action=Goto&t
yp
e=re
pair&id=AUDI.B5.GE03.13.2
Page 20 of 33
13-21
Dual-mass flywheel pilot needle bearing,
removing and installing
- Remove pilot needle bearing using puller -A- (e.g. KUKKO 21/2 and
KUKKO 22/1).
- Install bearing using 3264 bearing driver.
Pa
ge 20 of 33 C
ylinder block, crankshaft and fl
ywheel, servicin
g
11/21/2002 htt
p://127.0.0.1:8080/audi/servlet/Dis
play?action=Goto&t
yp
e=re
pair&id=AUDI.B5.GE03.13.2
Page 21 of 33
13-22
Dual-mass flywheel or driveplate,
removing and installing, installation
dimensions
Dual-mass flywheel
Note:
A pilot needle bearing is in the dual-mass flywheel and must be inserted
when dual-mass flywheel is replaced.
Note:
Always replace dual-mass flywheel mounting bolts. - With crankshaft at Top Dead Center (TDC), install 3242 crankshaft
holder.
- Mark position of dual-mass flywheel and engine housing (arrows).
- Remove bolts and replace.Component
Tightening torque
Dual-mass flywheel to crankshaft
60 Nm (44 ft lb) + 180 Clutch to dual-mass flywheel 20 Nm (15 ft lb)
Pa
ge 21 of 33 C
ylinder block, crankshaft and fl
ywheel, servicin
g
11/21/2002 htt
p://127.0.0.1:8080/audi/servlet/Dis
play?action=Goto&t
yp
e=re
pair&id=AUDI.B5.GE03.13.2
Page 22 of 33

13-23
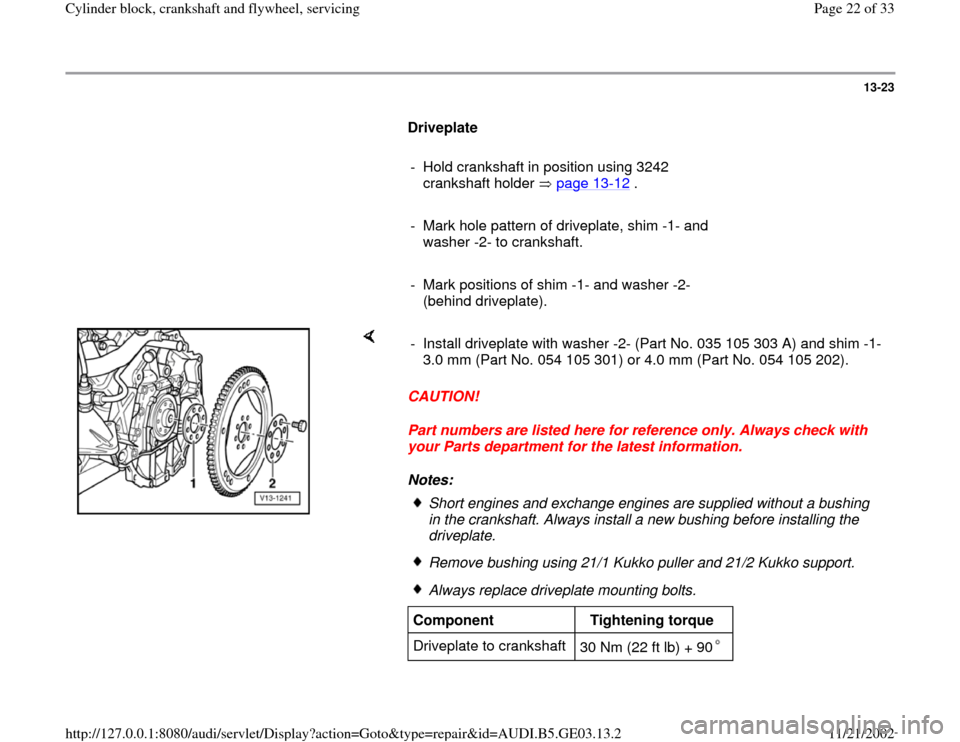
Driveplate
- Hold crankshaft in position using 3242
crankshaft holder page 13
-12
.
- Mark hole pattern of driveplate, shim -1- and
washer -2- to crankshaft.
- Mark positions of shim -1- and washer -2-
(behind driveplate).
CAUTION!
Part numbers are listed here for reference only. Always check with
your Parts department for the latest information.
Notes: - Install driveplate with washer -2- (Part No. 035 105 303 A) and shim -1-
3.0 mm (Part No. 054 105 301) or 4.0 mm (Part No. 054 105 202).
Short engines and exchange engines are supplied without a bushing
in the crankshaft. Always install a new bushing before installing the
driveplate. Remove bushing using 21/1 Kukko puller and 21/2 Kukko support.Always replace driveplate mounting bolts.
Component
Tightening torque
Driveplate to crankshaft
30 Nm (22 ft lb) + 90
Pa
ge 22 of 33 C
ylinder block, crankshaft and fl
ywheel, servicin
g
11/21/2002 htt
p://127.0.0.1:8080/audi/servlet/Dis
play?action=Goto&t
yp
e=re
pair&id=AUDI.B5.GE03.13.2
Page 23 of 33
13-24
Note:
Before installing the engine, make sure the engine to transmission
centering sleeves are installed in the engine flange. - Measure distance -a- at three places and calculate average.
Distance -a-: approx. 12.3 mm.
- If necessary, install different shim.
Pa
ge 23 of 33 C
ylinder block, crankshaft and fl
ywheel, servicin
g
11/21/2002 htt
p://127.0.0.1:8080/audi/servlet/Dis
play?action=Goto&t
yp
e=re
pair&id=AUDI.B5.GE03.13.2
Page 24 of 33
13-25
Crankshaft axial and radial clearance,
measuring
Axial clearance
CAUTION!
Bearing shells must be reinstalled in their
original location and orientation. Always label
the bearing shells according to their installed
position before removing. Never interchange
used bearing shells.
- Attach dial indicator together with VW387 dial indicator holder to oil
pump and set indicator against crankshaft counterweight.
- Press crankshaft against dial indicator by hand and set indicator to
zero.
- Press crankshaft away from dial indicator.
- Read gauge.
Clearance when new
Wear limit
0.07-0.23 mm (0.0028-0.0091 in.) 0.25 mm (0.0098 in.)
Pa
ge 24 of 33 C
ylinder block, crankshaft and fl
ywheel, servicin
g
11/21/2002 htt
p://127.0.0.1:8080/audi/servlet/Dis
play?action=Goto&t
yp
e=re
pair&id=AUDI.B5.GE03.13.2