Page 2066 of 2543

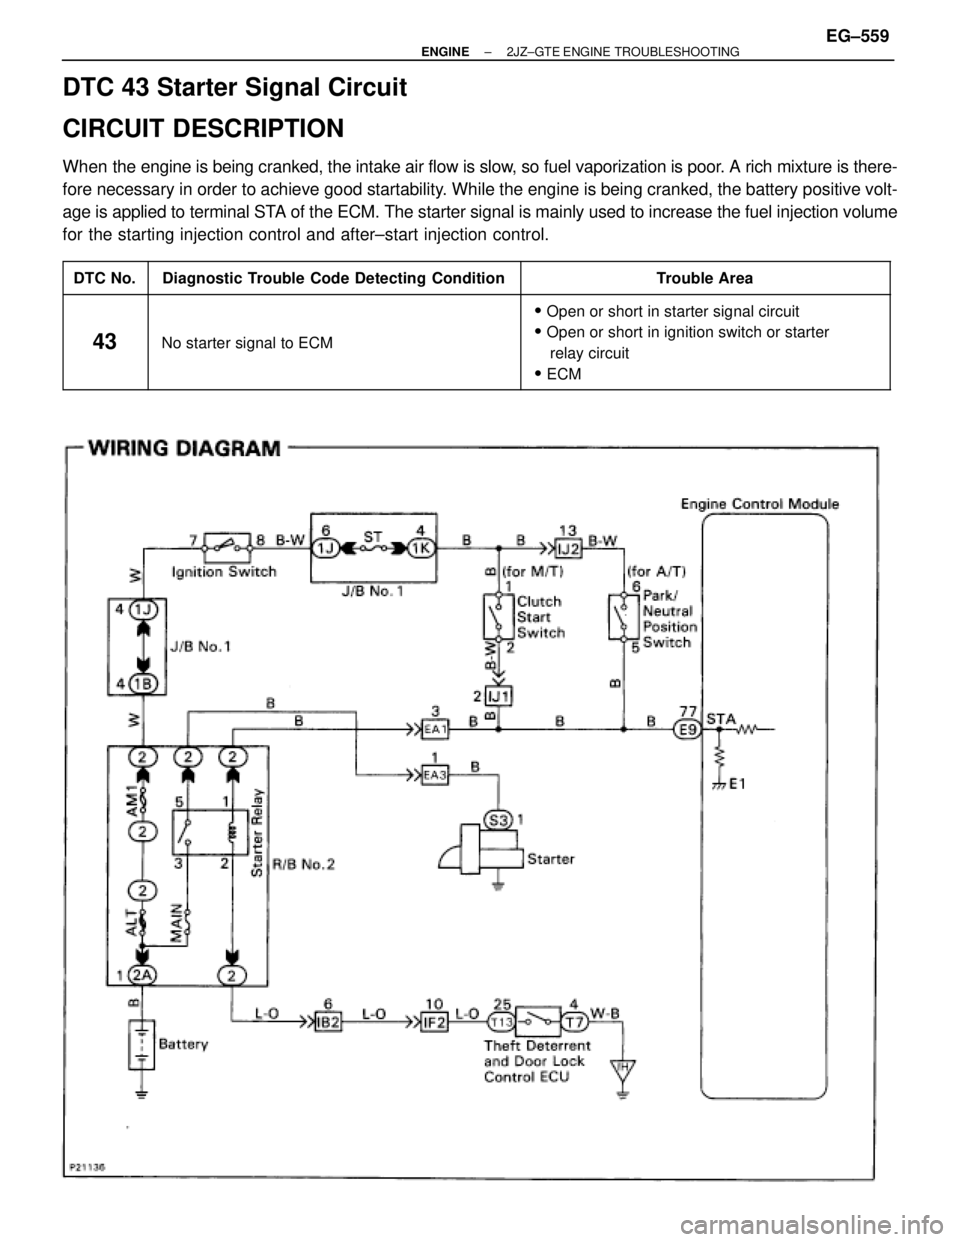
DTC 43 Starter Signal Circuit
CIRCUIT DESCRIPTION
When the engine is being cranked, the intake air flow is slow, so fuel vaporization is poor. A rich mixture is there-
fore necessary in order to achieve good startability. While the engine is being cranked, the battery positive volt-
age is applied to terminal STA of the ECM. The starter signal is mainly used to increase the fuel injection volume
for the starting injection control and after±start injection control.
����� �
���� �����DTC No.
���������������� �
��������������� ����������������Diagnostic Trouble Code Detecting Condition
���������������� �
��������������� ����������������Trouble Area
����� �
���� �
���� �
���� �����
43
���������������� �
��������������� �
��������������� �
��������������� ����������������
No starter signal to ECM
���������������� �
��������������� �
��������������� �
��������������� ����������������
�Open or short in starter signal circuit
�Open or short in ignition switch or starter
relay circuit
�ECM
± ENGINE2JZ±GTE ENGINE TROUBLESHOOTINGEG±559
Page 2075 of 2543

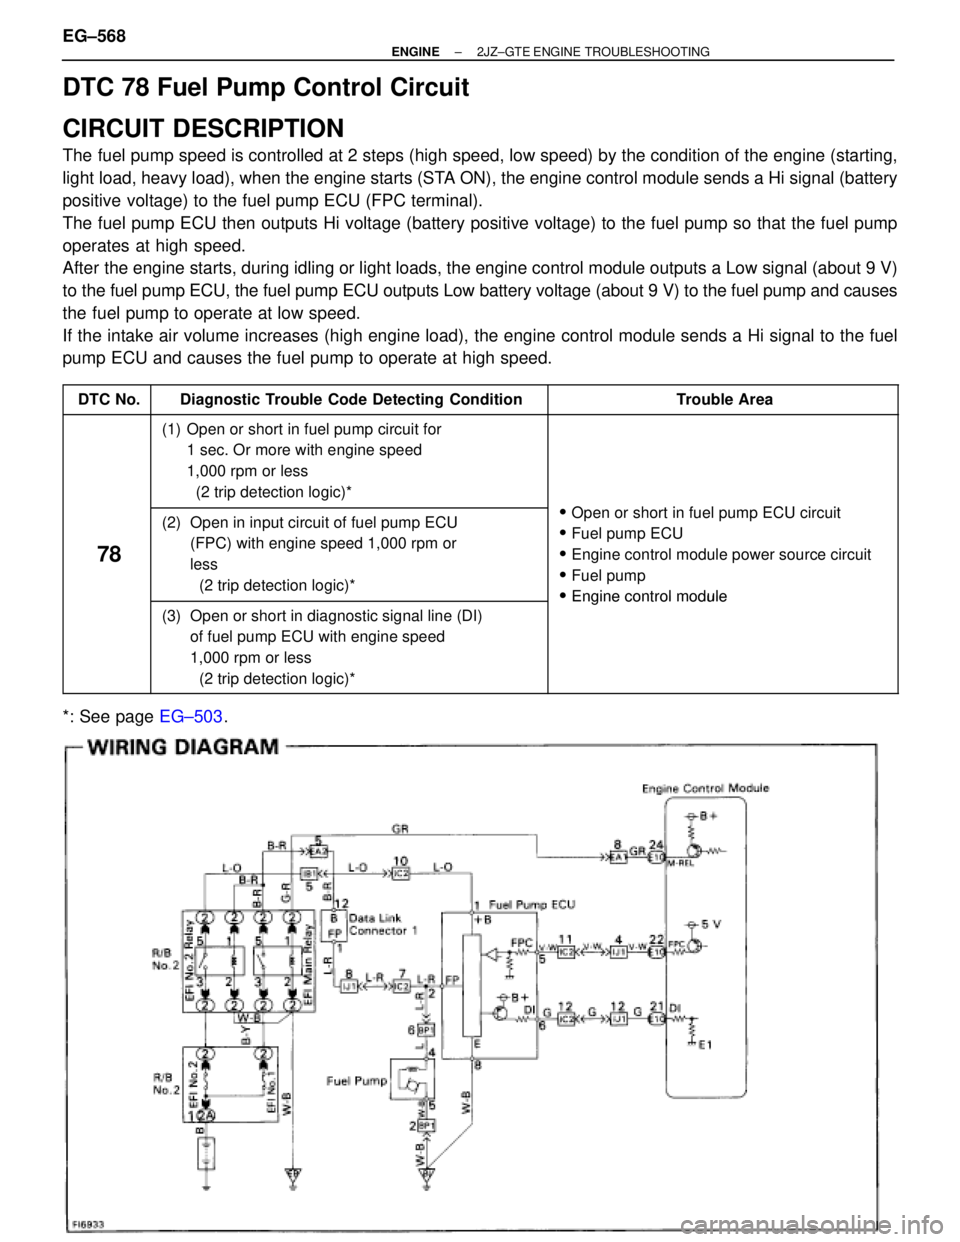
DTC 78 Fuel Pump Control Circuit
CIRCUIT DESCRIPTION
The fuel pump speed is controlled at 2 steps (high speed, low speed) by the condition of the engine (starting,
light load, heavy load), when the engine starts (STA ON), the engine control module sends a Hi signal (battery
positive voltage) to the fuel pump ECU (FPC terminal).
The fuel pump ECU then outputs Hi voltage (battery positive voltage) to the fuel pump so that the fuel pump
operates at high speed.
After the engine starts, during idling or light loads, the engine control module outputs a Low signal (about 9 V)
to the fuel pump ECU, the fuel pump ECU outputs Low battery voltage (about 9 V) to the fuel pump and causes
the fuel pump to operate at low speed.
If the intake air volume increases (high engine load), the engine control module sends a Hi signal to the fuel
pump ECU and causes the fuel pump to operate at high speed.
����� �
���� �����DTC No.
����������������� �
���������������� �����������������Diagnostic Trouble Code Detecting Condition
���������������� �
��������������� ����������������Trouble Area
����� �
���� �
���� �
���� �����
����������������� �
���������������� �
���������������� �
���������������� �����������������
(1) Open or short in fuel pump circuit for
1 sec. Or more with engine speed
1,000 rpm or less
(2 trip detection logic)*���������������� �
��������������� �
��������������� �
��������������� ����������������O h t i f l ECU i it����� �
���� �
���� �����
78
����������������� �
���������������� �
���������������� �����������������
(2) Open in input circuit of fuel pump ECU
(FPC) with engine speed 1,000 rpm or
less
(2 trip detection logic)*���������������� �
��������������� �
��������������� ����������������
�Open or short in fuel pump ECU circuit
�Fuel pump ECU
�Engine control module power source circuit
�Fuel pump
�Engine control module����� �
���� �
���� �
���� �����
����������������� �
���������������� �
���������������� �
���������������� �����������������
(3) Open or short in diagnostic signal line (DI)
of fuel pump ECU with engine speed
1,000 rpm or less
(2 trip detection logic)*
���������������� �
��������������� �
��������������� �
��������������� ����������������
�Engine control module
*: See page EG±503. EG±568
± ENGINE2JZ±GTE ENGINE TROUBLESHOOTING
Page 2081 of 2543
Park Neutral Position Switch Circuit
CIRCUIT DESCRIPTION
The park/neutral position switch goes on when the shift lever is in the N or P shift position. When it goes on the
terminal NSW of the ECM is grounded to body ground via the starter relay and theft deterrent ECU, thus the
terminal NSW voltage becomes 0 V. When the shift lever is in the D, 2, L or R position, the park/neutral position
switch goes off, so the voltage of ECM terminal NSW becomes positive battery voltage, the voltage of the ECM
internal power source.
If the shift lever is moved from the N position to the D position, this signal is used for air±fuel ratio correction
and for idle speed control (estimated control), etc.
When the park/neutral position switch is off, code º51º is output in the test mode diagnosis. (This is not abnor-
mal.)
EG±574± ENGINE2JZ±GTE ENGINE TROUBLESHOOTING
Page 2083 of 2543
ECM Power Source Circuit
CIRCUIT DESCRIPTION
When the ignition switch is turned on, battery volt-
age is applied to the terminal IGSW of the ECM,
and the main relay control circuit in the ECM sends
a signal to the terminal M±REL of the ECM, switch-
ing on the main relay. This signal causes current to
flow to the coil, closing the contacts of the main
relay and supplying power to the terminal + B of the
ECM.
If the ignition switch is turned off, the ECM contin-
ues to switch on the main relay for a maximum of
2 seconds for the initial setting of the IAC valve. EG±576
± ENGINE2JZ±GTE ENGINE TROUBLESHOOTING
Page 2085 of 2543
Check for short in the harness and all the compo-
nents connected to IGN fuse (See Electrical Wir-
ing Diagram).
Remove IGN fuse from J/B No.1.
Check continuity of IGN fuse.
Continuity
Check IGN fuse.
Check ignition switch.
(1) Remove finish lower panel and finish lower
panel LH.
(2) Remove heater to register duct No.2.
Check continuity between terminals.
Check and repair harness and connector between
battery and ignition switch, ignition switch and en-
gine control module.
Replace ignition switch.
Terminal
Switch position
LOCK
ACC
ON
START
continuity
EG±578± ENGINE2JZ±GTE ENGINE TROUBLESHOOTING
Page 2087 of 2543
(See page IN±30).
Remove EFI main relay from R/B No.2.
Check continuity between terminals of EFI main
relay shown below.
Check EFI main relay.
(1) Apply battery positive voltage between termi±
nals 1 and 2.
(2) Check continuity between terminals 3 and 5.
Replace EFI main relay.
Repair or replace harness or connector.
Check for open and short in harness and connector between terminals
M±REL of engine control module and body ground (See page IN±30).
Check and repair harness or connector between EFI
No.1 fuse and battery.
Continuity
Continuity
Terminals 3 and 6
Terminals 3 and 5
Terminals 1 and 2 (Reference value 72 �)
Open
EG±580± ENGINE2JZ±GTE ENGINE TROUBLESHOOTING
Page 2088 of 2543
Back Up Power Source Circuit
CIRCUIT DESCRIPTION
Battery positive voltage is supplied to terminal BATT of the ECM even when the ignition switch is off for use by
the diagnostic trouble code memory and air±fuel ratio adaptive control value memory, etc.
± ENGINE2JZ±GTE ENGINE TROUBLESHOOTINGEG±581
Page 2089 of 2543
INSPECTION PROCEDURE
(See page EG±510)
Check and repair harness or connector between
engine control module and EFI No.1 fuse, EFI No.1
fuse and battery.
Remove EFI No.1 fuse from R/B No.2.
Check continuity of EFI No.1 fuse.
Continuity
Check EFI No.1 Fuse.
Check voltage between terminal BATT of engine control module connector
and body ground.
Connect SST (check harness ªAº).
See page EG±510)
SST 09990±01000
Measure voltage between terminal BATT of en-
gine control module connector and body ground.
Voltage: 9 Ð 14 V
Check for short in the harness and all the compo-
nents connected to EFI No.1 fuse (See attached
wiring diagram).
Are the diagnostic trouble codes still in the memory when the ignition switch
is turned OFF?
Check and replace engine control module.
Proceed to next circuit inspection shown on matrix
chart (See page EG±514).
EG±582± ENGINE2JZ±GTE ENGINE TROUBLESHOOTING