1995 PONTIAC PONTIAC power steering
[x] Cancel search: power steeringPage 88 of 354
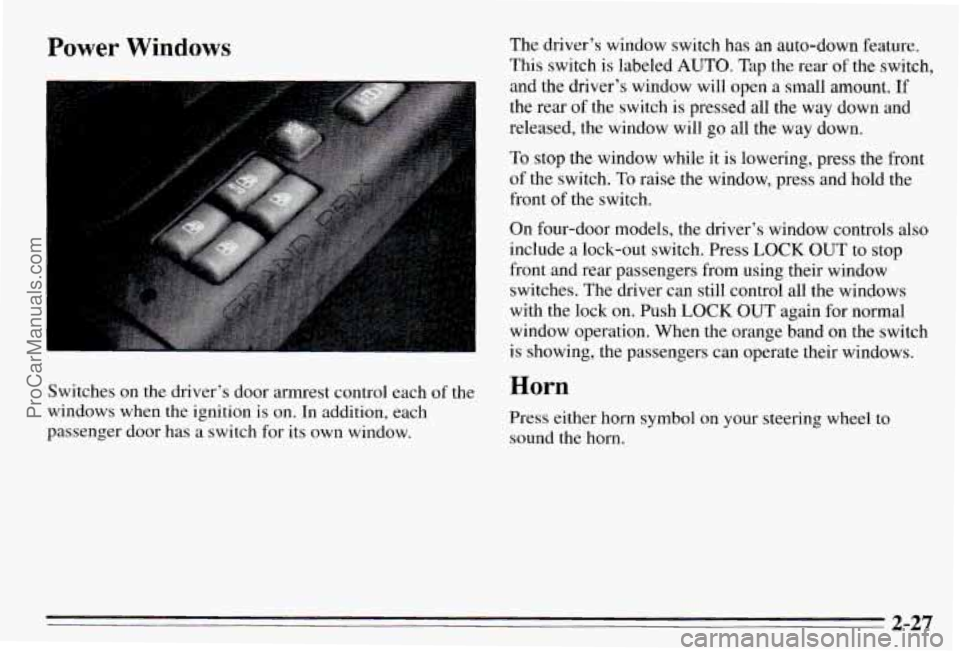
Power Windows The driver’s window switch has an auto-down feature.
This switch is labeled
AUTO. Tap the rear of the switch,
and the driver’s window will open a small amount. If
the rear of the switch
is pressed all the way down and
released, the window will
go all the way down.
To stop the window while it is lowering, press the front
of the switch.
To raise the window, press and hold the
front of the switch.
On four-door models, the driver’s window controls
also
include a lock-out switch. Press LOCK OUT to stop
front and rear passengers from using their window
switches. The driver can still control all the windows
with the lock on. Push
LOCK OUT again for normal
window operation. When the orange band on the switch
is showing, the passengers can operate their windows.
Switches on the driver’s door armrest control each
of the Horn
windows when the ignition is on. In addition, each
Press either horn symbol on your steering wheel to
passenger door has a switch for its own window.
sound the horn.
2-27
ProCarManuals.com
Page 152 of 354

Braking in Emergencies
At some time, nearly every driver gets into a situation
that requires hard braking.
If you have anti-lock, you can steer and brake at the
same time. However,
if you don’t have anti-lock, your
first reaction
-- to hit the brake pedal hard and hold it
down
-- may be the wrong thing to do. Your wheels can
stop rolling. Once they do, the vehicle can’t respond to
your steering. Momentum will carry it in whatever
direction it was headed when the wheels stopped rolling.
That could be off the road, into the very thing you were
trying to avoid, or into traffic.
If you don’t have anti-lock, use a “squeeze” braking
technique. This will give you maximum braking while
maintaining steering control. You do this by pushing on
the brake pedal with steadily increasing pressure.
In an emergency you will probably want to “squeeze”
the brakes hard without locking the wheels. If you hear
or feel the wheels sliding, ease off the brake pedal. This
will help you retain steering control.
(If you do have
anti-lock, it’s different: see “Anti-Lock Brakes’’ in the
Index.)
In many emergencies, steering can help you more than
even the very best braking.
Steering
Power Steering
If you lose power steering assist because the engine
stops or the system is not functioning, you can steer but
it will take much more effort.
Steering Tips
Driving on Curves
It’s important to take curves at a reasonable speed.
A lot of the “driver lost control” accidents mentioned on
the news happen on curves. Here’s why:
Experienced driver or beginner, each of us is subject to
the same laws of physics when driving on curves. The
traction of the tires against the road surface makes it
possible for the vehicle to change its path when you turn
the front wheels. If there’s no traction, inertia will keep
the vehicle going in the same direction. If you’ve ever
tried to steer a vehicle on
wet ice, you’ll understand this.
The traction you can get in a curve depends on the
condition of your tires and the road surface, the angle
at which the curve is banked, and your speed. While
you’re in a curve, speed is the one factor you can
control.
4-9
ProCarManuals.com
Page 221 of 354
I
a3
7
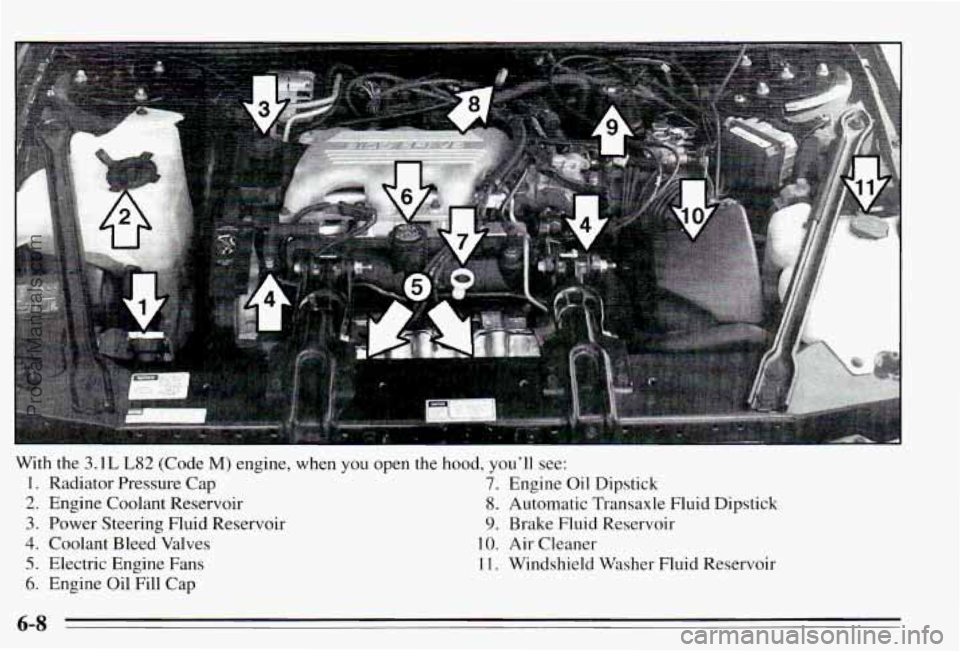
With the 3.1 L L82 (Code M) engine, when you open the hood, you’ll see:
1. Radiator Pressure Cap 7. Engine Oil Dipstick
2. Engine Coolant Reservoir 8. Automatic Transaxle Fluid Dipstick
3. Power Steering Fluid Reservoir 9. Brake Fluid Reservoir
4. Coolant Bleed Valves 10. Air Cleaner
5. Electric Engine Fans 11. Windshield Washer Fluid Reservoir
6. Engine Oil Fill Cap
6-8
ProCarManuals.com
Page 222 of 354
'4 L,
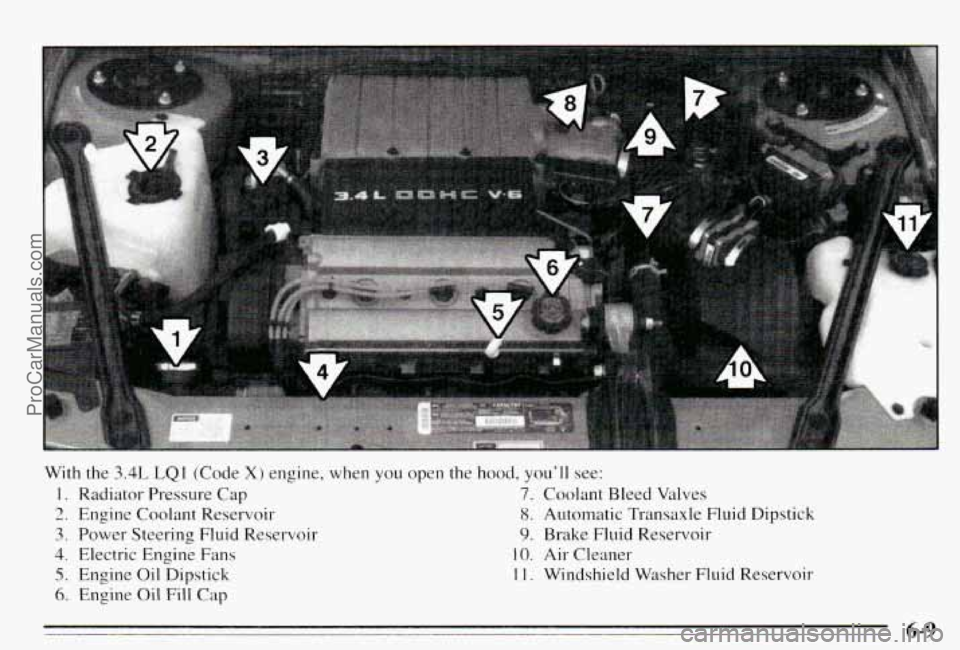
With the 3.4L LQI (Code X) engine, when you open the hood, you'll see:
1. Radiator Pressure Cap 7. Coolant Bleed Valves
2. Engine Coolant Reservoir 8. Automatic Transaxle Fluid Dipstick
3. Power Steering Fluid Reservoir 9. Brake Fluid Reservoir
4. Electric Engine Fans 10. Air Cleaner
5. Engine Oil Dipstick 1 1. Windshield Washer Fluid Reservoir
6. Engine Oil Fill Cap
6-9 ProCarManuals.com
Page 235 of 354

Radiator Pressure Cap
NOTICE:
Your radiator cap is a 15 psi (105 kPa)
pressure-type cap and must be tightly installed
to prevent coolant loss and possible engine
damage from overheating. Be sure the arrows
on
the cap line up with the overflow tube on the
radiator filler neck.
When you replace your radiator pressure cap, an A@
cap is recommended.
Thermostat
Engine coolant temperature is controlled by a thermostat
in the engine coolant system. The thermostat stops the
flow
of coolant through the radiator until the coolant
reaches a preset temperature.
When you replace your thermostat, an
AC@ thermostat
is recommended.
Power Steering Fluid
3.1L L82 (Code M) Engine 3.4L LQl (Code X) Engine
How To Check Power Steering Fluid
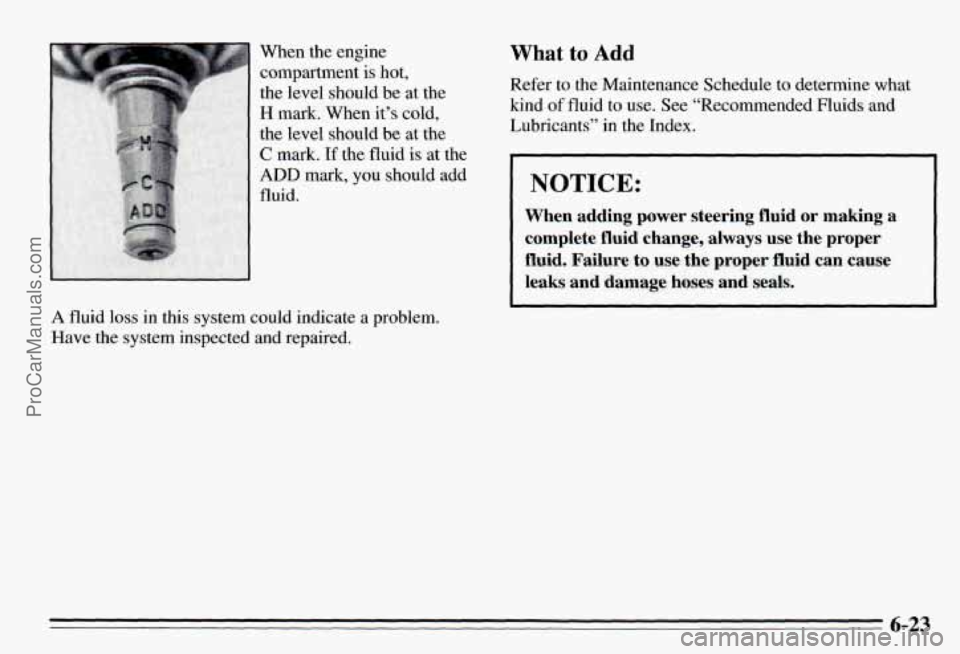
When the engine compartment is cool, unscrew the cap
and wipe the dipstick with a clean rag. Replace the cap
and completely tighten it. Then remove the cap again
and look at the fluid level on the dipstick.
6-22
ProCarManuals.com
Page 236 of 354
A fluid loss in this system could indicate a problem.
Have the system inspected and repaired.
What to Add
Refer to the Maintenance Schedule to determine what
kind
of fluid to use. See “Recommended Fluids and
Lubricants” in the Index.
NOTICE:
When adding power steering fluid or making a
complete fluid change, always use the proper
fluid. Failure to use the proper fluid can cause
leaks and damage hoses and seals.
6-23
ProCarManuals.com
Page 278 of 354
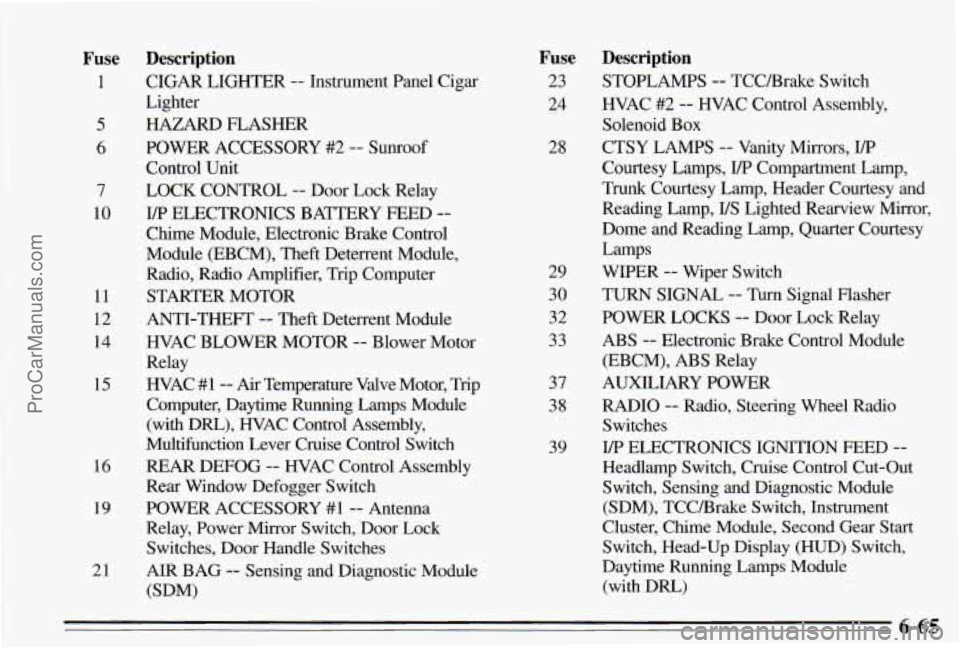
Fuse
1
5
6
7
10
11
12 14
15
16
19
21
Description
CIGAR LIGHTER -- Instrument Panel Cigar
Lighter
HAZARD FLASHER
Control Unit
LOCK CONTROL
-- Door Lock Relay
Chime Module, Electronic Brake Control
Module (EBCM), Theft Deterrent Module,
Radio, Radio Amplifier, Trip Computer
STARTER MOTOR
ANTI-THEFT
-- Theft Deterrent Module
WAC BLOWER MOTOR
-- Blower Motor
Relay
WAC
#1-- Air Temperature Valve Motor, Trip
Computer, Daytime Running Lamps Module
(with Dm), WAC Control Assembly,
Multifunction Lever Cruise Control Switch
REAR DEFOG -- WAC Control Assembly
Rear Window Defogger Switch
POWER ACCESSORY
#1 -- Antenna
Relay, Power Mirror Switch, Door Lock Switches, Door Handle Switches
AIR BAG -- Sensing and Diagnostic Module
@DM)
POWER ACCESSORY
#2 -- SUIKOO~
YP ELECTRONICS
BATTERY FEED --
Fuse
23
24
28
29
30
32
33
37
38
39
Description
STOPLAMPS -- TCCBrake Switch
HVAC #2
-- HVAC Control Assembly,
Solenoid Box
CTSY LAMPS
-- Vanity Mirrors, VP
Courtesy Lamps, I/P Compartment Lamp,
Trunk Courtesy Lamp, Header Courtesy and
Reading Lamp,
US Lighted Rearview Mirror,
Dome and Reading Lamp, Quarter Courtesy
WIPER
-- Wiper Switch
TURN SIGNAL
-- Turn Signal Flasher
POWER LOCKS
-- Door Lock Relay
ABS -- Electronic Brake Control Module
(EBCM),
ABS Relay
AUXILIARY POWER
RADIO
-- Radio, Steering Wheel Radio
Switches
Headlamp Switch, Cruise Control Cut-Out Switch, Sensing and Diagnostic Module
(SDM), TCCBrake Switch, Instrument
Cluster, Chime Module, Second Gear Start
Switch, Head-Up Display
(HUD) Switch,
Daytime Running Lamps Module
(with Dm)
Lamps
I/P ELECTRONICS IGNITION FEED --
6-65 ProCarManuals.com
Page 326 of 354

Part C: Periodic Maintenance
Inspections
Listed below are inspections and services which should
be performed at least twice a year (for instance, each spring and fall). You should let your
GM dealer’s
service department or other qualified service center do
these jobs. Make sure any necessary repairs
are
completed at once.
Restraint Systems
Now and then, make sure all your belts, buckles, latch
plates, retractors, anchorages and reminder systems are
working properly. Look for any loose parts or damage.
If you see anything that might keep a restraint system
from doing its job, have
it repaired.
Steering, Suspension and Front-Wheel-
Drive Axle Boot and Seal Inspection
Inspect the front and rear suspension and steering
system for damaged, loose or missing parts, signs of
wear, or lack of lubrication. Inspect the power steering
lines and hoses for proper hookup, binding, leaks,
cracks, chafing, etc. Clean and then inspect the drive
axle boot seals for damage, tears or leakage. Replace
seals
if necessary.
Exhaust System Inspection
Inspect the complete exhaust system. Inspect the body
near the exhaust system. Look for broken, damaged, missing or out-of-position parts as well as open seams,
holes, loose connections, or other conditions which could cause a heat build-up in the floor pan or could let
exhaust fumes into the vehicle. See “Engine Exhaust” in
the Index.
Throttle Linkage Inspection
Inspect the throttle linkage for interference or binding,
and for damaged or missing parts. Replace parts as
needed. Accelerator and cruise control cables should not
be lubricated.
Brake System Inspection
Inspect the complete system. Inspect brake lines and hoses for proper hookup, binding, leaks, cracks, chafing,
etc. Inspect disc brake pads for wear and rotors for
surface condition. Inspect other brake parts, including
calipers, parking brake, etc. Check parking brake
adjustment. You may need to have your brakes inspected
more often if your driving habits or conditions result in
frequent braking.
7-39 ProCarManuals.com