Page 98 of 354

Sustained Interior Illumination
Your courtesy lamps will come on and stay on for a set
time whenever you:
Open a door.
Press UNLOCK on the Remote Lock Control
(if equipped).
Press DOOR on the Remote Lock Control
(if equipped).
If
you open a door, the lamps will stay on while it’s open
and then turn
off automatically about 18 seconds after
you close
it. If you don’t open a door, the lamps will
turn off after about 18 seconds, unless you pressed
UNLOCK on the Remote Lock Control. If you pressed
UNLOCK and don’t open a door, the lamps will turn off
after about
55 seconds.
Sustained interior illumination includes a feature called
theater dimming. With theater dimming, the lamps don’t
just turn off at the end of the delay time. Instead, they
slowly dim during the delay time until they
go out. The
delay time
is cancelled if you turn the ignition key to
RUN or START, so the lamps will go out right away.
When the ignition is on, Sustained Interior Illumination is
inactive, which means the courtesy lamps won’t come
on.
Rearview Mirror Reading Lamps
These lamps go on when you open the doors. When the
doors are closed, turn them on and off with the switches.
2-37
ProCarManuals.com
Page 218 of 354
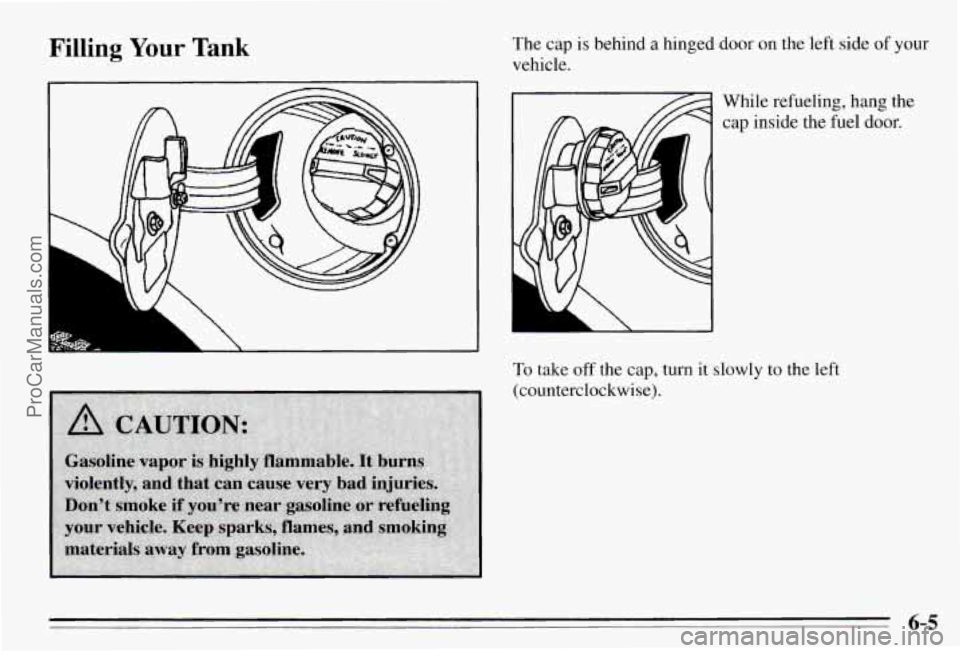
Filling Your Tank The cap is behind a hinged door on the left side of your
vehicle.
While refueling, hang the cap inside the fuel
door.
To take off the cap, turn it slowly to the left
(counterclockwise).
6-5
ProCarManuals.com
Page 248 of 354
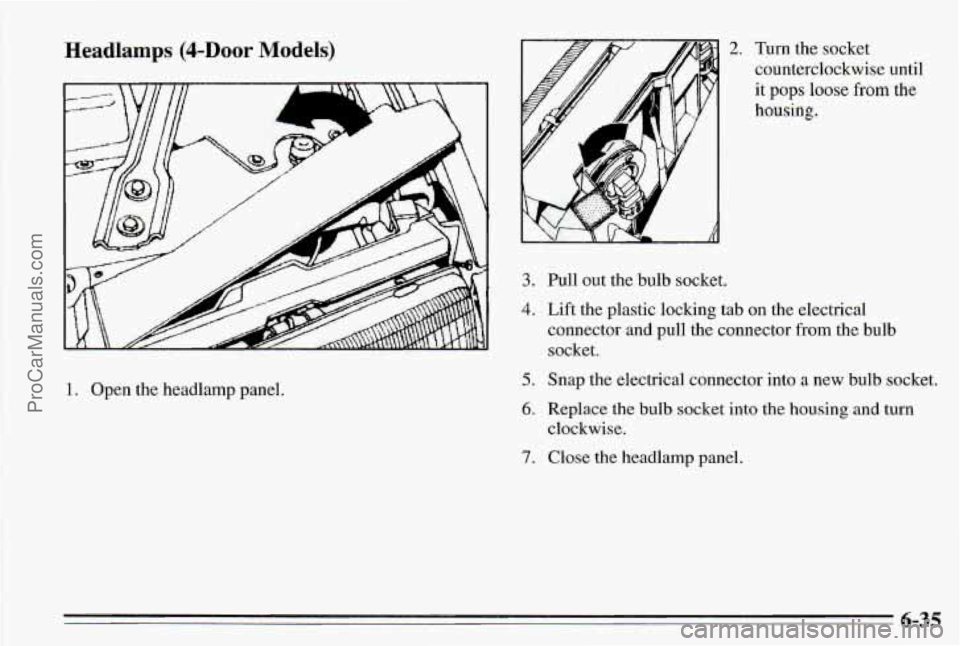
Headlamps @-Door Models)
1. Open the headlamp panel.
2. Turn the socket
counterclockwise until
it pops loose from the
housing.
3.
4.
5.
6.
7.
Pull out the bulb socket.
Lift the plastic locking tab on the electrical
connector and pull the connector
from the bulb
socket.
Snap the electrical connector into
a new bulb socket.
Replace the bulb socket into the housing
and turn
clockwise.
Close the headlamp panel.
6-35
ProCarManuals.com
Page 251 of 354
Front Sidemarker (&Door Models) Front Turn Signal (2-Door Models)
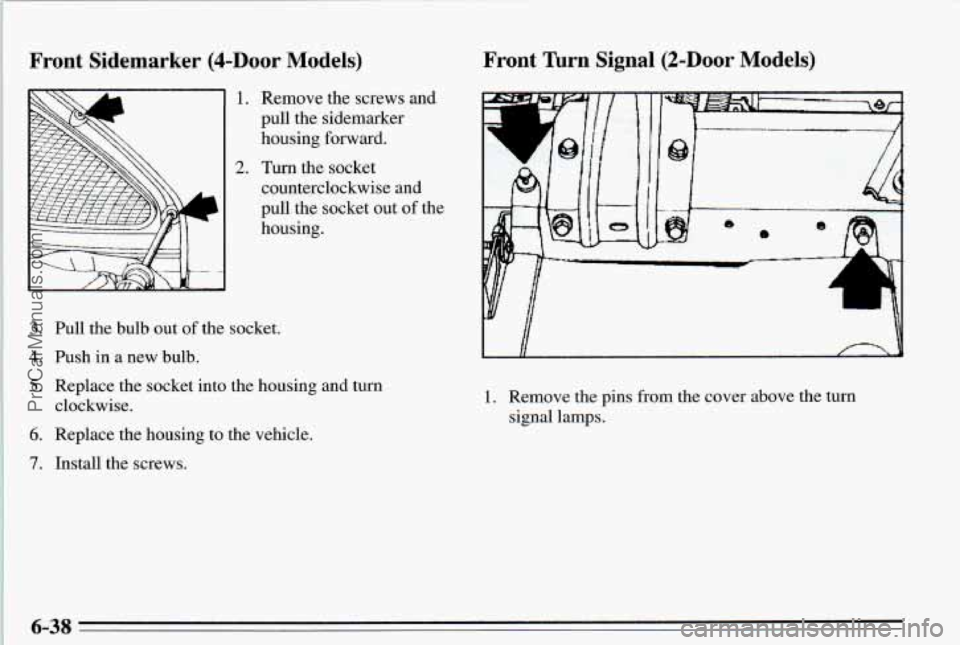
1.
2.
Remove the screws and
pull the sidemarker
housing forward.
Turn the socket
counterclockwise and
pull the socket out
of the
housing.
3.
4.
5.
6.
7.
Pull the bulb out of the socket.
fish
in a new bulb.
Replace the socket into the housing
and turn
clockwise.
Replace the housing to the vehicle.
Install the screws-
45 -3
L A
1. Remove the pins from the cover above the turn
signal lamps.
6-38 ProCarManuals.com
Page 252 of 354
3.
4.
5.
6.
7.
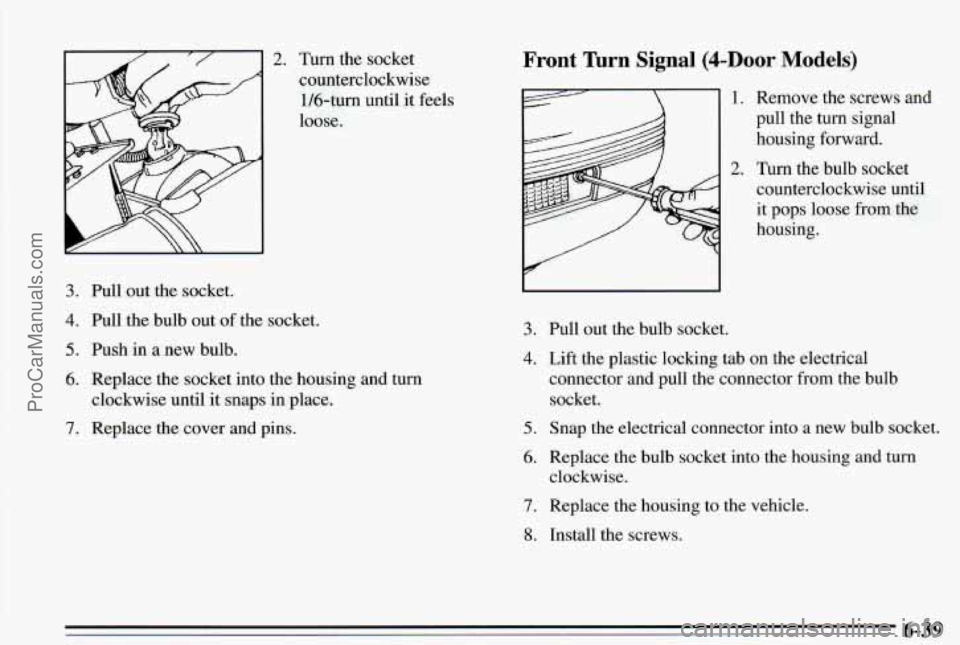
Turn the socket
counterclockwise 1/6-tum until it feels
loose.
Pull out~the socket.
Pull the bulb out
of the socket.
Push
in a new bulb.
Replace the socket into the housing and
turn
clockwise until it snaps in place.
Replace the cover and pins.
Front Turn Signal (4-Door Models)
)I 1. Remove the screws and
3. Pull out the bulb socket.
2.
pull the turn signal
housing forward.
Turn the bulb socket counterclockwise until
it pops loose from the
housing.
4. Lift the plastic locking tab on the electrical
connector and pull the connector from the bulb
socket.
5. Snap the electrical connector into a new bulb socket.
6. Replace the bulb socket into the housing and turn
clockxvise.
7. Replace the housing to the vehicle.
8. Install the screws.
6-39 ProCarManuals.com
Page 254 of 354
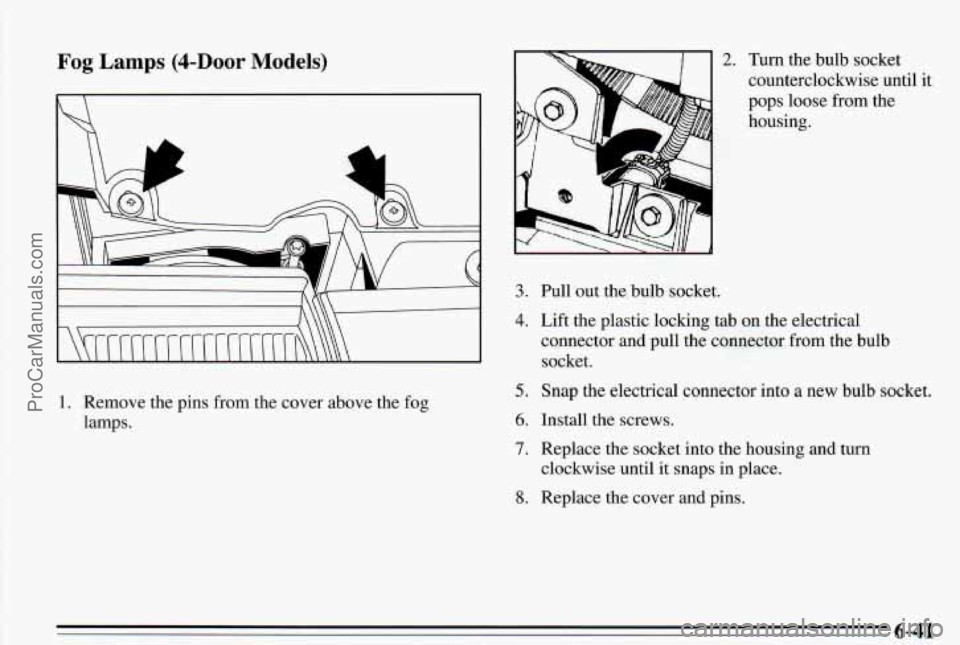
Fog Lamps (&Door Models)
1. Remove the pins from the cover above the fog
lamps.
3.
4.
5.
6.
7.
8.
2.
Pull out the bulb socket. Turn
the bulb socket
counterclockwise until
it
pops loose from the
housing.
Lift the plastic locking tab on the electrical
connector and pull the connector from the bulb
socket.
Snap the electrical connector into a new bulb socket.
Install the screws.
Replace the socket into the housing and turn
clockwise until it snaps in place.
Replace the cover and pins.
6-4 1 ProCarManuals.com
Page 278 of 354
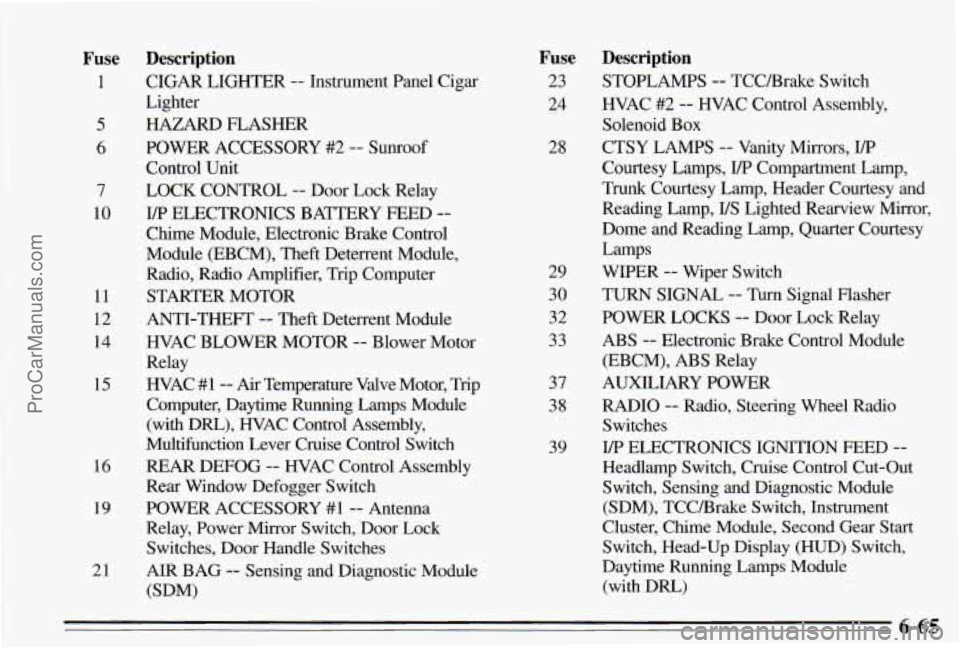
Fuse
1
5
6
7
10
11
12 14
15
16
19
21
Description
CIGAR LIGHTER -- Instrument Panel Cigar
Lighter
HAZARD FLASHER
Control Unit
LOCK CONTROL
-- Door Lock Relay
Chime Module, Electronic Brake Control
Module (EBCM), Theft Deterrent Module,
Radio, Radio Amplifier, Trip Computer
STARTER MOTOR
ANTI-THEFT
-- Theft Deterrent Module
WAC BLOWER MOTOR
-- Blower Motor
Relay
WAC
#1-- Air Temperature Valve Motor, Trip
Computer, Daytime Running Lamps Module
(with Dm), WAC Control Assembly,
Multifunction Lever Cruise Control Switch
REAR DEFOG -- WAC Control Assembly
Rear Window Defogger Switch
POWER ACCESSORY
#1 -- Antenna
Relay, Power Mirror Switch, Door Lock Switches, Door Handle Switches
AIR BAG -- Sensing and Diagnostic Module
@DM)
POWER ACCESSORY
#2 -- SUIKOO~
YP ELECTRONICS
BATTERY FEED --
Fuse
23
24
28
29
30
32
33
37
38
39
Description
STOPLAMPS -- TCCBrake Switch
HVAC #2
-- HVAC Control Assembly,
Solenoid Box
CTSY LAMPS
-- Vanity Mirrors, VP
Courtesy Lamps, I/P Compartment Lamp,
Trunk Courtesy Lamp, Header Courtesy and
Reading Lamp,
US Lighted Rearview Mirror,
Dome and Reading Lamp, Quarter Courtesy
WIPER
-- Wiper Switch
TURN SIGNAL
-- Turn Signal Flasher
POWER LOCKS
-- Door Lock Relay
ABS -- Electronic Brake Control Module
(EBCM),
ABS Relay
AUXILIARY POWER
RADIO
-- Radio, Steering Wheel Radio
Switches
Headlamp Switch, Cruise Control Cut-Out Switch, Sensing and Diagnostic Module
(SDM), TCCBrake Switch, Instrument
Cluster, Chime Module, Second Gear Start
Switch, Head-Up Display
(HUD) Switch,
Daytime Running Lamps Module
(with Dm)
Lamps
I/P ELECTRONICS IGNITION FEED --
6-65 ProCarManuals.com
Page 324 of 354
At Least Once a Year
Key Lock Cylinders
Lubricate the key lock cylinders with the lubricant
specified in Part
D.
Body Lubrication
Lubricate all all hinges and latches, including those for
the hood, rear compartment, glove box door, console
door and any folding seat hardware. Part
D tells you
what
to use. More frequent lubrication may be required
when exposed to a corrosive environment.
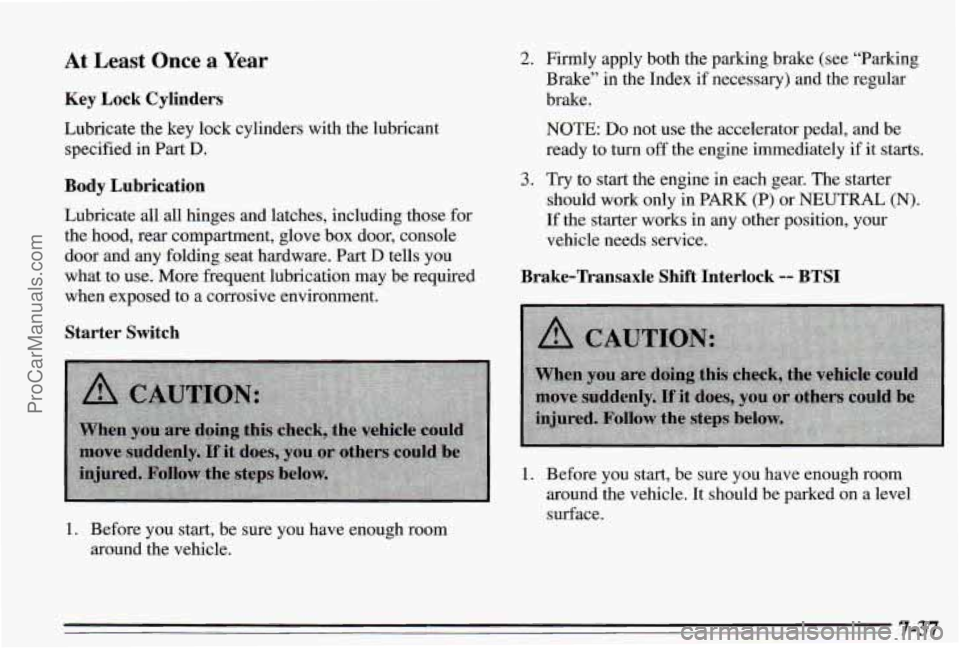
Starter Switch
1. Before you start, be sure you have enough room
around the vehicle.
2. Firmly apply both the parking brake (see “Parking
Brake” in the Index
if necessary) and the regular
brake.
NOTE: Do not use the accelerator pedal, and be
ready to turn off the engine immediately
if it starts.
3. Try to start the engine in each gear. The starter
should work only in
PARK (P) or NEUTRAL (N).
If the starter works in any other position, your
vehicle needs service.
Brake-Transaxle Shift Interlock -- BTSI
1. Before you start, be sure you have enough room
around the vehicle. It should be parked
on a level
surface.
7-37 ProCarManuals.com