1995 PONTIAC GRAND-AM air conditioning
[x] Cancel search: air conditioningPage 125 of 354

VENT Use when outside temperatures are mild,
and little heating or cooling is needed. Air flow is
through the instrument panel outlets. Set the center
control knob to the temperature desired.
HEATER: This setting brings heated air through
the heater ducts, and some through the windshield
defroster vents.
If you have the optional engine coolant heater (engine
block heater) and use it during cold weather,
0°F
(- 18 “C) or lower, your heating system will more quickly
provide heat because the engine coolant is already
warmed. See “Engine Coolant Heater” in the Index.
9 BLEND: This setting divides air flow equally
between the heater ducts and the windshield defroster
vents.
DEFROST This setting directs air through the
windshield defroster vents located on top of the
instrument panel.
Defogging Windows
To defog the windshield, turn all three control knobs to
the
far right.
Air Conditioning System (Option)
The air conditioner and heater work best if you keep
your windows closed while using them. Your vehicle
also has the flow-through ventilation system described
later in this section.
Air Conditioning
Your system has three air conditioner settings. Before using
your
air conditioner on very hot days, open the windows
long enough to let hot inside
air escape. This reduces the
amount
of work your air conditioner’s compressor will have
to do, which should help fuel economy.
MAX: Use for maximum cooling. This setting
recirculates much of the air inside your vehicle
so it
maximizes your air conditioner’s performance and your
vehicle’s fuel economy.
A/C: Use for normal cooling on hot days. This setting
cools outside air and directs it through the instrument
panel outlets.
BI-LEVEL: Use on cool, but sunny days. This
setting brings in the outside air, but directs it in two
ways. The cool air is directed to the upper portion
of
your body through the instrument panel outlets, but
slightly warmer air is directed through the heater ducts
and defroster vents. At times this temperature difference
may be more apparent than others.
ProCarManuals.com
Page 126 of 354
Ventilation
Use when outside temperatures are mild, and little
heating or cooling is needed.
Turn the right knob to
VENT. Air
flow is directed through the instrument panel
outlets. Set the center knob to the temperature desired.
Heating
Turning the right control knob to HEATER and the
center control knob clockwise will send heated air
through the heater ducts toward your feet and the
floor,
and some through the defroster vents.
VENT and HEATER are economical positions because
the air conditioner compressor doesn’t run in these two
settings. This reduces engine load, resulting in improved
fuel economy. If either setting fails to keep you
comfortable, or causes your windows to fog up, turn the
right control
knob to one of the air conditioning
positions, or to DEFROST.
If you have the optional engine coolant heater (engine
block heater) and use it during cold weather,
0°F
(- 18 O C) or lower, your heating system will more quickly
provide heat because the engine coolant ‘is already
warmed. See “Engine Coolant Heater” the Index.
BLEND: This setting divides airflow equally between
the heater ducts and the windshield defroster vents.
Defrosting
The DEFROST setting directs air through ‘the defroster
vents located on top of the instrument panel.
Defogging Windows with Air Conditioning
System
To defog the windshield, turn all three control knobs to
the far right.
To defog the side windows, turn the right control knob
to BI-LEVEL and the fan control
knob to HIGH. Aim
the side vents toward the side windows. For increased
air flow to the side vents, close the center vents.
22
ProCarManuals.com
Page 127 of 354

Rear Window Defogger (Option)
The rear window defogger
uses a warming grid to
remove fog from the rear
window.
Press the defogger
switch. The indicator light
will glow. If your vehicle is
traveling under
45 mph
(70 km/h), the rear window
defogger will
turn off
automatically after about
10 minutes of use.
If your vehicle is traveling over 45 mph (70 km/h), the
defogger will operate continuously. You can
h’rm the defogger
off by turning off the ignition or pressing the switch again.
Do not attach a temporary vehicle license across the
defogger grid on the rear window.
I NOTICE:
Don’t use a razor blade or something else sharp
on the inside
of the rear window. If you do, you
could cut or damage the warming grid, and the
repairs wouldn’t be covered by your warranty.
Flow-Through Ventilation System
Your Pontiac’s flow-through ventilation system supplies
outside air into the vehicle when it
is moving. Outside
air will also enter the vehicle when the heater or the air
conditioning fan
is running.
Ventilation Tips
0
0
0
Keep the hood and front air inlet free of ice, snow, or
any other obstruction (such as leaves). The heater
and defroster will work far better, reducing the
chance of fogging the inside of your windows.
When you enter a vehicle in cold weather, turn the
fan control
knob to the highest position for a few
moments before driving
off. This helps clear the
intake ducts of
snow and moisture, and reduces the
chance of fogging the inside of your windows.
Keep the air path under the front seats clear of
objects. This helps air to circulate throughout your
vehicle.
3-4
ProCarManuals.com
Page 264 of 354

I Fuse
PRNDL
F/P INJ
STOP
HAZ
CTSY
AIR BAG
- CIRCUIT PWR WDO
BREAKER
PWR ACC
BREAKER - CIRCUIT
Circuitry
Electronic PRNDL Display (Automatic Trans-
axle only)
Fuel Pump, Injectors
Stop/Hazard Lamps
Door Locks, Power Mirrors, Cigar Lighter
Sumlemental Inflatable Restraint
Fuse - ~~
INST LPS
GAUGES
HORN
ALARM
HTR-A/C
RDO
TURN
DR LK
TAIL LPS
WDO
WIPER
ERLS
DR UNLK
FTP
ACC
AIR BAG
PCM
CRUISE
HDLP
Circuitry
Interior Lamps Dimming
Gauges, Warning Lights, Rear Defog
Horns, Fog Lamps
Interior Lamps, Chime,
Auto Door Locks, Re-
mote Keyless Entry
Heater,
Air Conditioning, Anti-Lock Brakes,
Daytime Running Lamps (Canada)
Radio Power
Turn Signal Lamps
Auto Door Locks
Tail Lamps, Marker Lamps, License Lamp
Power Windows
Windshield Wipers/Washers
Engine Controls, Back-up Lamps
Auto Door Unlock (Remove to Disable)
Flash-to-pass
(U.S.)
Rear Window Defogger, Power Seats, Power
Sunroof (Circuit Breaker)
Supplemental Inflatable Restraint
Powertrain Control Module, Ignition System
Cruise Control
Headlamps (Circuit Breaker)
6-53
ProCarManuals.com
Page 266 of 354
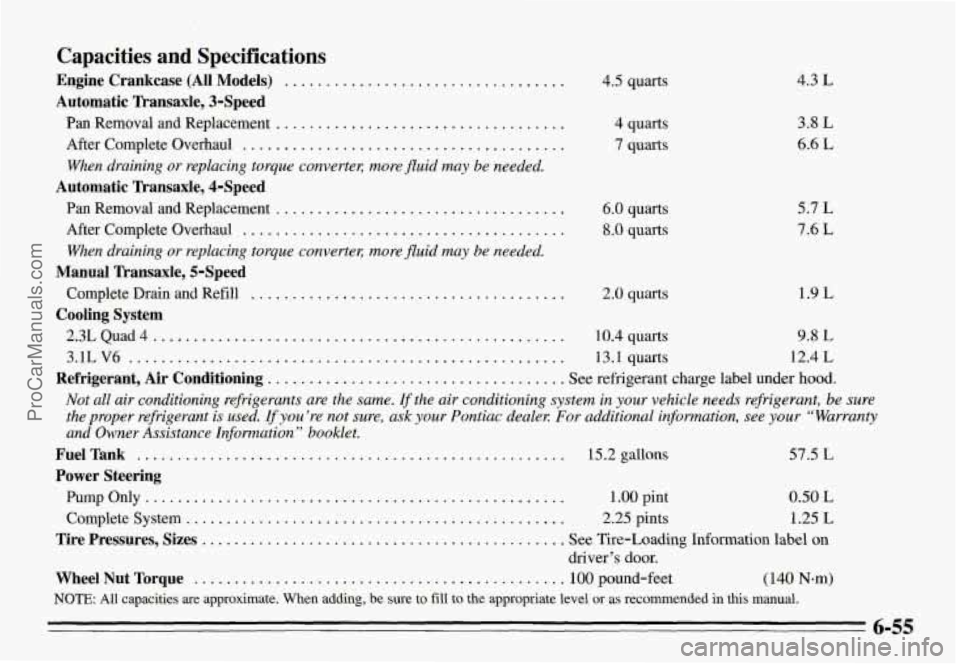
Capacities and Specifications
Engine Crankcase (All Models) ..................................
Automatic Transaxle, 3-Speed
Pan Removal and Replacement ...................................
When draining or replacing torque convertel; more fluid may be needed.
Pan Removal and Replacement ...................................
When draining or replacing torque convertel; more fluid may be needed.
After Complete Overhaul .......................................
Automatic Transaxle, 4-Speed
After Complete Overhaul .......................................
Manual Transaxle, 5-Speed
Cooling System
Complete Drain and Refill ......................................
2.3LQuad4 ..................................................
3.1LV6 .....................................................
4.5 quarts
4 quarts
7 quarts
6.0 quarts
8.0 quarts
2.0 quarts
4.3 L
3.8 L
6.6 L
5.7 L
7.6 L
1.9 L
10.4 quarts 9.8 L
13.1 quarts 12.4 L
Refrigerant, Air Conditioning .................................... See refrigerant charge label under hood.
Not all air conditioning refrigerants are the same. If the air conditioning system in your vehicle needs refrigerant, be sure
the proper refi-igerant is used.
If you’re not sure, ask your Pontiac dealel: For additional information, see your “Warranty
and Owner Assistance Information
” booklet.
FuelTank .................................................... 15.2gallons 57.5 L
Power Steering
Pumponly ................................................... 1.00 pint 0.50 L
Complete System .............................................. 2.25 pints 1.25 L
Tire Pressures, Sizes ............................................ See Tire-Loading Information label on
driver’s door.
WheelNutTorque ............................................. 100pound-feet (140 N-m)
NOTE: All capacities are approximate. When adding, be sure to fill to the appropriate level or as recommended in this manual.
6-55
ProCarManuals.com
Page 342 of 354

7 Section 9 Index
Adding
Automatic Transaxle Fluid .................... 6-20
Brake Fluid ................................. 6-28
Electrical Equipment ............ 2- 14. 15. 3- 18. 6-5 I
Engine Coolant ......................... 5- 16. 6-24
Hydraulic Clutch Fluid ........................ 6-22
Manual Transaxle Fluid
....................... 6-2 1
Power Steering Fluid ......................... 6-26
Sound Equipment ............................ 3- I8
Windshield Washer Fluid
................. 2-38. 6-27
How Does It Restrain ......................... 1-21
Location ................................... 1-20
Readiness Light
........................ I - 19. 2-59
Servlcmg
................................... 1-23
What Makes It Inflate ......................... 1-2 I
What Will You See After It Inflates .............. 1-22
When Should
It Inflate ........................ 1-21
Aircleaner .................................... 6-17
Alignment and Balance. Tires
..................... 6-40
Aluminum Wheels. Cleaning ...................... 6-48
Engine Oil ...................... ........ 6-12
Air Bag
How It Works ............................... 1-20
..
System ..................................... 1-19
Air Conditioning ................................ 3-2
Antenna. Fixed Mast ............................ 3-19
Antifreeze
..................................... 6-22
Adding
............................... 5.16. 6.24
Checking
................................... 6-24
Anti-Lock
..................................... 4-6
Anti-Lock Brake System Warning Light
......... 2.61. 4.6
Anti-Lock Brakes
............................... 4-6
Appearancecare ............................... 6-43
Appearance Care and Materials
.................... 6-50
Armrest. Storage ............................... 2-49
Ashtrays. Center Console
......................... 2-51
Audio Systems
.................................. 3-5
Auto Down Window ............ ........... 2-31
Automatic Door Locks ........... ............ 2-4
Automatic Overdrive Position
..................... 2-21
Automatic Transaxle
............................ 2-17
Automatic Overdrive Position .................. 2-21
First
(1) Position .......................... 2-20. 21
Drive
(D) Position ............................ 2-20
Neutral
(N) Position .......................... 2-19
Park (P) Position
............................. 2-18
Reverse
(R) Position .......................... 2-19
Second (2) Position
........................ 2-20. 21
Shifting
.................................... 2-17
Third
(3) Position ............................ 2-21
9-1
ProCarManuals.com