Page 50 of 390

Built-In Child Restraint (Option)
Each seat that has the built-in child restraint option fits in\
only one location in your vehicle.
To find out where a seat
that has a built-in child restraint must be located in your
vehicle,
see “Removable Rear Bucket Seats” in the Index.
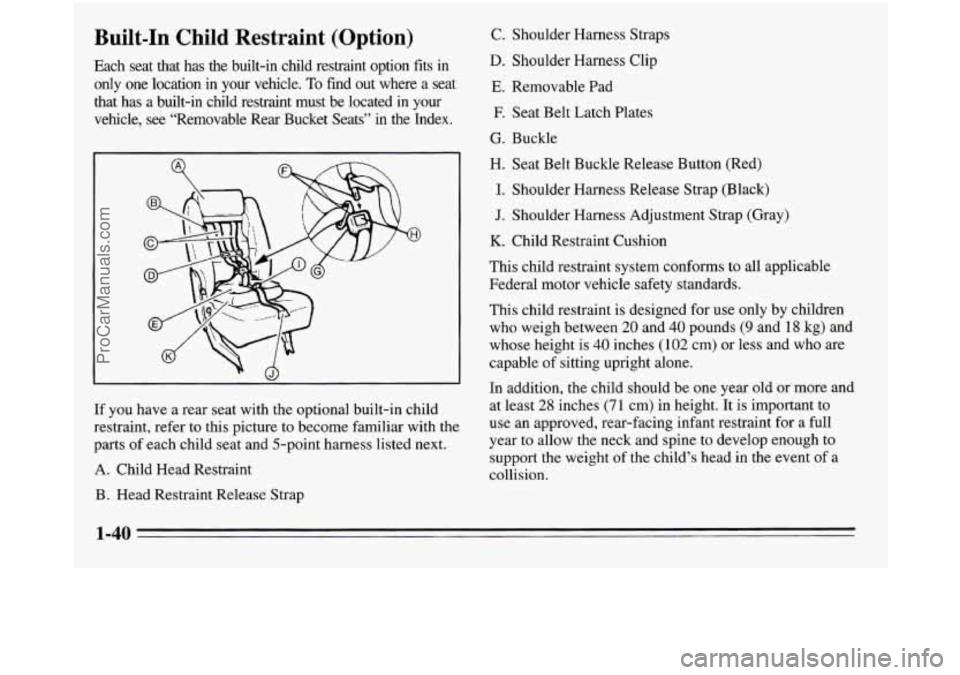
11 you have a rear seat with the optional built-in child
restraint, refer to this picture to become familiar with the
parts
of each child seat and 5-point harness listed next.
A. Child Head Restraint
B. Head Restraint Release Strap C.
Shoulder Harness Straps
D. Shoulder Harness Clip
E. Removable Pad
E Seat Belt Latch Plates
G. Buckle
H. Seat Belt Buckle Release Button (Red)
I. Shoulder Harness Release Strap (Black)
J. Shoulder Harness Adjustment Strap (Gray)
K. Child Restraint Cushion
This child restraint system conforms
to all applicable
Federal motor vehicle safety standards.
This child restraint
is designed for use only by children
who weigh between
20 and 40 pounds (9 and 18 kg) and
whose height is
40 inches (102 cm) or less and who are
capable of sitting upright alone.
In addition, the child should be one year old or more and
at least 28 inches (71 cm) in height. It is important to
use an approved, rear-facing infant restraint for a full
year to allow the neck and spine to develop enough to
support the weight of the child’s head in the event
of a
collision.
1-40
ProCarManuals.com
Page 56 of 390
To Store the Built-In Child Restraint
1. Make sure that the crotch strap is held flush to the
child restraint cushion with the fastener strip. Also
be sure the shoulder harness adjustment strap (gray)
is folded up in the seat. This will allow the cushion
to fold completely into the seatback. Raise the
cushion.
L
2. Unlatch the child head restraint by pulling the release
strap. Lower the head restraint and press it firmly into
the seatback until you hear the latch click.
1-46
ProCarManuals.com
Page 162 of 390

Rear Climate Control (Option)
If you have this option, you will have a master control
for the rear fan on the center instrument panel console,
and a rear control next to the rear seat, on the driver’s
side of the vehicle.
To maintain a comfortable temperature in the rear, use
either rear fan control to adjust the force
of air coming
through the rear outlets. See “Rear Fan
-- Master
Control” and “Rear Fan
-- Rear Control” later in
this section.
Select the desired climate control mode using the
directional controls on the instrument panel (see
“Directional Controls” earlier in the section). The mode
you choose will regulate both the front and rear climate
control systems. The temperature of heated or cooled air
directed to the rear
of the vehicle cannot be adjusted
with the temperature control
lever.
Select RECIRC, UPPER, BI-LEV or LOWER when
outside temperatures are warm or moderate. In
the RECIRC mode,
or if you press A/C when the
system is in the UPPER or BI-LEV modes, cooled air
will be directed to the rear
of the vehicle through the
overhead and third-row air conditioning outlets. If
you
select NC in the LOWER mode, cooled air will be
directed through the rear
floor vent (see “Rear Air
Vents“ later in this section) unless the temperature
control lever
is set approximately 30% from the full
cold setting. Heated air will result with the temperature
control
lever setting above 30% from the full cold
setting. Temperature adjustment of the heated air is
not possible. Cooled air will again return when the
temperature control lever setting is returned to
approximately
25% from the full cold setting.
If you do not select A/C in the UPPER or BI-LEV
modes, air directed to the rear of the vehicle will be
cabin temperature.
Select LOWER,
DEFOG or DEF when outside
temperatures are cool. In these modes, heated air will be
directed to the rear
of the vehicle through the rear side
window vents and the rear floor heater vent.
3-4
ProCarManuals.com
Page 378 of 390

Battery ...................................... 6-30
Battery Replacement. Remote Lock Control .......... 2-10
BBB Auto Line ................................. 8-3
Adjustment ................................. 6-29
Fluid, Adding ............................... 6-28
Master Cylinder ............................. 6-27
Pedal Travel ................................ 6-29
System Parts. Replacing ....................... 6-30
System Warning Light ........................ 2-77
BatteryWarnings ..............................5-2. 4
Blizzard ...................................... 4-27
Brake Trailer
..................................... 4-35
Transaxle Shift Interlock (BTSI) ........ 2-29.36. 7-37
Wear ...................................... 6-29
Brake. Parking ................................. 2-32
Brakes. Trailer .................................. 4-35
Brakes. Anti-Lock ............................... 4-6
Braking ........................................ 4-5
Braking In Emergencies .......................... 4-10
Break-In. New Vehicle .......................... 2-22
BTSI (Brake Transaxle Shift Interlock) ...... 2-29.36. 7-37
Bucketseats .................................... 1-5
Adjusting Rear Seats .......................... 1- 10
Capacities and Specifications ..................... 6-58
CarbonMonoxide ................... 2.20.4.27.34. 37
Cassette Tape Player ............................ 3-11
Cassette Tape Player Care ........................ 3-22
CD Player Anti-Theft Feature ..................... 3-17
Center Dome Lamp ............................. 2-55
Center Passenger Position ........................ 1-36
Certificatioflire Label .......................... 4-29
Chains, Safety ................................. 4-35
Changing a Flat Tire ............................. 5-24
CDPlayer ..................................... 3-16
Chains, Tire ................................... 6-41
9-2
ProCarManuals.com