1995 HONDA ODYSSEY seat adjustment
[x] Cancel search: seat adjustmentPage 33 of 240
Instruments and Controls
This section gives information about the controls and displays thatcontribute to the daily operation of
your Honda. All the essential controls are within easy reach.
Control Locations............................ 34
Indicator Lights................................ 35
Gauges............................................. 39
Speedometer............................... 39
Trip Meter................................... 39
Odometer..................................... 39
Temperature Gauge................... 40
Fuel Gauge.................................. 40
Maintenance Required
Indicator................................... 40
Controls Near the Steering Wheel...................................... 41
Headlights...................................
42
Daytime Running
Lights............ 42
Instrument Panel Brightness.... 43
Turn Signals................................. 43
Windshield Wipers...................... 44
Windshield Washers................... 44 Rear Window Wiper and Washer...................................... 45
Hazard Warning.......................... 45
Rear Window Defogger.............. 45
Steering Wheel Adjustment....... 46
Steering Wheel Controls ................ 48 Cruise Control.............................. 48
Horn............................................. 51
Keys and Locks................................ 51
Keys............................................... 51
Ignition Switch............................. 52
Power Door Locks....................... 53Remote Transmitter.................... 54
Childproof Door Locks............... 54
Tailgate......................................... 55 Glove Box..................................... 55
Seats................................................. 56
Passenger Seating...................... 56
Seat Adjustments........................ 56
Driver's Seat Power HeightAdjustment.............................. 57
Head Restraints.......................... 58
Third Seat Access....................... 58 Removing the Second Seats
in the Six-Passenger Model.... 59
Folding the Second Seats in the Seven-Passenger
Model................................... 60
Reclining the Second Seat.......... 61
Folding the Third Seat in All Models...........................
62
Power Windows.............................. .
64
Sunroof............................................. 65
Mirrors............................................. 66
Adjusting the Power Mirrors.....
67
Parking Brake.................................
68
Digital Clock..................................... 68
Beverage Holder.............................. 69 Dashboard Compartment............... 70
Center Poket.................................... 71
Coin Box........................................... 71
Vanity Mirror................................... 71
Cigarette Lighter............................. 72
Ashtrays........................................... 72
Interior Lights.................................. 73
Ceiling Lights.............................. 73
Spotlights..................................... 73
Tailgate Light............................... 74 Courtesy Lights........................... 74
Instruments and ControlsProCarManuals.comMain Menu s t
Page 46 of 240
Controls Near the Steering Wheel
Make sure the rear window is clear
and you have good visibility before
starting to drive.
The defogger wires on the inside of the rear window can be accidentallydamaged. When cleaning the glass,
always wipe side to side. Steering Wheel Adjustment
You can adjust the steering wheel height to suit your preference. Do
this before you begin driving.
1. Adjust the seat so you are acomfortable distance from the
pedals.
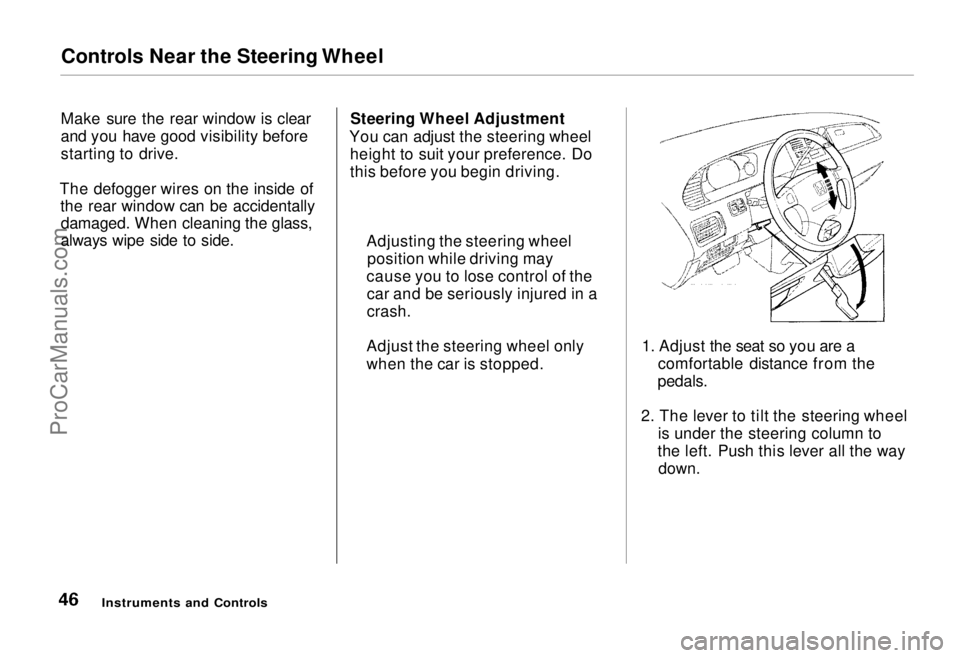
2. The lever to tilt the steering wheel is under the steering column to
the left. Push this lever all the way
down.
Instruments and Controls
Adjusting the steering wheel
position while driving may
cause you to lose control of the car and be seriously injured in a
crash.
Adjust the steering wheel only
when the car is stopped.ProCarManuals.comMain Menu Table of Contents s t
Page 56 of 240
Seats
Passenger Seating
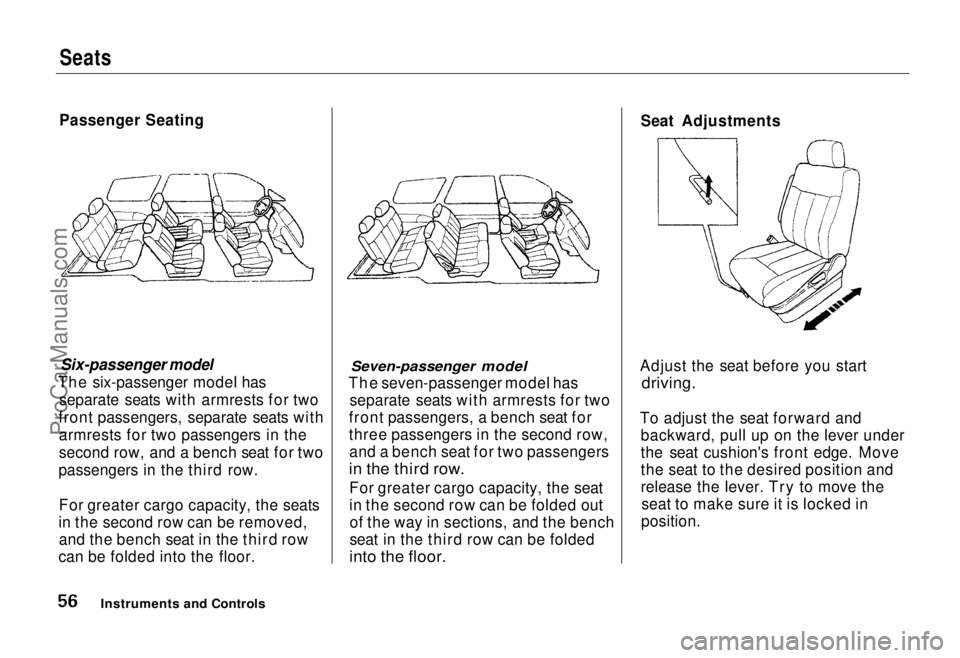
Six-passenger model
The six-passenger
model has
separate seats with armrests for two
front passengers, separate seats with armrests for two passengers in the
second row, and a bench seat for two
passengers in the third row.
For greater cargo capacity, the seats
in the second row can be removed, and the bench seat in the third row
can be folded into the floor.
Seven-passenger model
The seven-passenger
model has
separate seats with armrests for two
front passengers, a bench seat for
three passengers in the second row, and a bench seat for two passengers
in the third row.
For greater cargo capacity, the seat
in the second row can be folded outof the way in sections, and the bench
seat in the third row can be folded
into the floor.
Seat Adjustments
Adjust the seat before you start
driving.
To adjust the seat forward and backward, pull up on the lever under
the seat cushion's front edge. Move
the seat to the desired position and
release the lever. Try to move theseat to make sure it is locked in
position.
Instruments and ControlsProCarManuals.comMain Menu Table of Contents s t
Page 57 of 240
Seats
Adjust the seat-back before you start driving. The seat-backs should be in
an upright position for you and your
passengers to get the most protec-
tion from the seat belts.
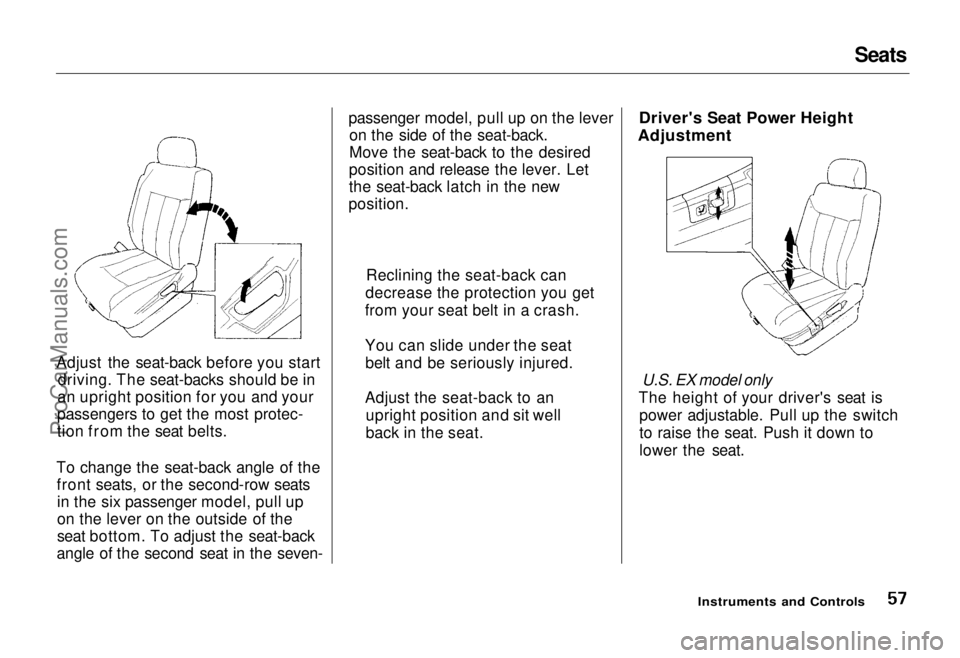
To change the seat-back angle of the front seats, or the second-row seatsin the six passenger model, pull up
on the lever on the outside of the
seat bottom. To adjust the seat-back
angle of the second seat in the seven- passenger model, pull up on the lever
on the side of the seat-back.
Move the seat-back to the desired
position and release the lever. Let
the seat-back latch in the new
position.
Driver's Seat Power Height
Adjustment
U.S. EX model only
The height of your driver's seat is power adjustable. Pull up the switch
to raise the seat. Push it down to
lower the seat.
Instruments and Controls
Reclining the seat-back can
decrease the protection you get
from your seat belt in a crash.
You can slide under the seat belt and be seriously injured.
Adjust the seat-back to an upright position and sit well
back in the seat.ProCarManuals.comMain Menu Table of Contents s t
Page 59 of 240
Seats
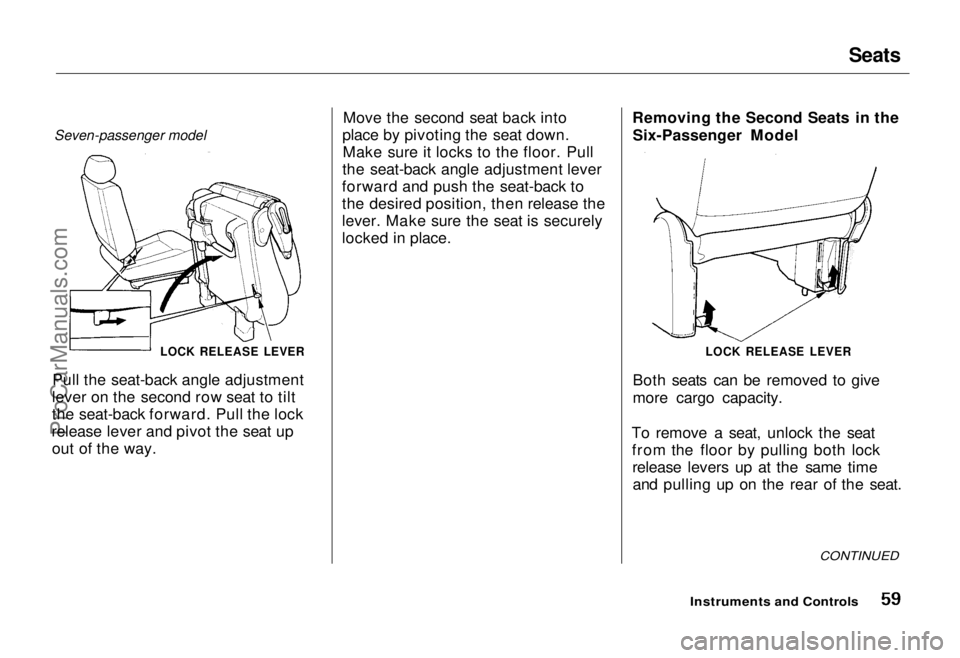
Seven-passenger model
LOCK RELEASE LEVER
Pull the seat-back angle adjustment
lever on the second row seat to tilt
the seat-back forward. Pull the lock
release lever and pivot the seat up out of the way. Move the second seat back into
place by pivoting the seat down. Make sure it locks to the floor. Pull
the seat-back angle adjustment lever
forward and push the seat-back to
the desired position, then release the
lever. Make sure the seat is securely
locked in place. Removing the Second Seats in the
Six-Passenger Model
Both seats can be removed to give
more cargo capacity.
To remove a seat, unlock the seat from the floor by pulling both lockrelease levers up at the same timeand pulling up on the rear of the seat.
CONTINUED
Instruments and Controls
LOCK RELEASE LEVERProCarManuals.comMain Menu Table of Contents s t
Page 61 of 240
Seats
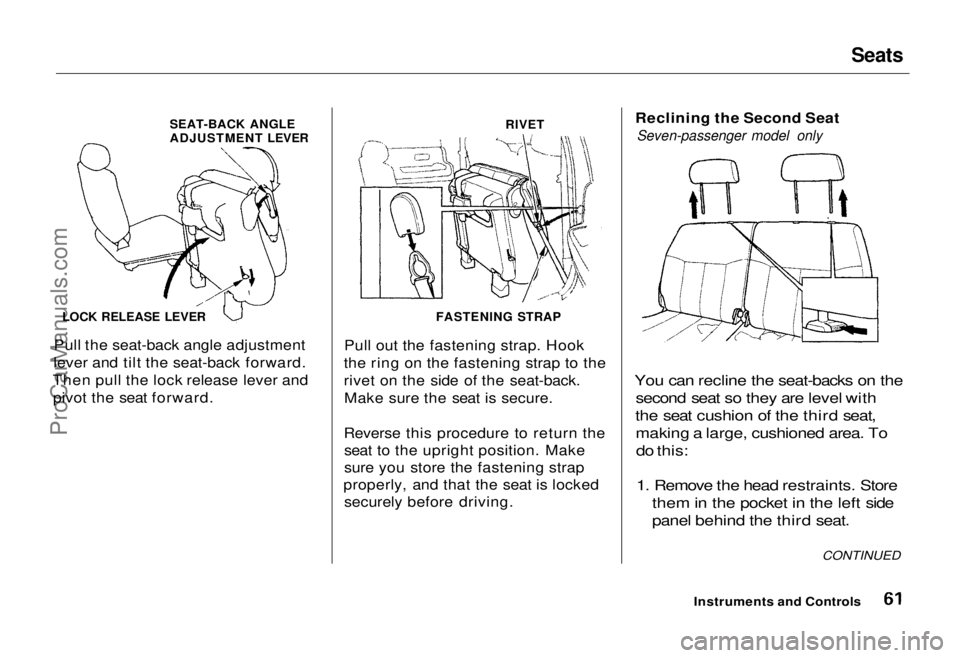
SEAT-BACK ANGLE
ADJUSTMENT LEVER
RIVET
LOCK RELEASE LEVER
Pull the seat-back angle adjustment
lever and tilt the seat-back forward.
Then pull the lock release lever and pivot the seat forward. Pull out the fastening strap. Hook
the ring on the fastening strap to the
rivet on the side of the seat-back. Make sure the seat is secure.
Reverse this procedure to return the seat to the upright position. Make
sure you store the fastening strap
properly, and that the seat is locked securely before driving. Reclining the Second Seat
Seven-passenger model only
You can recline the seat-backs on the second seat so they are level with
the seat cushion of the third seat, making a large, cushioned area. Todo this:
1. Remove the head restraints. Store them in the pocket in the left side
panel behind the third seat.
Instruments and Controls CONTINUED
FASTENING STRAPProCarManuals.comMain Menu Table of Contents s t
Page 62 of 240
Seats
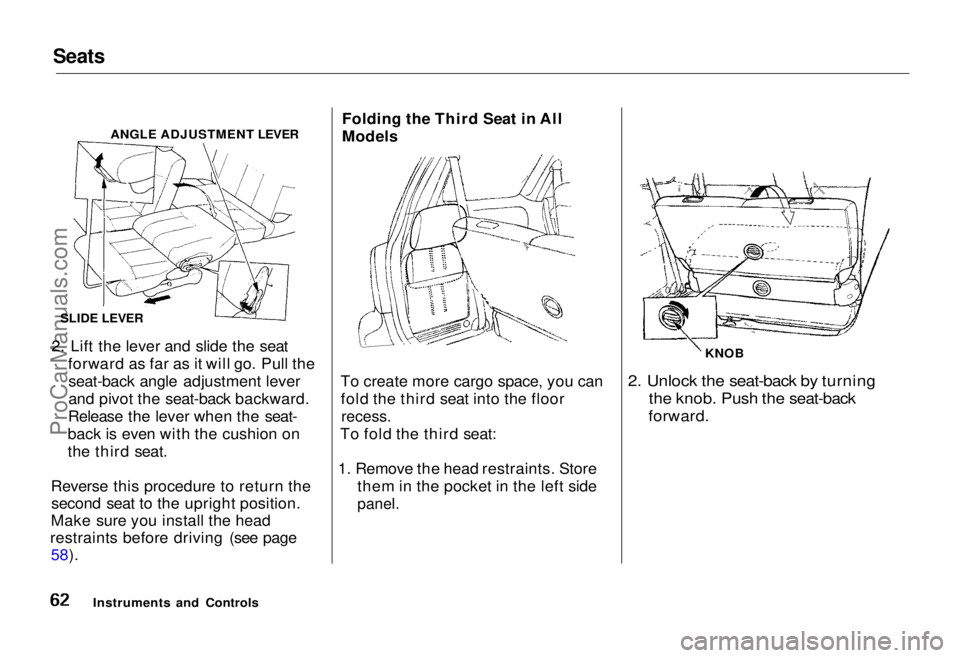
ANGLE ADJUSTMENT LEVER
SLIDE LEVER
2. Lift the lever and slide the seat forward as far as it will go. Pull theseat-back angle adjustment lever
and pivot the seat-back backward.
Release the lever when the seat-
back is even with the cushion on
the third seat.
Reverse this procedure to return the second seat to the upright position.
Make sure you install the head
restraints before driving (see page 58). Folding the Third Seat in All
Models
To create more cargo space, you can fold the third seat into the floor
recess.
To fold the third seat:
1. Remove the head restraints. Store them in the pocket in the left side
panel.
KNOB
2. Unlock the seat-back by turning
the knob. Push the seat-back
forward.
Instruments and ControlsProCarManuals.comMain Menu Table of Contents s t
Page 118 of 240
Preparing to Drive
You should do the following checks and adjustments every day before
you drive your car.
1. Make sure all windows, mirrors, and outside lights are clean and
unobstructed. Remove frost, snow,
or ice.
2. Check that the hood and tailgate are fully closed.
3. Visually check the tires. If a tire looks low, use a gauge to check its
pressure.
4. Check that any items you may be carrying with you inside are stored
properly or fastened down
securely. 5. Check the adjustment of the seat
(see page 56).
6. Check the adjustment of the inside and outside mirrors (see
page 66).
7. Check the adjustment of the steering wheel (see page 46).
8. Make sure the doors are securely closed and locked.
9. Fasten your seat belt. Check that your passengers have fastened
their seat belts (see page 7). 10. Turn the ignition ON (II). Check
the indicator lights in the instru-
ment panel.
11. Start the engine (see page 119).
12. Check the gauges and indicator lights in the instrument panel (see
page 35).
DrivingProCarManuals.comMain Menu Table of Contents s t