Page 321 of 486

Downloaded from www.Manualslib.com manuals search engine Replacing Brake System Parts
The braking system on a modern vehicle is complex. Its many parts have to
be of top quality and work well together
if the vehicle is to have really good
braking. Vehicles we design and test have top-quality
GM brake parts in
them, as your vehicle does when it is new. When you replace parts of your
braking system
- for example, when your brake linings wear down and
you have to have new ones put in - be sure you get new genuine GM
replacement parts. If you don’t, your brakes may no longer work properly.
For example, if someone puts in brake linings that are wrong for your
vehicle, the balance between your front and rear brakes can change
- for
the worse. The braking performance you’ve come to expect can change
in
many other ways if someone puts in the wrong replacement brake parts.
Front Shock Absorbers
The front shock absorbers of your vehicle do many things. They help the
vehicle ride smoothly and also control the travel of the suspension system.
When the shock absorbers are serviced, any replacement shock absorbers
must be the same
as the original equipment shock absorbers in both
extended length and strength.
I NOTICE:
If you use shock absorbers that are not the same as the original
shock absorbers, the shock absorbers or suspension system
could be damaged.
Windshield Wiper Blade Inserts
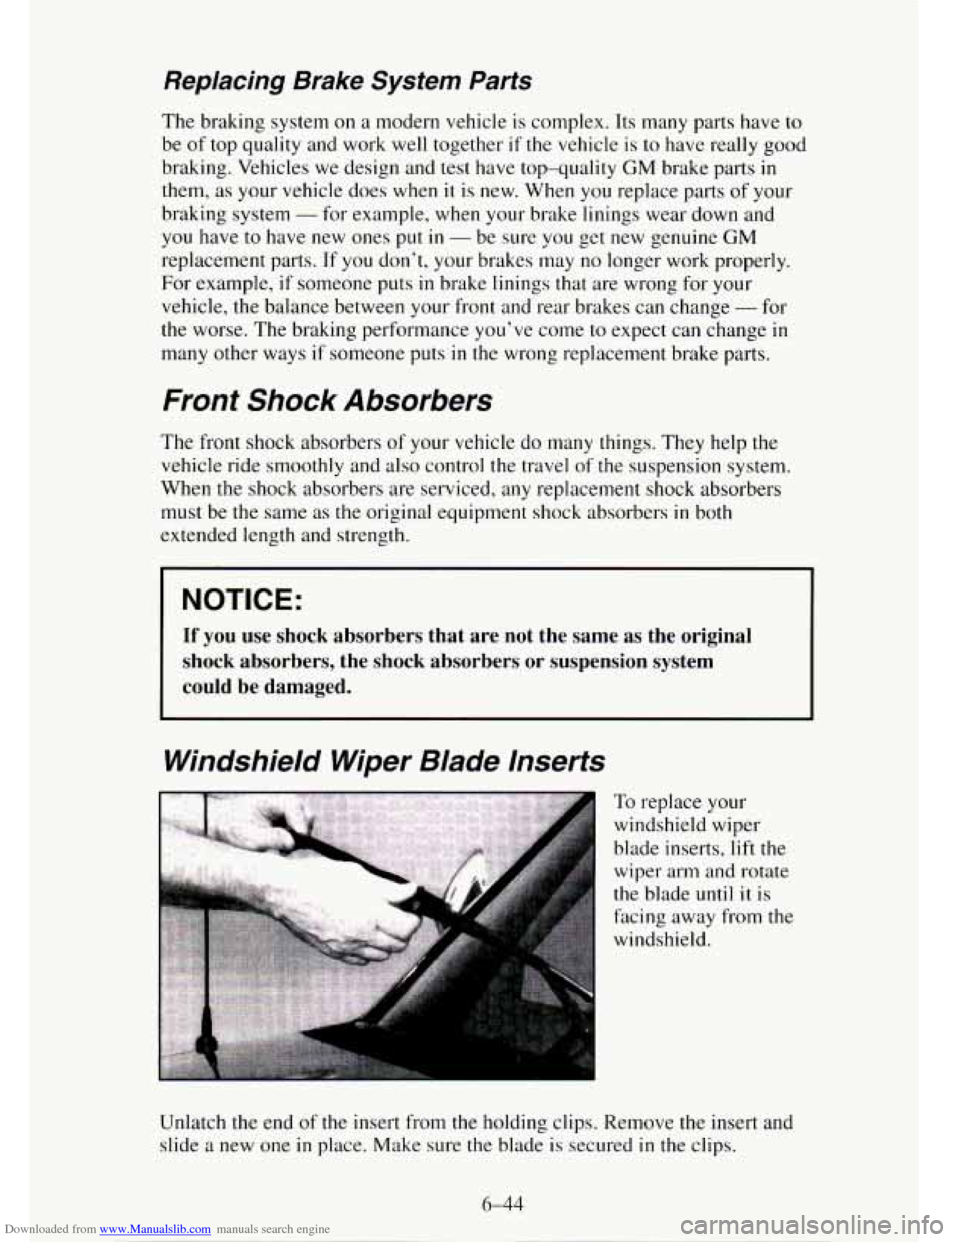
To replace your
windshield wiper
blade inserts, lift the
wiper arm and rotate
the blade until
it is
facing away from
the
windshield.
Unlatch the end of the insert from the holding clips. Remove the insert
and
slide a new one in place. Make sure the blade is secured in the clips.
6-44
Page 322 of 486

Downloaded from www.Manualslib.com manuals search engine Air Conditioning
Every now and then have your dealership check your air conditioning
system to be sure
it has not lost any cooling ability. If you think the system
is not working properly, have your dealership check it out as soon as
possible.
The air conditioning will not work when the temperature is below
40°F
(4°C).
Fluid Leak Check
After the vehicle has been parked for a while, inspect the surface under the
vehicle for water, oil, fuel or other fluids. Water dripping from the air
conditioning system after
it has been used is normal. If you notice fuel leaks
or fumes, the causes should be found and corrected at once.
Lock Cylinders
To be sure your locks operate properly, they must be lubricated. Your
vehicle’s maintenance schedule will tell
you how often to lubricate them.
See “Recommended Fluids and Lubricants”
in the Index for the proper
lubricant to use.
You should not use penetrating oils because they could wash out the factory
installed lubricant and cause the lock
to bind. De-icers which contain
alcohol could also wash away
the lubricant, so be sure to lubricate the lock
after using
a de-icer of this type.
Battery
Every new GM vehicle has a Delco Freedom’ battery. You never have to
add water
to one of these. When it’s time for a new battery, we recommend
a Delco Freedom@ battery. Get one that has the replacement number shown
on the original battery’s label.
Vehicle Storage
If you’re not going to drive your vehicle for 25 days or more, take off the
black, negative
(-) cable from the battery. This will help keep your battery
from running down.
6-45
Page 323 of 486
Downloaded from www.Manualslib.com manuals search engine Contact your dealer to learn how to prepare your vehicle for longer storage
periods.
Bulb Replacement
Before you replace any bulbs, be sure that all the lamps are off and the
engine isn’t running.
Sealed Beam Headlamps
1. Remove the four
screws
from the
headlamp
retainer.
2. Pull the headlamp
out and remove
the retainer.
3. Unplug and remove the headlamp.
4. Plug in the new headlamp and put it in place.
5. Install the retainer to the headlamp and tighten the screws.
6-46
Page 324 of 486
Downloaded from www.Manualslib.com manuals search engine Halogen Bulbs
I A CAUTION:
Halogen bulbs have pressurized gas inside and can burst if you
drop
or scratch the bulb. You or others could be injured. Take
special care when handling
and disposing of halogen bulbs.
NOTICE:
Avoid touching the bulb or letting it come in contact with
anything damp.
Oil from your skin or moisture on the bulb can
cause the bulb to explode when it
is turned on. If either comes in
contact with the bulb, clean it with alcohol or a suitable
degreaser and wipe
the bulb dry.
Composite Headlamps
I. Remove the two
screws at the top
of the radiator
support.
2. Pull the headlamp
lens assembly
out.
Page 325 of 486
Downloaded from www.Manualslib.com manuals search engine 3. Unplug the
electrical
connector.
4. Turn the bulb to
the left and
remove
it.
5. Put the new bulb in the lens assembly and turn it to the right until it is
tight.
6. Plug in the electrical connector.
7. Put the headlamp lens assembly back into the vehicle. Install and
tighten the two screws.
Front ParkingYTurn Signal Lamps with Sealed Beam
Headlamps
2.
1. Remove the two
screws at the
inside edge of the
parkingkurn signal lamp
assembly.
Remove the lamp assembly by swinging
it out from the inside edge and
sliding
it out at the outside edge.
6-48
Page 326 of 486
Downloaded from www.Manualslib.com manuals search engine Au
3. Squeeze the tab
on the side of the
lamp socket
while turning the
socket
to the left.
4. Pull the socket
out of the lamp
assembly.
5. Push in gently on the bulb, turn it to the left and remove it from the
socket.
6. Put the new bulb in the socket, gently press in on the bulb and turn it to
the right
until it is tight.
7. Put the socket back into the lamp assembly and turn it to the right until
it locks.
8. Put the parkinghurn signal lamp assembly back into the vehicle and
tighten the screws.
Front Parkingflurn Signal Lamps with Composite
Headlamps
_rY
I. Remove the screws and take
out the
parkinghrn
signal lamp
assembly.
2. Squeeze the tab
on the side of the
lamp socket
while turning
the
socket to the left.
6-49
Page 327 of 486
Downloaded from www.Manualslib.com manuals search engine 3. Pull the socket
out of the lamp
assembly.
4. Push in gently on
the bulb, turn
it to
the left and
remove it from
the socket.
5. Put the new bulb in the socket, gently press in on the bulb and turn it to
6. Put the socket back into the lamp assembly and turn it socket to the
the
right
until it is tight.
right until
it locks.
7. Put the parkinghrn signal lamp assembly back into the vehicle and
tighten the screws.
Side Marker Lamps with Sealed Beam and
Composite
Headlamps
1. Remove the screws and pull
out the
parkinghurn signal lamp
assembly.
2. Reach through
the opening and
turn the side
marker bulb
socket
to the left
and remove
it.
6-SO
Page 328 of 486
Downloaded from www.Manualslib.com manuals search engine 3.
4.
Pull the bulb straight out
of the
socket.
Put a new bulb
into the socket
and push it in
until it is tight.
5. Put the socket back into the side marker assembly and turn it to the
right to tighten it.
6. Replace the parkinghrn signal lamp assembly and tighten the screws.
Roof Marker Lamps
1. Remove the screws and lift off the lens.
2. Pull the bulb straight out of the socket.
3. Put a new bulb into the socket and push it in until it is tight.
4. Replace the lens and tighten the screws.
6-51