1995 CHEVROLET TAHOE Lubricant
[x] Cancel search: LubricantPage 316 of 486
Downloaded from www.Manualslib.com manuals search engine Power Steering Fluid
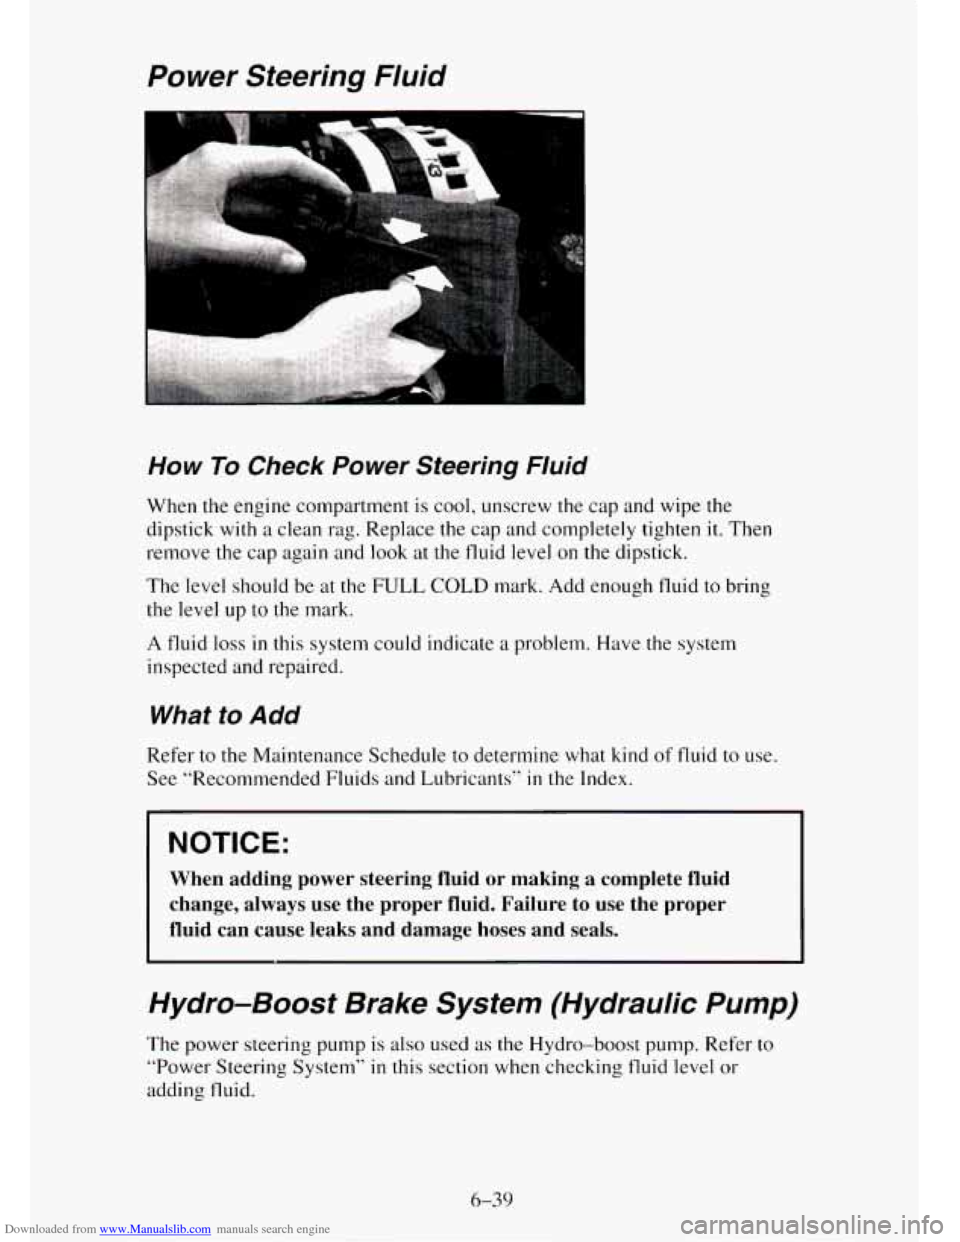
How To Check Power Steering Fluid
When the engine compartment is cool, unscrew the cap and wipe the
dipstick
with a clean rag. Replace the cap and completely tighten it. Then
remove the cap again
and look at the fluid level on the dipstick.
The level should be at the FULL COLD mark. Add enough fluid to bring
the level up
to the mark.
A fluid
loss in this system could indicate a problem. Have the system
inspected and repaired.
What to Add
Refer to the Maintenance Schedule to determine what kind of fluid to use.
See “Recommended Fluids and Lubricants”
in the Index.
I
I NOTICE:
When adding power steering fluid or making a complete fluid
change, always use the proper fluid. Failure to use the proper\
fluid can cause leaks and damage hoses and seals.
Hydro-Boost Brake System (Hydraulic Pump)
The power steering pump is also used as the Hydro-boost pump. Refer to
“Power Steering System” in this section when checking fluid level or
adding fluid.
6-39
Page 322 of 486
Downloaded from www.Manualslib.com manuals search engine Air Conditioning
Every now and then have your dealership check your air conditioning
system to be sure
it has not lost any cooling ability. If you think the system
is not working properly, have your dealership check it out as soon as
possible.
The air conditioning will not work when the temperature is below
40°F
(4°C).
Fluid Leak Check
After the vehicle has been parked for a while, inspect the surface under the
vehicle for water, oil, fuel or other fluids. Water dripping from the air
conditioning system after
it has been used is normal. If you notice fuel leaks
or fumes, the causes should be found and corrected at once.
Lock Cylinders
To be sure your locks operate properly, they must be lubricated. Your
vehicle’s maintenance schedule will tell
you how often to lubricate them.
See “Recommended Fluids and Lubricants”
in the Index for the proper
lubricant to use.
You should not use penetrating oils because they could wash out the factory
installed lubricant and cause the lock
to bind. De-icers which contain
alcohol could also wash away
the lubricant, so be sure to lubricate the lock
after using
a de-icer of this type.
Battery
Every new GM vehicle has a Delco Freedom’ battery. You never have to
add water
to one of these. When it’s time for a new battery, we recommend
a Delco Freedom@ battery. Get one that has the replacement number shown
on the original battery’s label.
Vehicle Storage
If you’re not going to drive your vehicle for 25 days or more, take off the
black, negative
(-) cable from the battery. This will help keep your battery
from running down.
6-45
Page 344 of 486

Downloaded from www.Manualslib.com manuals search engine Glass
Glass should be cleaned often. GM Glass Cleaner (GM Part No. 1050427)
or a liquid household glass cleaner will remove normal tobacco smoke and
dust films.
Don’t use abrasive cleaners
on glass, because they may cause scratches.
Avoid placing decals on the inside rear window, since
they may have to be
scraped off later. If abrasive cleaners are used on
the inside of the rear
window, an electric defogger element may be damaged. Any temporary
license should not be attached across the defogger grid.
Cleaning the Outside of the Windshield,
Backglass and Wiper Blades
If the windshield is not clear after using the windshield washer, or if the
wiper blade chatters when running, wax or other material may be on the
blade
or windshield.
Clean the outside
of the windshield with GM Windshield Cleaner, Bon-Ami
Powder@
(GM Part No. 10500 I 1 ). The windshield is clean if beads do not
form when you rinse it with water.
Clean the blade by wiping vigorously with a cloth soaked
in full strength
windshield washer solvent. Then rinse the blade with water.
Wiper blades should be checked on a regular basis and replaced when worn.
Weatherstrips
Silicone grease on weatherstrips will make them last longer, seal better, and
not stick or squeak. Apply silicone grease with a clean cloth
at least every
six months. During very cold, damp weather more frequent application may
be required. (See “Recommended Fluids and Lubricants”
in the Index.)
Cleaning the Outside of Your Vehicle
The paint finish on your vehicle provides beauty, depth of color, gloss
retention and durability.
6-67
Page 365 of 486
Downloaded from www.Manualslib.com manuals search engine How This Section is Organized
The remainder of this section is divided into five parts:
“Part A: Scheduled Maintenance Services” shows what to have done and
how often. Some of these services can be complex,
so unless you are
technically qualified and have
the necessary equipment, you should let your
dealer’s service department or another qualified service center do these jobs.
If you are skilled enough to do some work on your vehicle, you will
probably want
to get the service information GM publishes. See “Service
Publications”
in the Index.
“Part B: Owner Checks and Services” tells you what should be checked
whenever you stop for fuel. It also explains what you can easily do
to help
keep your vehicle
in good condition.
“Part C: Periodic Maintenance Inspections” explains important
inspections that your
GM dealer’s service department or another qualified
service center should perform.
“Part D: Recommended Fluids and Lubricants” lists some products GM
recommends to help keep your vehicle properly maintained. These products,
or their equivalents, should be used whether
you do the work yourself or
have it done.
“Part E: Maintenance Record” provides a place for you to record the
maintenance performed
on your vehicle. Whenever any maintenance is
performed, be sure to write
it down in this part. This will help you
determine when your next maintenance should be done. In addition,
it is a
good idea to keep your maintenance receipts. They may be needed to
qualify your vehicle
for warranty repairs.
7-2
Page 366 of 486
Downloaded from www.Manualslib.com manuals search engine Part A: Scheduled Maintenance Services
Using Your Maintenance Schedule
We at General Motors want to help you keep your vehicle in good working
condition. But we don’t know exactly how
you’ll drive it. You may drive
very short distances
only a few times a week. Or you may drive long
distances all the time
in very hot, dusty weather. You may use your vehicle
in making deliveries. Or you may drive it to work, to do errands or in many
other ways.
Because of all the different ways people use their GM vehicles, maintenance
needs vary. You may
even need more frequent checks and replacements than
you’ll find
in the schedules in this section. So please read this section and
note how
you drive. If you have any questions on how to keep your vehicle
in good condition, see your GM dealer.
This part tells you the maintenance services
you should have done and when
you should schedule them. If you go to your dealer for your service needs,
you’ll know that GM-trained and supported service people will perform the
work using genuine GM parts.
The proper fluids and lubricants to use are listed in Part D. Make sure
whoever services your vehicle uses these. All parts should be replaced and
all necessary repairs done before you or anyone else drives the vehicle.
These schedules are
for vehicles that:
carry passengers and cargo within recommended limits. You will find
these limits on your vehicle’s CertificatiodTire label. See “Loading
Your Vehicle”
in the Index.
are driven on reasonable road surfaces within legal driving limits.
are driven off-road in the recommended manner. See “Off Road
Driving With Your Four-wheel Drive Vehicle”
in the Index.
use the recommended unleaded fuel. See “Fuel” in the Index.
Selecting the Right Schedule
The proper maintenance schedule for your vehicle depends on which engine
you have in your vehicle and how you use your vehicle.
Gasoline engine vehicles and diesel engine vehicles have different
maintenance requirements. If you have a diesel engine, follow
a schedule
designated for diesel engine vehicles
only. If you have a gasoline engine,
you must first determine whether your engine has a light duty or a heavy
duty emissions classification. Follow a maintenance schedule designated for
gasoline engines with the emissions classification (light duty or heavy duty)
for your engine. See “Engine Identification”
in the Index to find your
engine’s emission classification.
7-3
Page 455 of 486
Downloaded from www.Manualslib.com manuals search engine Part B: Owner Checks and Services
Listed below are owner checks and services which should be performed at
the intervals specified to help ensure the safety, dependability and emission
control performance
of your vehicle.
Be sure any necessary repairs are completed at once. Whenever any fluids
or lubricants are added
to your vehicle, make sure they are the proper ones,
as shown in Part
D.
At Each Fuel Fill
It is important for you or u service station attendant to perjorm these
underhood checks at each fuel
fill.
Engine Oil Level
Check the engine oil level and add the proper oil if necessary. See “Engine
Oil” in the Index for further details.
Engine Coolant Level
Check the engine coolant level and add the proper coolant mix if necessary.
See “Coolant”
in the Index for further details.
Windshield Washer Fluid Level
Check the windshield washer fluid level in the windshield washer tank and
add the proper fluid
if necessary. See “Windshield Washer Fluid” in the
Index for further details.
At Least Once a Month
lire Inflation
Check tire inflation. Make sure tires are inflated to the pressures specified
on the Certificationire label which is located on the rear edge
of the
driver’s door or
on the incomplete vehicle document in the cab. See “Tires”
in the Index for further details.
Cassette Deck
Clean cassette deck. Cleaning should be done every 50 hours of tape play.
See “Audio Systems” in the Index for further details.
Page 456 of 486
Downloaded from www.Manualslib.com manuals search engine At Least Once a Year
Key Lock Cylinders
Lubricate the key lock cylinders with the lubricant specified in Part D.
Body Lubrication
Lubricate all fuel door, body hood and body door hinges, rear compartment
hinges, tailgate and tailgate handle pivot points, tailgate mounted spare tire
carrier pivot points, latches, locks, and folding seat hardware. Part
D tells
you what to use. More frequent lubrication may be required when exposed
to a corrosive environment.
Starter Switch
1. Before you start, be sure you have enough room around the vehicle. It
should be parked on a level surface.
2. Firmly apply both the parking brake (see “Parking Brake” in the Index
if necessary) and the regular brake.
NOTE:
Do not use the accelerator pedal, and be ready to turn off the
engine immediately
if it starts.
3. On automatic transmission vehicles, try to start the engine in each gear.
The starter should work only
in PARK (P) or NEUTRAL (N). If the
starter works
in any other position, your vehicle needs service.
On manual transmission vehicles, put the shift lever
in NEUTRAL (N),
push the clutch down halfway and try to start the engine. The starter
should work
only when the clutch is pushed down all the way to the
floor. If the starter works when the clutch isn’t pushed all the way
down, your vehicle needs service.
7-93
Page 459 of 486
Downloaded from www.Manualslib.com manuals search engine Part C: Periodic Maintenance Inspections
Listed below are inspections and services which should be performed at
least twice a year (for instance, each spring and fall).
You should let your
GM dealer’s service department or other qualified service center do these
jobs.
Make sure any necessary repairs are completed at once.
Steering and Suspension lnspection
Inspect the front and rear suspension and steering system for damaged,
loose or missing parts, signs
of wear, or lack of lubrication. Inspect power
steering lines and hoses for proper hookup, binding, leaks, cracks, chafing,
etc. (On vehicles equipped with manual steering gear, check
for seal
leakage.)
Exhaust System lnspection
Inspect the complete exhaust system. Inspect the body near the exhaust
system.
Look for broken, damaged, missing or out-of-position parts as well
as open seams, holes, loose connections, or other conditions which could
cause
a heat build-up in the floor pan or could let exhaust fumes into the
vehicle.
See “Engine Exhaust’’ in the Index.
Accelerator Control System
On gasoline engines, lubricate the pivot at the TBI throttle lever stud with
engine oil.
Do not oil any accelerator or cruise control cables. Replace any
cables that have high effort or excessive wear.
Drive Axle Service
Check readfront axle fluid level and add as needed. Check constant velocity
joints and axle seals for leaking.
Transfer Case (Four- Wheel Drive) Inspection
Every 12 months or at oil change intervals, check front axle and transfer
case and add lubricant when necessary. Oil the control lever pivot point and
all exposed control linkage. Check vent hose
at transfer case for kinks and
proper installation. More frequent lubrication
may be required on off-road
use.