1995 CHEVROLET S10 tailgate
[x] Cancel search: tailgatePage 50 of 354
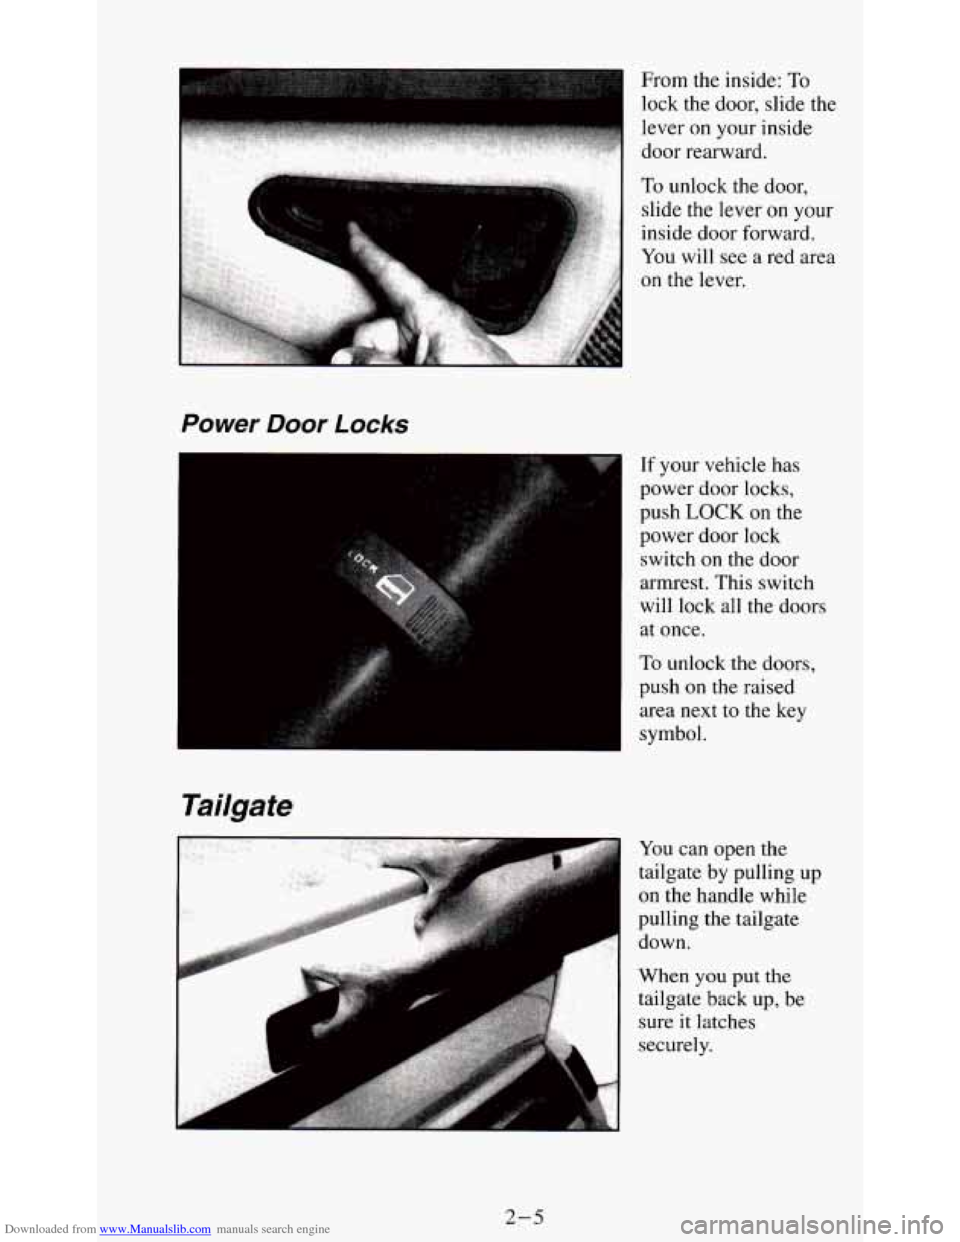
Downloaded from www.Manualslib.com manuals search engine From the inside: To
lock the door, slide the
lever
on your inside
door rearward.
Power Door Locks
I
Tailgate
If your vehicle has
power
door locks,
push LOCK on the
power door lock
switch on the door
armrest. This switch
will lock all the doors
at once.
To unlock the doors,
push
on the raised
area next to the key
symbol.
You can open the
tailgate by pulling
up
on the handle while
pulling the tailgate
down.
When
you put the
tailgate back up, be
sure it latches
securely.
2-5
Page 51 of 354
Downloaded from www.Manualslib.com manuals search engine Tailgate Removal
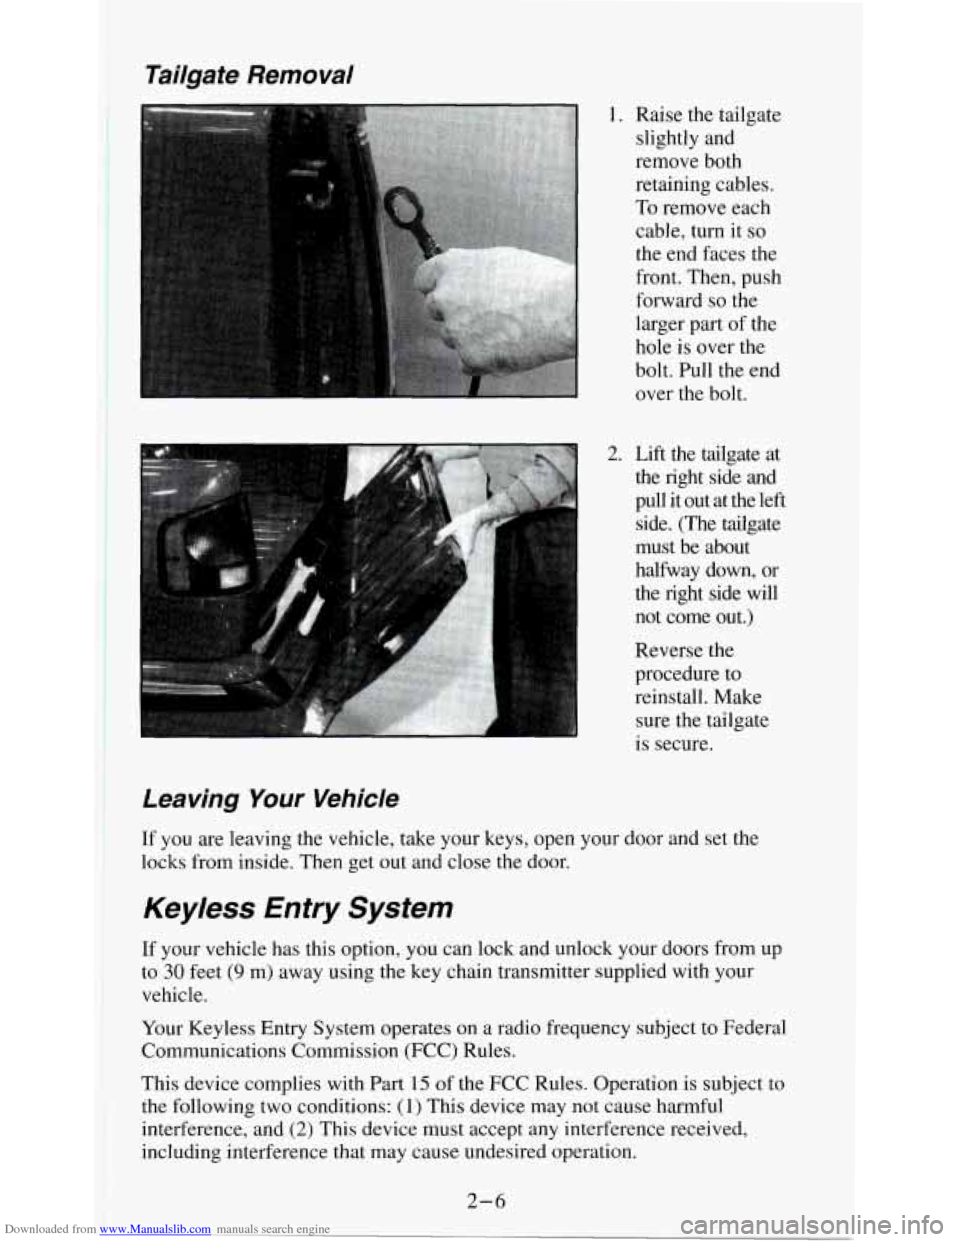
1. Raise the tailgate
slightly and
remove both
retaining cables.
To remove each
cable, turn it
so
the end faces the
front. Then, push
forward
so the
larger part of the
hole is over the
bolt. Pull the end
over the bolt.
2. Lift the tailgate at the right side and
pull it out at the left
side. (The tailgate
must be about
halfway down, or
the right side will
not come out.)
Reverse the
procedure to
reinstall. Make
sure the tailgate
is secure.
Leaving Your Vehicle
lr you are leaving the vehicle, take your keys, open your door and set the
locks from inside. Then get out and close the door.
Keyless Entry System
If your vehicle has this option, you can lock and unlock your doors from up
to
30 feet (9 m) away using the key chain transmitter supplied with your
vehicle.
Your Keyless Entry System operates on
a radio frequency subject to Federal
Communications Commission (FCC) Rules.
This device complies with Part 15 of the FCC Rules. Operation is subject to
the following
two conditions: (1) This device may not cause harmful
interference, and
(2) This device must accept any interference received,
including interference that may cause undesired operation.
2-6
Page 251 of 354
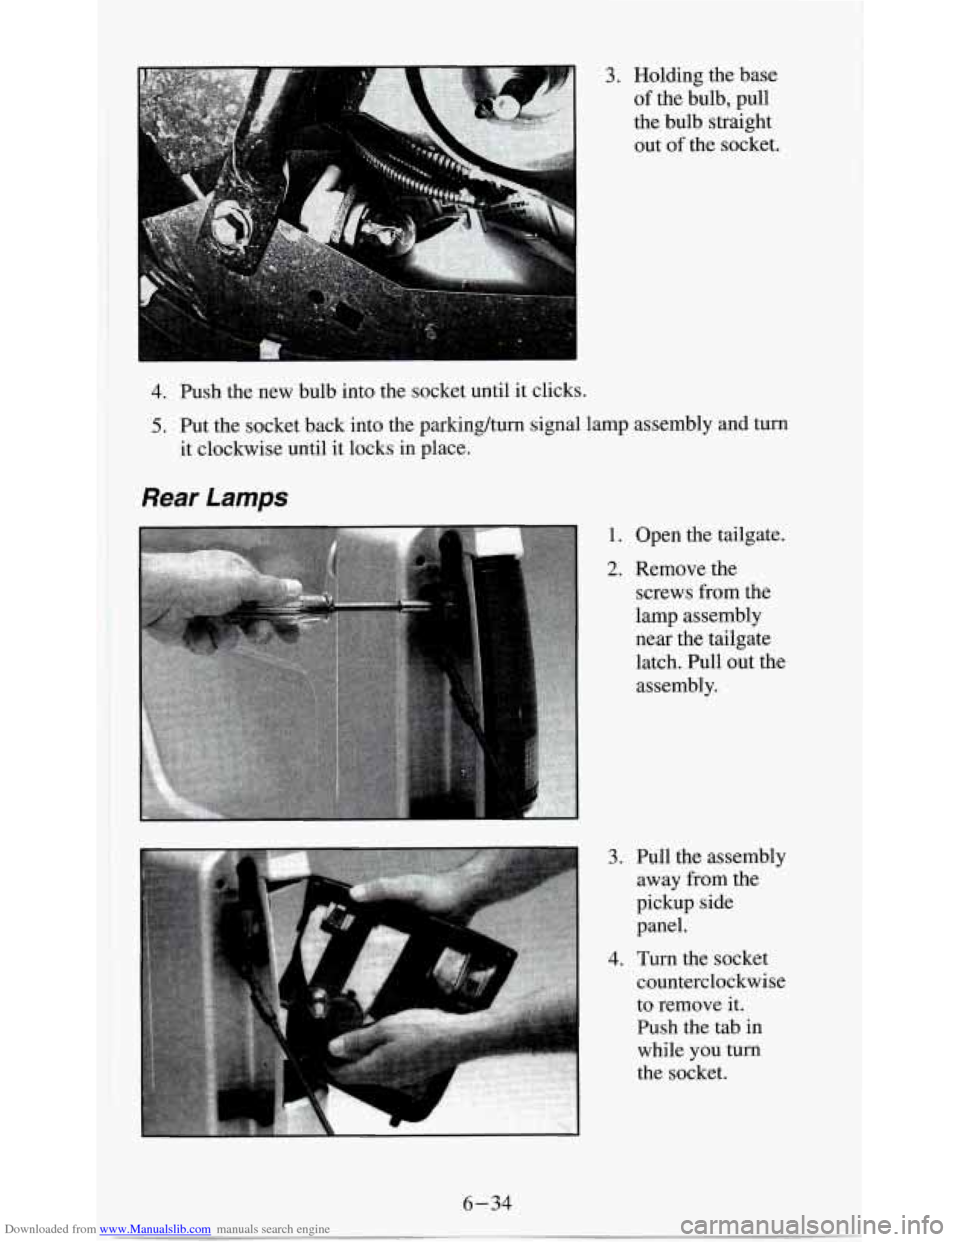
Downloaded from www.Manualslib.com manuals search engine 3. Holding the base
of the bulb, pull
the bulb straight out of the socket.
4. Push the new bulb into the socket until it clicks.
5. Put the socket back into the parkinghum signal lamp assembly and turn
it clockwise until it locks in place.
Rear Lamps
1. Open the tailgate.
2. Remove the
screws from the
lamp assembly
near the tailgate
latch. Pull out the assembly.
3. Pull the assembly away from the
pickup side
panel.
4. Turn the socket
counterclockwise to remove it.
Push the tab in
while you turn
the socket.
6-34
Page 252 of 354
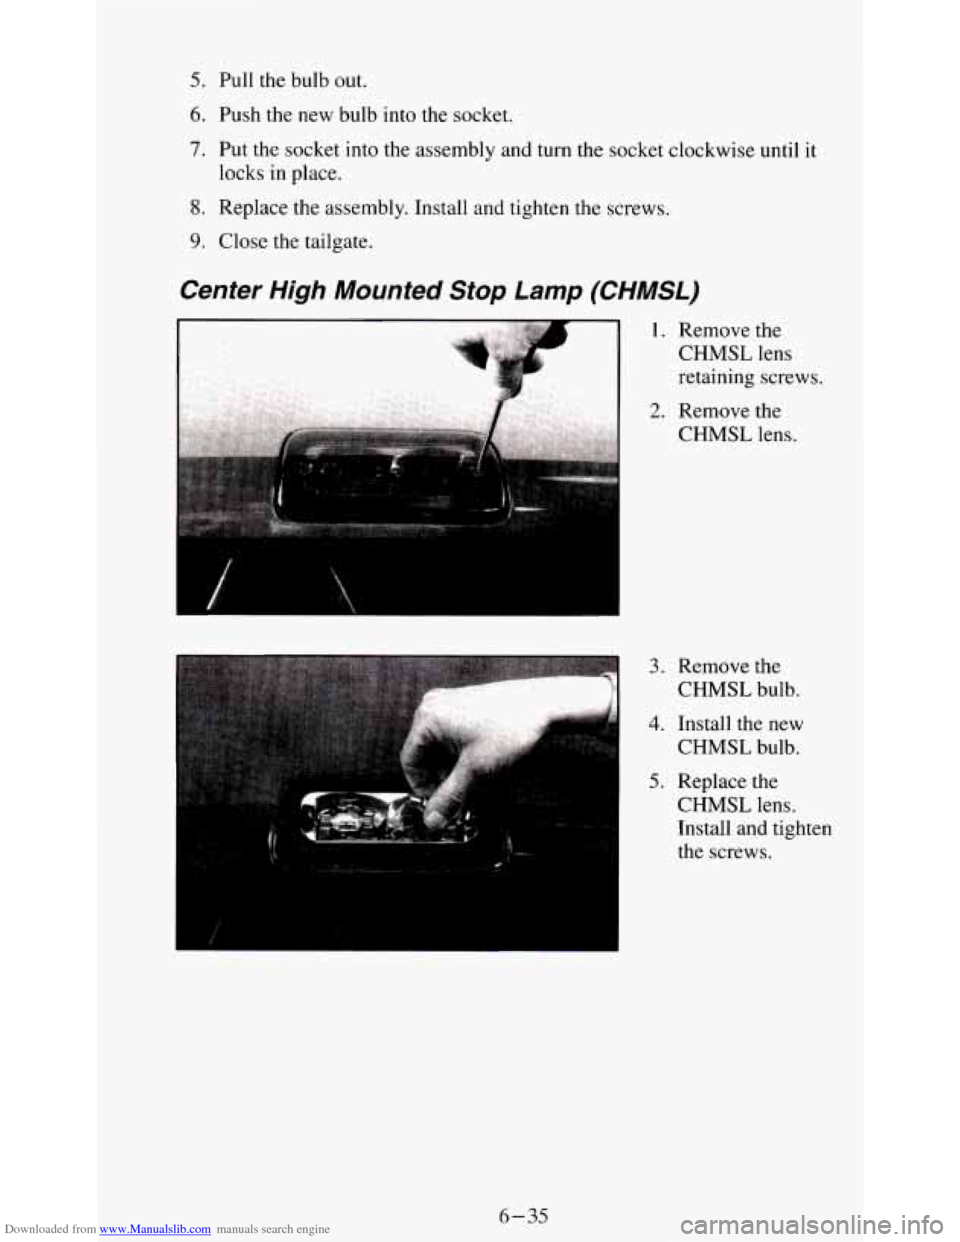
Downloaded from www.Manualslib.com manuals search engine 5. Pull the bulb out.
6. Push the new bulb into the socket.
7. Put the socket into the assembly and turn the socket clockwise until it
locks in place.
8. Replace the assembly. Install and tighten the screws.
9. Close the tailgate.
Center High Mounted Stop Lamp (CHMSL)
3. Remove the
CHMSL bulb.
4. Install the new
CHMSL bulb.
5. Replace the
CHMSL lens.
Install and tighten
the screws.
6-35
Page 323 of 354
Downloaded from www.Manualslib.com manuals search engine Engine Coolant Level
Check the engine coolant level and add the proper coolant mix if necessary.
See “Coolant”
in the Index for further details.
Windshield Washer Fluid Level
Check the windshield washer fluid level in the windshield washer tank and
add the proper fluid
if necessary. See “Windshield Washer Fluid” in the
Index for further details.
At Least Once a Month
Tire Inflation
Check tire inflation. Make sure tires are inflated to the pressures specified
on
the CertificatiodTire label located on the driver’s door lock pillar. See
“Tires” in the Index for further details.
Cassette Deck
Clean cassette deck. Cleaning should be done every 50 hours of tape play.
See “Audio Systems” in the Index for further details.
At Least Four Times a Year
Tailgate Lubrication
Lubricate tailgate latch bolt, handle assembly pivot points, and hinges w\
ith
lubricant recommended
in Part D. Lubricate every 3,000 miles (5 000 km) if
following schedule
I or every 7,500 miles (1 2 500 km) if following schedule
11.
At Least Once a Year
Key Lock Cylinders
Lubricate the key lock cylinders with the lubricant specified in Part D.
Body Lubrication
Lubricate all body door hinges, the body hood, fuel door and rear
compartment hinges, latches and locks including interior glove
box and
console doors, and any moving seat hardware. Lubricate the hood safety
lever pivot and prop rod pivot. Part D tells you what to use. More frequent
lubrication may be required when exposed to a corrosive environment.
7-36
Page 329 of 354
Downloaded from www.Manualslib.com manuals search engine USAGE
Weatherstrip
Tailgate Handle Pivot Points,
Hinges, Latch Bolt, and Linkage
Weather Strips
Gas Line
FLUILULUBRICANT
Silicone grease (GM Part No.
1052863) or equivalent.
Multi-purpose lubricant meeting
requirements of
GM Part No.
9985 164.
Spray-A-Squeak (GM Part No.
1052277).
Gas Line De-Icer
(GM Part No.
1051516).
See “Specifications Chart” in the Index for recommended replacement
filters, valves and spark plugs.
Part E: Maintenance Record
After the scheduled services are performed, record the date, odometer
reading and who performed
the service in the boxes provided after the
maintenance interval. Any additional information from “Owner Checks and
Services” or “Periodic Maintenance” can be added on the following recor\
d
pages. Also, you should retain all maintenance receipts. Your owner
information portfolio
is a convenient place to store them.
7-42
Page 351 of 354
Downloaded from www.Manualslib.com manuals search engine Seats (continued) Front Seatback Latches
.......................................... 1-4
Jump Seat (Extended Cab Models) ................................. 1-6
Lumbar Adjustment ............................................ 1-2
Reclining Front Seatbacks (Bucket Seats or
60/40 Bench) .............. 1-3
Bulletins ..................................................... 8-8
Doing Your Own Service Work ................................... 6-1
Parts Identification Label ....................................... 6-59
Publications ................................................... 8-8
Replacement Parts and Filter Recommendations .... .......... 6-69
Service
Service Engine Soon Light (See “Lights”)
Shift Indicator Light (See “Lights”)
Shifting Into Park
(P) ............................................. 2-23
SpareTire ...................................................... 5-22
Specifications Chart (See “Service - Replacement Parts and Filter
Recommendations”)
Speedometer and Odometer (See “Gages”)
Starting Your Engine (See “Engine-Starting”)
Steering
........................................................ 4-7
InEmergencies ................................................ 4-8
Tips ......................................................... 4-7
Storage Compartments ............................................ 2-50
SunVisors ..................................................... 2-48
Supplemental Inflatable Restraint System (SIR) ........................ 1-16
Adding Equipment to Your Air Bag-Equipped Vehicle ................ 1-21
How the Air Bag System Works .................................. 1-17
Servicing Your Air Bag-Equipped Vehicle ......................... 1-20
T
Tachometer (See “Gages”)
Tailgate
................. ... ............. 2-5
Removal ................................................. 2-6
Theft
........................................................... 2-8
Thermostat ..................................................... 6-24
Tilt Wheel (Option) .............................................. 2-34
Tire ........................................................... 640
Balancing (See “Wheel Alignment and Tire Balance”)
Chains
...................................................... 6-45
Flat (See “Changing a Flat Tire”)
Inspection and Rotation
...................................... 6-41
Loading (See “Loading Your Vehicle”)
New
........................................................ 6-43
Pressure ..................................................... 6-40
Spare (See “Spare Tire”)
Underbody Carrier
............................................ 5-23
Uniform Tire Quality Grading ................................... 6-44
Top Strap (See “Safety Belts-Child Restraints”)
Torque Lock (See “Transmission-Torque Lock”)