Page 3 of 34
17-2
Oil pump, cylinder block breather and oil
spray jets, removing and installing
Oil pan (upper part) and oil pan (lower part),
removing and installing page 17
-10
.
1 -
Bolt
20 Nm (15 ft lb)
2 -
Washer
3 -
Tensioner roller For toothed belt
4 -
Bolt 45 Nm (33 ft lb)
5 -
Bolt 10 Nm (7 ft lb)For toothed belt
6 -
Bolt 10 Nm (7 ft lb)
7 -
Bolt 10 Nm (7 ft lb)
Pa
ge 3 of 34 Lubrication s
ystem com
ponents, removin
g and installin
g
11/21/2002 htt
p://127.0.0.1:8080/audi/servlet/Dis
play?action=Goto&t
yp
e=re
pair&id=AUDI.B5.GE03.17.1
Page 4 of 34
17-3
8 -
Breather housing
9 -
Gasket/breather plate
Always replace
10 -
Oil check valve 25 Nm (18 ft lb)
11 -
Oil seal
12 -
Connector
13 -
Bolt 15 Nm (11 ft lb)
14 -
15 Nm For oil spray jets for piston cooling
15 -
Cylinder block
16 -
Bolt 10 Nm (7 ft lb)Use locking fluid D 000 600 A2 when
installing
17 -
Oil spray jet For piston cooling
18 -
Gasket Metal gasket
Pa
ge 4 of 34 Lubrication s
ystem com
ponents, removin
g and installin
g
11/21/2002 htt
p://127.0.0.1:8080/audi/servlet/Dis
play?action=Goto&t
yp
e=re
pair&id=AUDI.B5.GE03.17.1
Page 6 of 34
17-4
19 -
Engine oil temperature sensor -G8-
10 Nm (7 ft lb)For oil temperature gaugeWhiteIf seal is leaking, replace seal
20 -
Oil seal Replacing page 15
-14
21 -
Tensioner
Compress and secure before removing
page 13
-12
22 -
10 Nm
Use locking fluid D 000 600 A2 when
installing
23 -
Washer
24 -
Bearing bushing For tensioner lever
25 -
Washer
26 -
Bolt 25 Nm (18 ft lb)
27 -
Tensioning lever
28 -
Bearing bushing
Pa
ge 6 of 34 Lubrication s
ystem com
ponents, removin
g and installin
g
11/21/2002 htt
p://127.0.0.1:8080/audi/servlet/Dis
play?action=Goto&t
yp
e=re
pair&id=AUDI.B5.GE03.17.1
Page 8 of 34
17-5
Oil pump, oil pan, oil filter, oil cooler,
removing and installing
1 -
Bolt for dipstick tube
25 Nm (18 ft lb)
2 -
Dipstick tube Replace O-ring
3 -
Oil pan (upper part) No gasket is installed between engine
block and oil pan (upper part) Only use silicon sealant D 454 300 A2
4 -
Bolt M820 Nm (15 ft lb)
5 -
Bolt M615 Nm (11 ft lb)
6 -
Bolt M820 Nm (15 ft lb)Bolt is next to coolant drain plug
Pa
ge 8 of 34 Lubrication s
ystem com
ponents, removin
g and installin
g
11/21/2002 htt
p://127.0.0.1:8080/audi/servlet/Dis
play?action=Goto&t
yp
e=re
pair&id=AUDI.B5.GE03.17.1
Page 11 of 34
17-7
18 -
O-ring
Always replace
19 -
O-ring Always replace
20 -
Oil filter
21 -
Hex nut 30 Nm (22 ft lb)Threaded pipe for oil cooler and oil filter
installed in oil pan (upper part) and
tightened to 20 Nm (15 ft lb)
22 -
Oil cooler When installing, make sure O-ring is
seated correctly
23 -
Oil pump Disassembling and assembling Fig. 1Driven by chain from crankshaftTightening torque (chain sprocket to oil
pump): 25 Nm (18 ft lb) Tightening torque (oil pump to engine
block): 25 Nm (18 ft lb)
Pa
ge 11 of 34 Lubrication s
ystem com
ponents, removin
g and installin
g
11/21/2002 htt
p://127.0.0.1:8080/audi/servlet/Dis
play?action=Goto&t
yp
e=re
pair&id=AUDI.B5.GE03.17.1
Page 15 of 34
17-11
Lock carrier in service position page 13
-1
- Open engine coolant expansion tank cap.
- Place VAG1306 drip tray beneath engine.
- Turn radiator drain plug counterclockwise (arrow). If needed, attach
tube to connection flange.
Collect engine oil in appropriate receptacle.
Vehicles with automatic transmission - Open coolant pump bearing housing drain plug as well (arrow).
- Drain engine coolant.
- Drain engine oil.
- Unbolt oil cooler line bracket from right-side of oil pan.
Pa
ge 15 of 34 Lubrication s
ystem com
ponents, removin
g and installin
g
11/21/2002 htt
p://127.0.0.1:8080/audi/servlet/Dis
play?action=Goto&t
yp
e=re
pair&id=AUDI.B5.GE03.17.1
Page 21 of 34

17-17
Note:
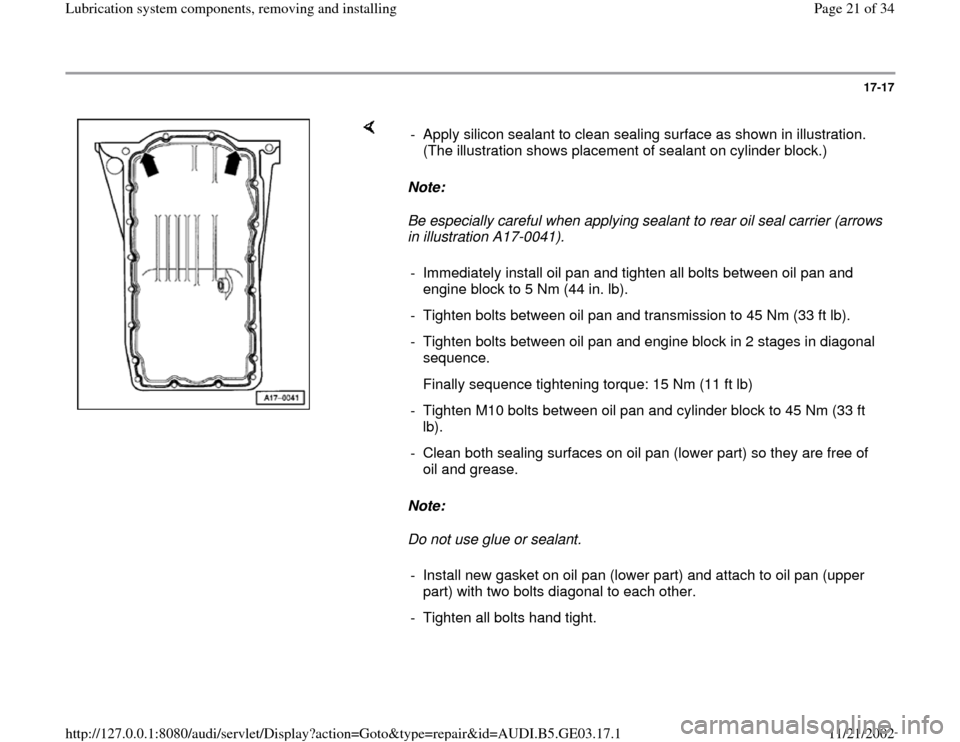
Be especially careful when applying sealant to rear oil seal carrier (arrows
in illustration A17-0041).
Note:
Do not use glue or sealant. - Apply silicon sealant to clean sealing surface as shown in illustration.
(The illustration shows placement of sealant on cylinder block.)
- Immediately install oil pan and tighten all bolts between oil pan and
engine block to 5 Nm (44 in. lb).
- Tighten bolts between oil pan and transmission to 45 Nm (33 ft lb).
- Tighten bolts between oil pan and engine block in 2 stages in diagonal
sequence.
Finally sequence tightening torque: 15 Nm (11 ft lb)
- Tighten M10 bolts between oil pan and cylinder block to 45 Nm (33 ft
lb).
- Clean both sealing surfaces on oil pan (lower part) so they are free of
oil and grease.
- Install new gasket on oil pan (lower part) and attach to oil pan (upper
part) with two bolts diagonal to each other.
- Tighten all bolts hand tight.
Pa
ge 21 of 34 Lubrication s
ystem com
ponents, removin
g and installin
g
11/21/2002 htt
p://127.0.0.1:8080/audi/servlet/Dis
play?action=Goto&t
yp
e=re
pair&id=AUDI.B5.GE03.17.1
Page 22 of 34
17-18
- Starting in center and moving toward outside,
tighten bolts to 10 Nm (7 ft lb).
- Install new seal on oil drain plug and tighten to
30 Nm (22 ft lb).
Notes:
When installing oil pan on removed engine,
make sure oil pan is aligned with cylinder block
on flywheel side.
After installing oil pan, allow sealant to dry for
approx. 30 minutes. Only after allowing sealant
to dry may engine oil be added.
- Install subframe.
Repair Manual, Suspension, Wheels,
Steering, Repair Group 40
- Install lock carrier.
Pa
ge 22 of 34 Lubrication s
ystem com
ponents, removin
g and installin
g
11/21/2002 htt
p://127.0.0.1:8080/audi/servlet/Dis
play?action=Goto&t
yp
e=re
pair&id=AUDI.B5.GE03.17.1