Page 1 of 75
69-40
Airbags, servicing
Airbag system, safety precautions
WARNING!
Checking, removing, installing and servicing
may ONLY be performed by qualified
personnel.
Never perform tests using a test light or
multimeter.
Airbag system may only be tested when
installed in vehicle using VAG1551/VAG1552
scan tool.
Battery must be disconnected before
performing any work on airbag system.
Work can begin immediately after
disconnecting the battery.
When connecting the airbag system to a
voltage source, no one should be in the
vehicle interior.
Always install airbag units in the vehicle as
soon as they are removed from the
Pa
ge 1 of 75 Airba
gs, servicin
g
11/19/2002 htt
p://127.0.0.1:8080/audi/servlet/Dis
play?action=Goto&t
yp
e=re
pair&id=AUDI.B5.BD03.69.3
Page 11 of 75
69-46
B - If airbag control module is replaced:
- Check DTC memory:
Repair Manual, Body On Board Diagnostic
(OBD), Repair Group 01
Activated belt tensioners can be identified by the
DTC: "Ignitor for belt tensioner - resistance is too
high"
- If necessary (visual check) also replace: all
damaged components.
Accident without airbag deployment
If airbag Malfunction Indicator Lamp (MIL) -K75-
does not indicate a DTC, then airbag
components do not need to be replaced. Check
seat belts separately.
After replacing airbag units or the control module,
attach label (only tear-off strip) to registration
card and send in registration card.
Pa
ge 11 of 75 Airba
gs, servicin
g
11/19/2002 htt
p://127.0.0.1:8080/audi/servlet/Dis
play?action=Goto&t
yp
e=re
pair&id=AUDI.B5.BD03.69.3
Page 12 of 75
69-47
Airbag system side airbags, safety
precautions
WARNING!
Checking, removing, installing and servicing
may ONLY be performed by qualified
personnel.
Following the same safety precautions as for
driver and passenger-side airbags.
Only use original equipment seat covers and
backrest covers that are approved for use
with side airbags (identified by a label on the
fabric).
Do not use extra seat covers over the seat as
they interfere with proper side airbag
operation.
Do not use seat cushion supports, mats or
similar since they impare seat occupant
sensor and airbags
Note:
The driver's seat does not have a seat occupant
sensor.
Pa
ge 12 of 75 Airba
gs, servicin
g
11/19/2002 htt
p://127.0.0.1:8080/audi/servlet/Dis
play?action=Goto&t
yp
e=re
pair&id=AUDI.B5.BD03.69.3
Page 16 of 75
69-49
Additional safety precautions for side
curtain protection airbag
WARNING!
All safety precautions for the driver and
passenger-side airbags apply, as well as the
following:
Visually check the vehicle's trim panels for
damage before every installation.
Do not attempt any repair work on the
vehicle trim panels (top trim panels for A-
pillar, B-pillar, C-pillar and D-pillar).
Make sure the trim panel is securely fitted
during installation.
Side curtain airbags must only be folded at
its intended location (transition of roof to A-
pillar).
To carry out repairs behind the side curtain
airbag, always remove the entire unit first.
After removal, always carry the side curtain
airbag in the folded position.
Pa
ge 16 of 75 Airba
gs, servicin
g
11/19/2002 htt
p://127.0.0.1:8080/audi/servlet/Dis
play?action=Goto&t
yp
e=re
pair&id=AUDI.B5.BD03.69.3
Page 17 of 75
69-50
WARNING!
After removal, place the side curtain airbag
into the transport container in the folded
position or lay on a clean, even surface (on a
blanket or in the luggage compartment).
After servicing the body of vehicle in vicinity
of airbag, check the body for welding beads,
deformations and chafe marks (compare to
opposite side of the vehicle).
Always hold the side curtain airbag
securely.
After removal, always fold the side curtain
airbag and grasp by the igniter (thumbs
toward E-connection).
Always keep one hand on the igniter.
Never twist, wind, bend, throw, spin, pull,
hang, squeeze, press, pinch or clamp the
side curtain airbag.
If any contamination penetrates into the
fabric (i.e. oil, grease, lacquer, paint or
solvent), the unit must always be replaced.
Pa
ge 17 of 75 Airba
gs, servicin
g
11/19/2002 htt
p://127.0.0.1:8080/audi/servlet/Dis
play?action=Goto&t
yp
e=re
pair&id=AUDI.B5.BD03.69.3
Page 66 of 75
69-93
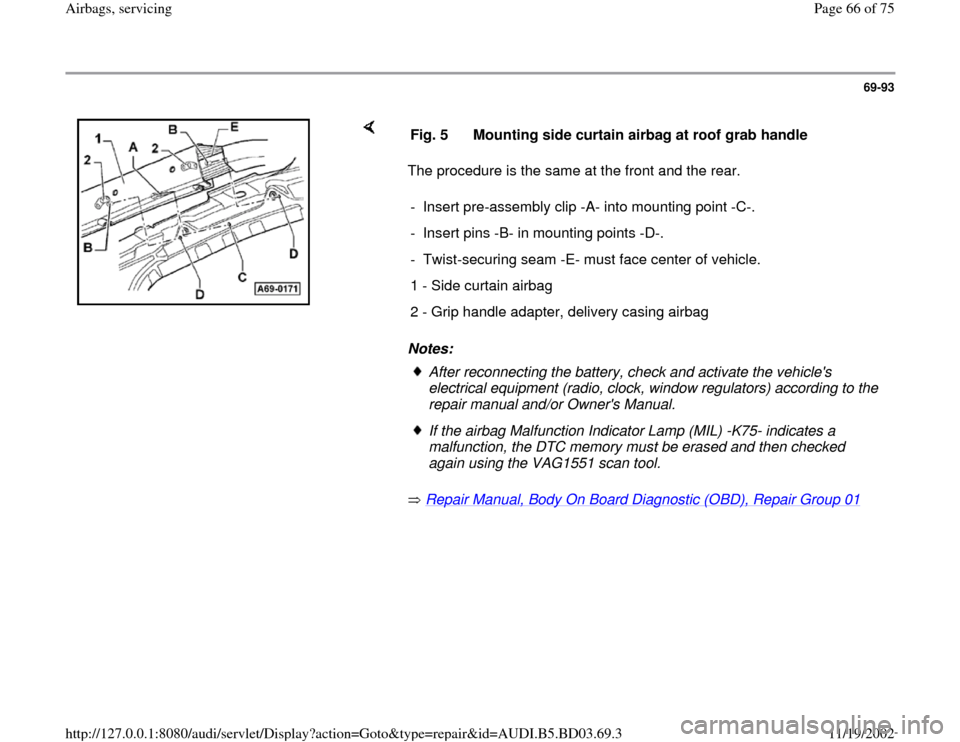
The procedure is the same at the front and the rear.
Notes:
Repair Manual, Body On Board Diagnostic (OBD), Repair Group 01
Fig. 5 Mounting side curtain airbag at roof grab handle
- Insert pre-assembly clip -A- into mounting point -C-.
- Insert pins -B- in mounting points -D-.
- Twist-securing seam -E- must face center of vehicle.
1 - Side curtain airbag
2 - Grip handle adapter, delivery casing airbag
After reconnecting the battery, check and activate the vehicle's
electrical equipment (radio, clock, window regulators) according to the
repair manual and/or Owner's Manual. If the airbag Malfunction Indicator Lamp (MIL) -K75- indicates a
malfunction, the DTC memory must be erased and then checked
again using the VAG1551 scan tool.
Pa
ge 66 of 75 Airba
gs, servicin
g
11/19/2002 htt
p://127.0.0.1:8080/audi/servlet/Dis
play?action=Goto&t
yp
e=re
pair&id=AUDI.B5.BD03.69.3
Page 75 of 75
69-100
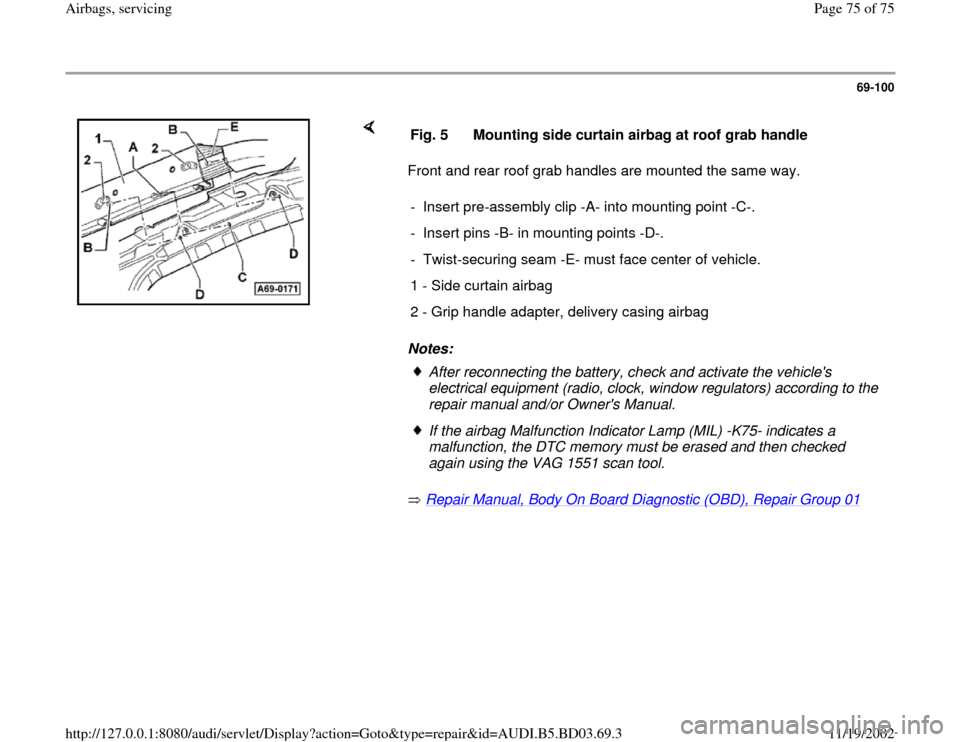
Front and rear roof grab handles are mounted the same way.
Notes:
Repair Manual, Body On Board Diagnostic (OBD), Repair Group 01
Fig. 5 Mounting side curtain airbag at roof grab handle
- Insert pre-assembly clip -A- into mounting point -C-.
- Insert pins -B- in mounting points -D-.
- Twist-securing seam -E- must face center of vehicle.
1 - Side curtain airbag
2 - Grip handle adapter, delivery casing airbag
After reconnecting the battery, check and activate the vehicle's
electrical equipment (radio, clock, window regulators) according to the
repair manual and/or Owner's Manual. If the airbag Malfunction Indicator Lamp (MIL) -K75- indicates a
malfunction, the DTC memory must be erased and then checked
again using the VAG 1551 scan tool.
Pa
ge 75 of 75 Airba
gs, servicin
g
11/19/2002 htt
p://127.0.0.1:8080/audi/servlet/Dis
play?action=Goto&t
yp
e=re
pair&id=AUDI.B5.BD03.69.3