Page 899 of 1771

Fuel Tube/Quick-Connec t Fitting s
Precaution s
Do no t smok e whil e workin g o n th e fue l
system . Kee p ope n flame s awa y fro m you r wor k area .
Th e fue l tube/quick-connec t fitting s assembl y connect s
th e in-tan k fue l pum p wit h th e fue l fee d pipe . Fo r remov -
in g o r installin g th e fue l pum p an d fue l tank , i t i s neces -
sar y t o disconnec t o r connec t th e quick-connec t fittings .
Pay attentio n to following :
The fue l tube/quick-connec t fitting s assembl y i s no t
heat-resistant ; b e carefu l no t t o damag e it durin g weld -
in g o r othe r heat-generatin g procedures .
Th e fue l tube/quick-connec t fitting s assembl y i s no t
acid-proof ; d o no t touc h i t wit h a sho p towe l whic h
wa s use d fo r wipin g batter y electrolyte . Replac e th e
fue l tube/quick-connec t fitting s assembl y i f i t cam e
int o contac t wit h electrolyt e o r somethin g similar .
Whe n connectin g o r disconnectin g th e fue l tube/quick -
connec t fitting s assembly , b e carefu l no t t o ben d o r
twis t i t excessively . Replac e i t i f damaged .
A disconnecte d quick-connec t fittin g ca n b e reconnected ,
bu t th e retaine r o n th e matin g pip e canno t b e reuse d onc e
i t ha s bee n remove d fro m th e pipe . Replac e th e retaine r
whe n
— Replacin g th e fue l pump .
— Replacin g th e fue l fee d pipe .
— It ha s bee n remove d fro m th e pipe .
— It i s damaged .
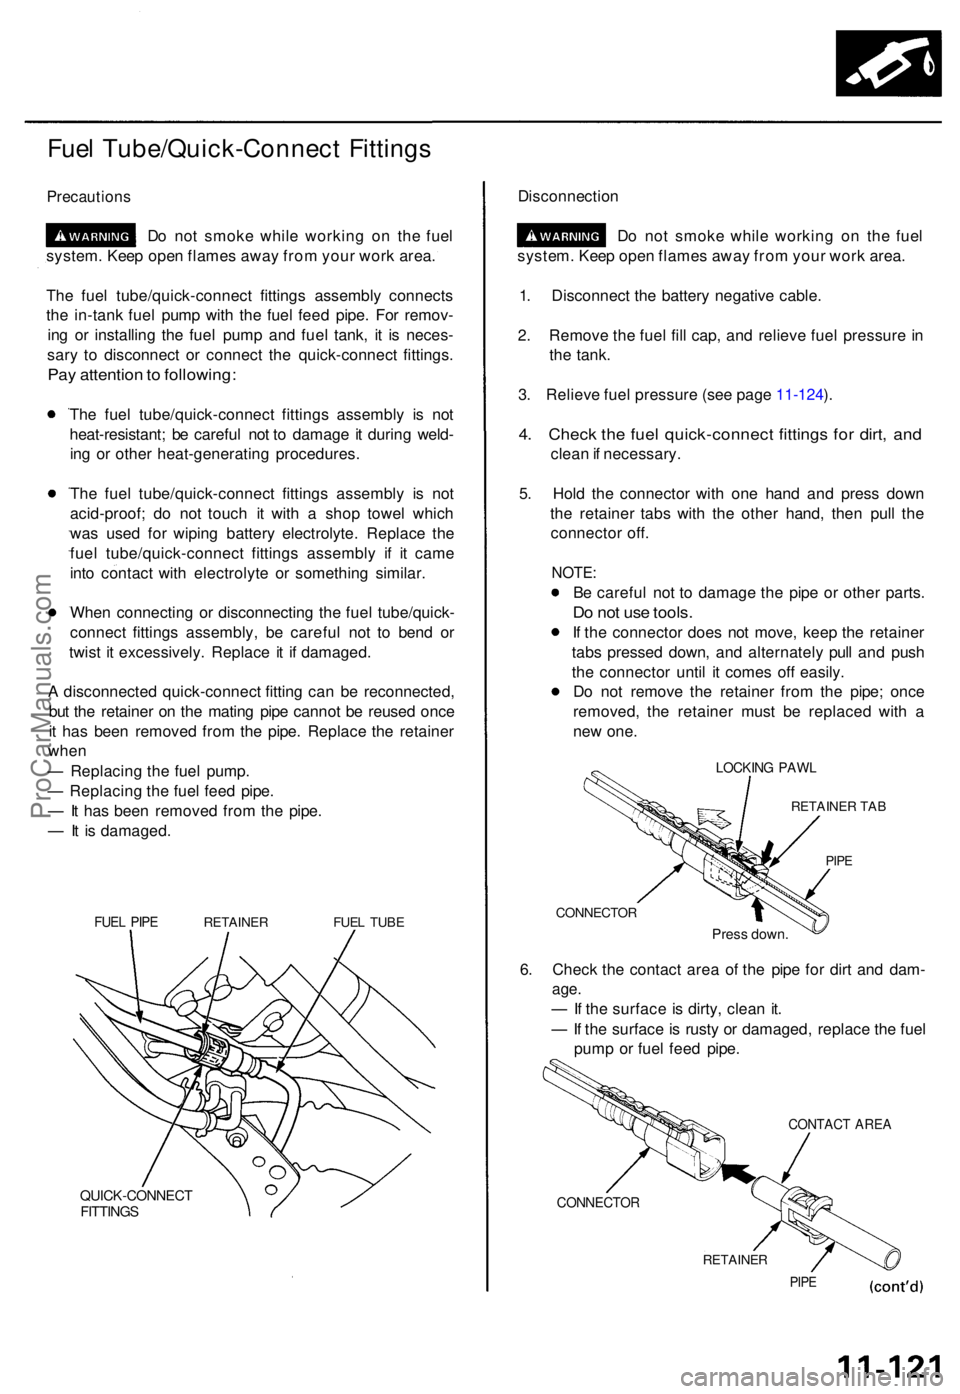
FUEL PIP ERETAINE RFUEL TUB E
QUICK-CONNEC TFITTINGS
Disconnectio n
Do no t smok e whil e workin g o n th e fue l
system . Kee p ope n flame s awa y fro m you r wor k area .
1 . Disconnec t th e batter y negativ e cable .
2 . Remov e th e fue l fil l cap , an d reliev e fue l pressur e in
th e tank .
3 . Reliev e fue l pressur e (se e pag e 11-124 ).
4 . Chec k th e fue l quick-connec t fitting s fo r dirt , an d
clea n if necessary .
5 . Hol d th e connecto r wit h on e han d an d pres s dow n
th e retaine r tab s wit h th e othe r hand , the n pul l th e
connecto r off .
NOTE :
Be carefu l no t t o damag e th e pip e o r othe r parts .
Do no t us e tools .
If th e connecto r doe s no t move , kee p th e retaine r
tab s presse d down , an d alternatel y pul l an d pus h
th e connecto r unti l i t come s of f easily .
D o no t remov e th e retaine r fro m th e pipe ; onc e
removed , th e retaine r mus t b e replace d wit h a
ne w one .
LOCKIN G PAW L
RETAINE R TA B
PIPE
CONNECTO R
Press down .
6. Chec k th e contac t are a o f th e pip e fo r dir t an d dam -
age.
— If th e surfac e is dirty , clea n it .
— If th e surface is rust y o r damaged , replac e th e fue l
pum p o r fue l fee d pipe .
CONTAC T ARE A
CONNECTO R
RETAINER
PIPE
ProCarManuals.com
Page 1296 of 1771
GAUGE ASSEMBLY
UNDER-HOOD FUSE/RELAY BOX
ABS INDICATOR LIGHT
BATTERY
(100 A) FUSE
IG (50 A) FUSE
STOP/ HORN
(20 A) FUSE
UNDER-DASH FUSE/RELAY BOX
UNDER-HOOD ABS FUSE/RELAY BOX
HEATER
CONTROL RELAY
(7.5 A) FUSE
BACK-UP LIGHTS/
METER LIGHTS
(SUN ROOF)
(10 A) FUSE
ECU (ECM)/
CRUISE CONTROL/
EAT ECU
(15 A) FUSE
ABS MOTOR (40 A) FUSE
ABS B1 (20 A) FUSE
ABS B2 (15 A) FUSE
ABS PUMP MOTOR RELAY
UNDER-DASH RELAY BOX
ABS UNIT (10 A) FUSE
REAR FAIL-SAFE RELAY
FRONT FAIL-SAFE RELAYProCarManuals.com
Page 1322 of 1771
ABS INDICATOR LIGHT
BATTERY
(100 A) FUSE
STOP/ HORN
(20 A) FUSE
IG (50 A) FUSE
UNDER-DASH FUSE/RELAY BOX
UNDER-HOOD ABS FUSE/RELAY BOX
HEATER
CONTROL RELAY
(7.5 A) FUSE
BACK-UP LIGHTS/
METER LIGHTS
(SUN ROOF)
(10 A) FUSE
ECU (ECM)/
CRUISE CONTROL/
EAT ECU
(15 A) FUSE
ABS MOTOR (30 A) FUSE
ABS B1 (20 A) FUSE
UNDER-DASH RELAY BOX
ABS PUMP MOTOR RELAY
ABS UNIT (7.5 A) FUSE
FAIL-SAFE RELAYProCarManuals.com
Page 1395 of 1771
Moonroof
Index
GLAS SReplacement , pag e 20-5 1
Adjustment , page s 20-49 , 20-5 0
CABLE ASSEMBL Y
Replacement , pag e 20-5 3
MOTO R
Replacement ,
pag e 20-5 2
SUNSHAD E
Replacement ,
pag e 20-5 1
FRAME
Replacement ,
pag e 20-5 2 GUID
E RAI L
Replacement , pag e 20-5 3
CLIP
REA R DRAI NVALV E
FRON T DRAI NVALVE
TUBECLIP FRON
T DRAI N
TUB E TUB
E
CLIP
REA R DRAI N
TUB E
FRAM
E SEA L
LIFT-U PGUIDE
REA
R SHI M
FRON T
SHIM
SUNSHAD E
RAI L HOLDE R
RAI
L HOLDE R
COVERSUNSHAD ERAIL
SLID E STOPPE R
INNE
R CABL E
SLIDER
RAIL COVE R
FRON
T SLIDE R
ProCarManuals.com
Page 1397 of 1771

Moonroof
Glass Heigh t Adjustmen t
The roo f pane l shoul d b e eve n wit h th e glas s weather -
strip, t o withi n 1 ± 0.5 m m (0.0 4 ± 0.0 2 in ) al l th e wa y
around . I f not , ope n th e glas s fully , and :
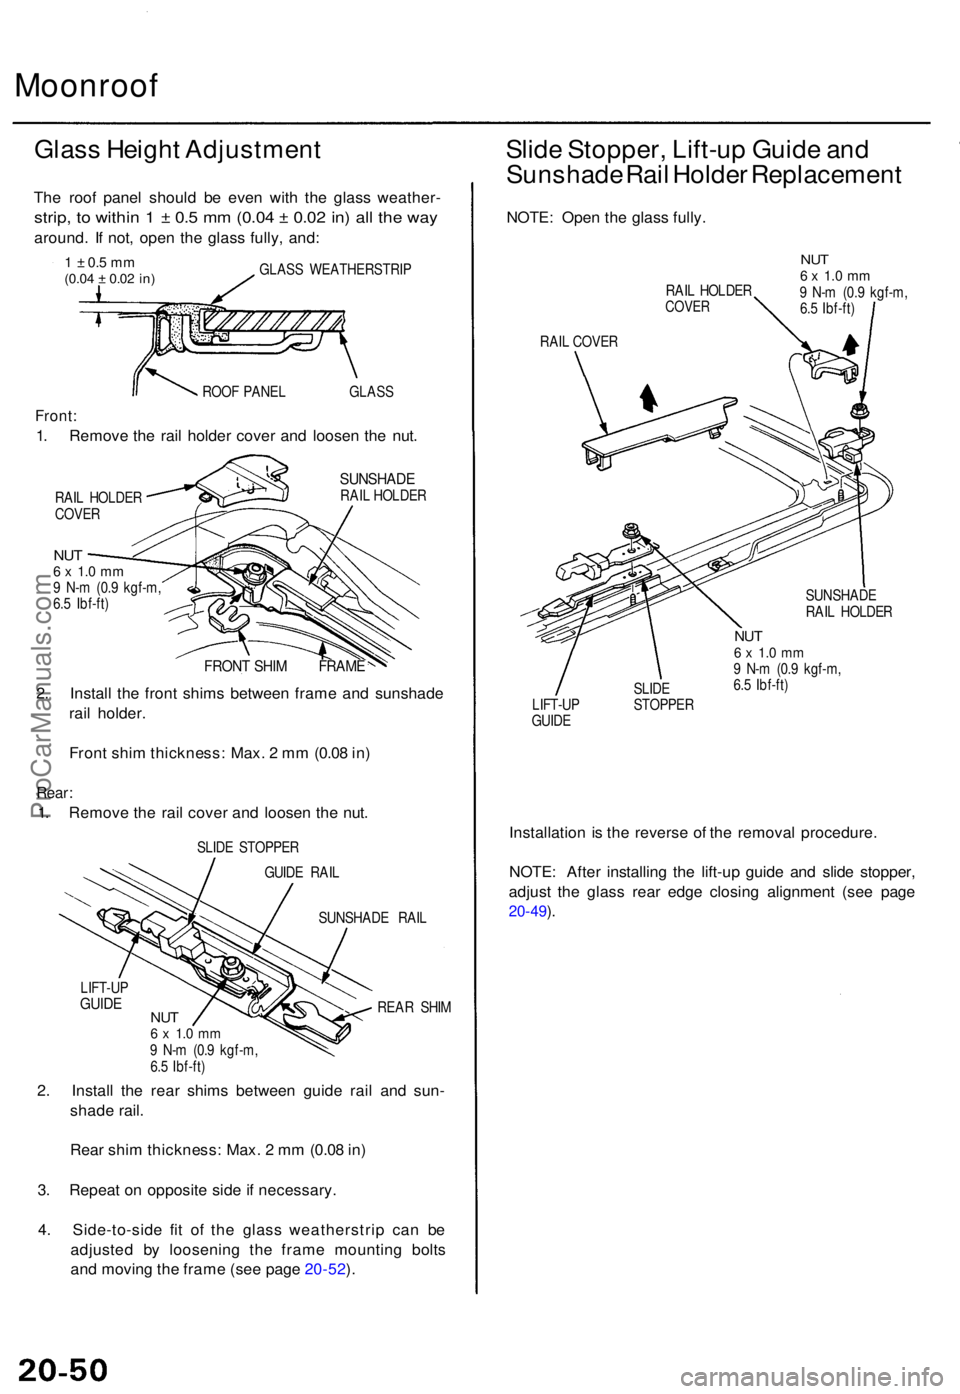
1 ± 0. 5 m m(0.0 4 ± 0.02 in)GLAS S WEATHERSTRI P
ROO F PANE L GLAS S
Front:
1. Remov e th e rai l holde r cove r an d loose n th e nut .
SUNSHAD ERAIL HOLDE R
RAI L HOLDE R
COVE R
NUT6 x 1. 0 m m9 N- m (0. 9 kgf-m ,
6. 5 Ibf-ft )
FRON T SHI M FRAM E
2. Instal l th e fron t shim s betwee n fram e an d sunshad e
rai l holder .
Fron t shi m thickness : Max . 2 m m (0.0 8 in )
Rear :
1. Remov e th e rai l cove r an d loose n th e nut .
SLID E STOPPE R
GUID E RAI L
SUNSHAD E RAI L
REA R SHI M
LIFT-U
P
GUIDENUT6 x 1. 0 m m9 N- m (0. 9 kgf-m ,
6. 5 Ibf-ft )
2. Instal l th e rea r shim s betwee n guid e rai l an d sun -
shad e rail .
Rea r shi m thickness : Max . 2 m m (0.0 8 in )
3 . Repea t o n opposit e sid e if necessary .
4 . Side-to-sid e fi t o f th e glas s weatherstri p ca n b e
adjuste d b y loosenin g th e fram e mountin g bolt s
an d movin g th e fram e (se e pag e 20-52 ).
Slid e Stopper , Lift-u p Guid e an d
Sunshad e Rai l Holde r Replacemen t
NOTE: Ope n th e glas s fully .
RAIL HOLDE RCOVER
NUT6 x 1. 0 m m9 N- m (0. 9 kgf-m ,
6. 5 Ibf-ft )
RAI L COVE R
SUNSHADE
RAI L HOLDE R
LIFT-U P
GUID E SLID
E
STOPPE R
NUT6 x 1. 0 m m9 N- m (0. 9 kgf-m ,
6. 5 Ibf-ft )
Installatio n i s th e revers e o f th e remova l procedure .
NOTE : Afte r installin g th e lift-u p guid e an d slid e stopper ,
adjus t th e glas s rea r edg e closin g alignmen t (se e pag e
20-49 ).
ProCarManuals.com
Page 1399 of 1771

Moonroof
Motor, Drai n Tub e an d Fram e Replacemen t
CAUTION:
Wea r glove s t o remov e an d instal l th e frame .
B e carefu l no t t o damag e th e seats , dashboar d an d
othe r interio r trim .
1 . Remov e th e headline r (se e pag e 20-61 ).
2 . Remov e th e overhea d speake r bracket .
3 . Disconnec t th e moto r connector .
NOTE : Whe n removin g th e motor , detac h th e con -
necto r fro m th e frame , remov e th e bolt s an d nuts ,
then remov e th e motor .
4 . Remov e th e glas s (se e pag e 20-51 ).
5 . Disconnec t th e drai n tubes , an d detac h th e ceilin g
ligh t harness .
6 . Remov e th e bolts .
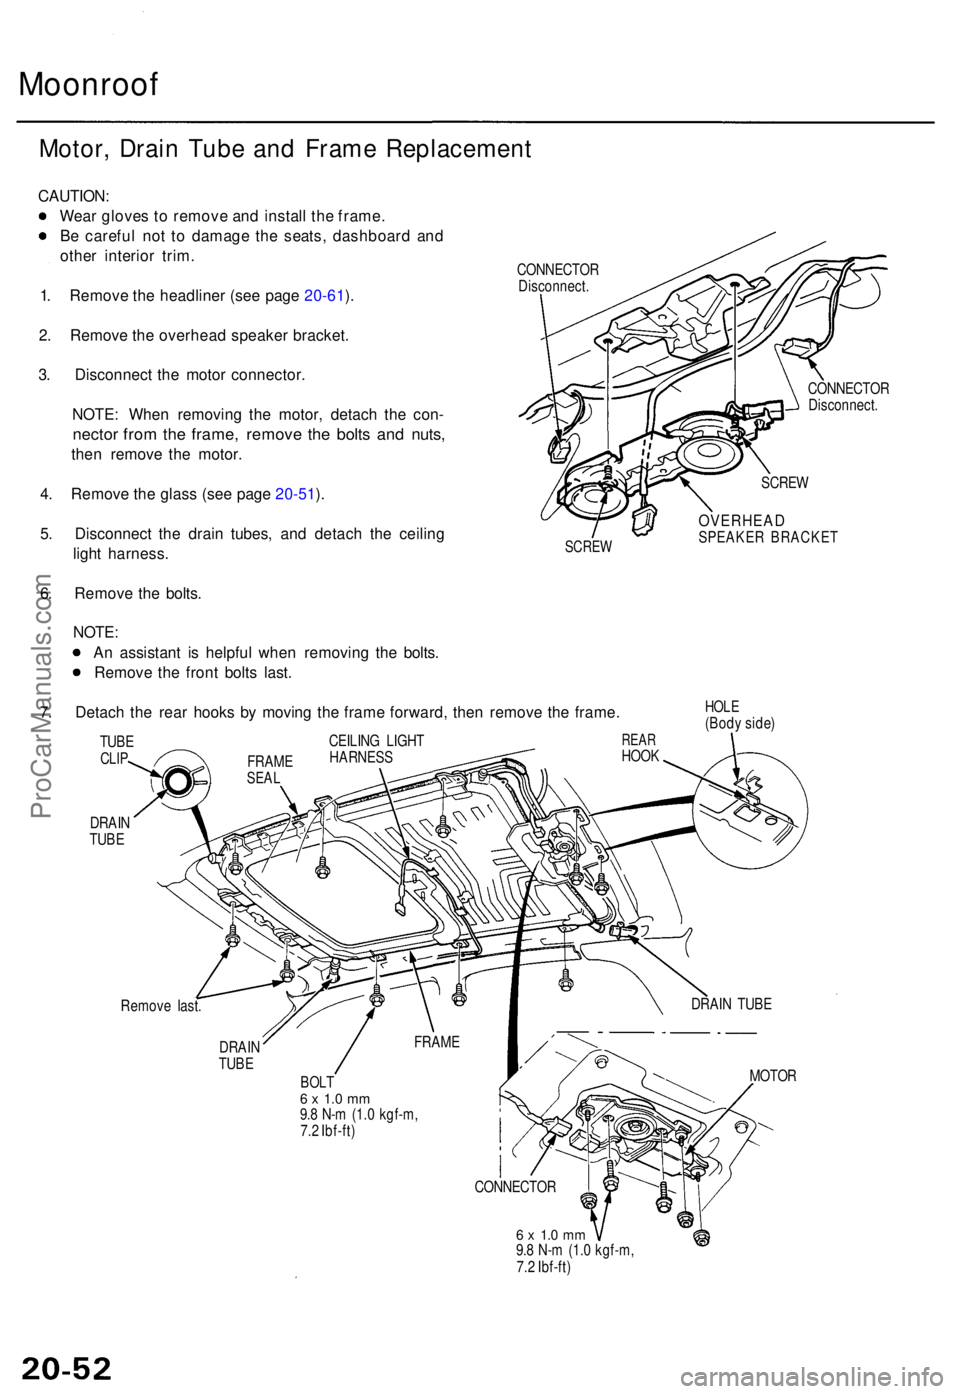
CONNECTO R
Disconnect .
SCREW
CONNECTO R
Disconnect .
SCREW
OVERHEA DSPEAKER BRACKE T
NOTE:
A n assistan t i s helpfu l whe n removin g th e bolts .
Remov e th e fron t bolt s last .
7 . Detac h th e rea r hook s b y movin g th e fram e forward , the n remov e th e frame .
DRAIN
TUB E
HOL E(Bod y side )
Remov e last .
DRAI N
TUB E
BOL T6 x 1. 0 m m9.8 N- m (1. 0 kgf-m ,
7. 2 Ibf-ft )
6 x 1. 0 m m9.8 N- m (1. 0 kgf-m ,
7. 2 Ibf-ft ) MOTO
R
CONNECTO R
FRAM
E DRAI
N TUB E
REARHOO K
CEILIN
G LIGH THARNES SFRAMESEAL
TUBECLIP
ProCarManuals.com
Page 1402 of 1771
Moonroof
Guide Rails/Cabl e Assembl y
Replacemen t (cont'd )
5. Installatio n i s th e revers e o f th e remova l procedure .
NOTE:
• Damage d part s shoul d b e replaced .
• Fil l th e groov e i n eac h gromme t wit h sealant .
GROMME T
FRAME
SEALAN T
• Instal l th e fram e sea l securely .
• Befor e installin g th e motor , mak e sur e bot h slid -
er s ar e paralle l (se e pag e 20-49 ).
• Befor e installin g th e motor , instal l th e fram e an d
glass , the n chec k th e openin g drag .
ProCarManuals.com
Page 1403 of 1771
Moonroof
Link Slider/Lift-u p Lin k Replacemen t
1. Remov e th e glas s (se e pag e 20-51 ).
2 . Pul l th e fron t slide r fro m th e fron t stay .
LINK LIFTE R LIN
K SLIDE R
GLAS S
FRONT
STAY
FRON T
SLIDE R
3. Remov e th e lin k lifter , the n remov e th e E-clip .
4 . Remov e th e lift-u p lin k fro m th e rea r stay . Driv e th e
lin k shaf t out , the n separat e th e lift-u p lin k an d lin k
slider .
5 . Installatio n i s th e revers e o f th e remova l procedure .
NOTE:
• Damage d part s shoul d b e replaced .
• Greas e th e slidin g portion .
COLLAR S
LINK SHAF T
E-CLI P
Replace .
COLLAR
LIFT-UP LIN KCOLLA R
REARSTAY
ProCarManuals.com