1994 OLDSMOBILE SILHOUETTE engine oil
[x] Cancel search: engine oilPage 197 of 276
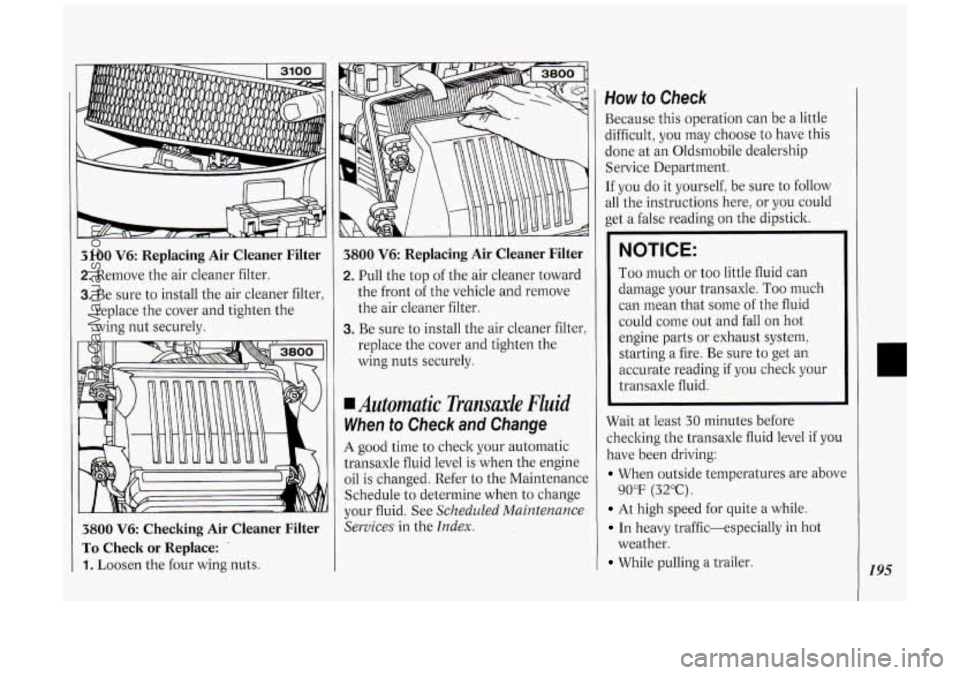
3100 V6: Replacing Air Cleaner Filter
2. Remove the air cleaner filter.
3. Be sure to install the air cleaner filter,
replace the cover and tighten the
wing nut securely.
3800 V6 Checking Air Cleaner Filter
To Check or Replace: .
1. Loosen the four wing nuts.
3800 V6: Replacing Air Cleaner Filter
2. Pull the top of the air cleaner toward
the front of the vehicle and remove
the air cleaner filter.
3. Be sure to install the air cleaner filter,
replace the cover and tighten the
wing nuts securely.
Automatic Transaxle Fluid
When to Check and Change
A good time to check your automatic
transaxle fluid level is when the engine
oil is changed. Refer
to the Maintenance
Schedule to determine when to change
your fluid. See
Scheduled Maintenance
Services
in the Index.
How to Check
Because this operation can be a little
difficult, you may choose to have this
done at an Oldsmobile dealership
Service Department.
If you do it yourself, be sure to follow
all the instructions here, or you could
get a false reading on the dipstick.
NOTICE:
Too much or too little fluid can
damage your transaxle.
Too much
can mean that some of the fluid
could come out and fall on hot
engine parts or exhaust system,
starting a fire. Be sure to get an
accurate reading if you check your
transaxle fluid.
Wait at least
30 minutes before
checking the transaxle fluid level
if you
have been driving:
When outside temperatures are above
At high speed for quite a while.
In heavy traffic-especially in hot
While pulling a trailer.
90°F (32°C).
weather.
195
ProCarManuals.com
Page 199 of 276
How to Add Fluid
Refer to the Maintenance Schedule to
determine what kind of transaxle fluid
to use. See
Recommended Fluids and
Lubricants
in the Index.
If the fluid level is low, add only enough
of the proper fluid to bring the level into
the cross-hatched area
on the dipstick.
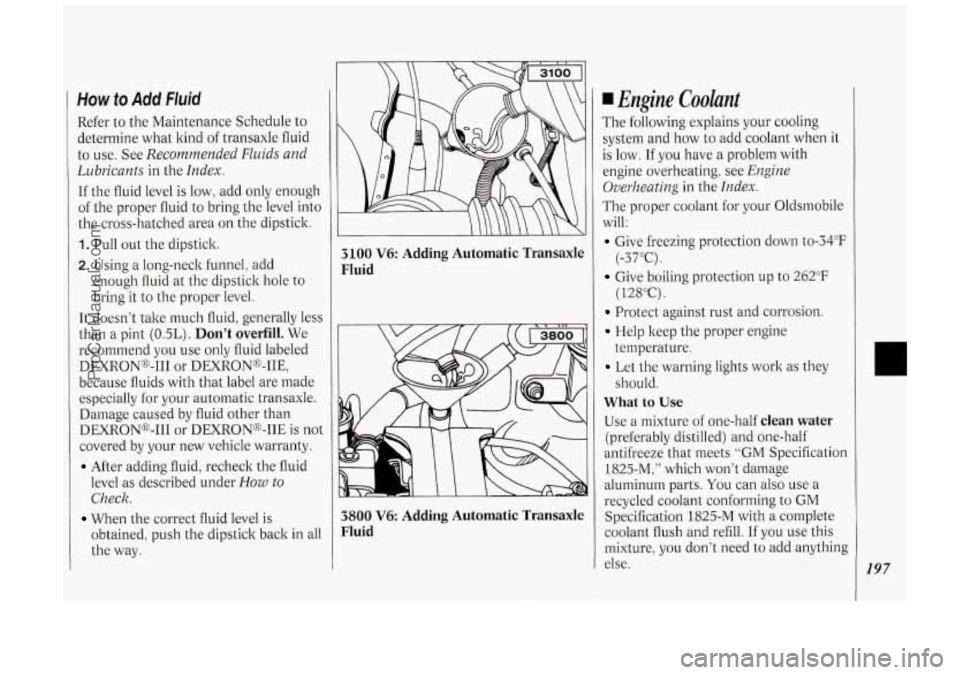
1. Pull out the dipstick.
2. Using a long-neck funnel: add
enough fluid at the dipstick hole to
bring it to the proper level.
It doesn’t take much fluid, generally less
than a pint
(OSL). Don’t overfill. We
recommend you use only fluid labeled
DEXRONo-I11 or DEXRON@-IIE,
because fluids with that label are made
especially for your automatic transaxle.
Damage caused by fluid other than
DEXRONo-I11 or DEXRONB-IIE is not
covered by your new vehicle warranty.
After adding fluid, recheck the fluid
level as described under
How to
Check.
obtained, push the dipstick back in all
the way.
When the correct fluid level is
3100 V6: Adding Automatic Transaxle
Fluid
3800 V6: Adding Automatic Transaxle
Fluid
Engine Coolant
The following explains your cooling
system and how to add coolant when it
is
low. If you have a problem with
engine overheating, see
Engine
Overheating
in the Index.
The proper coolant for your Oldsmobile
will:
Give freezing protection down to-34”F
Give boiling protection up to 262°F
Protect against rust and corrosion.
Help keep the proper engine
Let the warning lights work as they
What to Use
Use a mixture of one-half clean water
(preferably distilled) and one-half
antifreeze that meets
“GM Specification
1825-M:” which won’t damage
aluminum parts.
You can also use a
recycled coolant conforming to
GM
Specification 1825-M with a complete
coolant flush and refill.
If you use this
mixture,
you don’t need to add anything
else.
(-37°C).
( 12SoC).
temperature. should.
197
ProCarManuals.com
Page 204 of 276
Service & Appearance Care
202
container only, and always clean the
brake fluid reservoir cap before
removing it.
NOTICE:
DOT-5 silicone brake fluid can
Don’t let someone put in the
damage
your vehicle. Don’t use it.
wrong kind of fluid. For example,
just a few drops of mineral-based
oil, such
as engine oil, in your
brake system can damage brake
system parts
so badly that they’ll
have to be replaced.
Brake fluid can damage paint, so
be careful not to spill brake fluid
on your vehicle. If you do, wash it
off immediately. See
Appearance
Care
in the Index.
Brake Wear
Your Oldsmobile has front disc brakes
and rear drum brakes.
Disc brake pads have built-in wear
indicators that make
a high-pitched
warning sound when the brake pads are worn
and new pads are needed. The
sound may come and go or be heard all
the time your vehicle is moving (except
when you are pushing on the brake
pedal firmly).
NOTICE:
Continuing to drive with worn-out
brake pads could result in costly
brake repair.
Some driving conditions or climates
may cause
a brake squeal when the
brakes are first applied or lightly
applied. This does not mean something
is wrong with your brakes. Your
rear drum brakes don’t have wear
indicators, but if you ever hear a rear
brake rubbing noise, have the rear brake
linings inspected. Also, the rear brake
drums should be removed and
inspected each time the tires are
removed for rotation or changing. When
you have the front brakes replaced,
have the rear brakes inspected, too.
Brake linings should always be replaced
as complete axle sets.
Brake Pedal Travel
See your dealer if the brake pedal does
not return to normal height, or if there
is a rapid increase in pedal travel. This
could be a sign of brake trouble.
Brake Adjustment
Every time you apply the brakes
moderately, with or without the vehicle
moving, your brakes adjust for wear.
ProCarManuals.com
Page 225 of 276
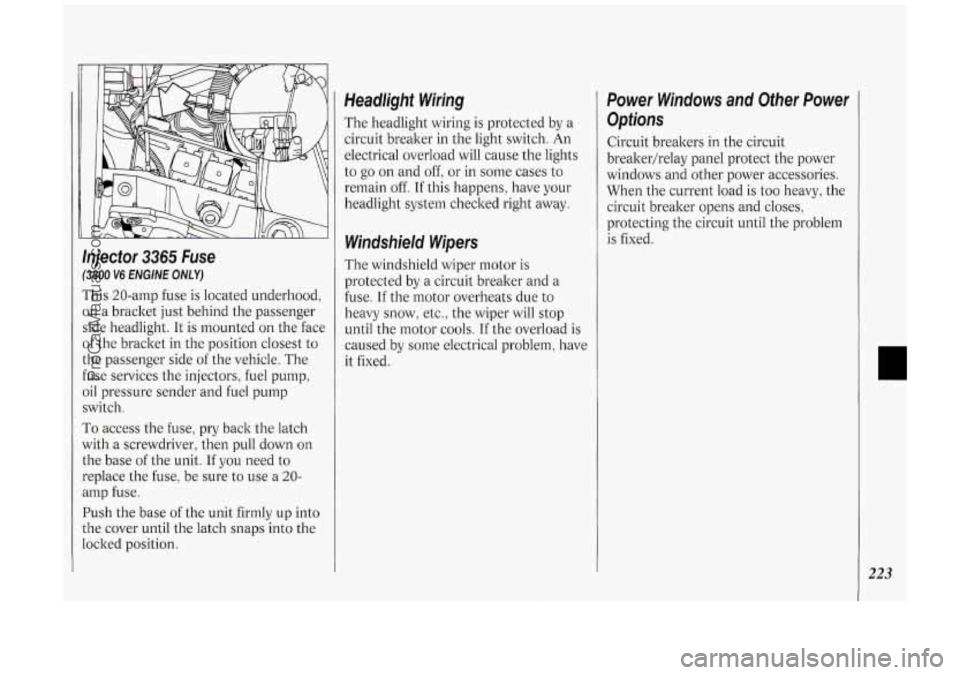
Injector 3365 Fuse
(3800 V6 ENGINE ONLY)
This 20-amp fuse is located underhood,
on a bracket just behind the passenger
side headlight. It is mounted on the face
of the bracket in the position closest to
the passenger side of the vehicle. The
fuse services the injectors, fuel pump,
oil pressure sender and fuel pump
switch.
To access the fuse, pry back the latch
with a screwdriver, then pull down on
the base
of the unit. If you need to
replace the fuse, be sure to use a 20-
amp fuse.
Push the base of the unit firmly up into
the cover until the latch snaps into the
locked position.
Headlight Wiring
The headlight wiring is protected by a
circuit breaker in the light switch. An
electrical overload will cause the lights
to go on and off: or
in some cases to
remain off. If this happens, have your
headlight system checked right away.
Windshield Wipers
The windshield wiper motor is
protected by a circuit breaker and a
fuse.
If the motor overheats due to
heavy snow, etc., the wiper will stop
until the motor cools.
If the overload is
caused by some electrical problem, have
it fixed.
Power Windows and Other Power
Options
Circuit breakers in the circuit
breakerhelay panel protect the power
windows and other power accessories.
When the current load is too heavy, the
circuit breaker opens and closes,
protecting the circuit until the problem
is fixed.
223
ProCarManuals.com
Page 226 of 276
Service & Appearance Care
224
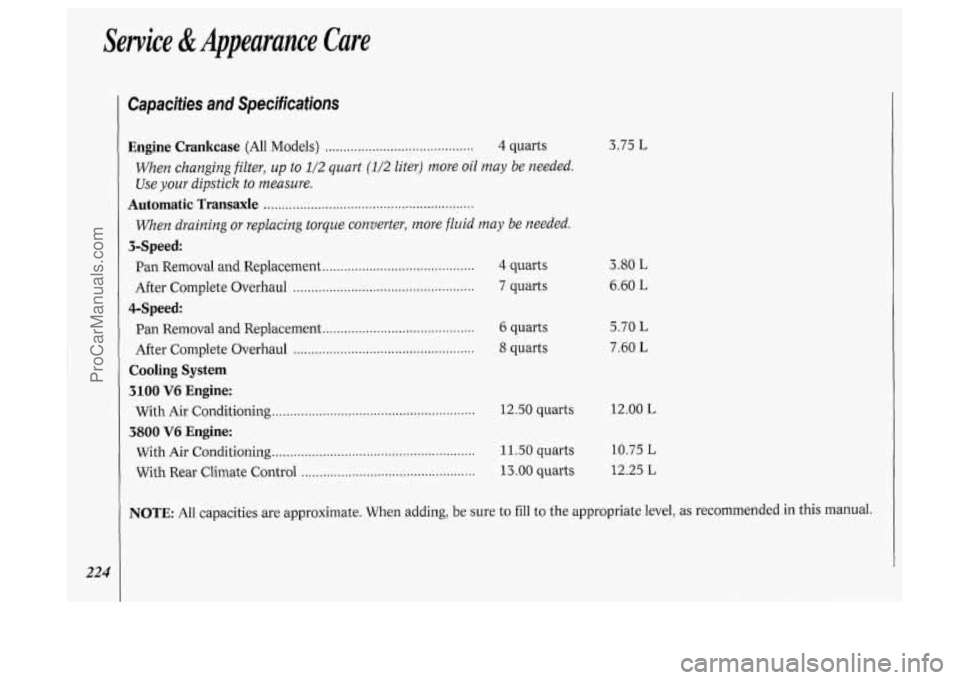
Capacities and Specifications
Engine Crankcase (All Models) ......................................... 4 quarts
When changing filter, up to 112 quart (1/2 liter) more oil may be needed.
Use
your dipstick to measure.
Automatic Transaxle ..........................................................
When draining or replacing torque converter, more fluid may be needed.
Pan Removal and Replacement .......................................... 4 quarts
After Complete Overhaul
.................................................. 7 quarts
3-Speed:
4-Speed:
Pan Removal and Replacement .......................................... 6 quarts
After Complete Overhaul
.................................................. 8 quarts
Cooling System
3100 V6 Engine:
3800 V6 Engine:
With Air Conditioning ........................................................ 12.50 quarts
With Air Conditioning ........................................................ 11.50 quarts
With Rear Climate Control
................................................ 13 .OO quarts
3.75 L
3.80 L
6.60 L
5.70 L
7.60 L
12.00 L
10.75
L
12.25 L
NOTE: All capacities are approximate. When adding, be sure to fill to the appropriate level, as recommended in this manual.
ProCarManuals.com
Page 228 of 276

226
Service & Appearance Care
Engine Specifications
VIN Engine Code ...........................................
Type ................................................................
Displacement ..................................................
Compression Ratio .......... ....... .. .. .. ..... .............
Firing Order ...................... .. ....................... ... ..
Thermostat Temperature Specification . . . . . . . . .
31 00 V6 Engine
D
V6
3.1 Liters
8.5:1
1-2-3-4-5-6
195°F (91°C)
3800 V6 Engine
1
V6
3.8 Liters
9.0:
1
1-6-5-4-3-2
195°F (91°C)
Normal Maintenance Replacement Parts
Air Cleaner Element ....................................... AC Type A-773C AC Type A-974C
Engine
Oil Filter ............................................. AC Type PF-51 AC Type PF-47
PCV Valve
................. .. ................... .... ... . . . ...... AC Type CV-789C AC Type CV-892C
Spark Plugs
...... . , . . . . . . . . . . . . .. . . . . . . .. . . . . . . , . . . . . . . . . . . . . . . . AC Type oR43TS AC Type 41-600
Remote Lock Control Batteries (2)
............... DL 2016 DL 2016
Gap: 0.045
inch (1.14
mm) Gap: 0.060 inch (1.52 mm)
ProCarManuals.com
Page 229 of 276
Fluids & Lubricants
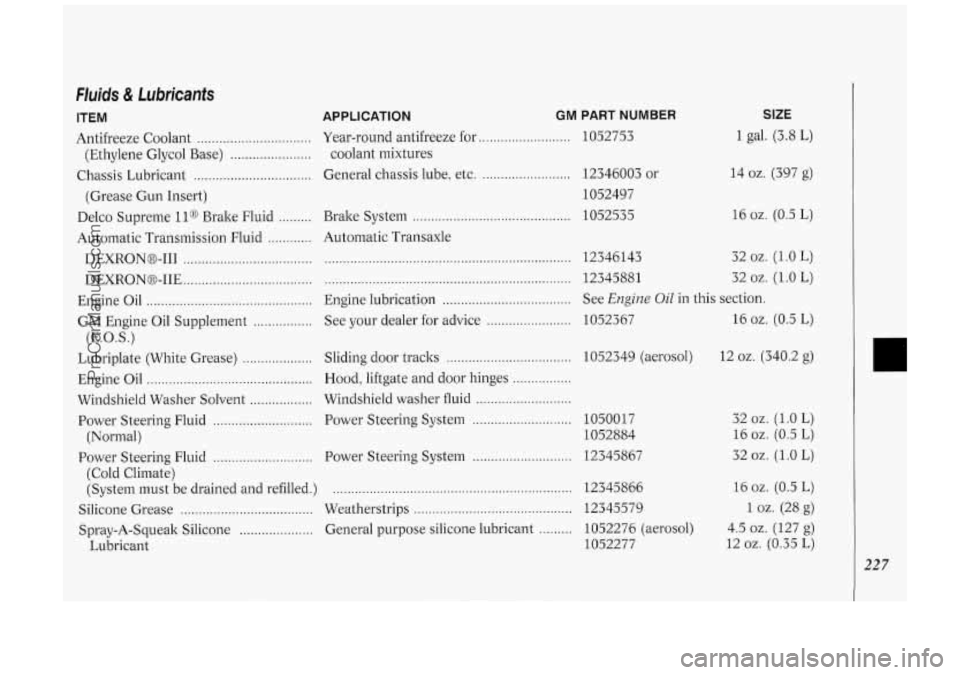
ITEM
Antifreeze Coolant ...............................
(Ethylene Glycol Base) ......................
Chassis Lubricant ................................
(Grease Gun Insert)
Delco Supreme
ll@ Brake Fluid .........
Automatic Transmission Fluid ............
DEXRONO-I11 ...................................
DEXRONO-IIE ...................................
Engine Oil .............................................
GM Engine Oil Supplement ................
Lubriplate (White Grease) ...................
Engine Oil .............................................
Windshield Washer Solvent .................
Power Steering Fluid ...........................
(E.O.S.)
(Normal)
(Cold Climate)
Power
Steering Fluid
...........................
APPLICATION GM PART NUMBER
Year-round antifreeze for ......................... 1052753
General chassis lube, etc.
........................ 12346003 or
coolant mixtures
1052497
Brake System
........................................... 1052535
Automatic Transaxle
................................................................... 12346143 32 oz. (1.0 L)
................................................................... 12345881 32 oz. (1 .O L)
Engine lubrication ................................... See Engine Oil in this section.
See your dealer for advice
....................... 1052367 16 oz. (0.5 L)
Sliding door tracks
.................................. 1052349 (aerosol) 12 oz. (340.2 g)
Hood, liftgate and door hinges
................
Windshield washer fluid ..........................
Power Steering System ........................... 1050017
1052884
Power Steering System
........................... 12345867
SIZE
1 gal. (3.8 L)
14 oz. (397 g)
16
02. (0.5 L)
32 oz. (1.0
L)
16 oz. (0.5 L)
32 oz. (1 .O L)
(System must 'be drained and refilled.) ................................................................. 12345866
Silicone Grease Weatherstrips 12345579
Lubricant 1052277
.................................... ...........................................
......... Spray-A-Squeak Silicone .................... General purpose silicone lubricant 1052276 (aerosol) 16
oz. (0.5 L)
1 oz. (28 g)
4.5
oz. (127 g)
12
oz. (0.35 L)
22 7
ProCarManuals.com
Page 236 of 276
Muintenunce Schedule
234
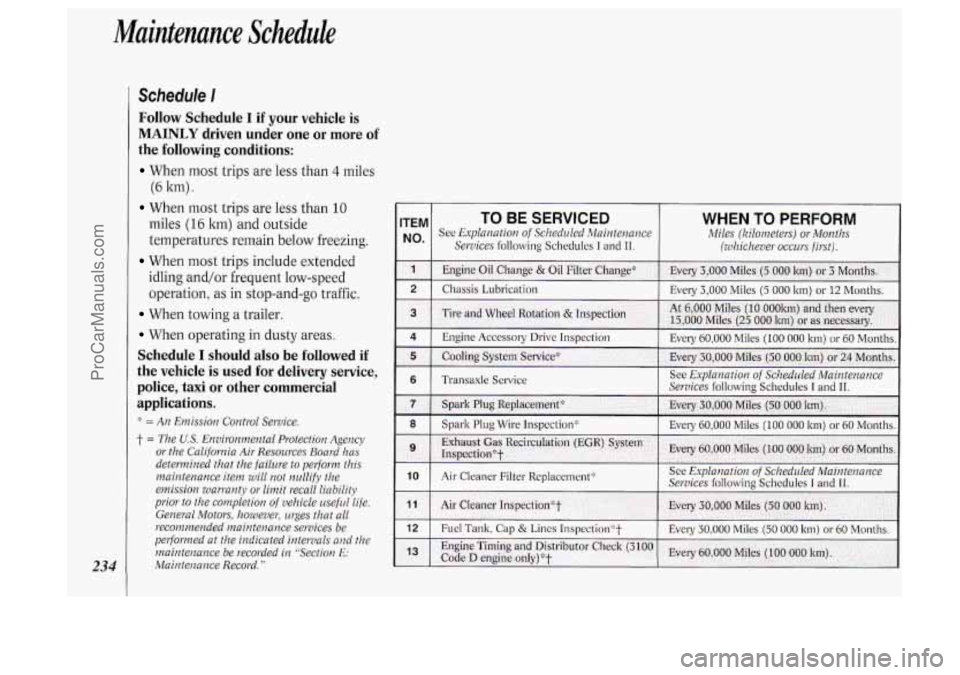
Schedule I
Follow Schedule I if your vehicle is
MAINLY driven under one or more of
the following conditions:
When most trips are less than 4 miles
When most trips are less than 10
(6
ltm)
.
miles (16 ltrn) and outside
temperatures remain below freezing.
When most trips include extended
idling and/or frequent low-speed
operation, as in stop-and-go traffic.
When towing a trailer.
When operating in dusty areas.
Schedule I should also be followed if
the vehicle is used for delivery service,
police, taxi
or other commercial
applications.
::: = An Emission Control Service.
j- = The U.S. Emiyonmental Protection Agency
or the California Air Resources Board has
determined that the failure
to pelform this
maintenance item will
not nullify the
emission warranty or limit recall liability
prior
to the completion of vehicle useful life.
General Motors, however, urges that all
recommended maintenance services be
pelformed at the indicated intervals and the
maintenance be recorded in “Section
E:
Maintenance Record.”
ITEM TO BE SERVICED WHEN TO PERFORM
No* See Explanation of Scheduled Maintenance Miles (Kilometers) or Months
Services
following Schedules I and 11. (whichever occurs firsl).
1 Engine Oil Change & Oil Filter Change* Every 3,000 Miles (5 000 km) or 3 Montl~s..
2 Chassis Lubrication Every 3,000 Miles (5 000 lm) or 12 Months.
ProCarManuals.com