Page 62 of 1708
ON-VEHICLE MAINTENANCE B Steps After Installation 1. Connect the neaative batterv cable. Oil seal 1. Cut the oil seal lip with a razor knife. 2. Remove the oil seal with a screwdriver protected with a rag. Installation Note Oil seal 1. Apply a small amount of clean engine oil to the lip of a new oil seal. 2. Push the oil seal slightly in by hand. 3. Tap the oil seal in evenly with a pipe and a hammer until it is flush with the edge of the oil pump body. Note Oil seal outer diameter: 50.5mm (1.99 in} Oil seal inner diameter: 36.5mm (1.44 in} Timing belt pulley 1. Install the timing belt pulley. 2. Install the pulley woodruff key with the tapered side to- ward the oil pump body. 2. Start the enginsand check, and if necessary, adjust the ignition timing. 3. Connect the negative battery cable. 4. Start the engine and check follows: (1) Engine coolant leakage (2) Ignition timing (Refer to page B-9.) 5. Recheck the engine coolant levels. Gartner Banana
Page 123 of 1708
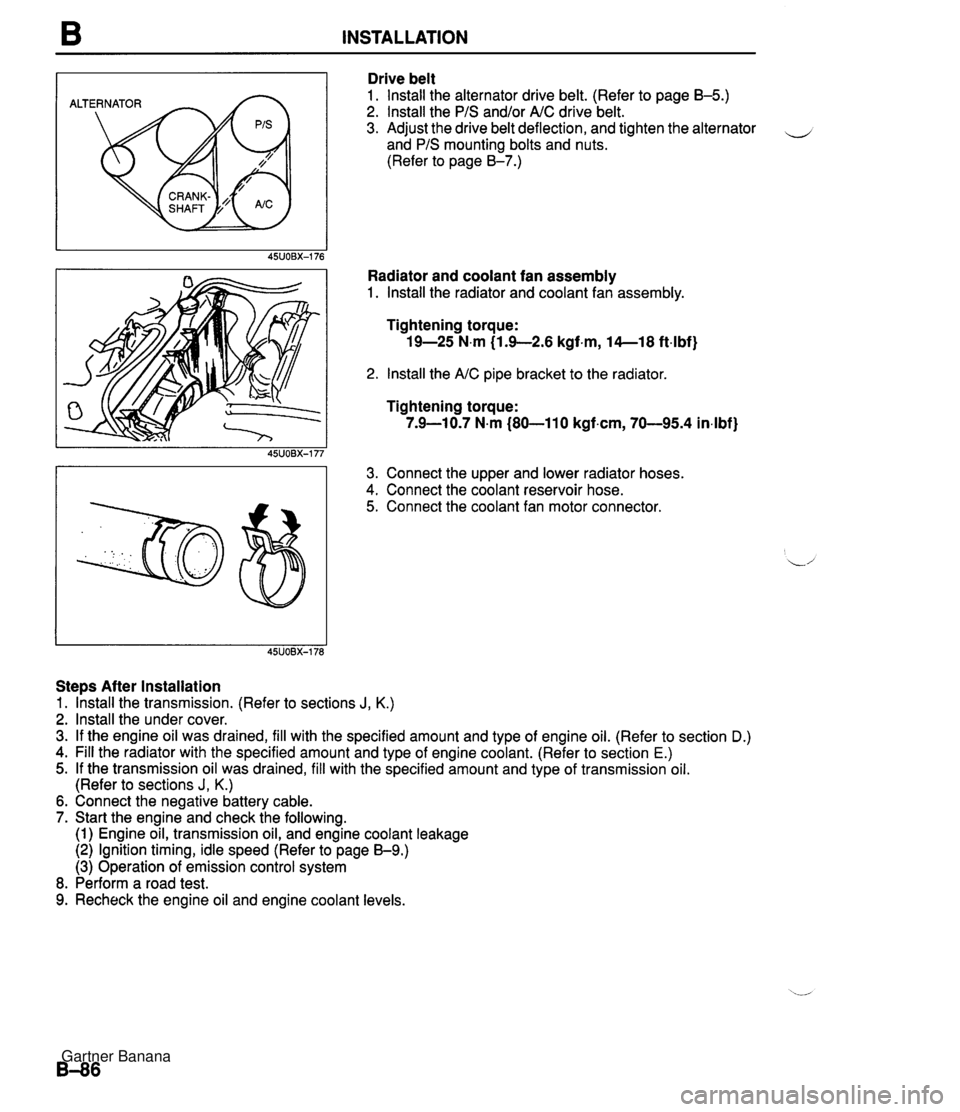
B INSTALLATION ALTERNATOR Drive belt 1. lnstall the alternator drive belt. (Refer to page B-5.) 2. lnstall the PIS and/or AIC drive belt. 3. Adjust the drive belt deflection, and tighten the alternator - and PIS mounting bolts and nuts. (Refer to page 8-7.) Radiator and coolant fan assembly 1. lnstall the radiator and coolant fan assembly. Tightening torque: 19-25 N.m (1.9-2.6 kgf.m, 14--18 ft4bf) 2. lnstall the AIC pipe bracket to the radiator Tightening torque: 7.9-10.7 N.m (80-110 kgf.cm, 70-95.4 in4bf) 3. Connect the upper and lower radiator hoses. 4. Connect the coolant reservoir hose. 5. Connect the coolant fan motor connector. Steps After Installation 1. lhstall the transmission. (Refer to sections J, K.) 2. lnstall the under cover. 3. If the engine oil was drained, fill with the specified amount and type of engine oil. (Refer to section D.) 4. Fill the radiator with the specified amount and type of engine coolant. (Refer to section E.) 5. If the transmission oil was drained, fill with the specified amount and type of transmission oil. (Refer to sections J, K.) 6. Connect the negative battery cable. 7. Start the engine and check the following. (1) Engine oil, transmission oil, and engine coolant leakage (2) Ignition timing, idle speed (Refer to page 59.) (3) Operation of emission control system 8. Perform a road test. 9. Recheck the engine oil and engine coolant levels. Gartner Banana
Page 130 of 1708
OIL COOLER D OIL COOLER REMOVAL I INSTALLATION 1. Disconnect the negative battery cable. 2. Drain the engine oil and engine coolant. (Refer to page D-5, Section E.) 3. Remove in the order shown in the figure. 4. Install in the reverse order of removal. INSTALL OIL COOLER WITH IDENTIFICATION MARK (BLACK) FACING UP A OIL FILTER^ RUBBER I 3049 (3.0--4.0,22-28) REPLACE Nm {kgtm, ft4bf) 1. Oil filter 3. Oil cooler Replacement . . . . . . . . . . . . . . . Page D-6 4. O-ring 2. Water hose Steps After Installation 1. Connect the negative battery cable. 2. Fill with the specified amount and type of engine oil and engine coolant. (Refer to page D-5, Section E.) 3. Start the engine and check for leaks. 4. Check the oil level and add oil if necessary. 5. Recheck the engine coolant levels. Gartner Banana
Page 139 of 1708
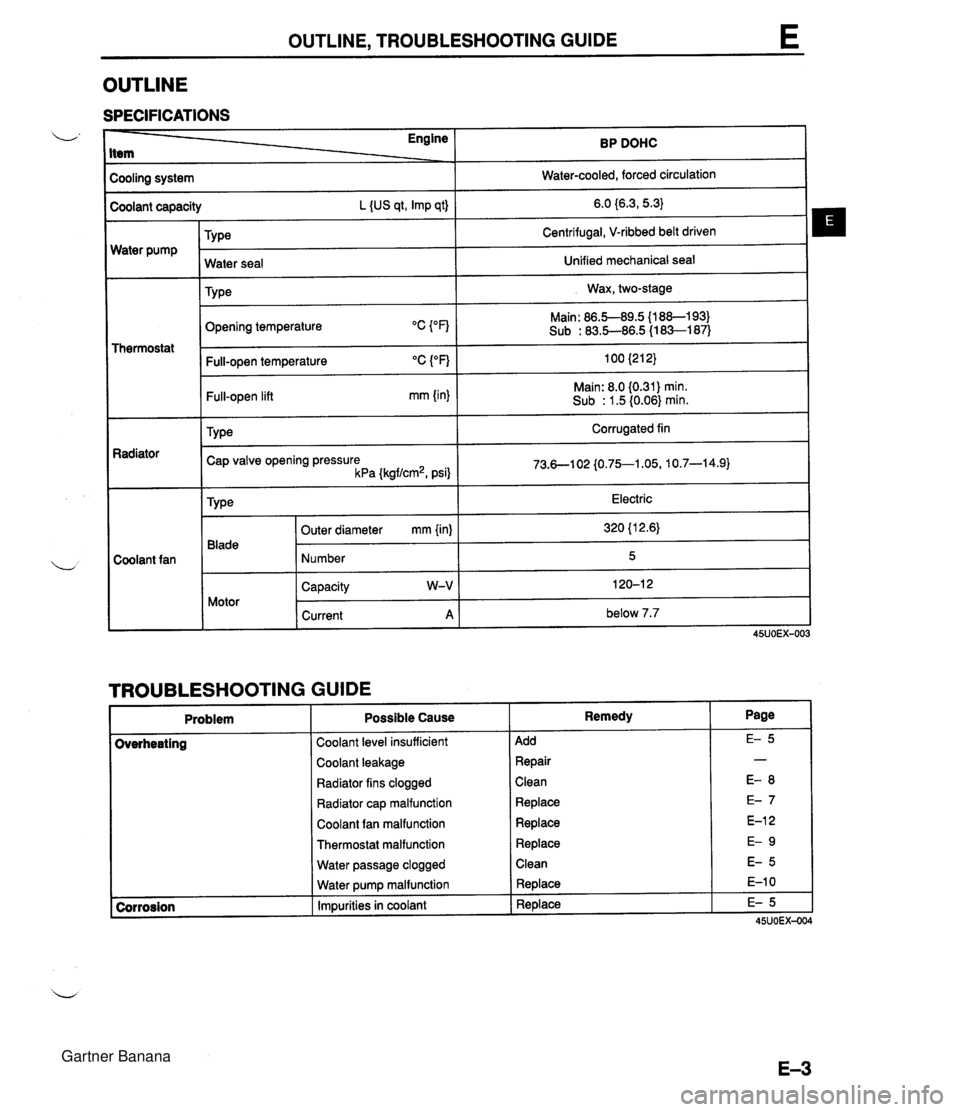
OUTLINE, TROUBLESHOOTING GUIDE OUTLINE SPECIFICATIONS Cooling system I Water-cooled, forced circulation I - - Engine Item - Water pump BP DOHC Coolant capacity L {US qt, Imp qt) TY ~e Thermostat 6.0 {6.3,5.3} Centrifugal, V-ribbed belt driven Radiator - Coolant fan Opening temperature Water seal TY pe Main: 86.5-89.5 {l 88-1 93) Sub : 83.5-86.5 (1 83-1 87) Unified mechanical seal Wax, two-stage I Full-open temperature "C ("F) 100 {212} 1 Full-open lift mm {in} Main: 8.0 (0.31) min. Sub : 1.5 (0.06) min. TY pe Corrugated fin Cap valve opening pressure kPa {kgf/cm2, psi} 1 TROUBLESHOOTING GUIDE Problem Electric 320 {l 2.6) 5 120-1 2 below 7.7 Type 45UOEX-003 Blade Motor Coolant level insufficient 1 Add Outer diameter mm {in) Number Capacity W-V Current A Possible Cause Coolant leakage 1 Repair Remedy Radiator fins clogged ( Clean Radiator cap malfunction 1 Replace Coolant fan malfunction 1 Replace Thermostat malfunction 1 Replace Water passage clogged 1 Clean Water pump malfunction Impurities in coolant Replace Replace Gartner Banana
Page 140 of 1708
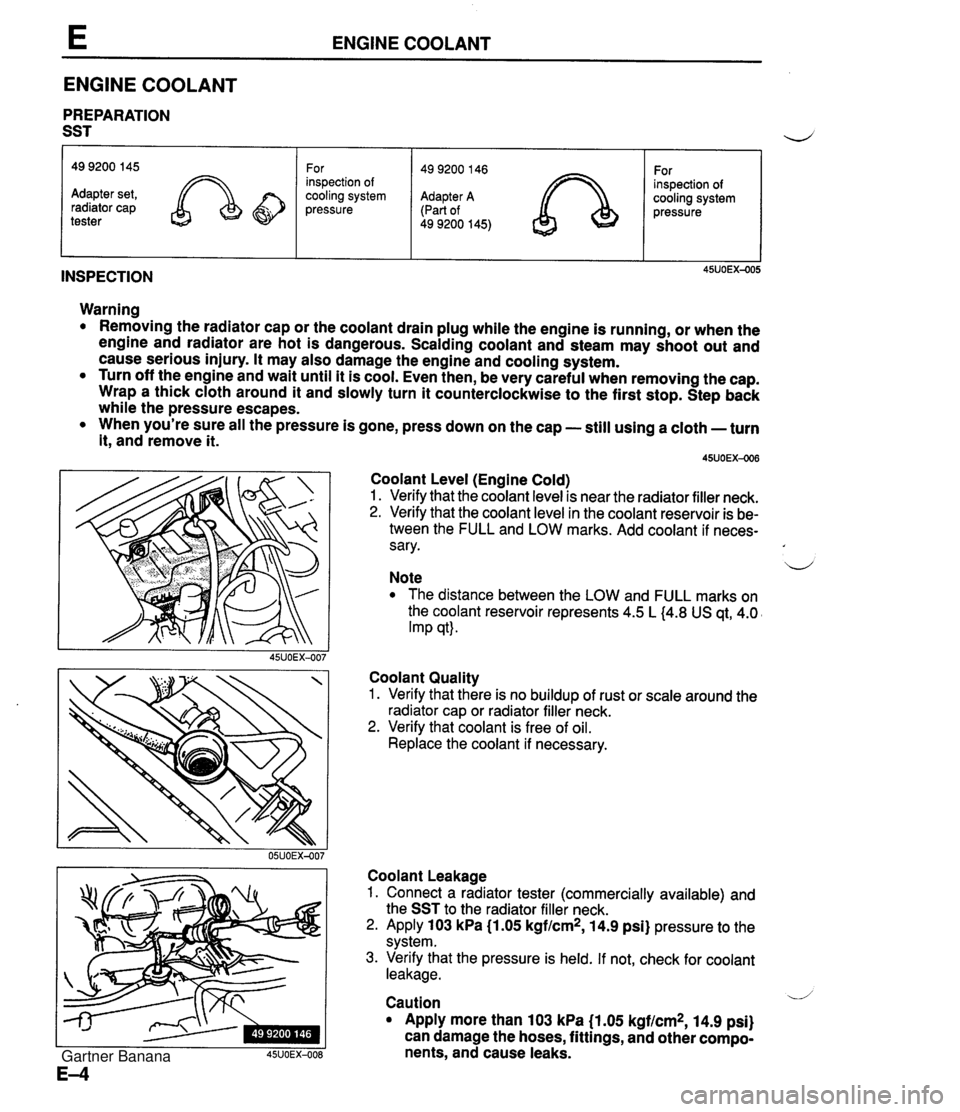
ENGINE COOLANT ENGINE COOLANT PREPARATION SST INSPECTION 49 9200 145 Adapter set, radiator cap tester Warning Removing the radiator cap or the coolant drain plug while the engine is running, or when the engine and radiator are hot is dangerous. Scalding coolant and steam may shoot out and cause serious injury. It may also damage the engine and cooling system. Turn off the engine and wait until it is cool. Even then, be very careful when removing the cap. Wrap a thick cloth around it and slowly turn it counterclockwise to the first stop. Step back while the pressure escapes. When you're sure all the pressure is gone, press down on the cap - still using a cloth -turn it, andremove it. For inspection of cooling system pressure Coolant Level (Engine Cold) 1. Verify that the coolant level is near the radiator filler neck. 2. Verify that the coolant level in the coolant reservoir is be- tween the FULL and LOW marks. Add coolant if neces- sary. u Note The distance between the LOW and FULL marks on the coolant reservoir represents 4.5 L (4.8 US qt, 4.0 Imp qt). Coolant Quality 1. Verify that there is no buildup of rust or scale around the radiator cap or radiator filler neck. 2. Verify that coolant is free of oil. Replace the coolant if necessary. 49 9200 146 Adapter A (Part of 49 9200 145) Coolant Leakage 1. Connect a radiator tester (commercially available) and the SST to the radiator filler neck. 2. Apply 103 kPa (1.05 kgf/cm2, 14.9 psi} pressure to the system. 3. Verify that the pressure is held. If not, check for coolant leakage. For inspection of cooling system pressure / V Caution Apply more than 103 kPa (1.05 kgf/cm2, 14.9 psi) can damage the hoses, fittings, and other compo- nents, and cause leaks. Gartner Banana
Page 142 of 1708
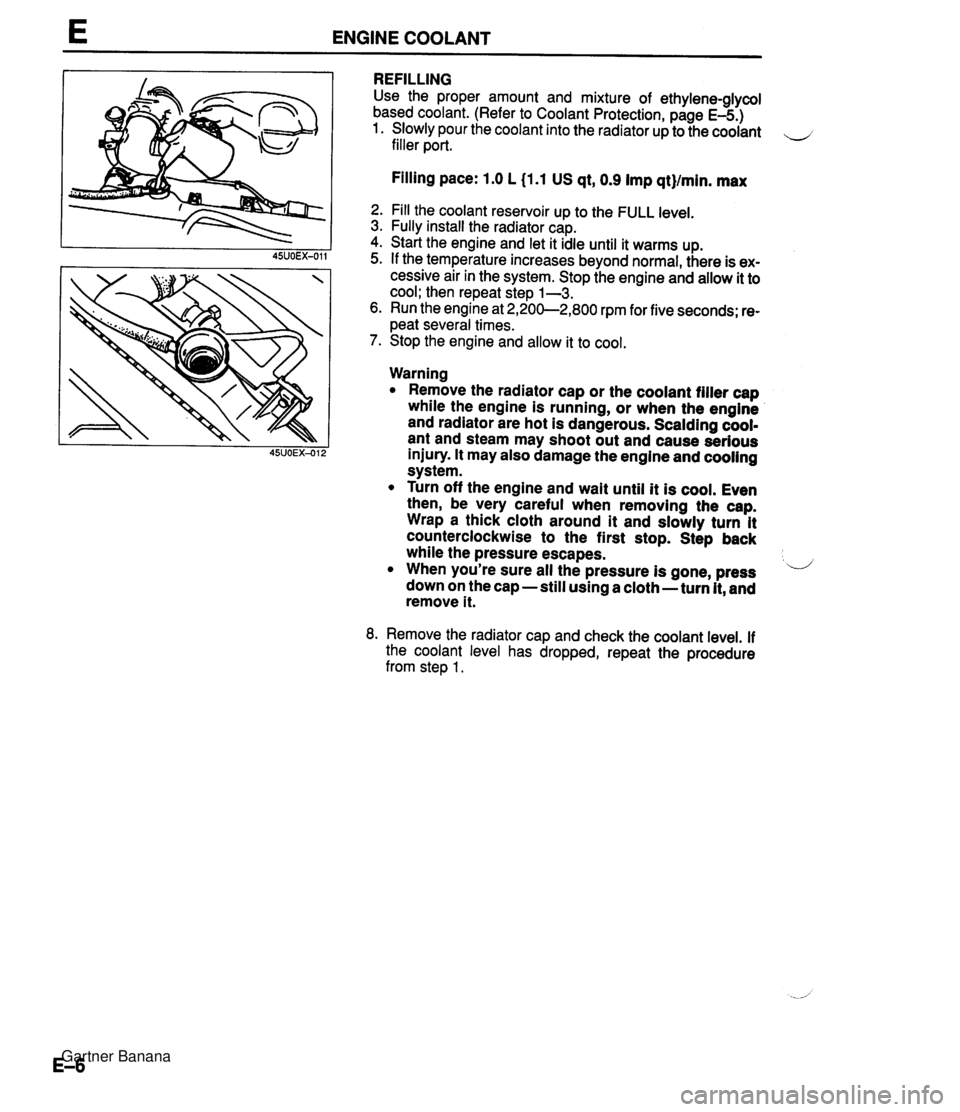
E ENGINE COOLANT REFILLING Use the proper amount and mixture of ethylene-glycol based coolant. (Refer to Coolant Protection, page E-5.) 1. Slowly pour the coolant into the radiator up to the coolant filler port. Filling pace: 1.0 L (1.1 US qt, 0.9 Imp qt}/min. max 2. Fill the coolant reservoir up to the FULL level. 3. Fully install the radiator cap. 4. Start the engine and let it idle until it warms up. 5. If the temperature increases beyond normal, there is ex- cessive air in the system. Stop the engine and allow it to cool; then repeat step 1-3. 6. Run the engine at 2,200-2,800 rpm for five seconds; re- peat several times. 7. Stop the engine and allow it to cool. Warning Remove the radiator cap or the coolant filler cap while the engine is running, or when the engine and radiator are hot is dangerous. Scalding cool- ant and steam may shoot out and cause serious injury. It may also damage the engine and cooling system. Turn off the engine and wait until it is cool. Even then, be very careful when removing the cap. Wrap a thick cloth around it and slowly turn it counterclockwise to the first stop. Step back while the pressure escapes. When you're sure all the pressure is gone, press ii down on the cap -still using a cloth - turn it, and remove it. 8. Remove the radiator cap and check the coolant level. If the coolant level has dropped, repeat the procedure from step 1. Gartner Banana
Page 224 of 1708
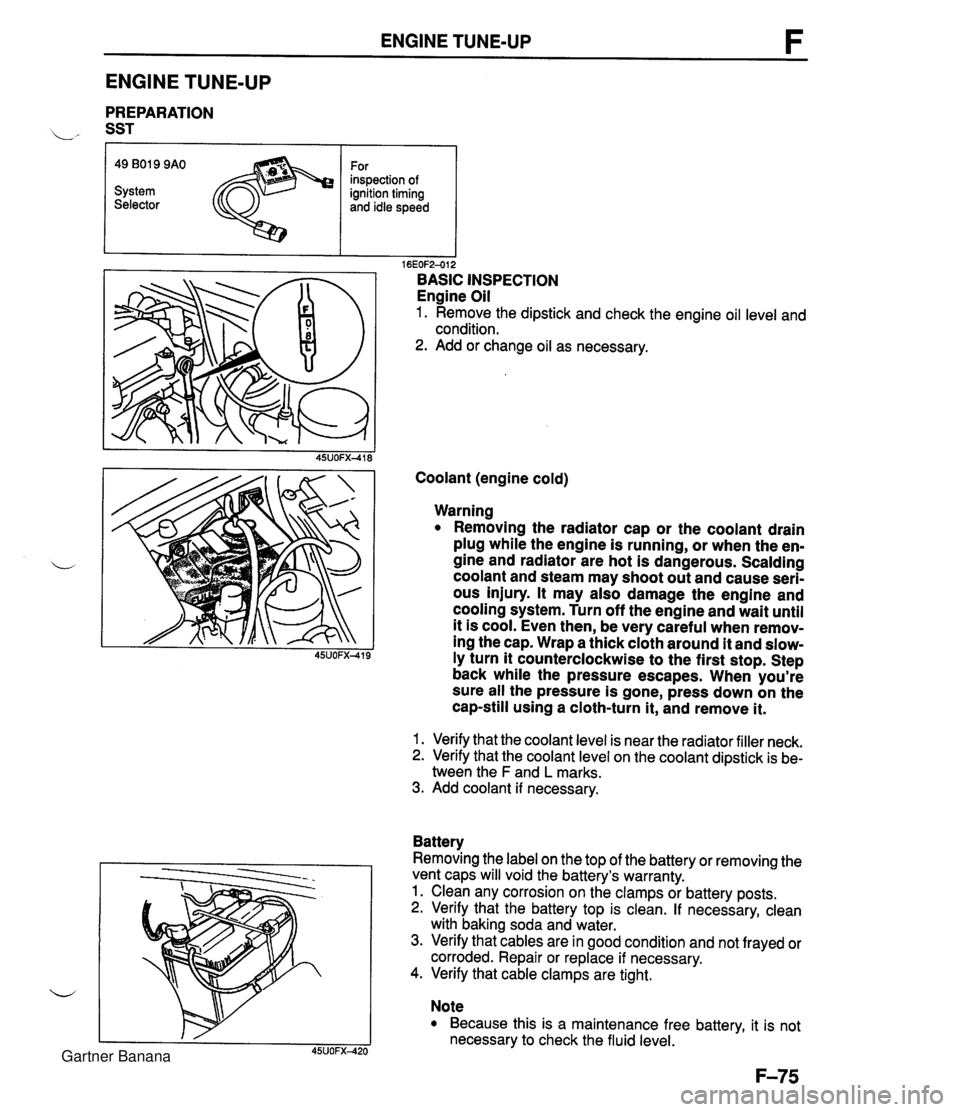
ENGINE TUNE-UP ENGINE TUNE-UP PREPARATION L" SST r I I 16EOF2-012 BASIC INSPECTION Engine Oil 1. Remove the dipstick and check the engine oil level and condition. 2. Add or change oil as necessary. 49 B019 9AO System Selector Coolant (engine cold) For inspection of ignition timing and idle speed Warning Removing the radiator cap or the coolant drain plug while the engine is running, or when the en- gine and radiator are hot is dangerous. Scalding coolant and steam may shoot out and cause seri- ous injury. It may also damage the engine and cooling system. Turn off the engine and wait until it is cool. Even then, be very careful when remov- ing the cap. Wrap a thick cloth around it and slow- ly turn it counterclockwise to the first stop. Step back while the pressure escapes. When you're sure all the pressure is gone, press down on the cap-still using a cloth-turn it, and remove it. 1. Verify that the coolant level is near the radiator filler neck. 2. Verify that the coolant level on the coolant dipstick is be- tween the F and L marks. 3. Add coolant if necessary. Battery Removing the label on the top of the battery or removing the vent caps will void the battery's warranty. 1. Clean any corrosion on the clamps or battery posts. 2. Verify that the battery top is clean. If necessary, clean with baking soda and water. 3. Verify that cables are in good condition and not frayed or corroded. Repair or replace if necessary. 4. Verify that cable clamps are tight. Note Because this is a maintenance free battery, it is not necessary to check the fluid level. Gartner Banana
Page 230 of 1708
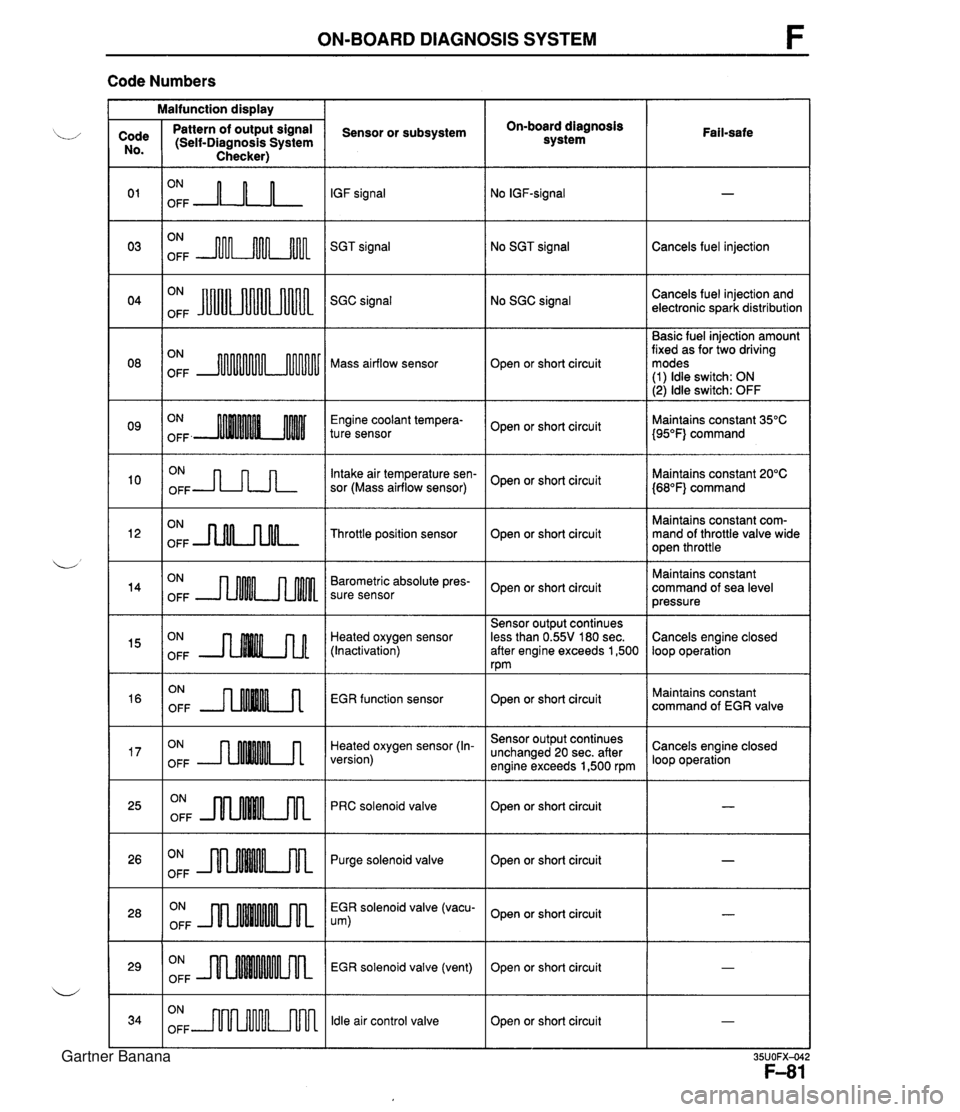
ON-BOARD DIAGNOSIS SYSTEM F Code Numbers Malfunction display On-board diagnosis system Code No. 0 1 03 Pattern of output signal (Self-Diagnosis System Checker) Sensor or subsystem IGF signal SGT signal Fail-safe ON OFF A-n-L ON OFF m No SGT signal ON OFF JuUu Cancels fuel injection No SGC signal Cancels fuel injection and electronic spark distribution SGC signal Basic fuel injection amount fixed as for two driving modes (1) ldle switch: ON (2) ldle switch: OFF ON OFF Mass airflow sensor Open or short circuit Engine coolant tempera- ture sensor ON OFF -JLnn Open or short circuit Intake air temperature sen- sor (Mass airflow sensor) Maintains constant 35°C {95"F} command Maintains constant 20°C {68"F} command Open or short circuit ON OFF -nNLnM- Maintains constant com- mand of throttle valve wide open throttle Throttle position sensor Open or short circuit ON OFF Barometric absolute pres- sure sensor Maintains constant command of sea level pressure Open or short circuit Heated oxygen sensor (Inactivation) EGR function sensor Sensor output continues less than 0.55V 180 sec. after engine exceeds 1,500 rpm Cancels engine closed loop operation ON OFF ON OFF --nMM.A ON OFF --rMMMA Open or short circuit Heated oxygen sensor (In- version) Maintains constant command of EGR valve ON OFF JlnMkm Sensor output continues unchanged 20 sec. after engine exceeds 1,500 rpm PRC solenoid valve Cancels engine closed loop operation Open or short circuit Open or short circuit I - ON OFF m Purge solenoid valve ON OFF EGR solenoid valve (vacu- um) ON OFF Open or short circuit EGR solenoid valve (vent) ldle air control valve - Open or short circuit ON OFF m Open or short circuit I - Gartner Banana