1994 CHEVROLET CORVETTE clock
[x] Cancel search: clockPage 68 of 274

Downloaded from www.Manualslib.com manuals search engine Ieadlights
?he headlight knob controls these lights:
b Headlights
1 Taillights
1 Parking lights
1 Sidemarker lights
hm the knob to $R to turn on your
leadlights and other operating lights.
rurn the knob to:OO:to turn on your
mking and other operating lights without
‘our headlights.
rurn the knob to “OFF’ to turn off the
ights.
(our digital display will dim at dusk to
emind you to turn on your headlights. To
read your odometer and fuel level with
the ignition
off, turn on your parking
lights.
Lights On Reminder
If you turn the ignition “Off” and leave
the lights on, you will hear a chime.
Brightness Control
The “DIMMER’ switch controls the
brightness of your instrument panel lights
when your headlights or parking lights are
on. Move the switch up or down to
brighten or dim the lights. If you turn the
switch all the way up, your courtesy,
reading, map and cargo area lights will
some on. Be sure to turn off the lights
when you leave your vehicle.
Headlight Doors
The headlight doors are designed to open
when you
turn the headlights on and close
when you turn the headlights and parking
lights
off. If you turn the headlights on,
then turn
the headlight switch back to the
parking lights setting, the headlight doors
will stay open.
You can open the doors manually using
the knob next to the headlight assembly.
Turn the knob counterclockwise until the
doors are open.
The headlight doors should be open when
driving in icy or snowy conditions to
prevent the doors from freezing closed
and when washing the vehicle to help
clean the headlights.
67. .
Page 106 of 274

Downloaded from www.Manualslib.com manuals search engine In this part you’ll find out how to
operate the comfort control
systems and audio systems
offered with your Corvette
. Be
sure to read about the particular
system supplied with your
vehicle
.
Part 3
Comfort Controls & Audio
Systems
Comfort Controls ................................................ 106
Air Conditioner Controls ........................................ 106
Automatic Electronic Climate Control .............................. 108
Rear Window Defogger ......................................... 111
Treated Windshield ............................................ 111
Flow-Through Ventilation System ................................. 111
Audio Systems .................................................. 112
Setting the Clock .............................................. 113
Noise Reduction ............................................... 113
AM/FM Stereo with Cassette Tape Player ........................... 113
DelcoBose AM/FM Stereo with Cassette Tape and
Compact Disc Player
......................................... 115
Understanding Radio Reception .................................. 117
Care of Your Cassette Tape Player ................................. 117
Care of Your Compact Discs ..................................... 118
Power Antenna Mast Care ................................... 118
105 ..
Page 114 of 274

Downloaded from www.Manualslib.com manuals search engine Setting the Clock
1. Press “SET.”
2. Within five seconds, press and hold
“TUNE
v ” until the correct hour
appears.
correct minute appears.
3. Press and hold “TUNE A ” until the
Noise Reduction
Your audio system has automatic Dolby@
B Noise Reduction.
Dolby and the
00 @are trademarks of
Dolby Laboratories Licensing
Corporation.
Noise reduction system manufactured under license from Dolby Laboratories
Licensing Corporation.
AMIFM Stereo with Cassette
Tape Player
To Play the Radio
Turn the upper knob to turn the system on
or
off.
Volume: Turn the upper knob to adjust
the volume.
Recall: Press the upper knob to recall the
station being played or
the clock display.
0 c3 0
STOP PLAY
0 0 0
Finding a Station
Band:
Press the “AM-FM” button to get
AM or F”. The lighted display shows
your selection.
fine: Press “TUNE or A ” to choose
radio stations. For fast tuning, press and
hold one side of the button, then press the
other side.
Seek: Press “AUTO’ then “TUNE v or
A ” and the radio will tune to the next
lower or higher station and stay there.
Pushbuttons: The six pushbuttons let
you return to your favorite stations. To
set up to
12 stations (6 AM and
6 FM), just:
1. Tune in the station.
2. Press “SET.”
3. Within five seconds, press one of the
six pushbuttons. Whenever you press
that button, the preset station will
return.
Repeat these steps for each pushbutton.
Setting the Tone
Bass:
Turn the “BASS” knob to the right
to hear more bass.
Treble: Turn the “TREB” control behind
the “BASS” knob to the right to hear
more treble.
113 ...
Page 116 of 274

Downloaded from www.Manualslib.com manuals search engine I I PROG RCL 0 0 0 0 I
0 0 0 0 0 I
IL
1 I
Delco/Bose AWFM Stereo
with Cassette Tape
and
Compacf Disc Player
To Play the Radio
Turn the upper knob to turn the system
on or
off.
~ Volume: Turn the upper knob to adjust
~ the volume. Your system also has a
’ feature called speed-compensated
volume (SCV). With SCV, your audio
system makes up for road noise by
getting louder as you drive faster. The
control behind the upper knob has three
SCV positions.
“H” has a higher
maximum volume and gets louder
faster than
“L.” Use “H” when you
are driving with the roof panel
off,
the convertible top down or the
windows open. If you don’t want to
use SCV,
turn the control to “OFF.”
Recall: Press the upper knob to recall the
station being played or the clock display.
Finding a Station
Band:
Press the “AM-FM” button to
get AM or
FM. The lighted display
shows your selection.
fine: Press “TUNE A or V” to choose
radio stations. For fast tuning, press and
hold one side of the button, then press
the other side.
Seek: Press “AUTO” then “TUNE V
or A’’ and the radio will tune to the
next lower or higher station and stay
there.
Pushbuttons: The six pushbuttons let
you return to your favorite stations.
To
set up to 12 stations (6 AM and 6 FM),
just:
1. Tune in the station.
2. Press “SET.”
3. Within five seconds, press one of
the six pushbuttons. Whenever you
press that button, the preset station
will return.
Setting the Tone
Bass:
Turn the “BASS” knob to the
right to hear more bass.
Treble: Turn the “TREB” control
behind the “BASS” knob to the right
to hear more treble.
Adjusting the Speakers
Balance:
With the DelcoBose system,
your speakers are electronically
balanced.
115 ...
Page 129 of 274

Downloaded from www.Manualslib.com manuals search engine Your Driving and the Road
the tires against the road surface makes it
possible for the vehicle to change its path
when you
turn the front wheels. If there’s
no traction, inertia will keep the vehicle
going in the same direction. If you’ve
ever tried to steer a vehicle
on wet ice,
you’ll understand this.
The traction you can get in a curve
depends on the condition of your tires and
the road surface, the angle at which
the
curve is banked, and,your speed. While
you’re in a curve, speed is the one factor
you can control.
Suppose you’re steering through a sharp
curve. Then you suddenly accelerate.
Both control systems
- steering and
acceleration
- have to do their work
where the tires meet the road. Unless
your
ASR system is on, adding the
sudden acceleration can demand too
much of those places. You can lose
control.
What should you do if this ever happens?
Ease up on the accelerator pedal, steer the
vehicle the way you want it to go, and
slow down.
Speed limit signs near curves warn that
you should adjust your speed. Of course,
the posted speeds are based on good
weather and road conditions. Under less favorable conditions
you’ll want to go
slower.
If you need to reduce your speed as
you
approach a curve, do it before you enter
the curve, while your front wheels are
straight ahead.
Try to adjust your speed
so you can
“drive”. through the curve. Maintain
a reasonable, steady speed. Wait to
accelerate until you are out of
the curve,
and then accelerate gently into the
straightaway.
Steering in Emergencies
There are times when steering can be more
effective than braking. For example, you
come over a hill and find a truck stopped
in your lane, or a car suddenly pulls out
from nowhere, or a child darts out from
between parked cars and stops right in
front of you. You can avoid these problems
by braking
- if you can stop in time. But
sometimes you can’t; there isn’t room.
That’s the time for evasive action
-
steering around the problem.
Your Corvette can perform very well in
emergencies like these. First apply your
brakes. It is better to remove as much speed as you can from a possible collision.
Then steer around the problem, to the left
or right depending on the space available.
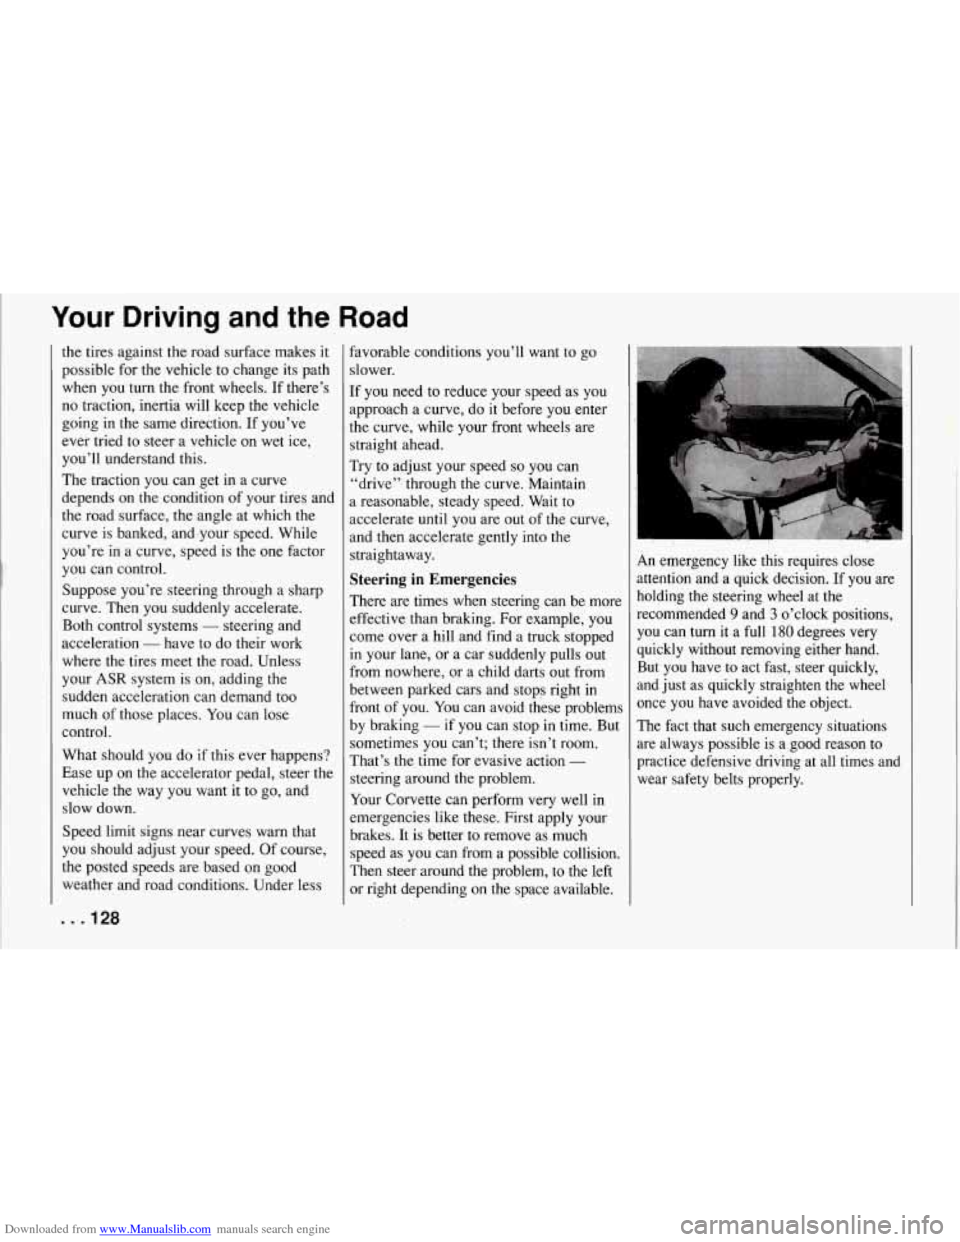
An emergency like this requires close
attention and a quick decision. If you are
holding the steering wheel at the recommended
9 and 3 o’clock positions,
you can turn it a full
180 degrees very
quickly without removing either hand. But you have to act fast, steer quickly,
and just as quickly straighten the wheel
once you have avoided the object.
The fact that such emergency situations
are always possible is
a good reason to
practice defensive driving at all times and
wear safety belts properly.
Page 162 of 274

Downloaded from www.Manualslib.com manuals search engine I -
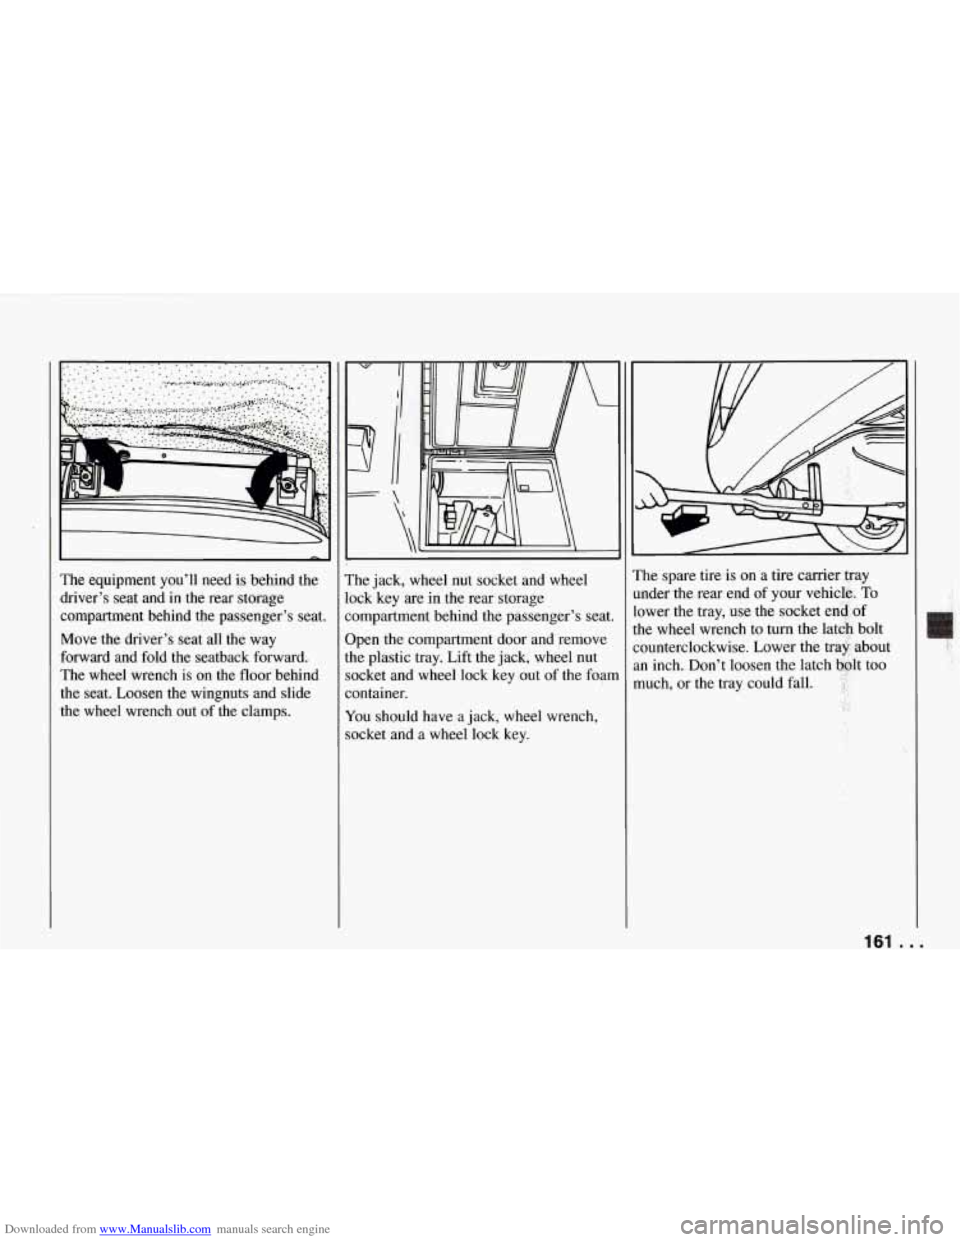
The equipment you’ll need is behind the
driver’s seat and in the rear storage
compartment behind the passenger’s seat.
Move the driver’s seat all the way
forward and fold the seatback forward.
The wheel wrench is on the floor behind
the seat. Loosen the wingnuts and slide
the wheel wrench out of the clamps. The
jack, wheel nut socket and wheel
ock key are in the rear storage
:ompartment behind the passenger’s seat.
]pen the compartment door and remove
,he plastic tray. Lift the jack, wheel nut
socket and wheel lock key out
of the foan
container.
You should have a jack, wheel wrench,
socket and
a wheel lock key. The
spare tire is on a tire carrier Q-ay
mder the rear end of your vehicle,.
To
lower the tray, use the socket end of
:he wheel wrench to turn the latch bolt
:ounterclockwise. Lower the trag- about
an inch. Don’t loosen the latch bplt too
much, or the tray could fall.
,i
161 ...
Page 164 of 274

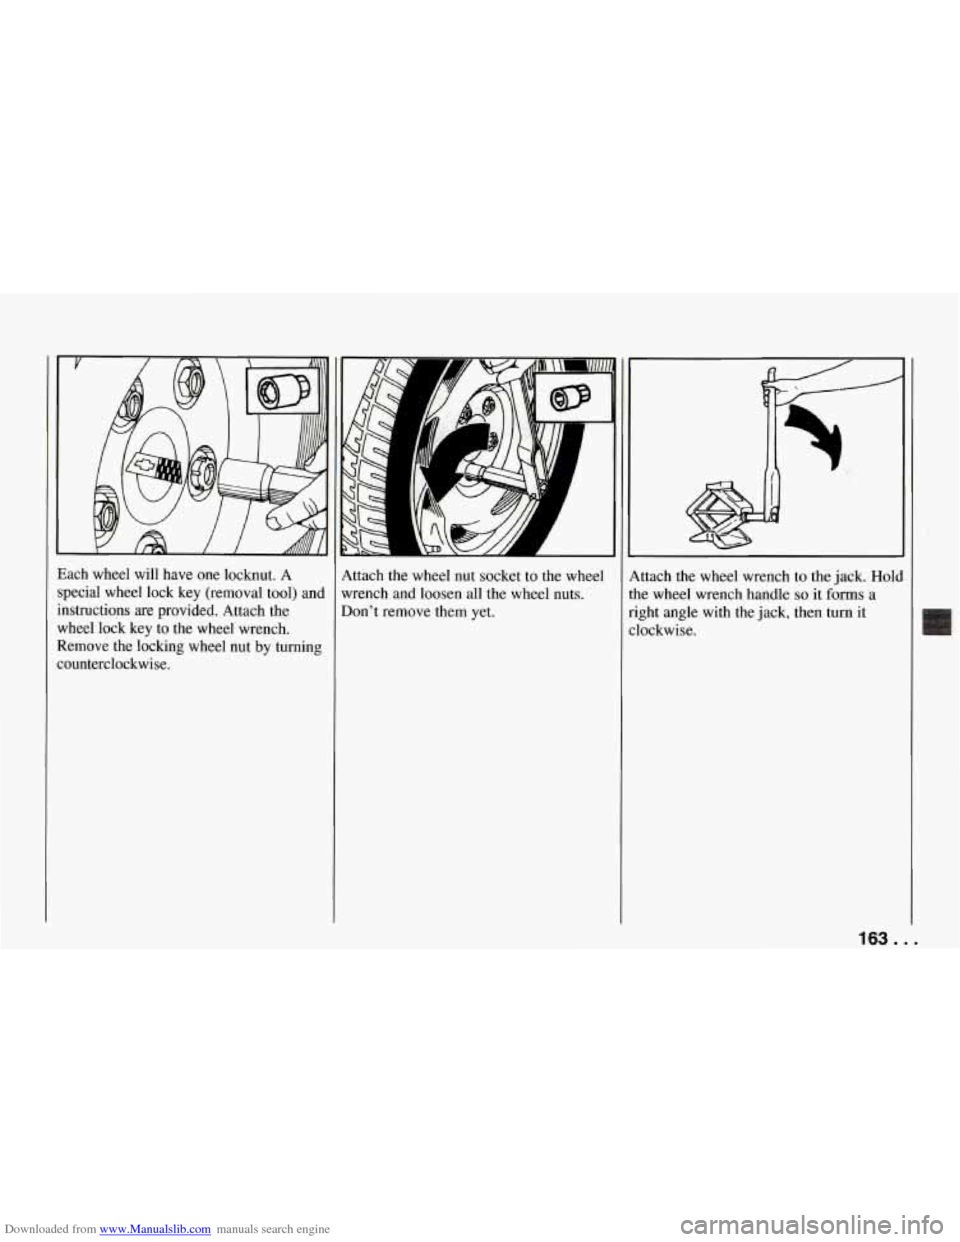
Downloaded from www.Manualslib.com manuals search engine Each wheel will have one locknut. A
special wheel lock key (removal tool) and
instructions are provided. Attach the
wheel lock key to the wheel wrench.
Remove the locking wheel nut by turning
counterclockwise. Attach the wheel nut
socket to the wheel
wrench and loosen all the wheel nuts.
Don’t remove them
yet.
4ttach the wheel wrench to the jack. Holc
he wheel wrench handle
so it forms a
ight angle with the jack, then turn it
lockwise.
163 ...
Page 165 of 274

Downloaded from www.Manualslib.com manuals search engine Problems on the Road
~~~ ~~~~
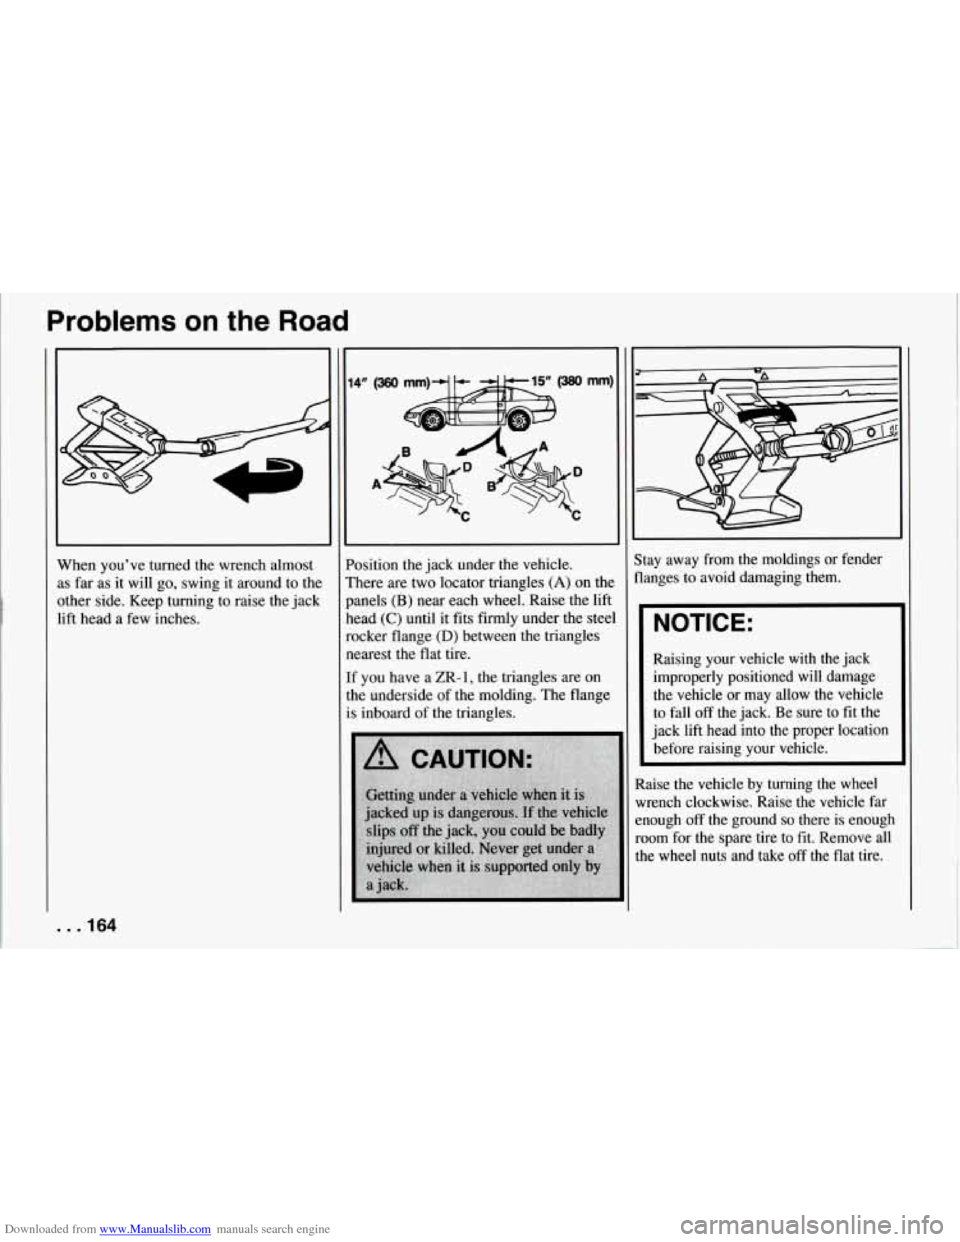
When you've turned the wrench almost
LS far as it will go, swing it around to the
)ther side. Keep turning to raise the jack
ift head a few inches.
. .I64
A
'osition the jack under the vehicle.
rhere are two locator triangles
(A) on the
,anels (B) near each wheel. Raise the lift
lead (C) until it fits firmly under the steel
ocker flange
(D) between the triangles
learest the flat tire.
f you have a ZR-
1 the triangles are on
he underside of the molding. The flange
s inboard of the triangles.
I
Stay away from the moldings or fender
flanges to avoid damaging them.
NOTICE:
Raising your vehicle with the jack
improperly positioned will damage
the vehicle or may allow the vehicle
to fall
off the jack. Be sure to fit the
jack lift head into the proper location
before raising your vehicle.
Raise the vehicle by turning the wheel
wrench clockwise. Raise the vehicle far
enough
off the ground so there is enough
room for the spare tire to fit. Remove all
the wheel nuts and take
off the flat tire.