Page 946 of 1413
Moonroof
Index
Hatchback
CABLE ASSEMBLYReplacement, page 2O-81SUNSHADEReplacement, page 20-79
MOTORReplacement, page 20-80
GLASS BRACKETReplacement, page 20-81
DRAIN CHANN€L
FRONT DRAII{CHANNEL
a/'#
-4
SUI{SHADE RAIL
Replacement, page 20 8l
FRAME SEAL
FRONT RAILHOLDER
REAR ORAIN TUBE
,**4
U
\a
GUIDE RAIL
FRAME
20-77
Page 947 of 1413

Moonroof
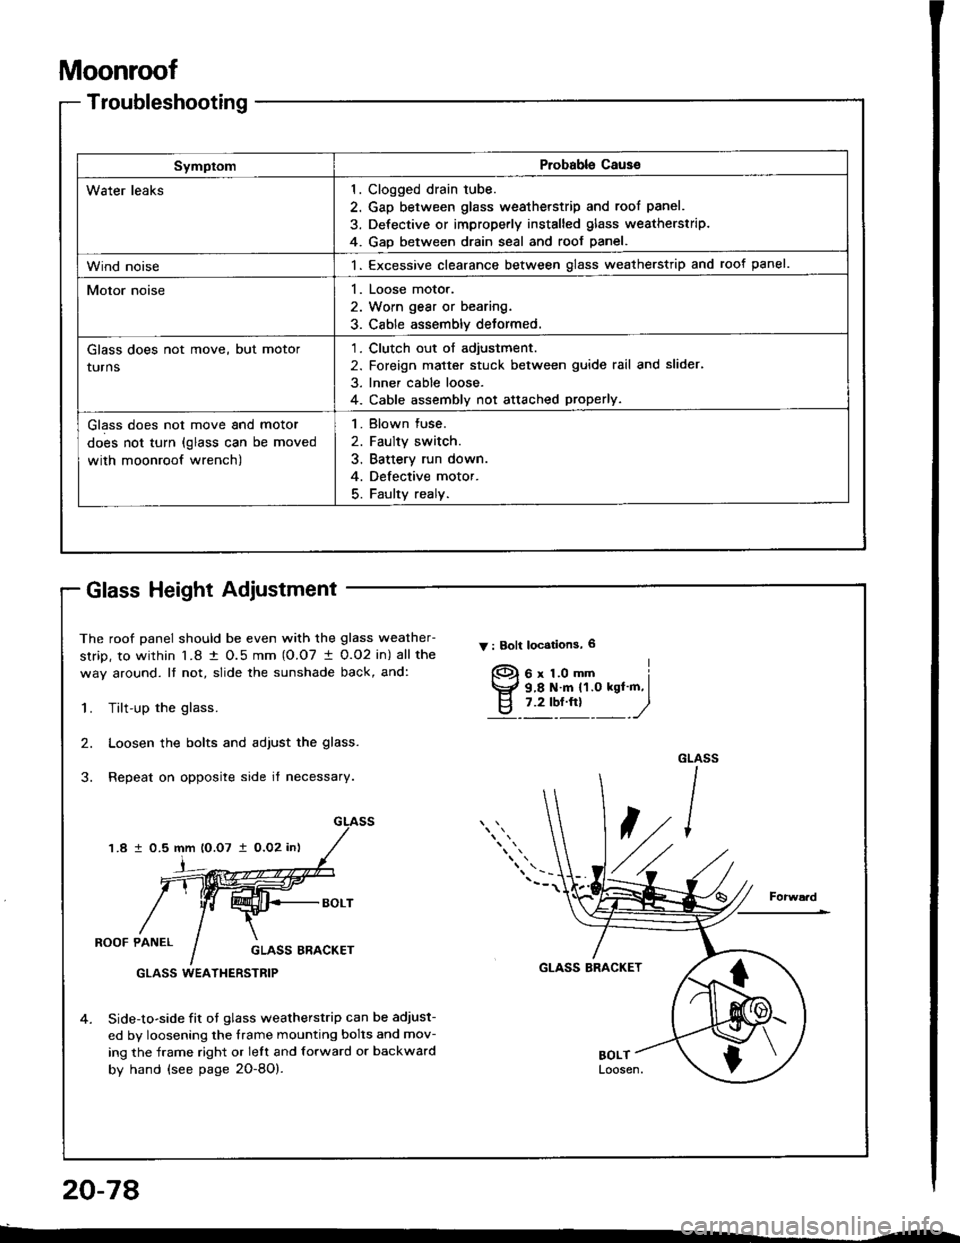
Troubleshooting
SymptomProbable Cause
Water leaks1
4
Clogged drain tube.
Gap between glass weatherstrip and roof panel.
Defective or improperly installed glass weatherstrip.
GaD between drain seal and roof panel.
Wind noise1. Excessive clearance between glass weatherstrip and roof panel.
Motor noise1. Loose motor.
2. Worn gear or bearing.
3. Cable assembly deformed.
Glass does not move, but motor
turns
1. Clutch out of adjustment.
2. Foreign matter stuck between guide rail and slider,
3. Inner cable loose.
4. Cable assembly not attached properly.
Glass does not move and motor
does not turn (glass can be moved
with moonroof wrench)
1. Blown fuse.
2. Faulty switch.
3. Battery run down.
4. Defective motor.
5. Faulty realy.
The roof panel should be even with the glass weather-
strip, to within l�8 t O.5 mm (O.O7 I 0.O2 in) all the
way around. It not, slide the sunshade back, and:
Y : Bolt locstions, 6
1.Tilt-up the glass.
Loosen the bolts and adjust the glass.
Repeat on opposite side it necessary.
2.
1.8 1 0.5 mm lO.O7 i0,O2 in)
i
ROOF PANELGLASS ERACKET
GLASS BRACKET
4.Side-to-side fit ot glass weatherstrip can be adjust-
ed by loosening the frame mounting bolts and mov-
ing the frame right or lelt and forward or backward
by hand (see page 2O-8O).
GLASS WEATI{ERSTRIP
f)
Glass Height Adiustment
20-78
Page 948 of 1413

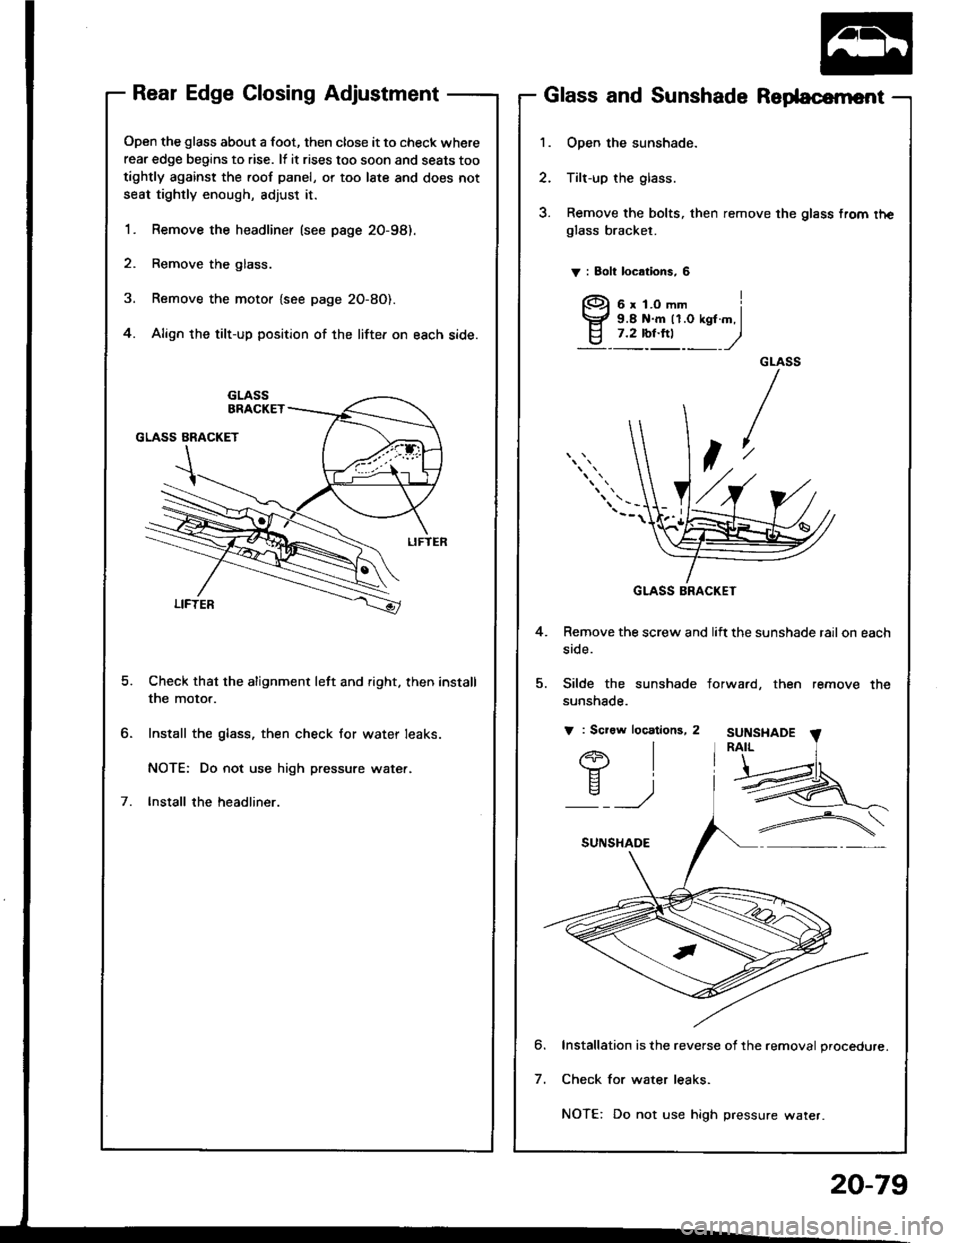
Rear Edge Closing Adjustment
Open the glass about a foot, then close it to check where
rear edge begins to rise. lf it rises too soon and seats too
tightly against the roof panel, or too late and does not
seat tightly enough, adjust it.
1. Remove the headliner (see psge 20-98).
2. Remove the glass.
3. Remove the motor {see page 2O-8O).
4. Align the tilt-up position of the lifter on each side.
Check that the alignment left and right. then install
the motor.
Install the glass, then check for water leaks.
NOTE: Do not use high pressure wate..
lnstall the headliner.
Glass and Sunshade Redacernent
1. Open the sunshade.
2. Tilt-up the glass.
3. Remove the bolts, then remove the glass from rheglass bracket.
V : 8oh locations, 6
4. Remove the screw and lift the sunshade rail on each
side.
5. Silde the sunshade
sunshade.
V : Scraw locations, 2
forwa.d, then remove the
SUNSI{ADE
l-tII
)
6
7
Installation is the reverse of the removal procedure.
Check for water leaks.
NOTE: Do not use high pressure water.
GLASS BRACKET
20-79
Page 951 of 1413
Moonroof
Glass Bracket/SliderGuide Rails and Cable Assembly ReplacementLifter
(cont'dl
8. Slide the guide rail fofward, then remove it.
NOTE: Take care not to bend the inner cable.
10.Slide the anchor rod forward, then remove it from
the guide rail.
STOPPER
To install. insort the anchorrod by turning the stopper 9Oo.
qSeparate the glass bracket, lifter, slide stopper link
and slider,
AIT|CHOB ROD
1 1 . lnstallation is the reverse ol the removal procedure.
NOTE:
a Dsmsged pans should be replaced.
. Apply grease to the sliding portion.
SLIOER
NOTE: To inst€ll, apply multipurpose grease tothe lifter and slide stooDer link.
CABLE ASSEMBLY
GUIDE RAIL
INNER CABLEGLASS
20-82
'-
Page 953 of 1413
Moonroof
lndex
Ssdan
GLASS BRACKETReplacement, page 20-88
SUNSHAOEReplacement, page
MOTORReplacement, page 20-87
('
/\FROi{T DRAIN TUBE
SLIDE STOPP€R LINK
SUNSHADE RAIL
GUIDE RAILReplacement, page 20-88
REAR DRAIN
V
\
e
FRONT ORAIN
REAR RAILHOLDER
SEAL
FRAMERepfacement, page 20-87
20-84
----/_--4
DRAIN CHANNEL
Page 954 of 1413

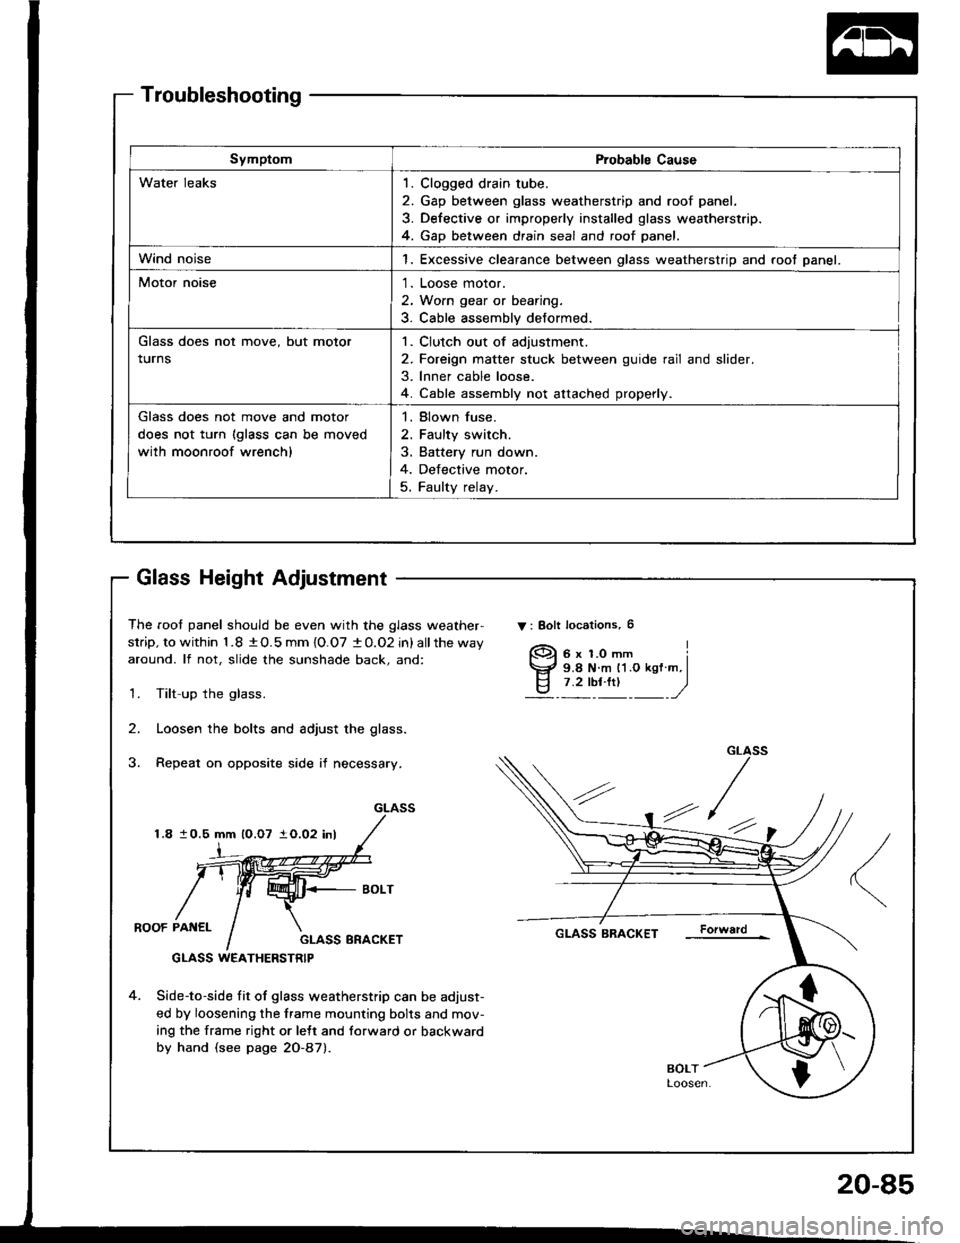
SymptomProbable Cause
Water leaks1. Clogged drain tube.
2. Gap between glass weatherstrip and roof panel.
3. Defective or improperly installed glass weatherstrip.
4. Gap between drain seal and roof panel.
Wind noise1. Excessive clearance between glass weatherstrip and root panel.
Motor noise1. Loose motor.
2, Worn gear or bearing,
3. Cable assembly deformed.
Glass does not move, but motor
turns
1. Clutch out of adjustment.
2. Foreign matter stuck between guide rail and slider.
3. lnner cable loose.
4. Cable assembly not attached properly.
Glass does not move and motor
does not turn {glass can be moved
with moonroof wrench)
1. Blown fuse.
2. Faulty switch.
3, Battery run down.
4. Defective motor.
5. Faulty relay.
Glass Height Adjustment
The roof panel should be even with the glass weather-
strip, to within 1.8 tO.5mm{O.O7 1O.O2 in} allthe way
around. lf not, slide the sunshade back, and:
Tilt-up the glass.
Loosen the bolts and adjust the glass.
Repeat on opposite side if necessary.
ROOF PANELGLASS ERACKET
GLASS WEATHERSTRIP
4. Side-to-side fit of glass weatherstrip can be adjust-
ed by loosening the frame mounting bolts and mov-
ing the frame right or lett and forward or backward
by hand (see page 20-87).
GLASS BRACKETForward
V : Eolt localions, 6
6x LOmm9.8 N.m 11.O kgf m,7.2 tbf.ttt
I
")
1.
2.
GLASS
4'/1210.5 mm lO.O7 1O.02 inl
Page 955 of 1413

Moonroof
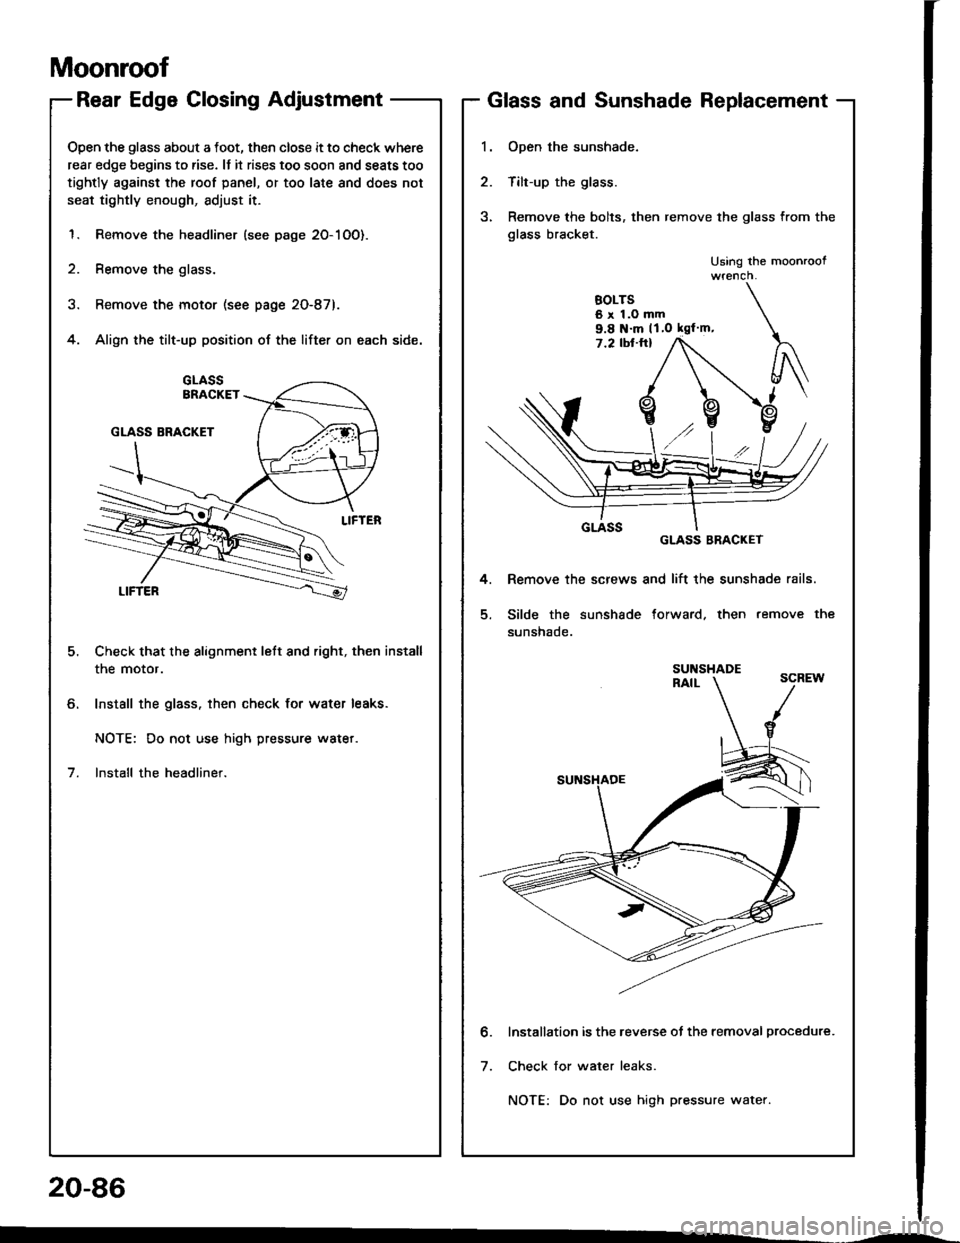
Rear Edge Closing Adjustment
Open the glass about a foot, then close it to check where
rear edge begins to rise. It it rises too soon and seats too
tightly against the roof panel, or too late and does not
seat tightly enough, adjust it.
1. Remove the headliner (see page 20-1OO).
2. Remove the glass.
3. Remove the motor (see page 20-87).
4. Align the tilt-up position of the lifter on each side.
o.
5.
7.
Check that the alignment lett and right, then install
the motor.
Install the glass. then check for water leaks.
NOTE: Do not use high pressure water.
Install the headliner.
Glass and Sunshade Replacement
1. Open the sunshade.
2. Tilt-up the glass.
3, Remove the bolts, then remove the glass from the
glass bracket.
Using the moonroof
BOLTS6 x 1.O mm9.8 N'm lt O kgf m,
4.
5.
7.2 tbt.ftl
Remove the screws and lift the sunshade rails.
Silde the sunshade forward. then remove the
sunsnaoe.
SUlTSHADERAIL
Installation is the.everse ot the removal procedure.
Check for water leaks.
NOTE: Do not use high pressure water.
GLASS BRACKET
20-86
Page 957 of 1413
Moonroof
Remove the frame (see page 20-87).
Remove the drain channel.
NOTE: Take care not to damage, twist or litt the
seal.
4. Remove the motor (see page 20-87).
5. Remove the front drain channel.
6. Remove the nut, then remove the front rail holder.
9.8 N.m {1.O kgf.m,7 .2 tbt-lrl
9, Slide the glass bracket/slider, liJter backward, then remove it.
Glass Bracket/Slider, Lifter, Guide Rails and Cable Assembly Replacement -
1.
2.
3. Remove the screws, then remove the sunshade rail
by sliding it backward.
ITUT6xl.Omm9.8 t{.m {1.0 kgt.m,7.2 tbf.ttl
7. Remove the screws @ attsching the guide rail. then litt the guide rail.
8. Remove the nut. then remove the rear rail holder.
NOTE: Remove the anchor spring.
AI{CHOR
NUT6 x 'l.O mm
REAR RAILHOLDER
NOTE: Install the rear railthe sub-seal to the trame.
SUB-SEAL
holder, then glue
SUNSHADE RAIL
SCREW
20-88