1994 ACURA INTEGRA change
[x] Cancel search: changePage 3 of 1413
INTRODUCTION
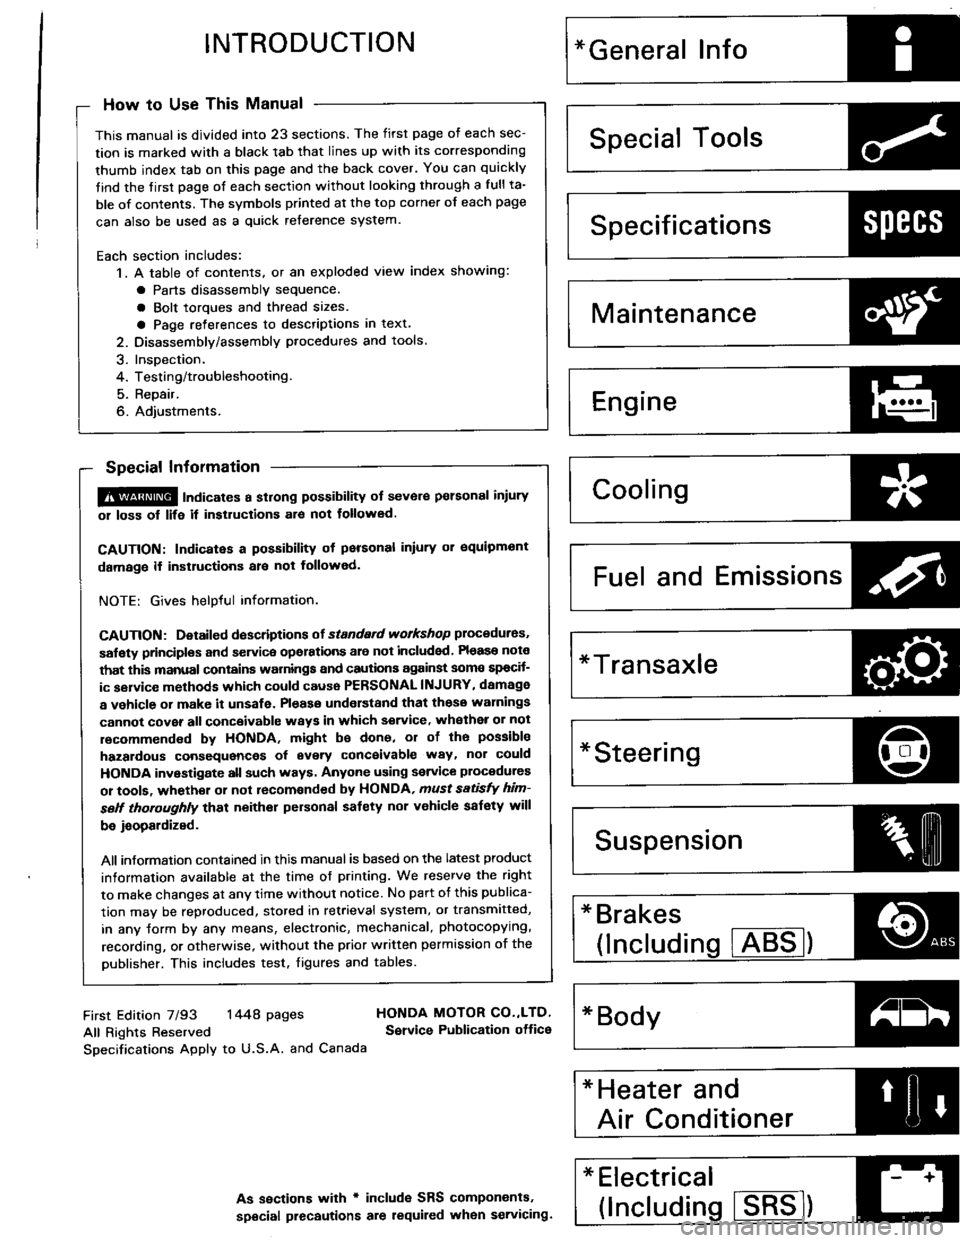
How to Use This Manual
This manual is divided into 23 sections. The first page of each sec-
tion is marked with a black tab that lines up with its corresponding
thumb index tab on this page and the back cover. You can quickly
tind the tirst page of each section without looking through a full ta-
ble of contents. The svmbols printed at the top corner of each page
can also be used as a quick reference system.
Each section includes:
1. A table of contents. or an exploded view index showing:
a Parts disassemblv sequence.
a Bolt toroues and thread sizes.
a Page references to descriptions in text.
2. Disassemblv/assembly procedures and tools.
3. InsDection.
4. Testing/troubleshooting.
5. Repair.
6. Adiustments.
Special Information
@ lnai""tes a strong possibility of sevor€ pelsonal iniury
01 loss of life it instructions al€ not tollowed.
CAUTION: Indicates a possibility ot personal inlury or oquipmont
damage if instructions ale not followed.
NOTE: Gives helpful information.
CAUTfON: Detaifed doscriptions ot standad workshop procedures,
salety principlos and servica opelations are not included Pleaso note
that this manual conlains warnings and cautions against somo spocif-
ic sgrvice methods which could cause PERSONAL INJURY, damage
a vehicle or make it unsafe. Pleaso understand that those warnings
cannot cover all conceivablc waYs in which service, whethea or not
recommended bv HONDA, might be done, or of the possibla
hazardous consequences of svery conceivable way, nor could
HONDA investigate all such ways. Anyone using seryice plocedures
or toofa, whethor 01 not recomonded by HONDA, ,nust sttisfY him-
sett thoroughly that neither personal saf€ty nor v€hicle safety will
be jaopaldized.
All information contained in this manual is based on the latest product
information available at the time of printing. We reserve the right
to make changes at any time without notice. No part of this publica-
tion mav be reproduced, stored in retrieval system, or transmitted,
in any Jorm by any means, electronic, mechanical, photocopying,
recording, or otherwise, without the prior written permission of the
publisher. This includes test. figures and tables.
Specificationstrtl:{lt'
Maintenance4Pi
Engine
H
I-""
Fuel and Emissions Za
*Transaxle
*Steeringr-\
lDl\.t/
* Brakes
(lncludins !TEg)o
*Electrical J--*
(lncludins ISBE)
First Edition 7/93 1448 pages
All Rights Reserved
Specifications Apply to U.S.A. and Canada
HONDA MOTOR CO.,LTD,
Service Publication ottice
As sections with r includ€ SRS components.
special precautions are lequiled when servicing.
Page 23 of 1413
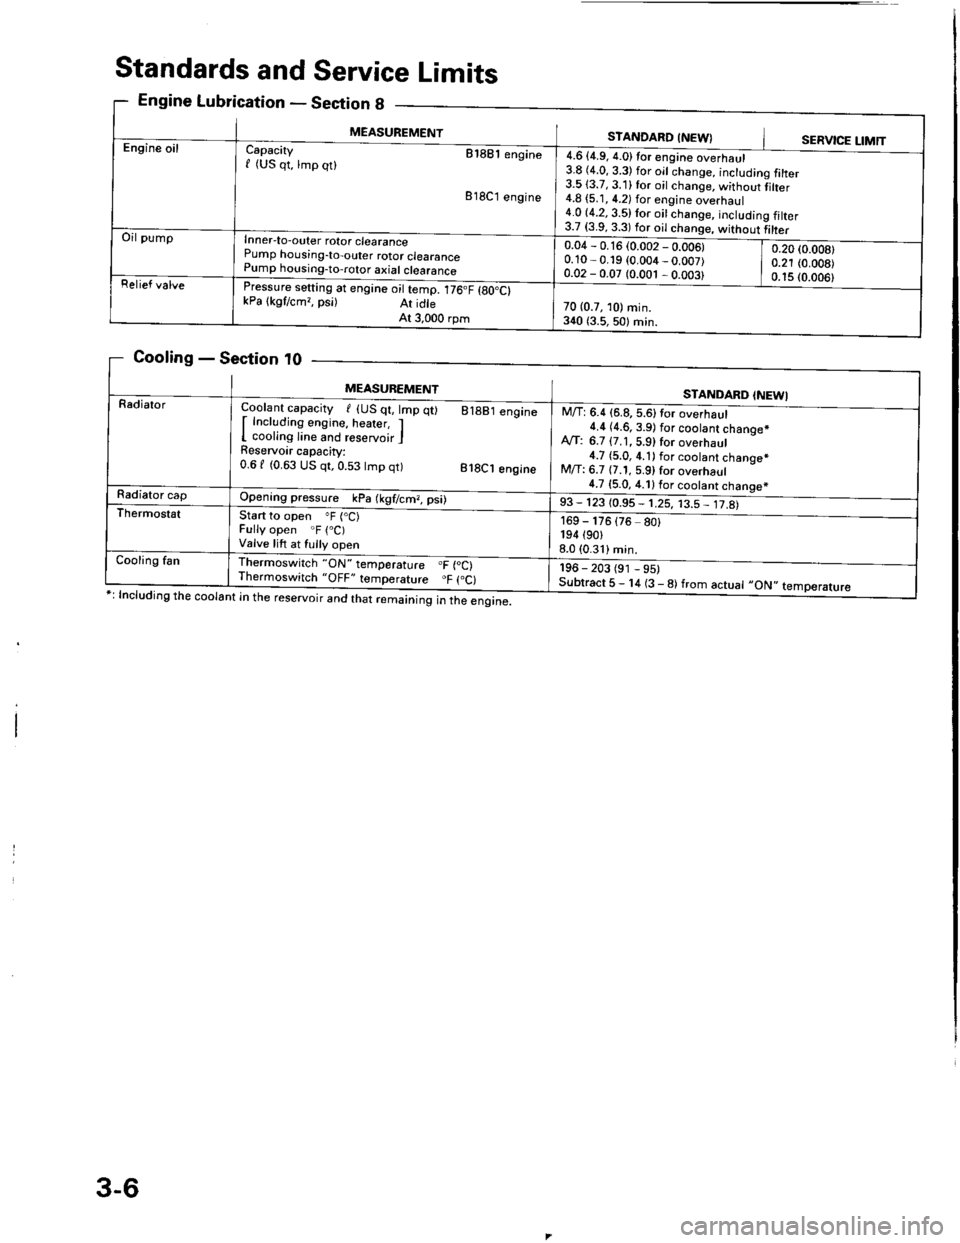
Standards and Service Limits
Engine Lubrication - Section g
Cooling - Section t0
ng the coolant in the reservoir and that remaining in the engine.
eclton u _
MEASUREMENTSTANDARD INEW}SERVICE LIMTT
g talter
tiher
g filter
Engine oilCapacity etaet engine
f (US qt, lmp qt)
818C1 engine
Inner-to-outer rotor clearance
Pump horising-to-outer rotor clearance
Pump housing-to,rotor axial clearance
rressure setting at engine oil temp. 176.F {gO.Ct
kPa lkgtcm,, psi) At idte
At 3,000 rpm
4.6 {4.9, 4.0}tor engine overhaul
3.8 (4.0, 3.3) for oil change, inctudin
3.513.7, 3.11 for oil change, without
4.8 {5.1, 4.2) for engine overhaul
4.0 (4.2, 3.5) lor oit change, includin
3.7 i3.9 3 3l fdr ^il .hi
Oil pump
0.04 - 0.16 (0.002 - 0.006)
0.10 - 0.19 (0.004 _ 0.007)
0.02 - 0.07 (0.001 , 0.003)
0.20 (0.008)
0.21 (0.008)
0.1s (0.006)
Relief valve
70 (0.7, 10) min.
3{0 {3.5,50) min.
MEASUBEMENTSTANDARD INEWI
RadialorCoolant capacity I {US qt, lmp
I Including engine, heater, I
I cooling line and reservoir I
Reservoir capacity:
0.61 (0.63 US qt,0.53 tmp qt)
q0 81881 engine
818C1 engine
Opening pressure kPa (kgf/cm?, psi)
start to open oF (.C)
Fully open .F (.C)
Valve lift at fully open
lhermoswitch "ON" temperature .F {oC)
Thermoswitch "OFF" temporature "F (.C)
M/T: 6.4 (6.8, 5.6)tor overhaul
4.4 (4.6.3.9) f6r s66lsn1gh66q.*
A,rf: 6.7 {7.1, 5.9) for overhaul
4.7 {5.0, 4.1) for coolant chanoe*
M/T: 6.7 {7.1, 5.9} for overhaul
4.7 {5.0, 4.1) for coolant chanoe*
,3 - 113 toss - trs, r3= Jt&
-
196 - 203 (91 - 95)
Subtract 5 - 14 (3 - 8) from actuat -ON',
169 - 176
194 (90,
8.0 (0.31)
{76 80}
temperature
Radiator cap
Thermostst
Cooling fan
3-6
Page 25 of 1413
ll
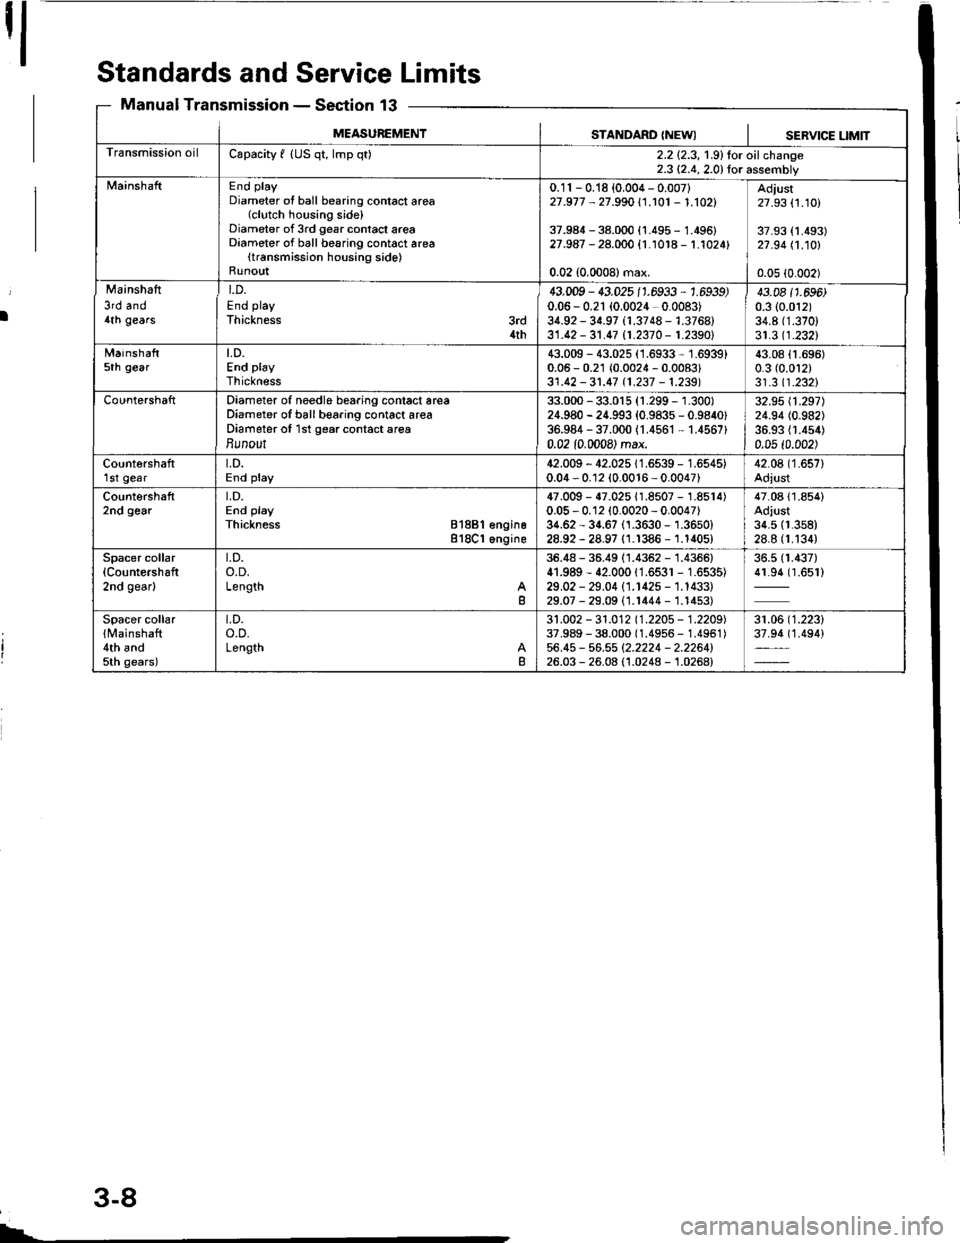
Standards andService Limits
Manual TransmissionSection 13
MEASUREMENTSTANDARD {NEWISERVICE UMIT
Transmission oilCapacity f {US qt, lmp q02.2 {2.3, 1.9}lor oilchange2.3 (2.4, 2.0) lor assembly
MainshaftEnd playDiameter ot ball bearing contact area(clutch housing side)Diameter of 3rd gear contact areaDiameter of ball besring contact area(transmission housing side)Runo!t
0.11 - 0.18 {0,004 - 0.007)27 .977 - 27 s90 l.1.101 - 1 .1021
37.984 - 38.000 {1.495 - 1.495}27.987 - 28.000 {r.1018 - 1.1024}
0.02 (0.0008) max.
Adjust27.93 (1.10)
37.93 {1.493)21 .94 /.1.10!'
0.05 (0.002)
Mainshafi
3rd and4lh gears
t.D.
End playThickness3rd4th
43.009 - 43.025 11.6933 , 1.6939)0.06 - 0.21 (0.0024 0.0083)34.92 - 31.97 (1.3748 - 1.3768)31.12 - 31.17 11.2370 - 1.23SOl
43.08 t 1 .696)0.3 (0.012)
34.8 (1.370)
31.3 (1.2321
Mainshaft5th geart.D.End playThickness
43.009 - 43.025 (1.6933 - 1.6939)0.06 - 0.21 (0.0024 - 0.0083)31.42 - 31.47 t1.237 -1.2391
43.08 {1.696)0.3 (0.012)
31.3 (1.232)
CountershaftDiameter of needle bearing conlact areaDiameter of ball boaring contact areaDiameter of 1st gear contact areaBunout
33.000 - 33.015 (1.299 - 1.300)24.980 - 24.993 {0.9835 - 0.9840)36.984 - 37.000 (1.4561 - 1.4567)0.02 10.0008) max.
32.95 \1.297)24.94 (0.982)
36.93 {1.454)0.05 t0.002)
Countershaftlst geart.D.End play42.009 - 42.025 11.6539 - 1.6545)0.04 - 0.12 (0.0016 - 0.0047)42.08 (1.657)
Adjust
Countershaft2nd gearLD.End playThickness 81881 engino818C1 6ngine
47.009 - {7.025 11.8507 - 1.85r4)0.05 - 0.12 (0.0020 - 0.0047)34.62 - 34.67 (1.3630 - 1.3650)28.92 - 28.97 (1.1386 - 1.1405)
47.0811.854)Adjust3{.5 (1.358)
28.8 (1.134)
Spacer collar(Countershaft
2nd gear)
t.D.o.D.LengthB
36.48 - 36.49 (1.4352 - 1.4366)41.989 - 42.00011.6531 - 1.6535)29.02 - 29.04 (1.r42s - 1.1433)29.07 - 29.09 (1.1444 - 1.1453)
36.5 (1.437)
41.94 (1.651)
Spacer collar{ l'rainshaft4th andsth gears)
t.D.o.D.LengthB
31.002 - 31.012 (1.2205 - '1.2209)
37.989 - 38.000 (1.4956 - 1.4951)56.45 - 56.55 12.2224 - 2.2264126.03 - 26.08 (1.0248 - 1.0268)
31.06 ('1.223)
37.94 (1.494)
3-8
Page 26 of 1413

MEASUREMENISTANDARD INEW)SERVICE LIMIT
Reverse idlergear'1LD.Gear-to-reverse gear shaft clearance20.016 - 20.043 (0.7880 - 0.7891)0.036 - 0.084 (0.0014 - 0.0033)20.09 (0.7909)
0.16 (0.006)
Synchro ringRing-to-gear clearance (ring pushed against 99ar)0.85 - 1.10 (0.033 - 0.043)0.4 (0.0't6)
Oouble conesynchro ring *2Clearance {rin9 pushed against gear)
Outer synchro ring-to-gearlnner synchro ring-to-gearOuter synchro ring-to-synchro cone
0.95 r 1.68 (0.037 - 0.066)0.5 - 1.0 (0.02 - 0.04)0.5- 1.0 {0.02 -0.04)
0.6 (0.024)
0.3 (0.01)
0.3 (0.01)
Sh itt forkShift tork finger thicknessFork-to synchro sleeve clearance7.4,7.6 (0.291 - 0.299)0.35 - 0.65 (0.014 - 0.026)1.0 (0.039)
qeverse shiftShift fork pawl groove widthFork-to-reverse idler gear clearance"1" groove width at sth gear sideat reverse gear side
Fork-to-5th/reverse shift piece pin clearanceat 5th gear sideat reverse gear side
13.0 - 13.3 (0.512 - 0.524)0.5 - 1.1 10.020 - 0.043)7.40 - 7.70 (0.291 -0.303)
7.05 - 7.25 (0.278 - 0.28s)
0.4 - 0.9 {0.016 - 0.03s)0.05 - 0.45 (0.0020 - 0.018)
13907)
Shift armGroove width of change piece contact area
Change piece-to-shift arm clearance11.8 - 12.0 (0.4646- 0.4724)0.05 - 0.35 (0.002 - 0.014)0.8010.031)
Shift pieceGroove width of shift arm contact area
Shift piece'to-shift arm clearanceLD.Shift piece-to-shaft clearanceDiameter of shift Iork cont6ct areaShift piece-to-shift fork shaft clearance
7.9 - 8.0 (0.311 -0.315)
0.10 - 0.30 (0.004 - 0.012)14.000 - 14.068 {0.551 - 0.554)0.011-0.092 (0.0004 - 0.0036,1'1.90 - 12.00 (0.469 - 0.472)0.20 - 0.50 (0.008 - 0.020i
0.60 (0.024)
0.150 (0.0059)
oso to.oart
SelectorDiameter of change piece contact areaArm-to-change piece clearanceGroove widlh of interlock contact area
Arm-to-interlock clearance
11.90 - 't2.00 (0.469 - 0.472)0.05 - 0.35 {0.002 - 0.014)10.05 - 10.15 {0.3957 - 0.3996}0.05 - 0.2s (0.002 - 0.010)
0.50 (0.020)
0.50 (0.020)
Manual TransmissionSection 13
'1:81881 engine'2 818C1 engine
- Automatic TransmissionSection 14
Unit of length: mm (in)
(cont'd)
- oEutrlrrl rr
MEASUREMENTSTANDARD {NEWISERVICE LIMIT
TransmissionlluidCapacity I (US qt, lmp qt)5.9 16.2, 5.2)for overhaul2.7 (2.9, 2.4) for lluid change
Hydraulicpressure
I kPa lkgflcm', psi)
Line pressure at 2,000 rpm(E or E position)830 - 880 (8.5 - 9.0, 120 - 130)780 {8.0, 110)
2nd clutch pressure at 2,000 rpm(DJ position)460 - 14.7, 67)throttle Iully closed
II830 - 880 (8.5 - 9.0, 120 - 130)
throttle more than 3/16 opened
410 {4.2.60)throttle fully closed
I780 {8.0, 110)throttle more than3/16 opened
3rd clutch pressure at 2,000 rpm(lqr posirion)
4th clutch pressure at 2,000 rPm
{E position)
2nd clutch pressure at 2,000 rPm(Elposition)830 - 880 {8.s - 9.0. 120 130)780 (8.0, 110)
1st clutch pressure at 2,000 rpm([O or E position)830 - 880 (8.5 - 9.0, 120 - 130)780 (8.0, 110)
'lst'hold clutch pressure at 2,000 rpm(Elposition)830 - 880 {8.5 - 9.0, 120 - 130}780 (8.0, 110)
Throttle pressure B Throttle fully closedThrotlle Iully opened0 - 1s {0-0.15,0- 21)830 - 880 (8.5 - 9.0, 120 - 130)780 18.0, 110)
Stall speed rpm (Check with car on level ground)2,200 - 2,600Below 2,200,above 2,600
3-9
Page 31 of 1413
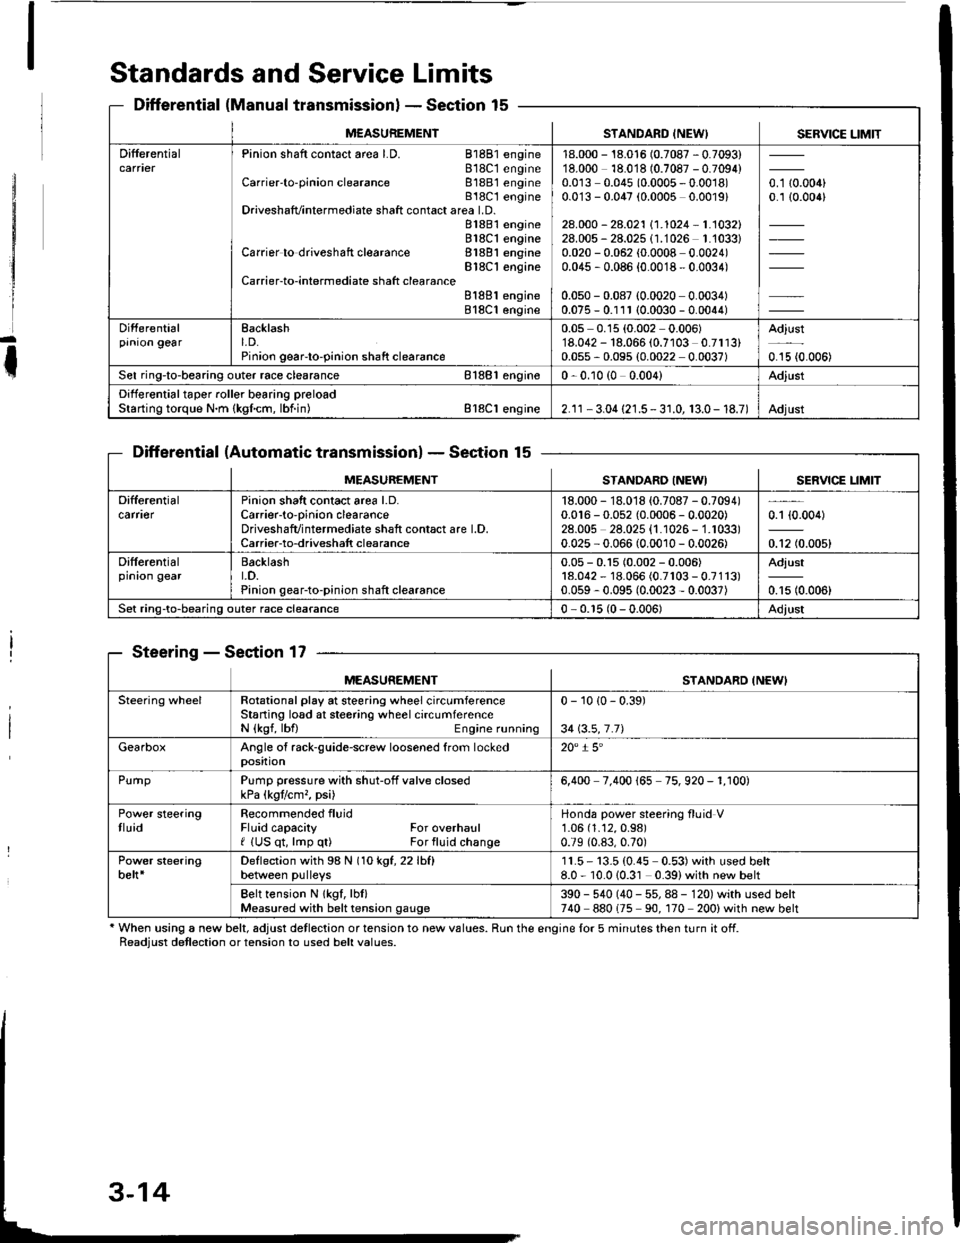
Standards and Service Limits
Differential (Manual transmissionlSection 15
Differential (Automatic transmissionlSection 15
Steering - Section 17
' When using a new belt, adjust detlection or tension to new values. Run the engine lor 5 minutes then turn it off.Readiust detlection or tension to used belt values.
M€ASUREMENTSTANDARD INEW) SERVICE LIMIT
DifferentialPinion shaft contact area LD. 81881 engine818C1 engineCarrier'to-pinion clearance 81881 engineB18C t engineDriveshafvintermediate shaft contact area LD.81881 engine818C1 engineCarrier to driveshaft clearance 81881 engineBlSC'l engineCarrier-to-intermediate shatt clearanceB188l engine818C1 engine
18.000 - 18.016 (0.7087 - 0.7093)18.000 18.018 (0.7087 - 0.7094)0.0r3 0.045 (0.0005 - 0.0018)0.0'13 - 0.047 (0.0005 0.0019)
28.000 - 28.021 \1.1024-1.1032128.005 - 28.025 (1.1026 1.'1033)0.020 - 0.062 (0.0008 0.0024)0.045 , 0.086 {0.0018 - 0.0034)
0.050 - 0.087 (0.0020 0.0034)0.075 - 0.111 (0.0030 - 0.0044)
o. t aron,0.1 {0.006}
Differentialprnron gearEacklasht. D.Pinion geaFto-pinion shaft clearance
0.05 0.15 (0.002 0.006)'18.042 - 18.066 (0.7103 0.7113)0.055 - 0.095 (0.0022 0.0037)
Adjust
0.15 {0.006)
Sel ring-to-bearing outer race clearance 81881 engin€0 - 0.10 (0 0.004)Adjust
Differential taper roller bearing preloadStarting torque N.m {kgfcm, lbf.in) Bl8Cl engine2.1r - 3.04 {21.5 - 3 r.0, 13.0- 18.7)Adjust
MEASUREMENTSTANDARO INEWISERVICE LIM]T
Difterentialcarfl€rPinion shatt contact area l.D.Carrier-to-oinion clearanceDriveshafvintermediate shaft contact are l.D.Carrier-to-driveshatt clearance
18.000 - 18.018 {0.7087 - 0.7094)0.016 - 0.052 {0.0006 - 0.0020)28.00s 28.025 {1.1026 - 1.1033)0.025 - 0.066 (0.0010 - 0.0026)
0.1 {0.004)
0.12 (0.005)
Differentialprnron gearBacklasht.D.Pinion gear-to-pinion shaft clearance
0.05 - 0.15 (0.002 - 0.006)18.042 - 18.066 (0.7r03 - 0.7113)0.059 - 0.095 (0.0023 - 0.0037)
Adjust
0.15 (0.006)
Set ring-to-bearing outer race clearance0 - 0.r5 (0 - 0.006)Adjust
MEASUREMENTSTANDARD INEWI
Steering wheelRotational play at steering wheel circumferenceStaning losd at steering wheel circumferenceN {kgf, lbfl Engine running
0 - 10 {0 - 0.39)
34 \3.5,7.71
GearboxAngle of rack-guide-screw loosened from lockedposition20" i 5'
PurnpPump pressure with shut-off valve closedkPa (kgtlcm,, psi)6,400 7.400 165 75. 920 - 1. r00)
Power steeringtluidRecommended fluidFluid capacity For overhaulf (US qt, lmp q0 For fluid change
Honda power steering fluid V1.06 (1.12,0.98)
0.79 (0.83,0.70)
Power steeringbelt*Deflection with 98 N (1okgt,22lhfl
between pulleys11.5- 13.5 (0.45 0.53)with used belt8.0 - 10.010.31 0.39)with new belt
Belt tension N lkgf, lbl)Measured with belt tension gauge390 - 540 (40 - 55, 88 - 120) with used belt740 880175 90. 170 200) with new belt
Page 85 of 1413
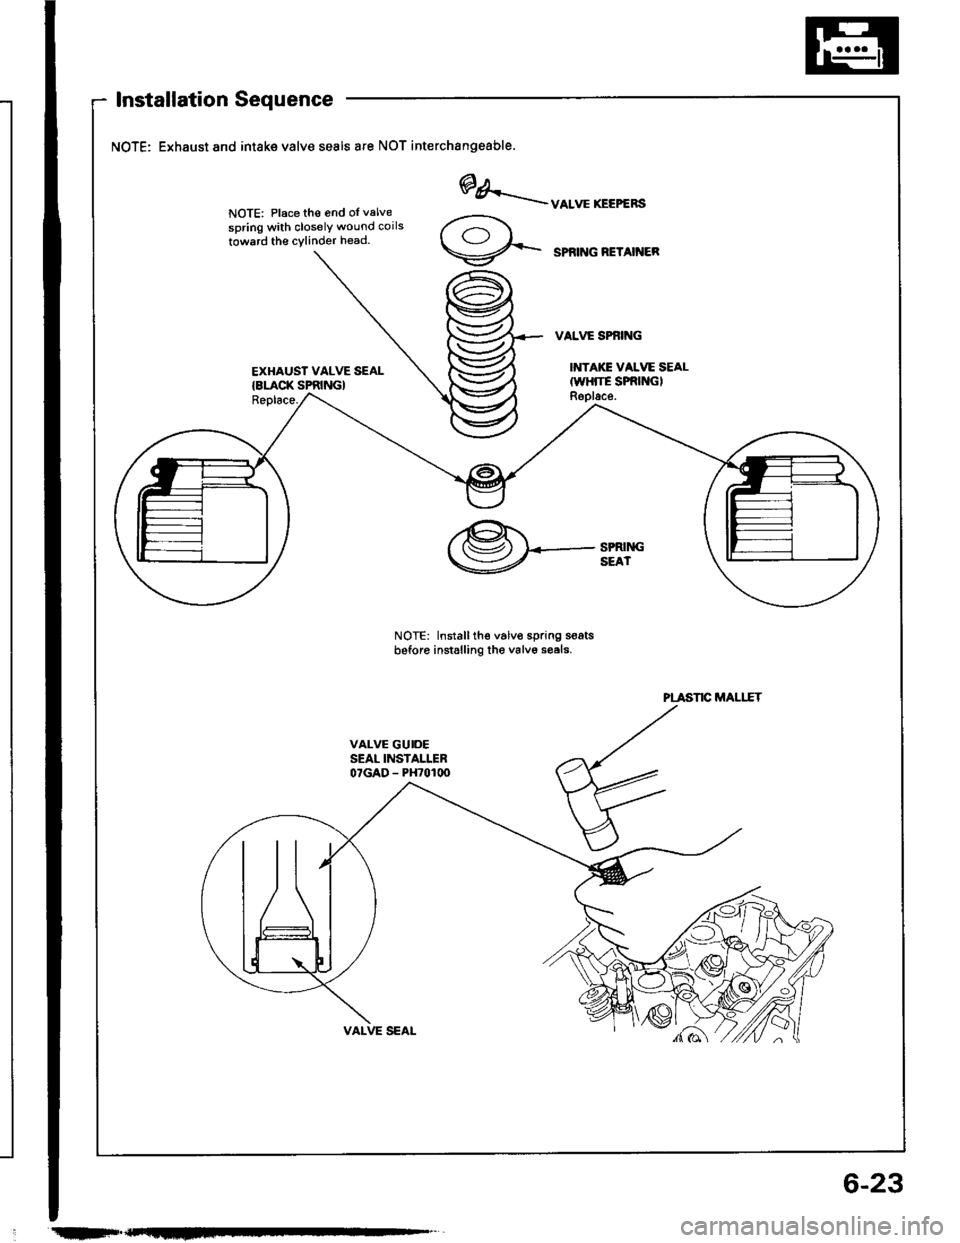
Installation Sequence
NOTE: Exhaust and intake valve seals ate NOT interchangeable.
NOTE: Place th€ 6nd oI valve
spring with closelY wound coils
towrrd th€ cylinder head.
EXHAUST VALVE SEAL{8LACK SPRING}Replace.
NOTE: Installth€ v6lvo spring s€atsbeforo instslling the valv6 sesls.
@/.-uo.**.r..",
SPRNG NETAINER
@*_-.tt*
PLASTIC MALIIT
.tIF"F-
6-23
Page 130 of 1413
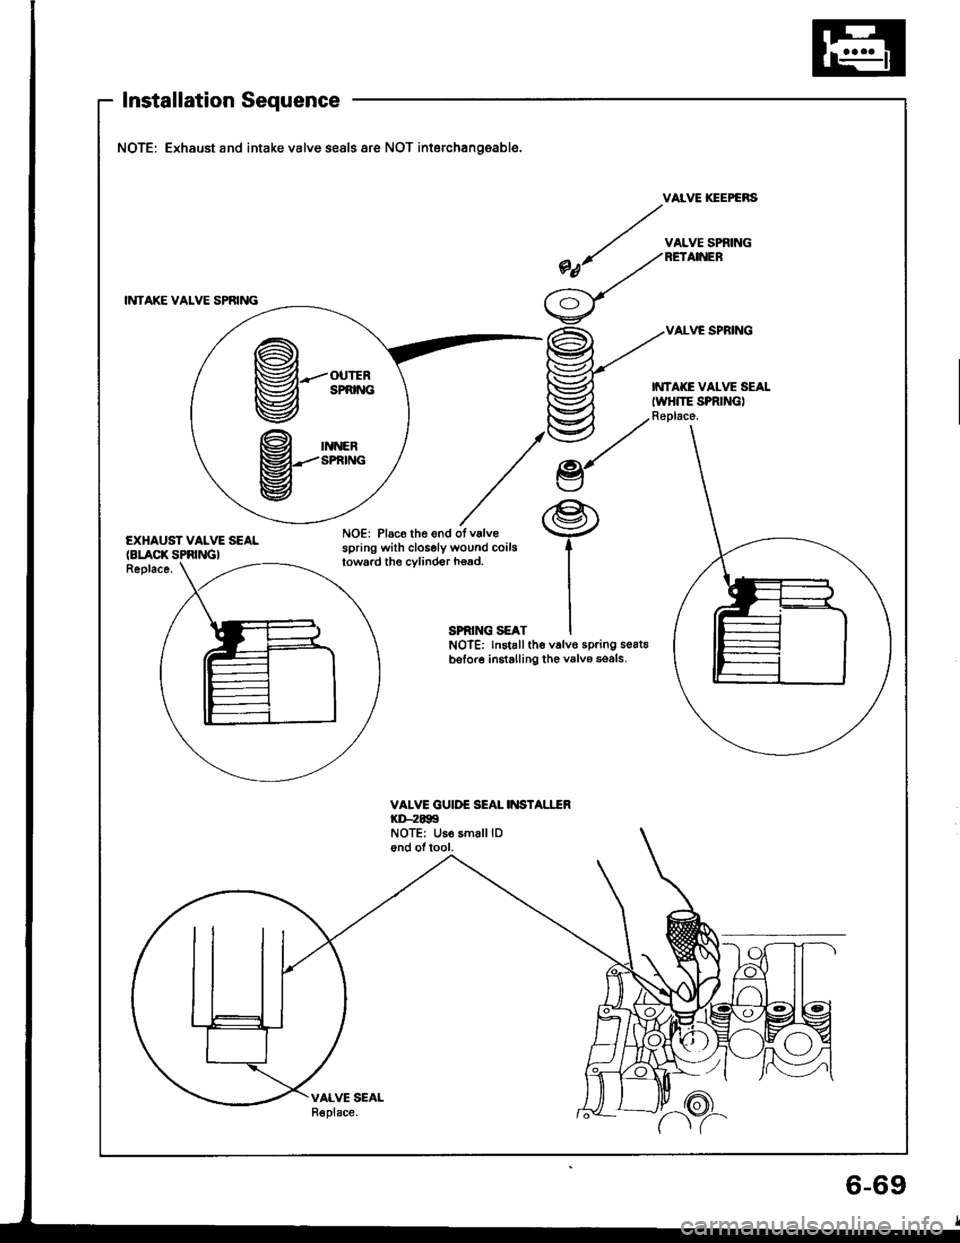
Installation Sequence
NOTE: Exhaust and intake valve seals are NOT interchangeable.
VAIVE IGEPGNS
INTAKE VALVE SPAING
/ v^LvEsP'ittNG
*nt /^no,n
/'=\/\y
VALVE SPRING
EXHAUST VALVE SEALNOE: Place the end ofv.lv€spring with closely wound coilgloward the cvlinder h€ad.(BLACK SPRINGIReplace.
SPRING SEATNOTE: lnstallthe valvo spring se6t6bsfore installing the valv6 so6ls,
VALVE GUIDE SEAL II{STALITRKD-2EgSNOTE: Uso smalllDond oftool.
VALVE SEALR€place.
@--'**
9-**
P.%
6-69
Page 143 of 1413

lllustrated Index
NOTE:
. Apply liquid gasket to the mating surfaces of the right
side cover and oil pump housing before installing
them.
. Use liquid gasket, Pan No.08718 - 0001.
. Clean the oil pan gasket mating surfaces before
installing it.
Bl8Bl engine: wAsHEF
Lubricate all internal parts with engine oil during
reassemory.
6x1.0mm12 N.m (1.2 kgf.m,I lbf.ftl
6x1.0mm11 N.m (1.1 kgf.m,8lbtft)
OIL SCREEN
11 x 1.25 mm76 N.m17.8 kgl.m, 56 lbf ftlApply engine oilto the bolt
threads and the washers.NOTE: After torquingeach cap, turn crankshaftto check lor binding.
DRAIN PLUG44 N.m {4.5 kgf.m,33 tbtfr)
GASKETReplace.
6x1.0mm1'l N.m {1.1 kgt.m, I lbtft)
OIL PAN
O.RING
GASKETReplace.
BEARING CAP
12 x 1.0 mm103 N.m (10.5 kgf.m, ?6lbf ft)
MANUALFLYWHEEL
'12 x 1.0 mm74 N.m {7.5 kgt m,54lbf.ftlTorque sequence, page 7 7
DRIVE PLATECheck for cracks,
AUTOMATIC TRANSMISSION
WASHER
6x1.0mm11 N.m {1.1 kgl.m,8 tbf.frt
CRANKSHAFTEnd play, page 7-12Runout, Taper, andOut-of-Round, pages 7 12, 13Instsllation, page 7 22
MAIN BEARINGRadial clearance, page 7-8
Sel€ction, page 7-8NOTE: New main bearingsmust be selected by matching
crank and block identificationmarkrngs.
Apply liquid gasket
to block mating surface.
OIL SEALInstallation, page 7-25,
RIGHTSIDE COVERDOWEL PINSOIL PUMPOverhaul, page 8-9THRUST WASHERSGrooved sides face outward.NOTE: Thrust washer thicknessis tixed and must not be changedby grinding or shamming.
8 x 1 .25 mm2,1 N.m {2.4 kgt m,17 tbt.ft)
OIL SEALInstallation, page 8-11Apply engrneorl.Replace.
Apply liquid gasket
to block mating
6x1.0mm'11 N.m {1.1 kgf'm, 8 lbl ft)(conr'dl
7-3