Page 52 of 306

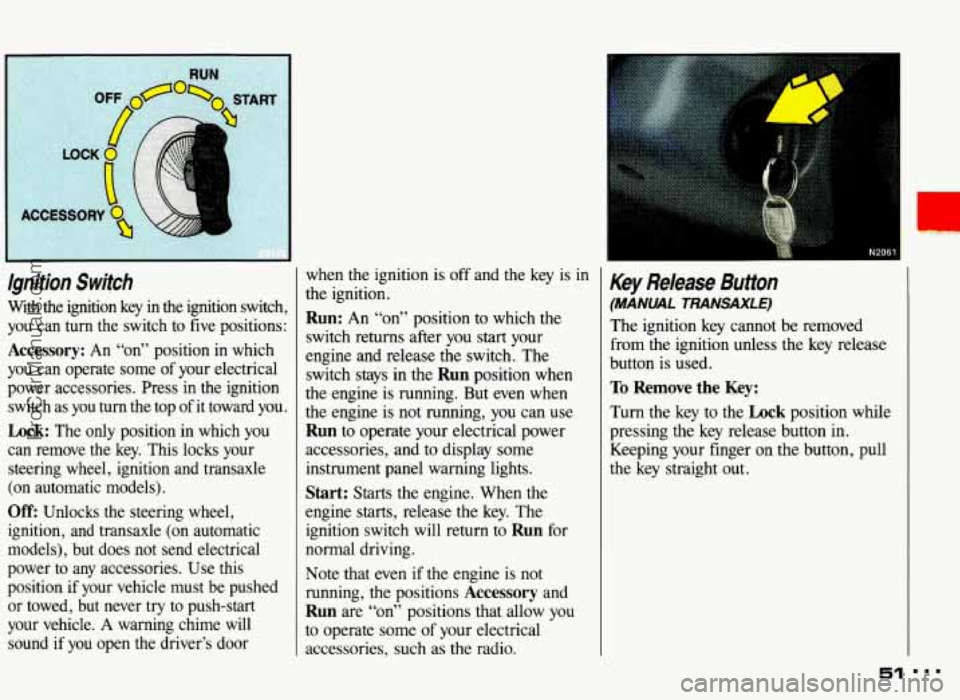
lgnition Switch
With the ignition key in the ignition switch,
you can turn the switch
to five positions:
Accessory: An “~n” position in which
you can operate some of your electrical
power accessories. Press in the ignition
switch as you turn the top of it toward you.
Lock: The only position in which you
can remove the key. This locks your
steering wheel, ignition and transaxle
(on automatic models).
Off: Unlocks the steering wheel,
ignition, and transaxle (on automatic
models), but does not send electrical
power to any accessories. Use this
position if your vehicle must be pushed
or towed, but never try to push-start
your vehicle.
A warning chime will
sound if
you open the driver’s door when
the ignition is
off and the key is in
the ignition.
Run: An “on” position to which the
switch returns after you
start your
engine and release the switch. The
switch stays in the
Run position when
the engine is running. But even when
the engine is not running,
you can use
Run to operate your electrical power
accessories, and
to display some
instrument panel warning lights.
Start: Starts the engine. When the
engine starts, release the key. The
ignition switch will return to
Run for
normal driving.
Note that even if the engine is not
running, the positions
Accessory and
Run are “on” positions that allow you
to operate some of your electrical
accessories, such
as the radio.
Key Release Button
(MANML TRANSAXLE)
The ignition key cannot be removed
from the ignition unless the key release
button is used.
To Remove the Key:
Turn the key to the Lock position while
pressing the key release button in.
Keeping your finger on the button, pull
the key straight out.
51 ...
ProCarManuals.com
Page 69 of 306

...
Features & Controls
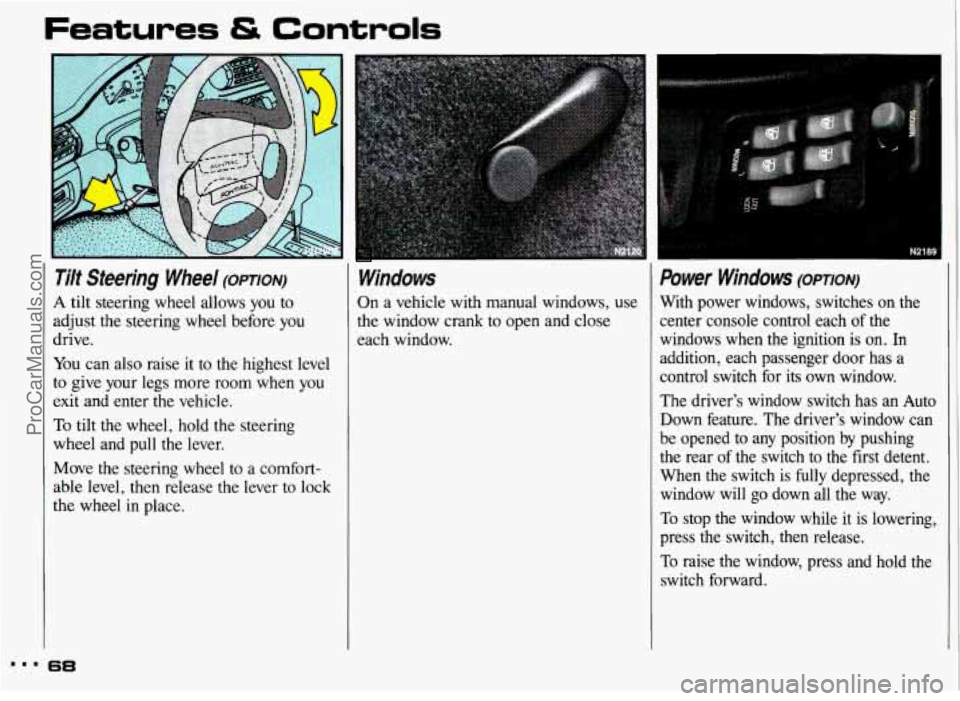
Ti/t Steering Wheel (opTIoN)
A tilt steering wheel allows you to
adjust the steering wheel before you
drive.
You can also raise it to the highest level
to give your legs more room when
you
exit and enter the vehicle.
To tilt the wheel, hold the steering
wheel and pull the lever.
Move the steering wheel to a comfort-
able level, then release the lever to lock
the wheel in place.
38
Windows
On a vehicle with manual windows, use
the window crank to open and close
each window.
I N21
Power Windows (opTIoN)
With power windows, switches on the
center console control each of the
windows when the ignition is
on. In
addition, each passenger door has a
control switch for its own window.
The driver’s window switch has an Auto
Down feature. The driver’s window can
be opened to any position by pushing
the rear of the switch to the first detent.
When the switch is fully depressed, the
window will go down all the way.
To stop the window while it
is lowering,
press the switch, then release.
To raise the window, press and hold the
switch forward.
ProCarManuals.com
Page 70 of 306
I
Power Window Lock-Out Switch
(OPT/Off)
On 4-door models, this switch disables
all passenger power windows. Push the
switch forward to lock the windows.
Push the switch back to unlock the
windows.
Turn SignallHeadlight
Beam
Lever
The lever on the left side of the steering
column includes your:
Turn Signal and Lane Change
Headlight High-Low Beam Changer
Flash-to-Pass Feature
Cruise Control (Option)
The High-Low Beam feature is
discussed under
Headlights. See the
Index under Headlights.
Indicator
Turn Signa/ and Lane Change
lndicator
The turn signal has two upward (for
Right) and two downward (for Left)
positions. These positions allow you to
signal a turn or a lane change.
To signal a turn, move the lever all the
way up or down. When the turn is
finished, the lever will return
automatically.
A green arrow on the instrument panel
will flash in the direction of the turn
or
lane change.
ProCarManuals.com
Page 136 of 306
Brake Aflustment
Every time you make a moderate reverse
brake stop, your brakes adjust for wear.
If you rarely make a moderate or
heavier stop, then your brakes might not
adjust correctly. If you drive
in that way,
then-very carefully-make a few
moderate brake stops about every
1,OOO
miles (1 600 km), so your brakes will
adjust properly.
If your brake pedal goes down farther
than
normal, your rear drum brakes may
need adjustment. Adjust them by
backing up and
firmly applying the
brakes a few times.
Braking In Emergencies
Use your anti-lock braking system when
you need to. With anti-lock, you can
steer and brake at the same time. In
many emergencies, steering can help
you more than even the very best
braking.
Power Steering -
If you lose power steering assist because
the engine stops or the system fails to
function, you can steer but it will
take
much more effort.
135
ProCarManuals.com
Page 198 of 306

Part 6
... N604
Here you will find information
about the care of your Pontiac
. This
part begins with service and fuel
information. and then it shows how
to check important fluid and
lubricant levels
. There is also
technical information about your
vehicle. and a section devoted to its
appearance care
.
Service & Appearance Care
Service ................ .................................. 198
Fuel
........................................................... 199
HoodRelease .................................................... 205
Engineoil
...................................................... 209
Aircleaner
...................................................... 214
Transaxle Fluid
.................................................. 216
Engine Coolant
.................................................. 221
Power Steering Fluid
.............................................. 224
Windshield Washer Fluid
........................................... 224
Brakes
......................................................... 225
Battery
......................................................... 227
BulbReplacement
................................................ 228
Windshield Wiper Blade Replacement
................................. 230
Loading Your Vehicle
............................................. 230
Tires
.......................................................... 232
Appearancecare
................................................. 239
Vehicle Identification Number (VIN)
................................. 247
Add-on Electrical Equipment
....................................... 248
Fuses
& Circuit Breakers ........................................... 248
Capacities
& Specifications ......................................... 251
Fluids
& Lubricants ............................................... 253
Replacement Bulbs
............................................... 254
Normal Maintenance Replacement
Parts ............................. 257
197
ProCarManuals.com
Page 208 of 306
2.3L Quad OHC and Quad 4
Engines (CODES 3, D AND A)
When you open the hood, you'll see:
1 . Automatic Transaxle Dipstick
2. Brake Fluid Reservoir
3. Air Cleaner
4. Hydraulic Clutch Fluid Reservoir
5. Windshield Washer Fluid Reservoir
6. Battery
7. Power Steering Fluid Reservoir
8. Engine Oil Fill Cap, Engine Oil
9. Engine Coolant Surge Tank
(if equipped)
(if equipped)
Dipstick
ProCarManuals.com
Page 209 of 306
Service & Appearance Care
208
3300 V6 Engine (CODE N)
When you open your hood, you’ll see:
1. Power Steering Fluid Reservoir
2. Automatic Transaxle Fluid Dipstick
3. Brake Fluid Reservoir
4. Air Cleaner
5. Windshield Washer Fluid Reservoir
6. Battery
7. Engine Oil Fill Cap
8. Engine Oil Dipstick
9. Engine Coolant Surge Tank
(if equipped)
ProCarManuals.com
Page 225 of 306
Service & Appearance Care
Power Steering Fluid
How to Check Power Steering Fluid:
Unscrew the cap and wipe the dipstick
with a clean rag. Replace the cap and
completely tighten
it. Then remove the
cap again and look at the fluid level
on
the dipstick.
When the engine compartment is hot,
the level should be at the
H (Hot)
mark.
the level should be at the
C (Cold)
mark.
When the engine compartment is cool,
What to Add:
Refer to the Maintenance Schedule to
determine what kind
of fluid to use. See
the
Index under Fluids & Lubricants.
Windshield Washer Fluid
To Add:
Open the cap labeled WASHER FLUID
ONLY.
Add washer fluid until the bottle is full.
mmm 224
ProCarManuals.com