1993 DODGE TRUCK start stop button
[x] Cancel search: start stop buttonPage 418 of 1502

VEHICLE
SPEED
CONTROL
SYSTEM
8H - 3
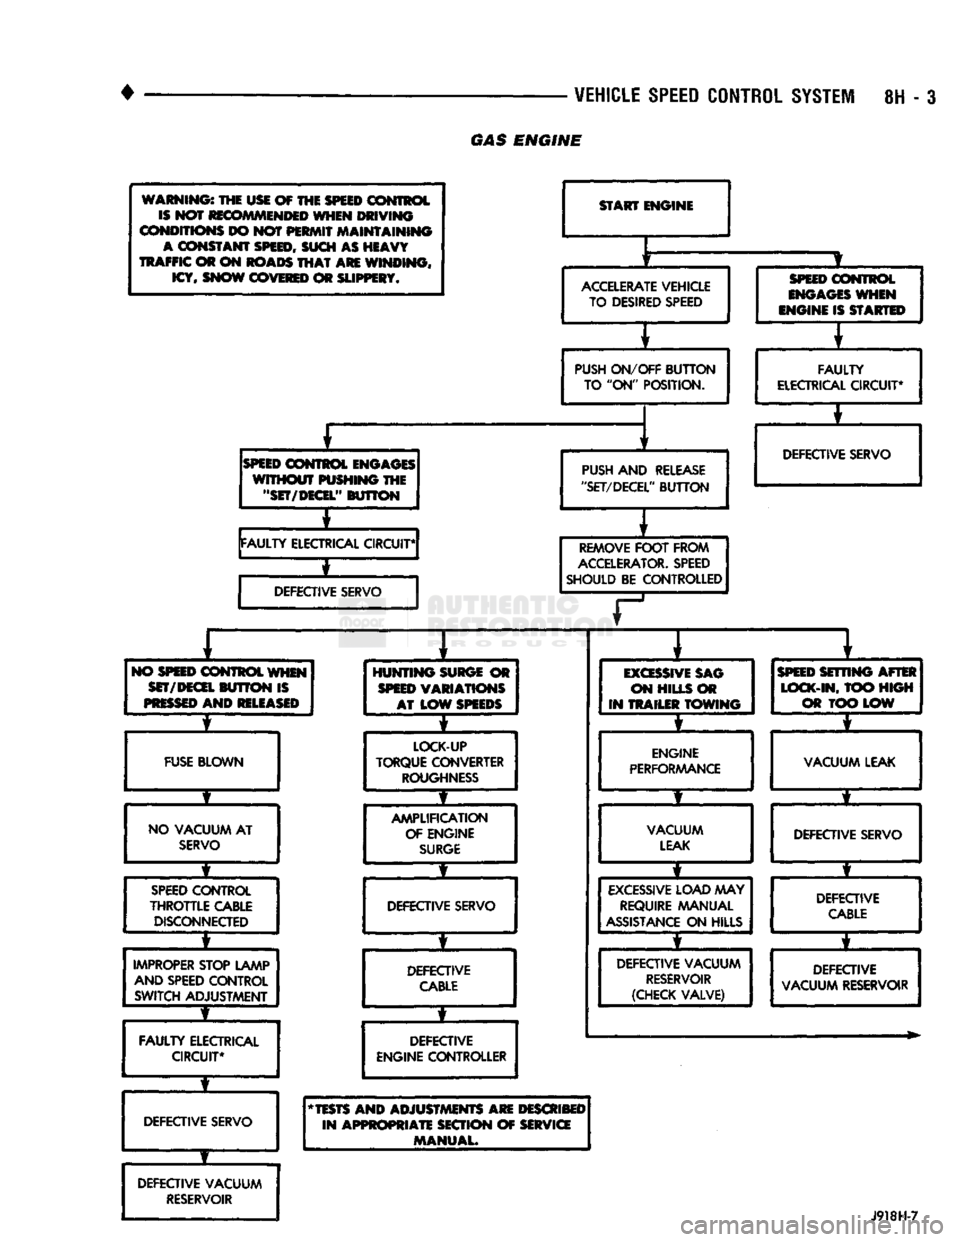
GAS
ENGINE
warnings the usi of THE
SPEED
control is NOT recommended when
DRIVING
CONDITIONS
DO not
PERMIT
maintaining
A
constant
SPEED, SUCH
AS
HEAVY
TRAFFIC
©r on
ROADS
THAT ARE
WINDING, ICY, SNOW COVERED
OR
SLIPPERY*
START
ENGINE
r
ACCELERATE
VEHICLE TO DESIRED SPEED
SPEED
CONTROL
ENGAGES
WHEN
mmm is
STARTED
PUSH
ON/OFF
BUTTON
TO "ON"
POSITION.
E
FAULTY
ELECTRICAL CIRCUIT*
SPEED
CONTROL ENGAGES
WITHOUT
PUSHING
THE
"SET/DECEL"
BUTTON
PUSH
AND
RELEASE
"SET/DECEL'
'
BUTTON
FAULTY
ELECTRICAL CIRCUIT* DEFECTIVE SERVO
i
DEFECTIVE SERVO
REMOVE
FOOT
FROM
ACCELERATOR.
SPEED
SHOULD
BE
CONTROLLED
T
1
i
1
*
NO
WEED
CONTROL
WHEN
SET/DECEL
BUTTON IS
PRESSED
AND RELEASED
HUNTING
SURGE
OR
SPEED
VARIATIONS AT
LOW
SPEEDS
EXCESSIVE
SAG
ON
HILLS
OR
IN
TRAILER TOWING
SPEED
SETTING AFTER
LOCK-IN,
TOO
HIGH
C3«t LOW
4 *
FUSE
BLOWN
LOCK-UP
TORQUE CONVERTER
ROUGHNESS
ENGINE
PERFORMANCE
VACUUM LEAK
# f
t f
NO
VACUUM
AT
SERVO
AMPLIFICATION
OF ENGINE
SURGE
VACUUM
LEAK
DEFECTIVE SERVO
1
f
it
t
t
SPEED
CONTROL
THROTTLE
CABLE
DISCONNECTED
DEFECTIVE SERVO
EXCESSIVE
LOAD
MAY
REQUIRE MANUAL
ASSISTANCE
ON
HILLS DEFECTIVE
CABLE
i
f
f • *
IMPROPER
STOP LAMP
AND
SPEED CONTROL SWITCH ADJUSTMENT DEFECTIVE
CABLE
DEFECTIVE VACUUM
RESERVOIR
(CHECK VALVE) DEFECTIVE
VACUUM RESERVOIR
1
f
*
FAULTY
ELECTRICAL CIRCUIT* DEFECTIVE
ENGINE
CONTROLLER
DEFECTIVE SERVO
* TESTS AND
ADJUSTMENTS
ARE DESCRIBED
IN
APPROPRIATE
SECTION
OF SERVICE
MANUAL.
DEFECTIVE VACUUM
RESERVOIR
J918H-7
Page 420 of 1502

•
^ ^ VEHICLE
SPEED
CONTROL
SYSTEM
8H - I
WARNING:
THE USE OF THE
SPEED
CONTROL
IS
NOT
RECOMMENDED
WHEN DRIVING
CONDITIONS
DO NOT PERMIT MAINTAINING
A
CONSTANT
SPEED,
SUCH AS HEAVY
TRAFFIC
OR ON
ROADS
THAT
ARE WINDING,
ICY,
SNOW
COVERED
OR
SLIPPERY*
SPEED
CONTROL
ENGAGES
WITHOUT PUSHING THE
"SET/DECEL"
BUTTON
±
FAULTY
ELECTRICAL CIRCUIT*
±
DEFECTIVE
SERVO
START ENGINE
ACCELERATE
VEHICLE TO DESIRED SPEED
PUSH
ON/OFF
BUTTON
TO "ON" POSITION.
PUSH
AND
RELEASE
"SET/DECEL"
BUTTON
REMOVE
FOOT
FROM
ACCELERATOR.
SPEED
SHOULD BE CONTROLLED
SPEED
CONTROL
ENGAGES
WHEN
ENGINE IS STARTED
FAULTY
ELECTRICAL
CIRCUIT*
T
DEFECTIVE SERVO
NO
SPEED
CONTROL WHEN
SET/DECEL
BUTTON
IS
PRESSED
AND
RELEASED
FUSE
BLOWN
NO VACUUM AT
SERVO
T
SPEED
CONTROL
THROTTLE
CABLE DISCONNECTED
IMPROPER
STOP LAMP AND SPEED CONTROL SWITCH ADJUSTMENT
FAULTY
ELECTRICAL CIRCUIT*
T
DEFECTIVE SERVO
DEFECTIVE
VACUUM PUMP
HUNTING
SURGE
OR
SPEED
VARIATIONS AT LOW
SPEEDS
I
LOCK-UP
TORQUE CONVERTER
ROUGHNESS
AMPLIFICATION OF ENGINE
SURGE
DEFECTIVE SERVO
DEFECTIVE
CABLE
DEFECTIVE
ENGINE CONTROLLER
EXCESSIVE
SAG
ON HILLS OR
IN TRAILER
TOWING
ENGINE
PERFORAAANCE
VACUUM
LEAK
EXCESSIVE
LOAD MAY
REQUIRE
MANUAL
ASSISTANCE
ON HILLS
DEFECTIVE
VACUUM PUMP
SPEED
SETTING AFTER
LOCK-IN,
TOO
HIGH
OR TOO LOW
T
VACUUM LEAK
DEFECTIVE SERVO DEFECTIVE
CABLE
T
DEFECTIVE
VACUUM PUMP
REFER
TO GROUP 5 - BRAKES
FOR VACUUM PUMP DIAGNOSIS.
"TEST AND ADJUSTMENTS ARE DESCRIBED IN APPROPRIATE SECTION OF SERVICE MANUAL.
J928H-15
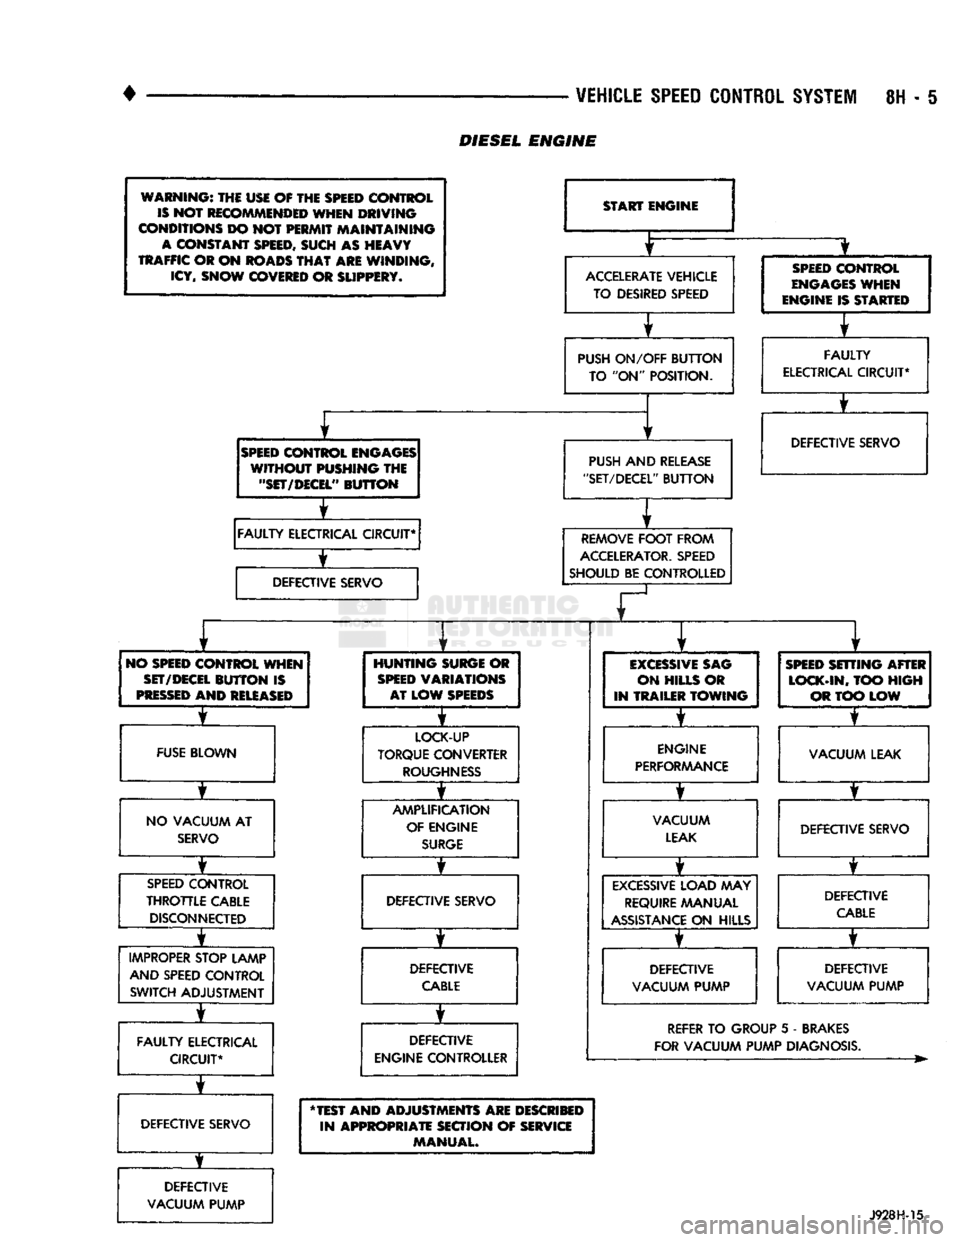
DIESEL
ENGINE
Page 1132 of 1502

•
IN-VEHICLE
SERVICE-32RH/36RH/37RH/42RH/46RH
21 - 131
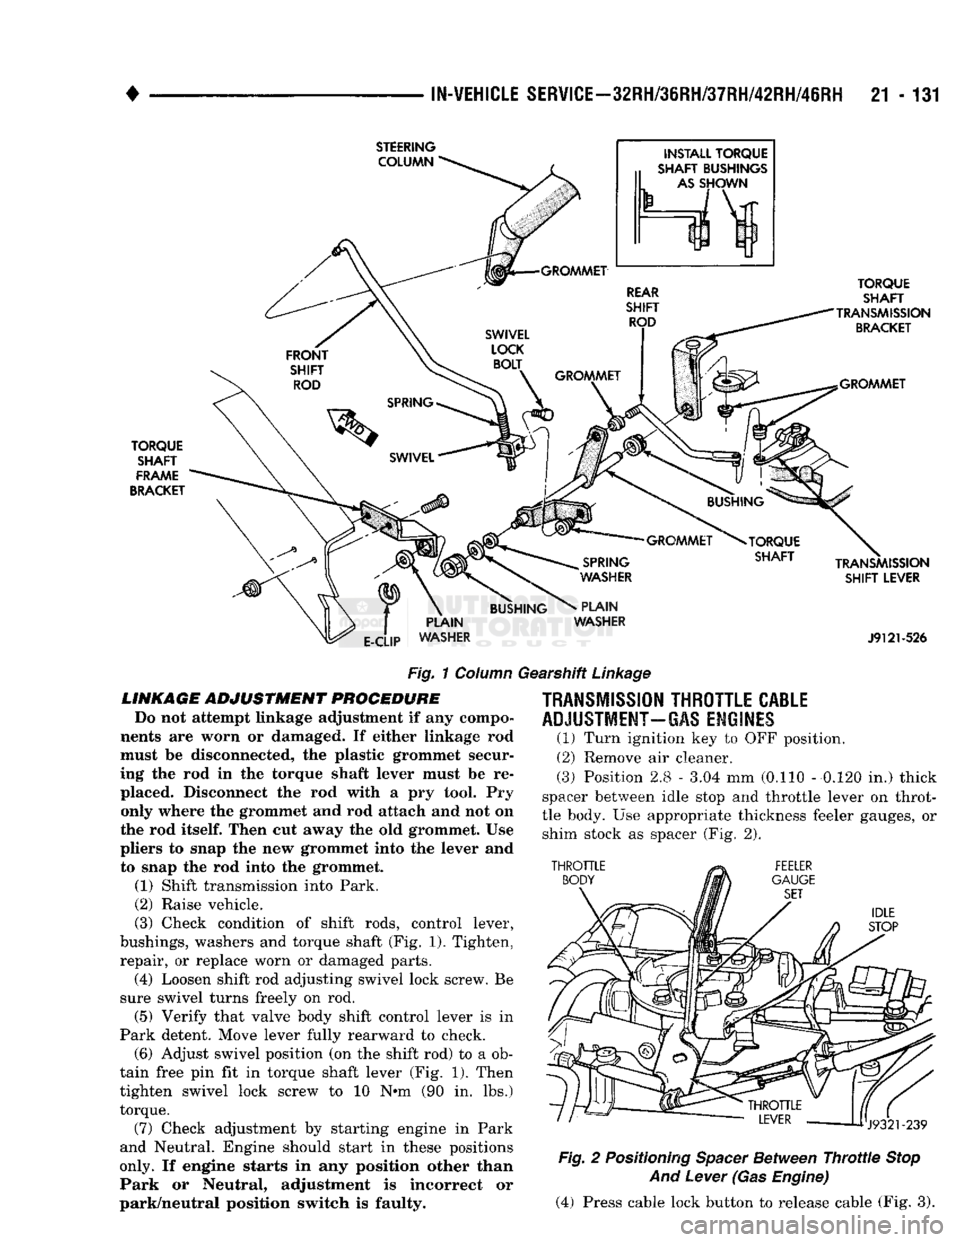
Fig.
1
Column
Gearshift
Linkage
LINKAGE
ADJUSTMENT
PROCEDURE
Do
not
attempt
linkage
adjustment
if any
compo
nents
are
worn
or
damaged.
If
either linkage
rod
must
be
disconnected,
the plastic
grommet secur
ing
the rod in the
torque shaft lever must
be re
placed. Disconnect
the rod
with
a pry
tool.
Pry
only where
the
grommet
and rod
attach
and not on
the
rod
itself.
Then
cut
away
the old
grommet.
Use
pliers
to
snap
the new
grommet into
the
lever
and
to snap
the rod
into
the
grommet.
(1) Shift transmission into Park.
(2) Raise vehicle.
(3) Check condition
of
shift rods, control lever,
bushings, washers
and
torque shaft
(Fig.
1). Tighten,
repair,
or
replace worn
or
damaged parts. (4) Loosen shift rod adjusting swivel lock screw.
Be
sure swivel turns freely
on rod.
(5) Verify that valve body shift control lever
is in
Park detent. Move lever fully rearward
to
check. (6) Adjust swivel position
(on the
shift rod)
to a ob
tain free
pin fit in
torque shaft lever
(Fig. 1).
Then
tighten swivel lock screw
to 10 N»m (90 in. lbs.)
torque.
(7) Check adjustment
by
starting engine
in
Park
and Neutral. Engine should start
in
these positions
only. If
engine starts
in any
position other than
Park
or
Neutral, adjustment
is
incorrect
or
park/neutral position switch
is
faulty.
TRANSMISSION
THROTTLE
CABLE
ADJUSTMENT-GAS
ENGINES
(1)
Turn ignition
key to OFF
position.
(2)
Remove
air
cleaner.
(3)
Position 2.8
-
3.04
mm
(0.110
-
0.120
in.)
thick
spacer between idle stop
and
throttle lever
on
throt
tle body.
Use
appropriate thickness feeler gauges,
or
shim stock
as
spacer
(Fig. 2).
Fig.
2
Positioning
Spacer
Between
Throttle
Stop
And
Lever
(Gas
Engine)
(4) Press cable lock button
to
release cable
(Fig. 3).
Page 1449 of 1502

24-12
HEATING
AND AIR
CONDITIONING
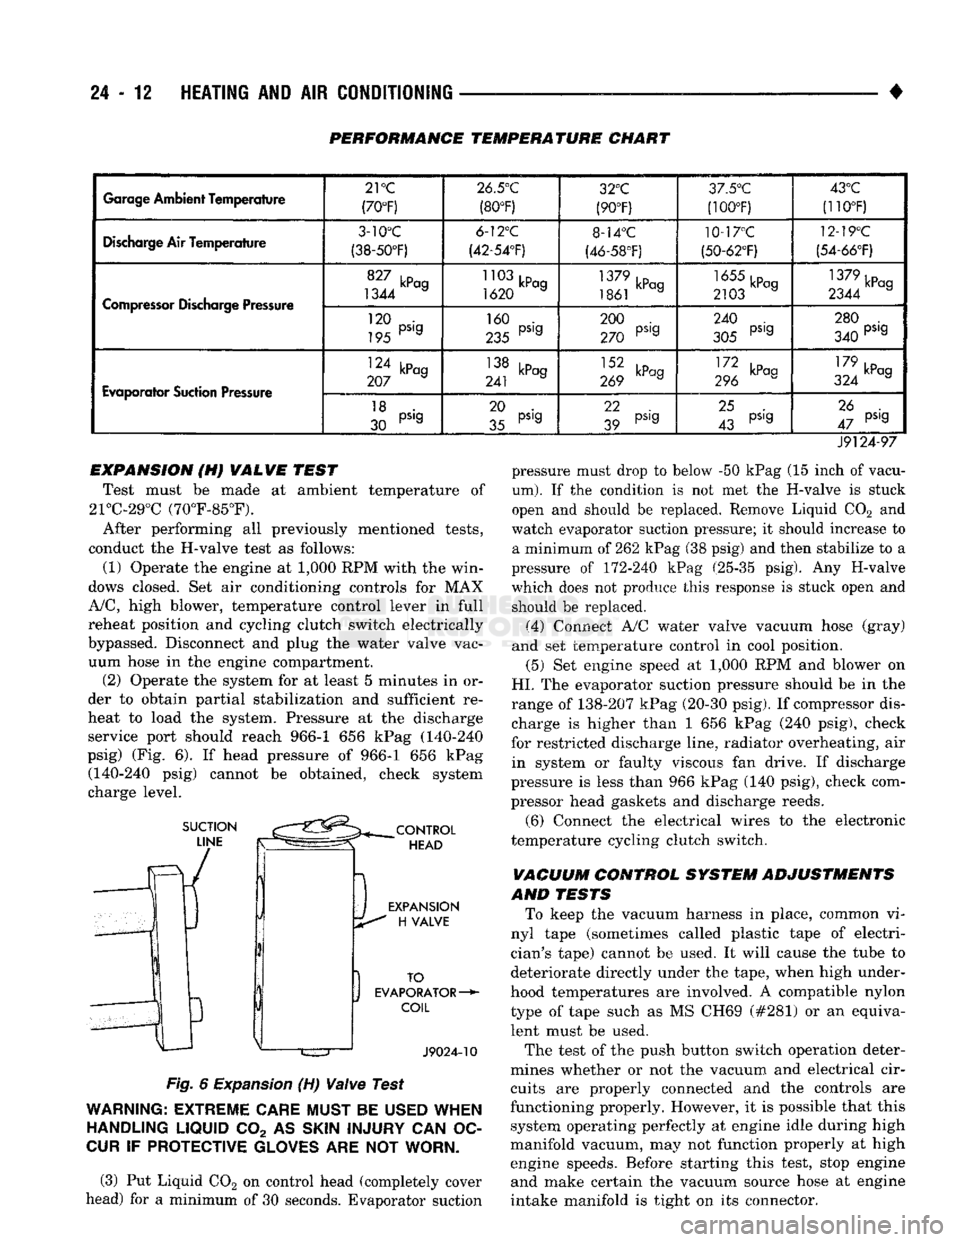
PERFORMANCE TEMPERATURE CHART
Garage
Ambient
Temperature
21
°C
(70°F) 26.5°C
(80°F) 32°C
(90°F) 3/.5°'J
(100T) 43°C
(110°F)
Discharge
Air Temperature
3-10°C
(38-50°F) 6-12°C
(42-54'F) 8-14°C
(46-58°F) 10-17°C
(50-62°F) 12-19°C
(54-66°F)
Compressor
Discharge Pressure
1344 a
1620 a
1861 kPag 2103 a 1379kPcg
2344 a
Compressor
Discharge Pressure
120 •
195 PS'9 160 .
235 PS'9 200 .
270 PS'9 240 .
305 PS'9 280 .
340 PS'9
Evaporator
Suction Pressure
124 kPag
207 a 138 kPag
241 J 269 kPag III kP°9
296 179 ,D
324 kPag
Evaporator
Suction Pressure
18 .
30 PS'9 20 .
35 pS'g 22
39 pS,g
25 .
43 pS'g 26 .
47 pS'9
J9124-97 pressure must drop to below -50 kPag (15 inch of vacu
um).
If the condition is not met the H-valve is stuck
open and should be replaced. Remove Liquid C02 and
watch evaporator suction pressure; it should increase to a minimum of 262 kPag (38 psig) and then stabilize to a
pressure of 172-240 kPag (25-35 psig). Any H-valve
which does not produce this response is stuck open and should be replaced.
(4) Connect A/C water valve vacuum hose (gray)
and set temperature control in cool position.
(5) Set engine speed at 1,000 RPM and blower on
HI.
The evaporator suction pressure should be in the
range of 138-207 kPag (20-30 psig). If compressor dis charge is higher than 1 656 kPag (240 psig), check
for restricted discharge line, radiator overheating, air in system or faulty viscous fan drive. If discharge
pressure is less than 966 kPag (140 psig), check com
pressor head gaskets and discharge reeds.
(6) Connect the electrical wires to the electronic
temperature cycling clutch switch.
VACUUM CONTROL SYSTEM ADJUSTMENTS
AND TESTS To keep the vacuum harness in place, common vi
nyl tape (sometimes called plastic tape of electri
cian's tape) cannot be used. It will cause the tube to
deteriorate directly under the tape, when high under
hood temperatures are involved. A compatible nylon type of tape such as MS CH69 (#281) or an equivalent must be used.
The test of the push button switch operation deter
mines whether or not the vacuum and electrical cir cuits are properly connected and the controls are
functioning properly. However, it is possible that this system operating perfectly at engine idle during high
manifold vacuum, may not function properly at high engine speeds. Before starting this test, stop engine and make certain the vacuum source hose at engine
intake manifold is tight on its connector.
EXPANSION (H) VALVE TEST
Test must be made at ambient temperature of
21°C-29°C (70°F-85°F).
After performing all previously mentioned tests,
conduct the H-valve test as follows:
(1) Operate the engine at 1,000 RPM with the win
dows closed. Set air conditioning controls for MAX
A/C,
high blower, temperature control lever in full
reheat position and cycling clutch switch electrically
bypassed. Disconnect and plug the water valve vac uum hose in the engine compartment. (2) Operate the system for at least 5 minutes in or
der to obtain partial stabilization and sufficient re
heat to load the system. Pressure at the discharge service port should reach 966-1 656 kPag (140-240
psig) (Fig. 6). If head pressure of 966-1 656 kPag (140-240 psig) cannot be obtained, check system
charge level.
Fig.
6
Expansion
(H)
Valve
Test
WARNING:
EXTREME
CARE
MUST
BE
USED
WHEN
HANDLING
LIQUID
C02 AS
SKIN
INJURY
CAN OC
CUR
IF
PROTECTIVE
GLOVES
ARE NOT
WORN.
(3) Put Liquid C02 on control head (completely cover
head) for a minimum of 30 seconds. Evaporator suction