1993 DODGE TRUCK flat tire
[x] Cancel search: flat tirePage 967 of 1502
19
- 6
STEERING
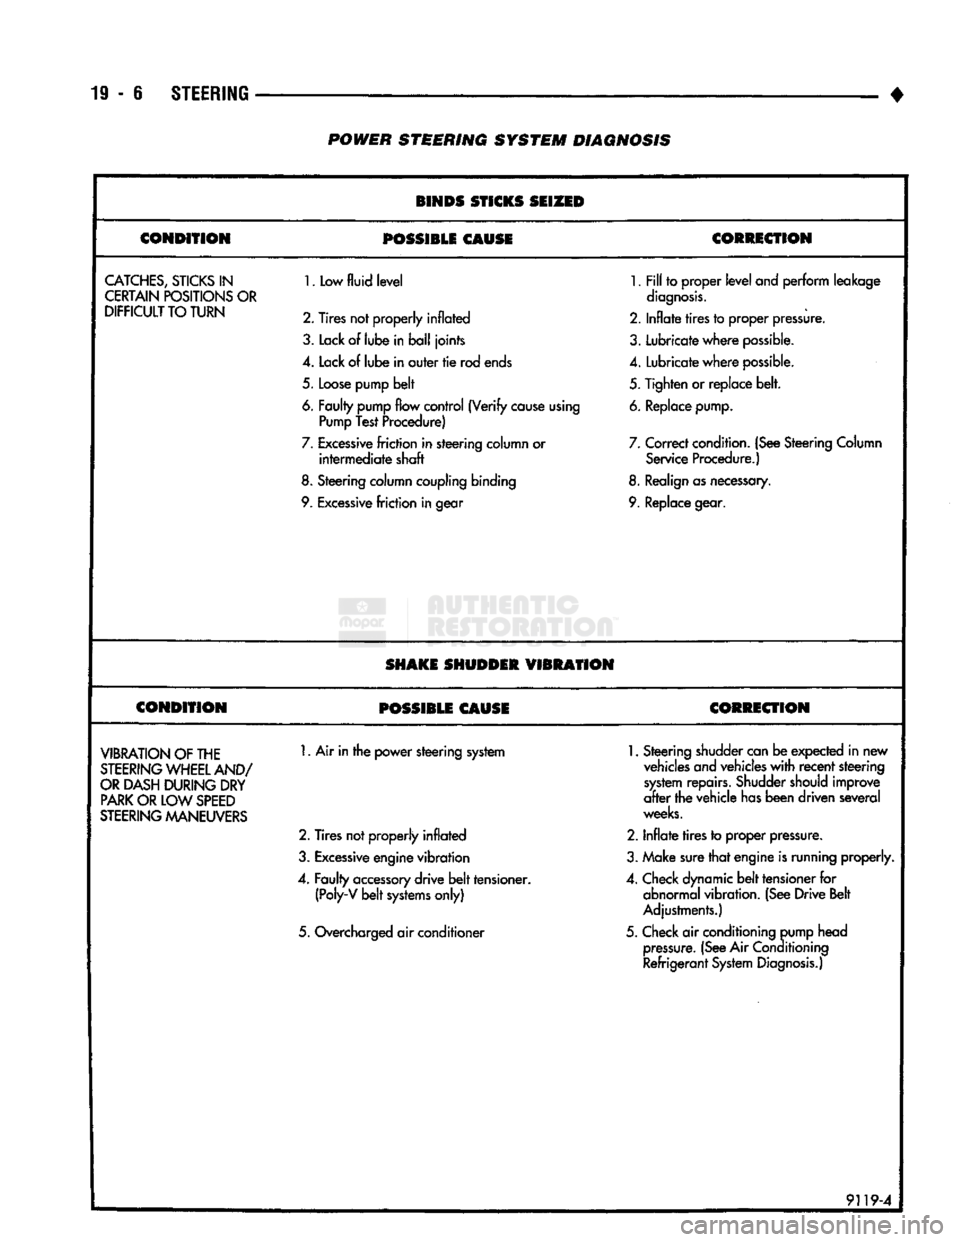
• POWER STEERING SYSTEM DIAGNOSIS
BINDS STICKS SEIZED
CONDITION
POSSIBLE
CAUSE CORRECTION
CATCHES,
STICKS
IN
CERTAIN POSITIONS OR
DIFFICULT
TO TURN
1.
Low
fluid level
2. Tires not properly
inflated
3.
Lack
of
lube
in ball joints
4.
Lack of lube in outer tie rod ends
5.
Loose pump belt
6. Faulty pump flow control (Verify cause using Pump Test Procedure)
7.
Excessive friction in steering column or intermediate shaft
8.
Steering column coupling binding
9. Excessive friction in gear
1.
Fill to proper level
and
perform leakage
diagnosis.
2.
Inflate tires to proper pressure.
3.
Lubricate where possible.
4.
Lubricate where possible.
5.
Tighten or replace belt.
6. Replace pump.
7.
Correct condition. (See Steering Column Service Procedure.)
8. Realign as necessary.
9. Replace gear.
SHAKE SHUDDER
VIBRATION
CONDITION
POSSIBLE CAUSE CORRECTION
VIBRATION
OF THE
STEERING
WHEEL AND/
OR
DASH DURING DRY
PARK
OR LOW
SPEED
STEERING
MANEUVERS
1.
Air in the power steering system
2.
Tires not properly inflated
3.
Excessive engine vibration
4.
Faulty accessory drive belt tensioner. (Poly-V belt systems only)
5.
Overcharged air conditioner
1.
Steering shudder can be expected in new
vehicles and vehicles with recent steering system repairs. Shudder should improve
after the vehicle has been driven several
weeks.
2.
Inflate tires to proper pressure.
3.
Make sure that engine is running properly.
4.
Check dynamic belt tensioner for abnormal vibration. (See Drive Belt
Adjustments.)
5.
Check air conditioning pump head pressure. (See Air
Conditioning
Refrigerant System Diagnosis.)
9119-4
Page 968 of 1502
•
STEERING
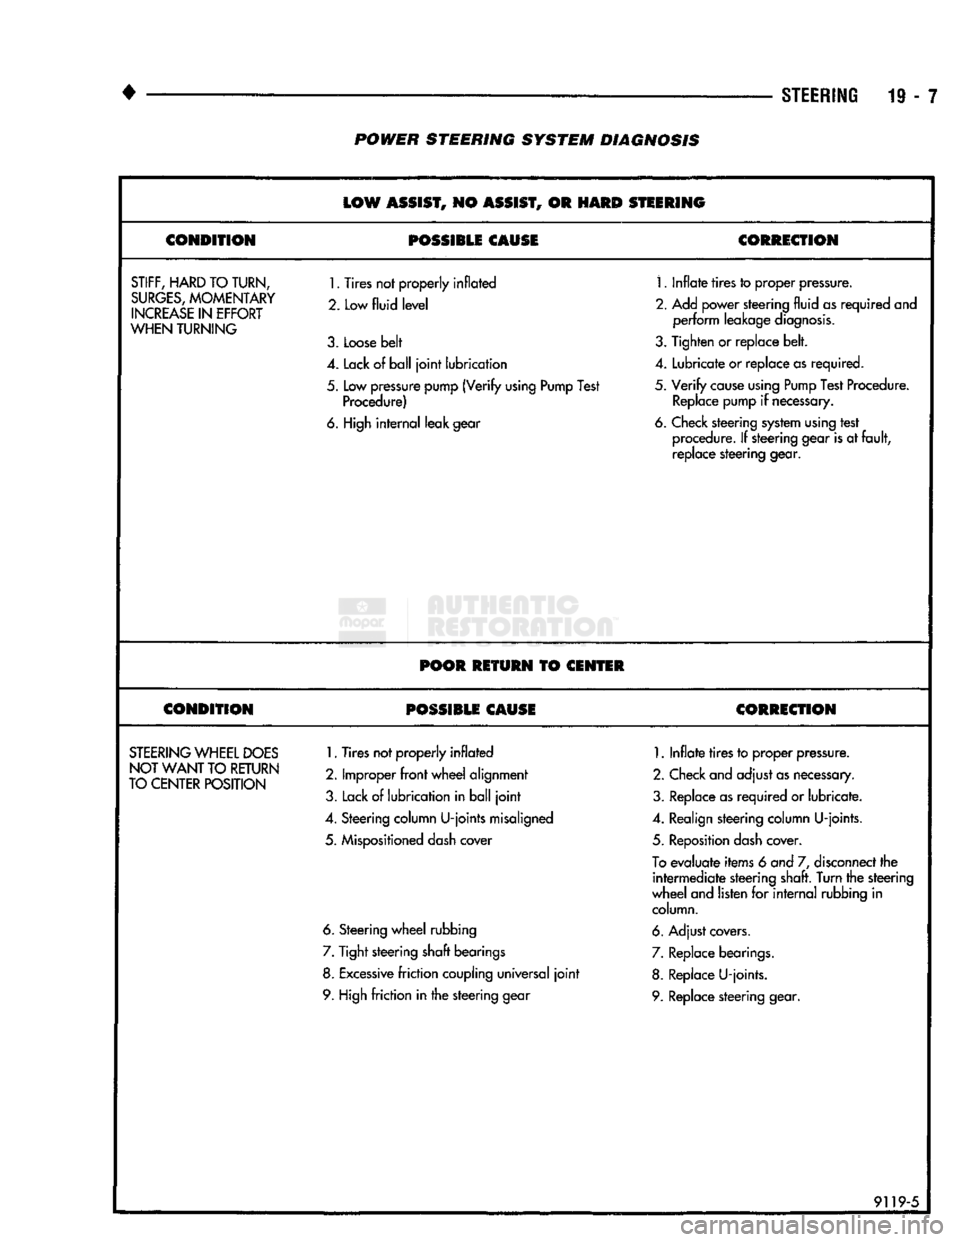
19 - 7 POWER STEERING SYSTEM DIAGNOSIS
LOW
ASSIST,
NO
ASSIST,
OR
HARD
STEERING
CONDITION
POSSIBLE CAUSE
CORRECTION
STIFF,
HARD
TO TURN,
SURGES,
MOMENTARY
INCREASE
IN
EFFORT
WHEN
TURNING
1.
Tires not properly inflated
2. Low
fluid level
3.
Loose belt
1.
Inflate tires to proper pressure.
2.
Add power steering fluid as required and perform leakage diagnosis.
3.
Tighten or replace belt.
4.
Lack of ball joint lubrication
4.
Lubricate or replace as required.
5.
Low pressure pump (Verify using Pump Test Procedure)
5.
Verify cause using Pump Test Procedure.
Replace pump if necessary.
6. High internal leak gear 6. Check steering system using test
procedure. If steering gear is at fault, replace steering gear.
POOR RETURN
TO
CENTER
CONDITION POSSIBLE CAUSE CORRECTION
STEERING
WHEEL
DOES
NOT WANT
TO
RETURN
TO CENTER POSITION
1.
Tires not properly inflated
2.
Improper front wheel alignment
3.
Lack of lubrication in ball joint
1.
Inflate tires to proper pressure.
2.
Check and adjust as necessary.
3.
Replace as required or lubricate.
4.
Steering column U-joints misaligned
4.
Realign steering column U-joints.
5.
Mispositioned dash cover
5.
Reposition dash cover.
To
evaluate items 6 and 7, disconnect the intermediate steering shaft. Turn the steering
wheel and listen for internal rubbing in column.
6. Steering wheel rubbing 6. Adjust covers.
7.
Tight steering shaft bearings
7.
Replace bearings.
8. Excessive friction coupling universal joint 8. Replace U-joints.
9. High friction in the steering gear 9. Replace steering gear.
91195
Page 1171 of 1502
21
- 170
TRANSMISSION OVERHAUL—32RH
•
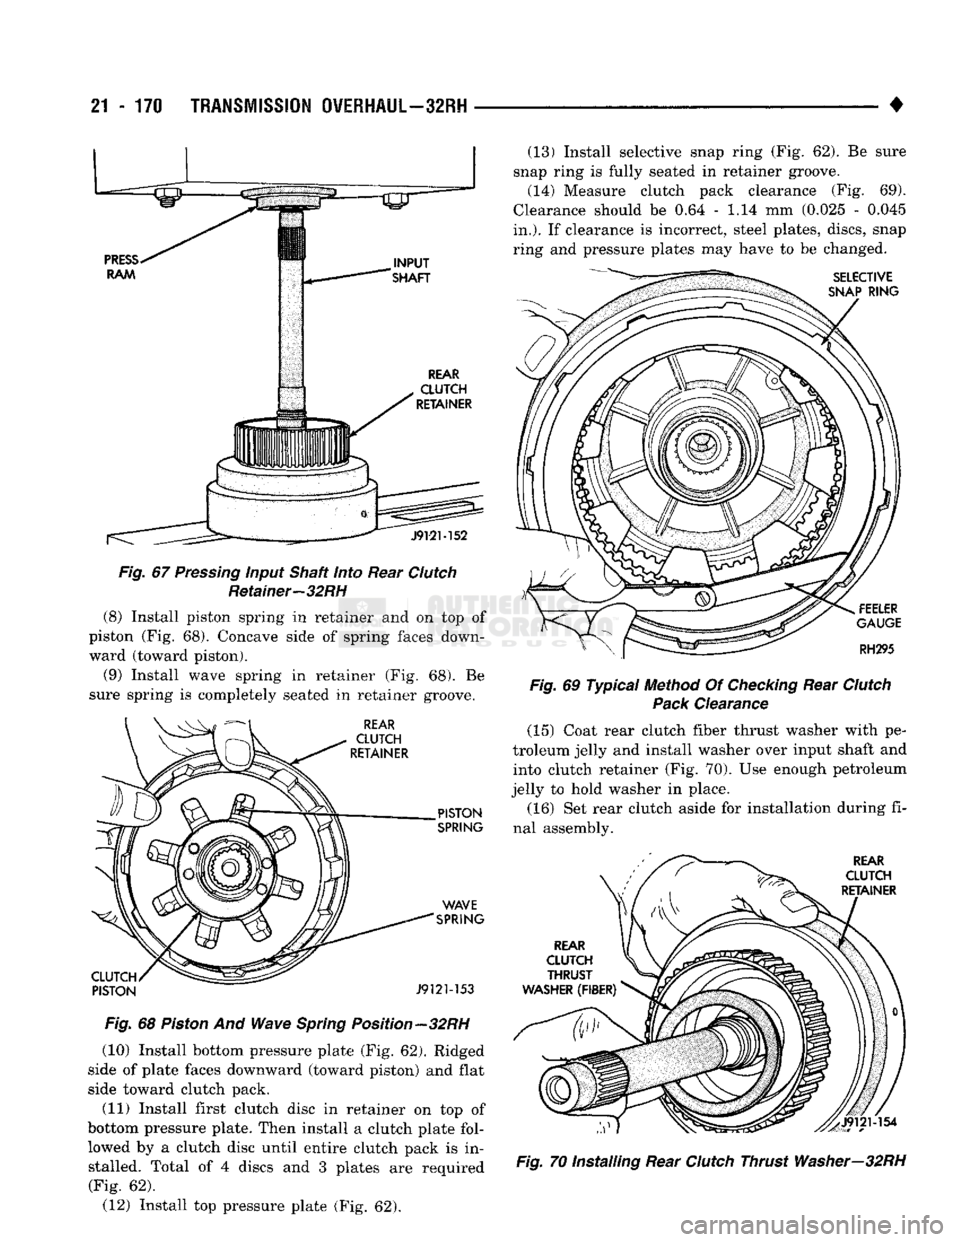
Fig.
67
Pressing
input Shaft
into
Rear
Clutch
Retainer—32RH (8) Install piston spring in retainer and on top of
piston (Fig. 68). Concave side of spring faces down ward (toward piston).
(9) Install wave spring in retainer (Fig. 68). Be
sure spring is completely seated in retainer groove.
Fig.
68
Piston
And Wave
Spring
Position—32RH
(10) Install bottom pressure plate (Fig. 62). Ridged
side of plate faces downward (toward piston) and flat
side toward clutch pack.
(11) Install first clutch disc in retainer on top of
bottom pressure plate. Then install a clutch plate fol lowed by a clutch disc until entire clutch pack is installed. Total of 4 discs and 3 plates are required (Fig. 62). (12) Install top pressure plate (Fig. 62). (13) Install selective snap ring (Fig. 62). Be sure
snap ring is fully seated in retainer groove. (14) Measure clutch pack clearance (Fig. 69).
Clearance should be 0.64 - 1.14 mm (0.025 - 0.045
in.).
If clearance is incorrect, steel plates, discs, snap
ring and pressure plates may have to be changed.
Fig.
69 Typical Method Of
Checking
Rear
Clutch
Pack
Clearance (15) Coat rear clutch fiber thrust washer with pe
troleum jelly and install washer over input shaft and into clutch retainer (Fig. 70). Use enough petroleum
jelly to hold washer in place.
(16) Set rear clutch aside for installation during fi
nal assembly.
Fig.
70 Installing Rear
Clutch
Thrust Washer—32RH
Page 1370 of 1502
•
WHEELS
AND
TIRES
22 - 1
CONTENTS
page page
TIRES
1
VEHICLE VIBRATION
11
TORQUE SPECIFICATIONS
13
WHEELS
6
TIRES INDEX
page
Cleaning
of
Tires
2
General
Information
1
Pressure
Gauges
. 2
Repairing Leaks
3
Replacement Tires
2
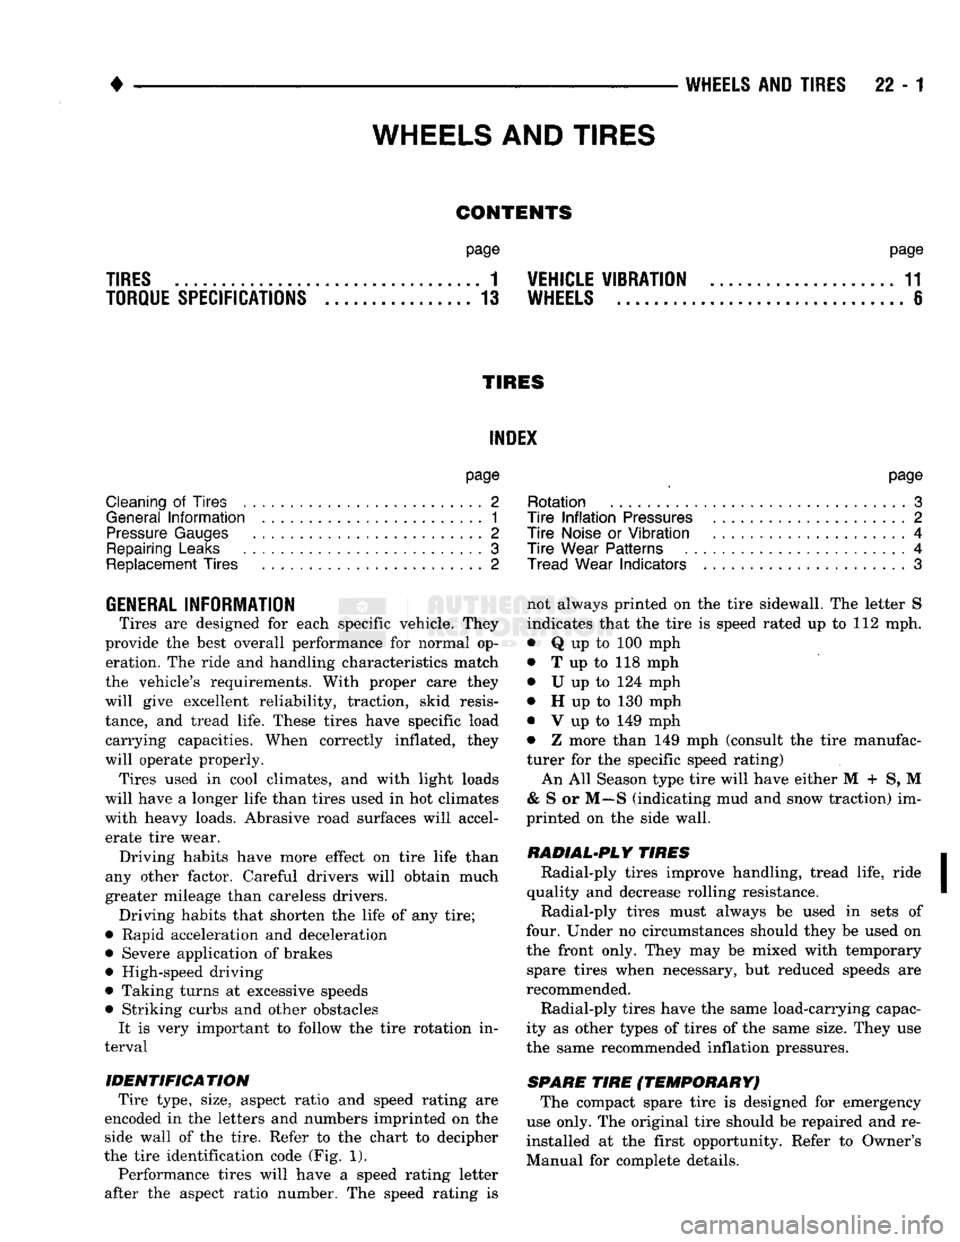
GENERAL
INFORMATION
Tires are designed for each specific vehicle. They
provide the best overall performance for normal op eration. The ride and handling characteristics match
the vehicle's requirements. With proper care they
will give excellent reliability, traction, skid resis
tance, and tread life. These tires have specific load carrying capacities. When correctly inflated, they
will operate properly.
Tires used in cool climates, and with light loads
will have a longer life than tires used in hot climates
with heavy loads. Abrasive road surfaces will accel erate tire wear.
Driving habits have more effect on tire life than
any other factor. Careful drivers will obtain much
greater mileage than careless drivers.
Driving habits that shorten the life of any tire;
• Rapid acceleration and deceleration
• Severe application of brakes • High-speed driving
• Taking turns at excessive speeds
• Striking curbs and other obstacles It is very important to follow the tire rotation in
terval
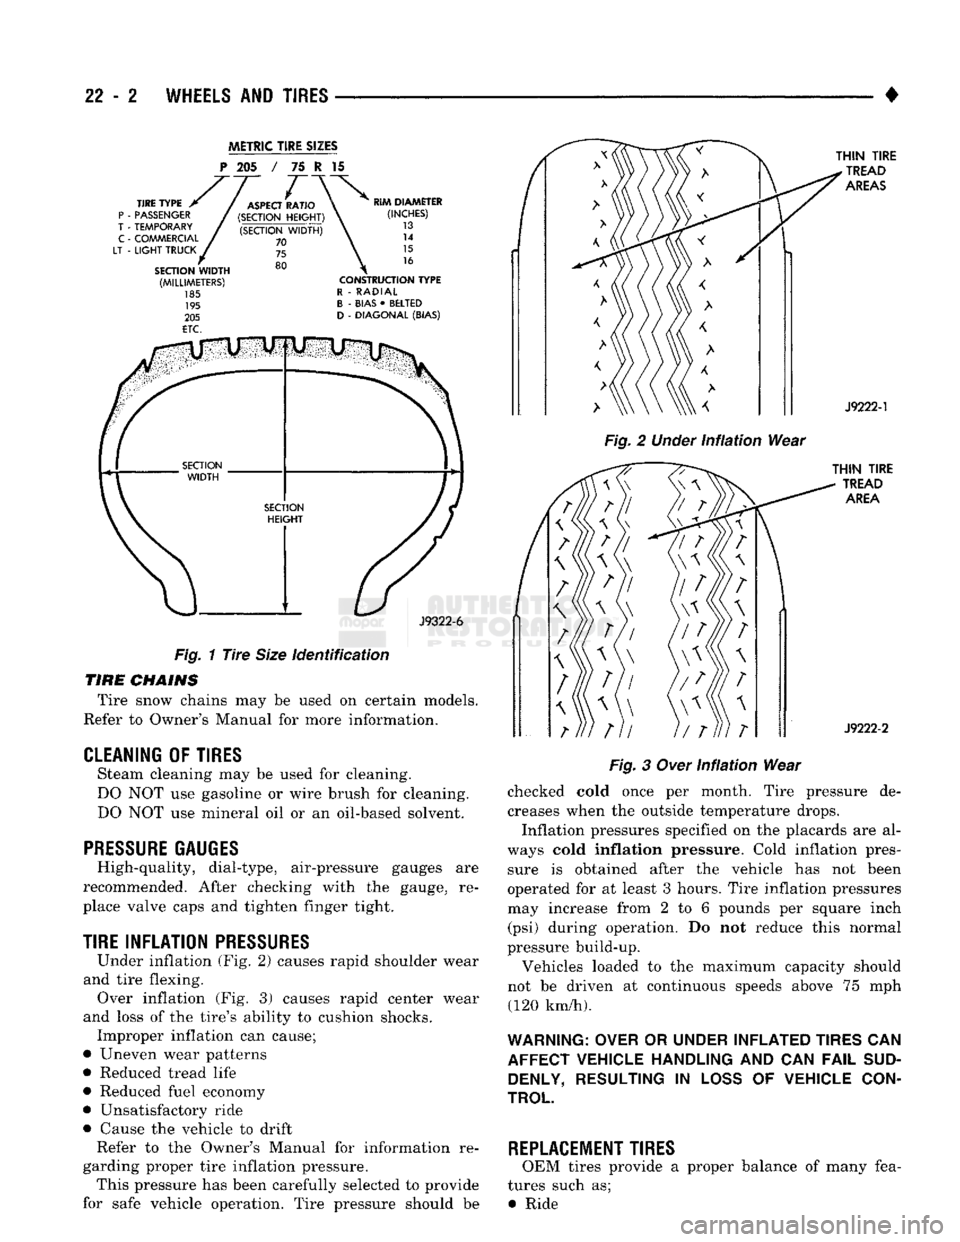
IDENTIFICATION Tire type, size, aspect ratio and speed rating are
encoded in the letters and numbers imprinted on the
side wall of the tire. Refer to the chart to decipher
the tire identification code (Fig. 1). Performance tires will have a speed rating letter
after the aspect ratio number. The speed rating is
page
Rotation
. 3
Tire
Inflation
Pressures
2
Tire
Noise
or
Vibration
4
Tire
Wear
Patterns
4
Tread Wear
Indicators
3
not always printed on the tire side wall. The letter S
indicates that the tire is speed rated up to 112 mph.
• Q up to 100 mph
• T up to 118 mph
• U up to 124 mph
• H up to 130 mph
• V up to 149 mph
• Z more than 149 mph (consult the tire manufac
turer for the specific speed rating)
An All Season type tire will have either M + S, M
& S or M—S (indicating mud and snow traction) im
printed on the side wall.
RADIAL-PLY TIRES Radial-ply tires improve handling, tread life, ride
quality and decrease rolling resistance. Radial-ply tires must always be used in sets of
four. Under no circumstances should they be used on
the front only. They may be mixed with temporary spare tires when necessary, but reduced speeds are
recommended.
Radial-ply tires have the same load-carrying capac
ity as other types of tires of the same size. They use
the same recommended inflation pressures.
SPARE TIRE (TEMPORARY) The compact spare tire is designed for emergency
use only. The original tire should be repaired and re
installed at the first opportunity. Refer to Owner's
Manual for complete details.
WHEELS
AND
TIRES
Page 1371 of 1502
22 - 2
WHEELS
AND
TIRES
•
METRIC
TIRE
SIZES
P
205 / 75 I 15
J9322-6
Fig.
1
Tire
Size
identification
TIRE
CHAINS
Tire snow chains may be used on certain models.
Refer to Owner's Manual for more information.
CLEANING
OF
TIRES
Steam cleaning may be used for cleaning.
DO NOT use gasoline or wire brush for cleaning.
DO NOT use mineral oil or an oil-based solvent.
PRESSURE GAUGES
High-quality, dial-type, air-pressure gauges are
recommended. After checking with the gauge, re
place valve caps and tighten finger tight.
TIRE
INFLATION
PRESSURES
Under inflation (Fig. 2) causes rapid shoulder wear
and tire flexing. Over inflation (Fig. 3) causes rapid center wear
and loss of the tire's ability to cushion shocks. Improper inflation can cause;
• Uneven wear patterns
• Reduced tread life
• Reduced fuel economy
• Unsatisfactory ride
• Cause the vehicle to drift Refer to the Owner's Manual for information re
garding proper tire inflation pressure. This pressure has been carefully selected to provide
for safe vehicle operation. Tire pressure should be
Fig.
2
Under
infiation
Wear
Fig.
3
Over
Infiation
Wear
checked cold once per month. Tire pressure de creases when the outside temperature drops.
Inflation pressures specified on the placards are al
ways cold
inflation
pressure. Cold inflation pres sure is obtained after the vehicle has not been
operated for at least 3 hours. Tire inflation pressures may increase from 2 to 6 pounds per square inch (psi) during operation. Do not reduce this normal
pressure build-up.
Vehicles loaded to the maximum capacity should
not be driven at continuous speeds above 75 mph (120 km/h).
WARNING: OVER
OR
UNDER INFLATED TIRES
CAN
AFFECT VEHICLE HANDLING
AND CAN
FAIL
SUD DENLY, RESULTING
IN
LOSS
OF
VEHICLE CON
TROL
REPLACEMENT TIRES
OEM tires provide a proper balance of many fea
tures such as; • Ride
Page 1373 of 1502
22 - 4
WHEELS
AND
TIRES
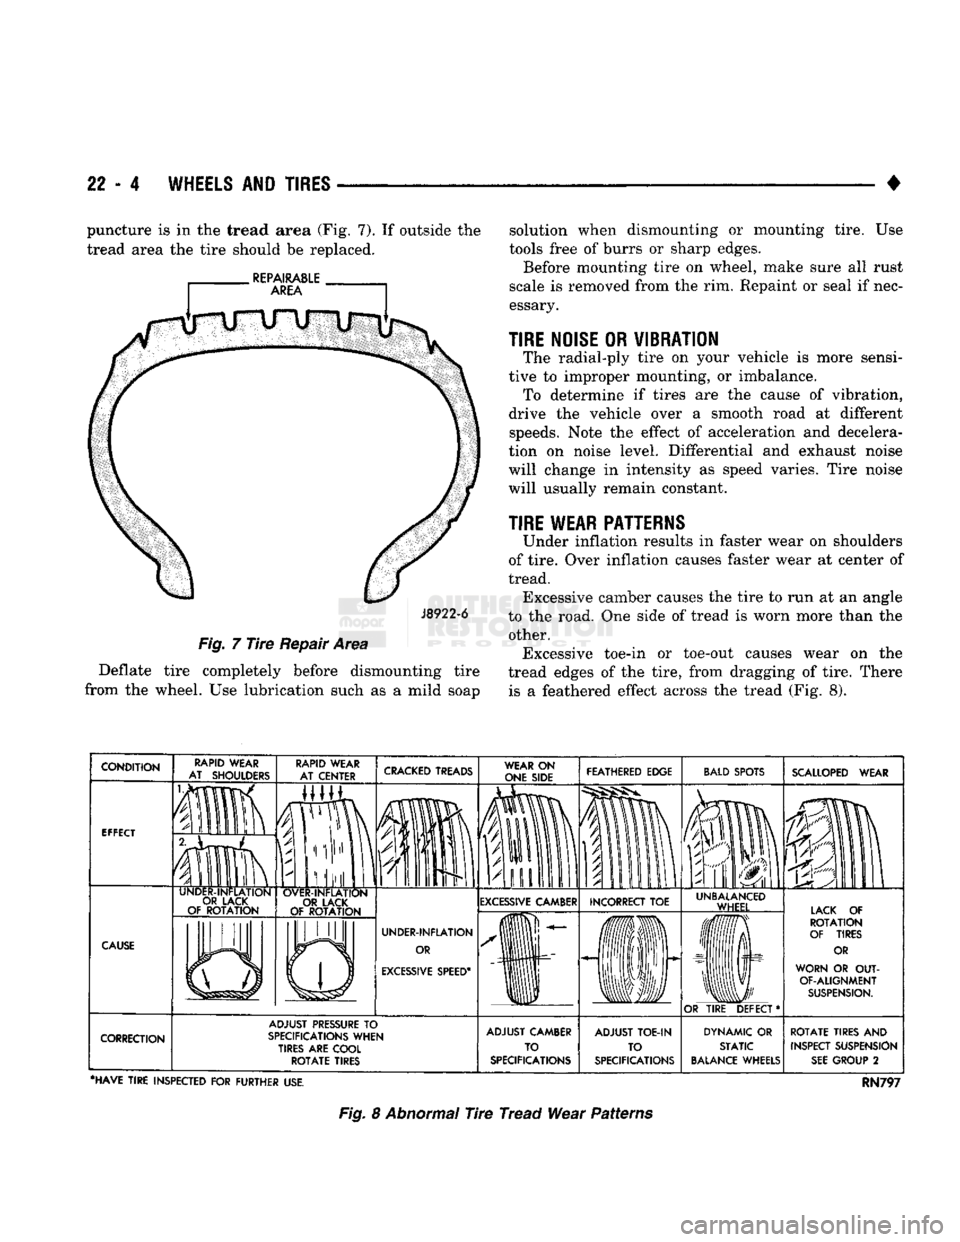
• puncture is in the tread area (Fig. 7). If outside the
tread area the tire should be replaced.
J8922-6
Fig.
7
Tire
Repair Area
Deflate tire completely before dismounting tire
from the wheel. Use lubrication such as a mild soap solution when dismounting or mounting tire. Use
tools free of burrs or sharp edges.
Before mounting tire on wheel, make sure all rust
scale is removed from the rim. Repaint or seal if nec
essary.
TIRE NOISE
OR
VIBRATION
The radial-ply tire on your vehicle is more sensi
tive to improper mounting, or imbalance. To determine if tires are the cause of vibration,
drive the vehicle over a smooth road at different speeds. Note the effect of acceleration and decelera
tion on noise level. Differential and exhaust noise
will change in intensity as speed varies. Tire noise
will usually remain constant.
TIRE WEAR PATTERNS
Under inflation results in faster wear on shoulders
of tire. Over inflation causes faster wear at center of
tread. Excessive camber causes the tire to run at an angle
to the road. One side of tread is worn more than the other. Excessive toe-in or toe-out causes wear on the
tread edges of the tire, from dragging of tire. There is a feathered effect across the tread (Fig. 8).
CRACKED
TREADS
WEAR
ON
ONE SIDE FEATHERED EDGE
BALD
SPOTS
IP
fa
SCALLOPED
WEAR
EXCESSIVE
CAMBER INCORRECT
TOE
EXCESSIVE
SPEED*
UNBALANCED
WHEEL LACK
OF
ROTATION
OF TIRES
OR
WORN
OR OUT-
OF-ALIGNMENT
SUSPENSION.
OR
TIRE
DEFECT* ADJUST
PRESSURE
TO
SPECIFICATIONS
WHEN
TIRES ARE COOL
ROTATE
TIRES ADJUST CAMBER
TO
SPECIFICATIONS ADJUST
TOE-IN
TO
SPECIFICATIONS DYNAMIC
OR
STATIC
BALANCE
WHEELS
ROTATE
TIRES
AND
INSPECT SUSPENSION
SEE
GROUP
2
•HAVE
TIRE
INSPECTED
FOR
FURTHER
USE.
RN797
Fig.
8 Abnormal Tire Tread Wear Patterns
Page 1375 of 1502
22 - e
WHEELS
AND
TIRES
• WHEELS
GENERAL
INFORMATION
Original equipment wheels are designed for all
loads up to the specified Maximum Vehicle Capacity. All models use steel or cast aluminum drop center
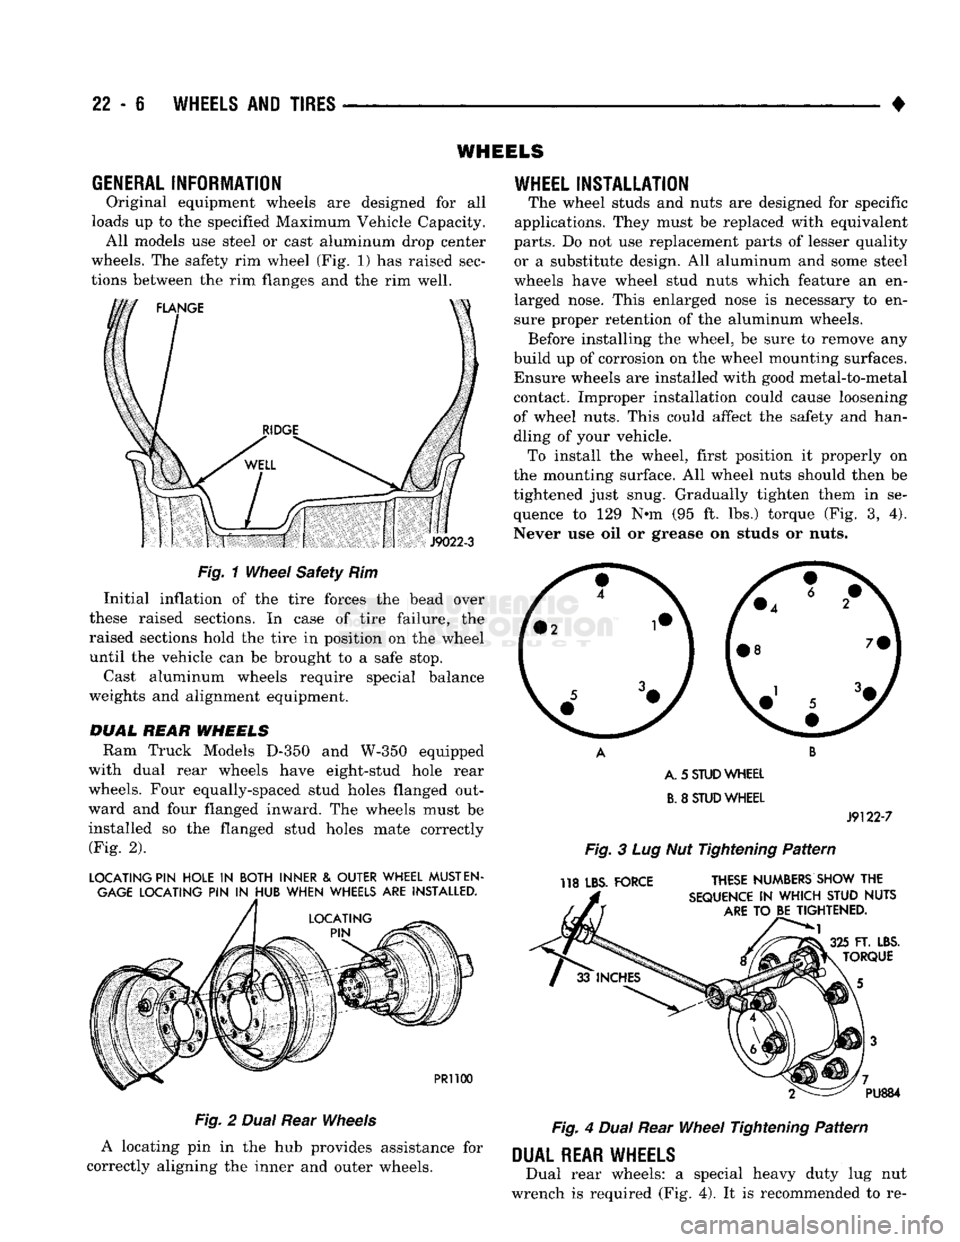
wheels. The safety rim wheel (Fig. 1) has raised sec
tions between the rim flanges and the rim well.
S
J9022-3
Fig.
1
Wheel
Safety Rim Initial inflation of the tire forces the bead over
these raised sections. In case of tire failure, the
raised sections hold the tire in position on the wheel
until the vehicle can be brought to a safe stop.
Cast aluminum wheels require special balance
weights and alignment equipment.
DUAL
REAR
WHEELS
Ram Truck Models
D-350
and
W-350
equipped
with dual rear wheels have eight-stud hole rear
wheels. Four equally-spaced stud holes flanged out
ward and four flanged inward. The wheels must be
installed so the flanged stud holes mate correctly (Fig. 2).
LOCATING PIN HOLE
IN
BOTH INNER
&
OUTER WHEEL
MUST
EN
GAGE
LOCATING PIN
IN
HUB WHEN WHEELS ARE INSTALLED.
PR1100
Fig.
2
Dual
Rear
Wheels
A locating pin in the hub provides assistance for
correctly aligning the inner and outer wheels.
WHEEL
INSTALLATION
The wheel studs and nuts are designed for specific
applications. They must be replaced with equivalent
parts.
Do not use replacement parts of lesser quality or a substitute design. All aluminum and some steel
wheels have wheel stud nuts which feature an en larged nose. This enlarged nose is necessary to en
sure proper retention of the aluminum wheels. Before installing the wheel, be sure to remove any
build up of corrosion on the wheel mounting surfaces. Ensure wheels are installed with good metal-to-metal contact. Improper installation could cause loosening
of wheel nuts. This could affect the safety and han
dling of your vehicle. To install the wheel, first position it properly on
the mounting surface. All wheel nuts should then be
tightened just snug. Gradually tighten them in se
quence to 129 N-m (95 ft. lbs.) torque (Fig. 3, 4).
Never use oil or grease on studs or nuts.
A. 5
STUD
WHEEL
B.
8
STUD
WHEEL
J9122-7
Fig.
3 Lug Nut Tightening
Pattern
118 LBS. FORCE THESE NUMBERS SHOW THE
SEQUENCE
IN
WHICH STUD NUTS
ARE
TO BE TIGHTENED.
FT. LBS.
TORQUE PU884
Fig.
4
Dual
Rear
Wheel
Tightening
Pattern
DUAL
REAR WHEELS
Dual rear wheels: a special heavy duty lug nut
wrench is required (Fig. 4). It is recommended to re-
Page 1378 of 1502
•
WHEELS
AND
TIRES
22 - 9
Fig.
8 First Measurement On
Tire
VALVE STEM
REFERENCE
AAARK J9322-4
Fig.
9
Remount
Tire
180
Degrees
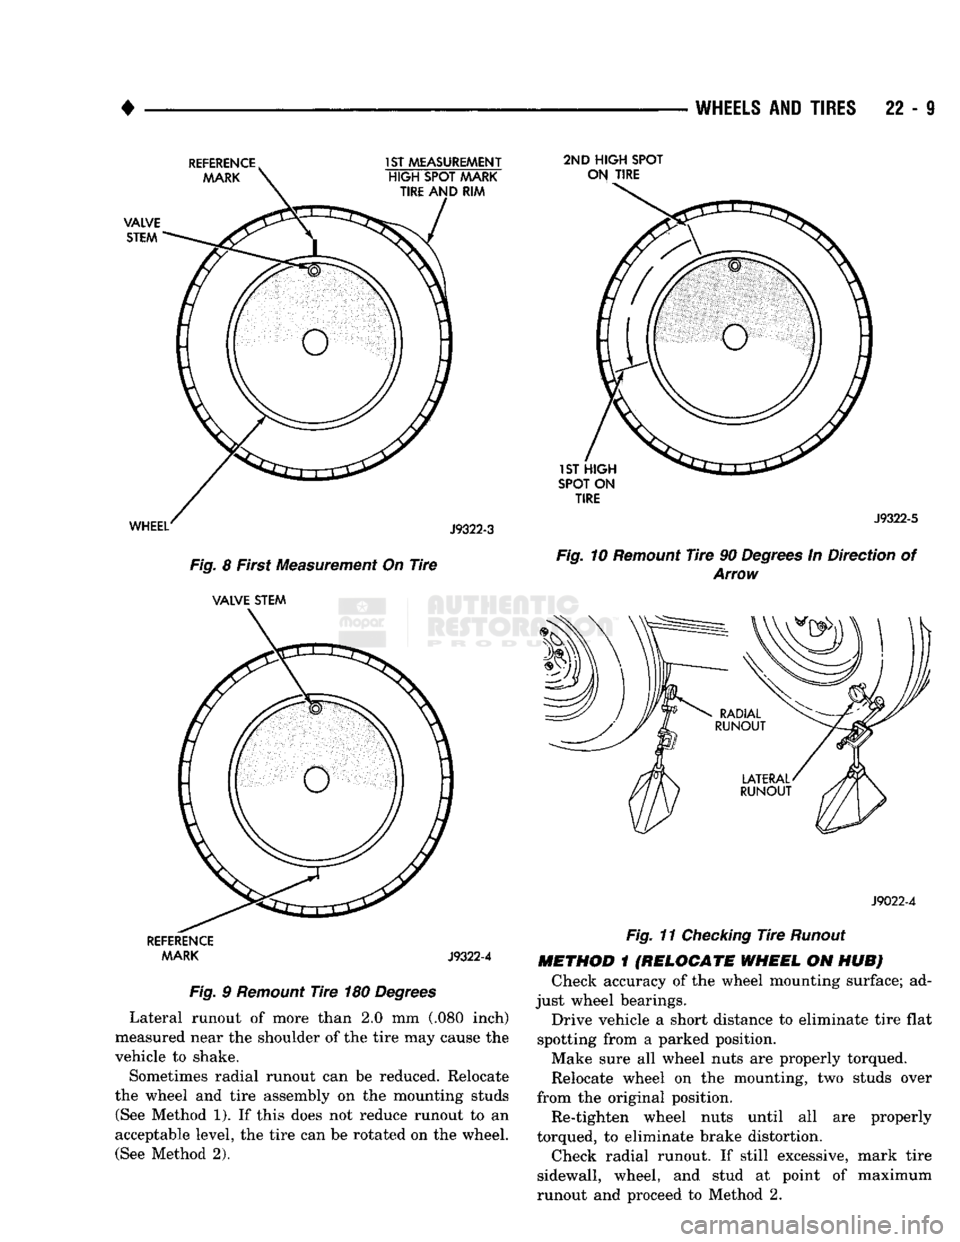
Lateral runout of more than 2.0 mm (.080 inch)
measured near the shoulder of the tire may cause the
vehicle to shake.
Sometimes radial runout can be reduced. Relocate
the wheel and tire assembly on the mounting studs (See Method 1). If this does not reduce runout to an
acceptable level, the tire can be rotated on the wheel. (See Method 2). 2ND HIGH SPOT
ON TIRE
SPOT ON TIRE J9322-5
Fig.
10
Remount
Tire
90
Degrees
In Direction of
Arrow
J9022-4
Fig.
11
Checking
Tire
Runout
METHOD
1
(RELOCATE WHEEL
ON HUB) Check accuracy of the wheel mounting surface; ad
just wheel bearings.
Drive vehicle a short distance to eliminate tire flat
spotting from a parked position. Make sure all wheel nuts are properly torqued.
Relocate wheel on the mounting, two studs over
from the original position.
Re-tighten wheel nuts until all are properly
torqued, to eliminate brake distortion.
Check radial runout. If still excessive, mark tire
sidewall, wheel, and stud at point of maximum
runout and proceed to Method 2.